Working on a computer with one partition on the hard drive where Windows is installed is a sure way to once be left not only without operating system, but without all the acquired data - your favorite media library, family photos, important documents, etc. Storing significant files on non-system drives - drive D, E, etc. is, in fact, a guarantee that even if Windows and a critical failure occurs, user data will not be affected during an unplanned reinstallation of the operating system. However, laptops with hard drives, where there is only one system partition, are far from uncommon today. Such a lack of foresight of sellers computer technology, most likely due to greed and a stereotyped approach to the buyer, in which Windows is installed in a hurry for nothing more than a demonstration of the possibilities computer device. And why should sellers do for free what they often do themselves or recommended by them service centres can they do it for an extra charge?
Hard drives are extremely sensitive devices. Data is written to magnetic disks. Magnetic disks rotate at a speed of several thousand revolutions per minute. In the event of a defect in these sensitive individual parts, data loss occurs because the data can no longer be read.
Here the existing data is permanently reflected. If HDD fails, the defective storage medium can be replaced and the data is thus not endangered. Defect hard drive- it's only a matter of time, because this is a design of very sensitive moving parts. Therefore wear or defect is pre-programmed.
Below we will talk in detail about how to divide a hard disk into two partitions without losing data, if initially there is only one - system disk WITH.
1. About AOMEI Partition Assistant
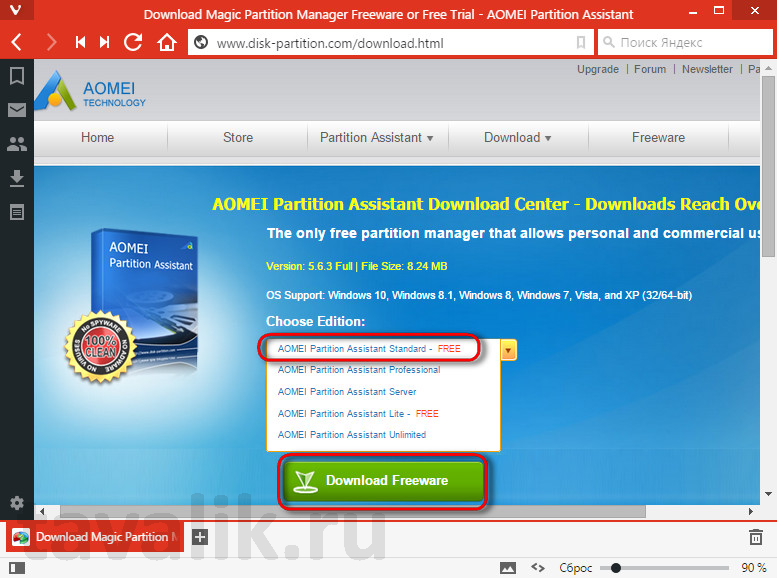
Partitioning a hard disk, in principle, is possible by means of the Windows systems. The regular disk management utility allows you to compress the system partition and give the freed space to another partition - non-system. But, alas, this method is not always workable, and it will often be simply impossible to free more from the volume of the system partition than the system itself wants to give. And it is unlikely that the standard functionality for partitioning a disk into sections will be advised by experienced system specialists. The latter, as a rule, prefer the classics of the genre - a paid professional program Acronis Disk Manager. At one time, she outperformed a few alternatives with the support of the Russian language, a good interface and functionality. We will carry out work with dividing the disk into sections with the participation of the program AOMEI Partition Assistant Standard Edition- a rapidly growing full-fledged alternative to Acronis Disk Director, which can be used completely free of charge.
Head injury as the cause of broken hard drives
Typical causes of broken hard drives. Head crash can happen for a variety of reasons and hence is one of the most common causes of data loss. Most of this is caused by a fall or vibration. A head crash is obviously one of the worst cases for a hard drive owner to lose data with a crashed hard drive as the user cannot do anything himself to retrieve the data. This leads to the final loss of all or part of the data.
The developers of AOMEI Technology have created a multifunctional hard disk partition manager with an intuitive interface that is in no way inferior to its paid counterparts. With free edition Standard Edition The AOMEI Partition Assistant program can create disk partitions, resize them, delete or format any more or less advanced user. The program works with conventional hard drives, HDD/SSD hard drives, flash drives, and RAID arrays.
Overvoltage as a Cause for Defective Hard Drives
The only way save this data - send the hard drive to a professional data recovery lab. If this is faulty, the data can no longer be read. However, there is no need for a professional data rescuer to replace these sensitive and extremely small spare parts in order to save data.
In general, it can be said that a professional data rescuer can save data with a broken hard drive, as long as the magnetic disks are not attacked too hard. As the magnetic disks are destroyed, the data is finally destroyed. How can you prevent data loss.
2. Data backup
The AOMEI Partition Assistant program allows you to create a new non-system disk partition by taking space from the system one without losing data. That is, after completing work with partitions, we will return to working Windows, and all user files will be in place. But no matter what tool - regular Windows functionality or any third-party program - is used for such a sophisticated procedure as partitioning a hard disk into partitions, it's still better to take care of creating a backup copy. A backup copy of the system and user data stored on removable media or in cloud storage, will allow you to return everything back if an error is made in the process of working with the disk. For these purposes, by the way, another product from the developer AOMEI Technology is suitable - free program to backup and restore data AOMEI Backupper Standard .
The only way to overcome data loss is to have an existing updated backup - a duplicate of the data on another non-defective drive. To make this as simple as possible, there are various free tools. This always requires a second, non-defective hard drive.
Online backup is the best alternative. A useful alternative to manually backing up to another hard drive is online backup. At the same time, these services are also evaluated as a solution that can certainly be considered. Since the problem of local or physical data recovery is the lack of spatial separation of data and backup. In the event of a fire, water damage, or short circuit, both the data and the associated backup are lost.
3. Creation of a non-system disk partition using the system partition
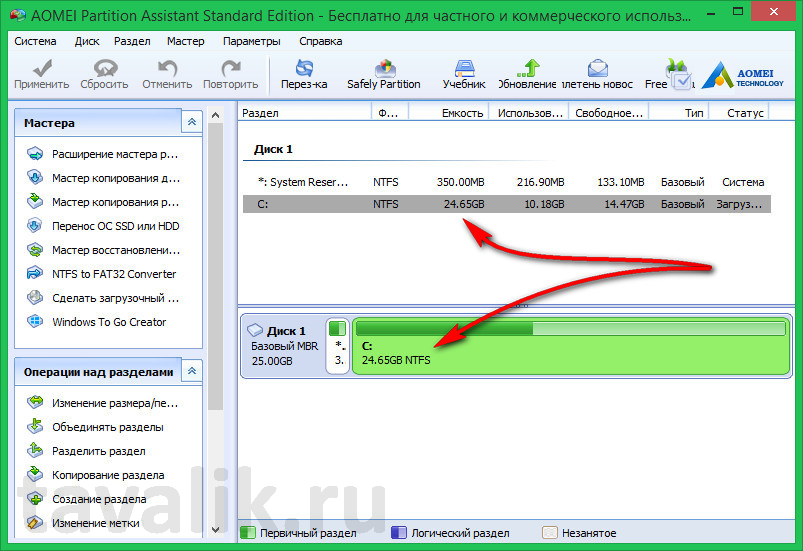
After the standard installation of the AOMEI Partition Assistant program, in the main window we will see a table of existing hard disk partitions in the upper part, and in the lower part the same data will be displayed in a visual representation.
Another problem with the handy backup version is the timeliness of the data. Unlike online backup: here the data is not only in a completely different location, in the provider's data center, but is also constantly synchronized and therefore always up to date. The backup is not only up to date and really safe, but also automatic. Thus, online backups is an option with guaranteed freedom from stress!
Data protection for online backups
One of the often critical factors in online backup is data security, as well as the associated data protection. Everyone must make this decision personally. Although the data is always encrypted and secure according to the provider, but 100% guarantee - so often - no.
In our case, as you can see, the hard drive is miniature - only 24.65 GB is allocated for the only system partition on the test one. But whatever the size of the hard drive - at least 25 GB, at least 1 TB, the process of dividing it into partitions will be exactly the same.
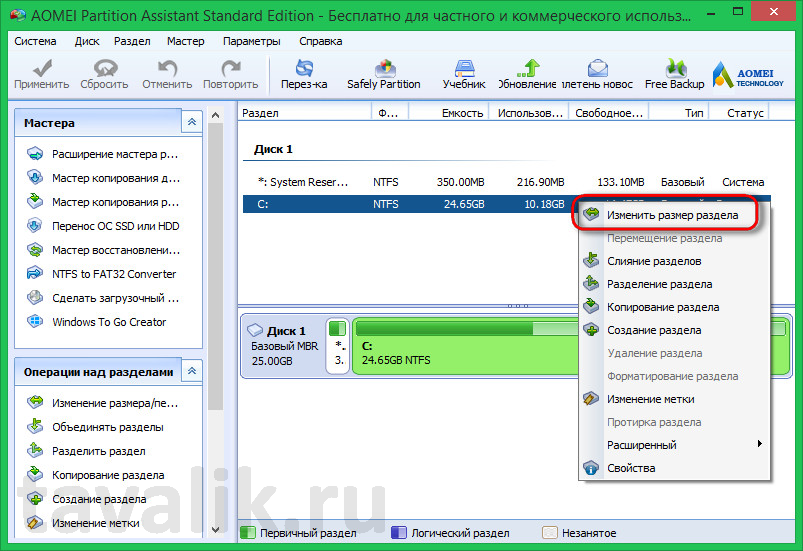
On the system drive C in the partition table, we call context menu and select the first command " Resize Partition».
With us, as a professional lifeguard, all of our personal data carries personal data in the cloud. Below you will find information about slots and, if necessary, replacement of hard drive modules. Important information: Read the "Warranty" section before repairing or Maintenance equipment not covered in this manual.
Potential hazards when opening the cover while the product is in operation include rotating fan blades and hot surfaces. Removing the cover may void your product warranty. . Follow the instructions below and do one of the following:
Next, in the window that appears, you need to set the size to which the system drive C will be reduced. In our case, we will reduce the size to 20 GB, but in general, today users usually leave at least 80 GB for the needs of the system. Click " OK».
- Paste new hard drive to an empty bay.
- Storage capacity with high capacity hard drive.
- Change the failed hard drive.
Observe the following points before following the instructions. Verify that the capacity of the 2.5-inch hard drive is greater than or equal to the capacity of the replacement hard drive. We store data quickly and professionally on hard drives and other data carriers from customers in Winterthur. We analyze your data carrier free of charge and deliver it to you in Winterthur by express delivery within 48 hours after completion of the analysis in particularly urgent cases. Depending on the complexity of the error on your drive, we can perform data recovery within 24 hours.

The program will return to the main window, where we can see in the table and clearly see the approximate distribution of hard disk partitions in the future.
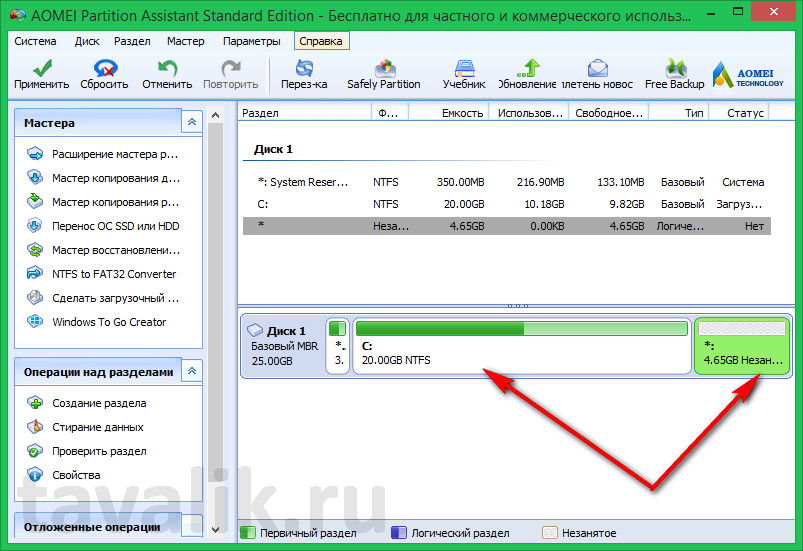
The future non-system partition is still visible as unallocated space on the hard drive. And the next task will be to create a disk partition on this unallocated space. We call the context menu on it and select the command " Section creation».
Data recovery for customers in Winterthur
Our Swiss logistics partners in the Canton of Zurich ensure that you can get your rescued data back as soon as possible. Call and get advice from our customer service. Data recovery at a guaranteed fixed price! We analyze your data medium free of charge and without any obligation. You get individual offer with a fixed price guarantee!
Values for data recovery prices and costs
We help you quickly and professionally. Request your mandatory fixed price offer now. In addition, the following analysis in our data recovery lab is completely free and does not require any commitment. After our error diagnosis, you will receive a fixed price offer from us for data recovery on a new media. Only now you decide, based on our proposal, whether we need to perform data recovery for you. If you do not wish to accept the offer, we will send the data carrier back to you free of charge. If you give us an order, we will perform data recovery at a fixed price and send you the data to a new medium. Depending on your requirements, you will receive your media by mail or courier.
- This is completely optional and does not oblige you to do anything.
- Simply send us the data carrier by post or courier.

A program window will appear, where the entire size remaining from the system partition will be automatically given to the new partition. In our case, only one non-system partition is created, so we will give it all the remaining disk space. Then choose a letter for it. In our case, the letters D and E are given to the drive and the network device, so the first free column in the drop-down list is " Drive letter» F is visible. Well, we use it. Click " OK».
Are you in a hurry with your data? Our express data recovery helps!
What costs actually arise, we can only determine after analyzing the data carrier and identifying the specific defect. The analysis is free for you. You will then receive a data recovery quote from us with a fixed price guarantee. By ticking the "Express" box in your online request, you will receive our express data recovery. Of course, you can also express this desire by contacting us by phone. Just share it with us while talking to our customer service team.
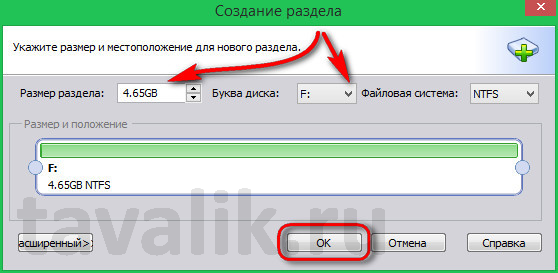
If there is a lot of space remaining from the system partition, you can create two or more non-system partitions by setting in the column " Partition size» desired value (for example, 100 or 150 GB) and repeating the same procedure with the third section.
Returning to the main window, we will again see the future picture of the disk partitions, where the non-system partition will already be fully formed and titled with a letter. Now it remains only to apply the specified settings. In the upper left corner of the program window, click the " Apply».
You can also reliably launch express data recovery through this communication channel. When the express data recovery job goes live, we will work on your media from the moment it arrives at the data recovery lab until your data is fully recovered and sent to you. We waste no time providing you with your data as soon as it is technically possible. Average duration professional express data recovery is from 24 to 48 hours.
The exact duration depends on the defect found, on the data carrier you provide us and of course on the number if you send us multiple media. In detail, you can discuss all this with our friendly customer service.
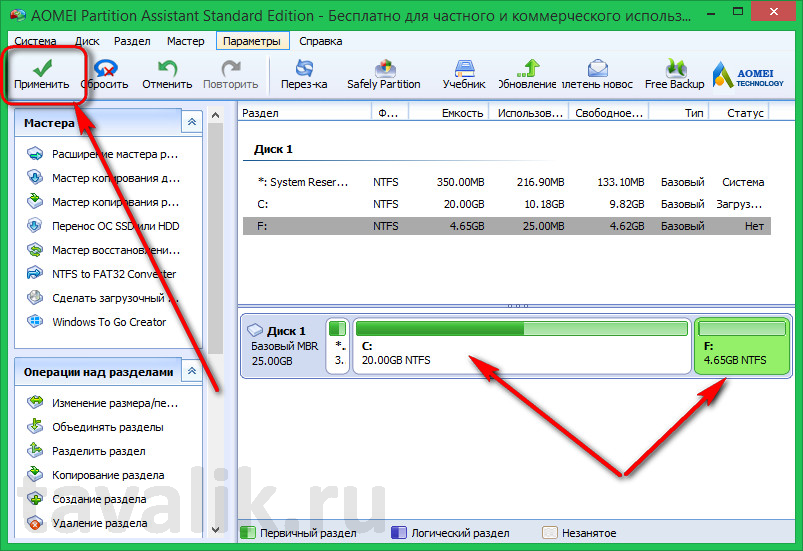

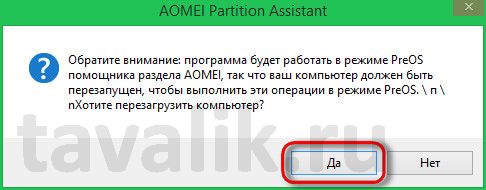
The program will notify you that the process of working with hard drive will be carried out in Windows preload mode. Click " Yes».
Our efficient network of logistics partners in Germany and Switzerland allows you to quickly collect your defective media. It is then safely transported to us and analyzed. If the data needs to be available in a hurry to continue your work or your business, express delivery and delivery via courier service in Winterthur are also possible. The courier from our logistics partner then takes the defective storage media from your company or home and provides a new storage media after data recovery.
Speeding up data recovery in Winterthur
Center the disc in the package so that there is a gap of at least ten centimeters on both sides. Fill the space between the data carrier and the packaging wall with a suitable filling material. Plastics should be avoided here as they can become statically charged and damage the storage medium if necessary. Our customer service will send you a form with all the information you need for submission, free analysis and express method.
- Isolate the failed drive from the computer case.
- Use an antistatic coating.
The system will reboot.

After rebooting, for a few seconds we will observe the AOMEI Partition Assistant start window in preload mode. " Press any key to cancel the operation” - the program notifies, and this means that if we want the operation to complete successfully, we do not need to touch the keyboard until the preload mode is completed.
Beware of data loss!: Storage media is not forever
The lifetime of a hard drive is highly dependent on its storage. Regular backups protect against the loss of personal files. But storage media eventually runs out, and therefore should be replaced regularly - otherwise data loss is in danger. But these media are short-lived. Manufacturers guarantee lifetime, but depend heavily on optimal storage conditions. Disks and chips don't like temperature fluctuations and high humidity. But what does it matter if you want to keep media as long as possible?


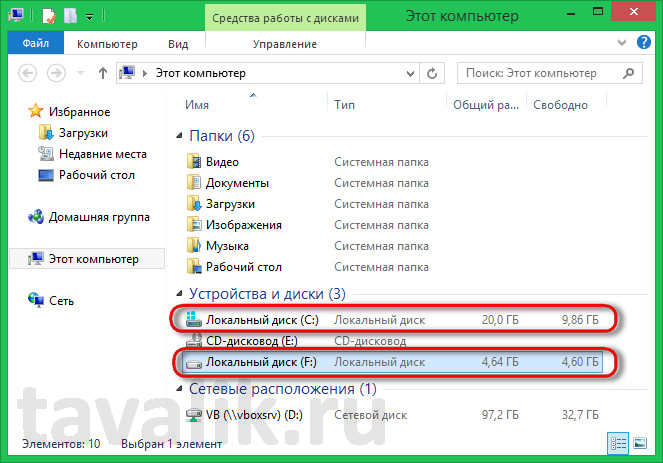
After the operation of the AOMEI Partition Assistant program is completed, Windows will restart. All data will be in place. Having opened the system explorer, we will see that now the system partition has become smaller exactly as much as the volume of the non-system partition that has appeared, as planned in the AOMEI Partition Assistant program.
Did this article help you?
How to partition a system disk without losing data? It is not always possible to install a hard drive, so it may be necessary to divide it into two or more logical partitions. Moreover, the size of modern disks allows you to do this, because the system itself does not need a lot of space. Most of all, this need arises on laptops. After all, they usually only have one hard drive installed.
There are several reasons for partitioning the system disk. The first is if you decide to install another system on your only drive. The second is the storage of personal (non-system) files on another drive, so that in the event of a system reinstall, they are safe and sound, and they do not have to be lost or even lost.
This breakdown can be done without third party programs by means of the operating system itself. I'll show you how it's done using the operating room as an example. Windows programs 10, but the same can be done in Windows XP/Vista/7/8.
To do this, you must first disable system protection (in Windows XP, this step can be skipped).
Disabling system protection
We start the conductor.

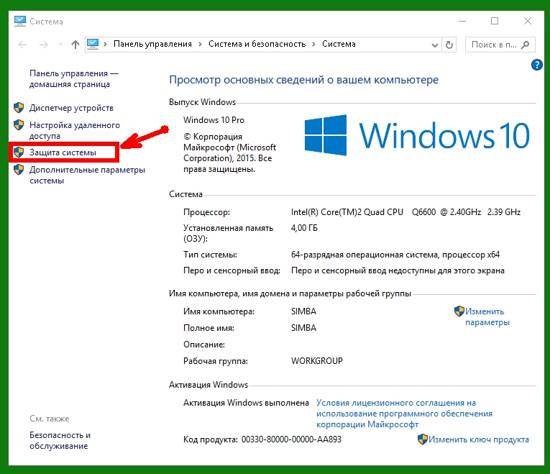
Find it in the list on the left This computer(or My computer, or simply A computer) and click on this icon right click mice. In the list that opens at the very end, click on the entry Properties.

A window will open System, in which you need to click on the link on the left System protection.
We select the disk with the system (I have a lot of disks, but the system is installed on the C drive for everyone), and click the button below Tune.

In the next window, set the switch to record Disable system and press the button below Apply.
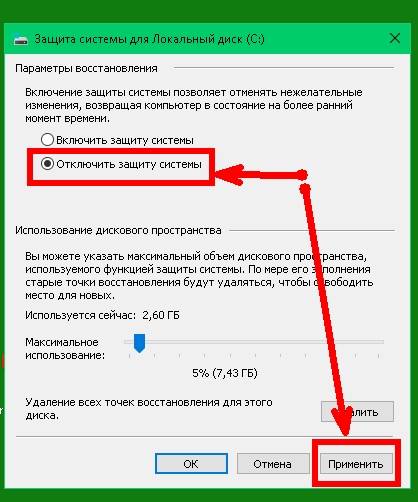
Click Yes, in to confirm your actions.

Disk partitioning
We open again Conductor, go to This computer, right-click on it, and in the list that opens, select the link Control.

In the window Computer management in the first (left area) click on the link Disk Management.
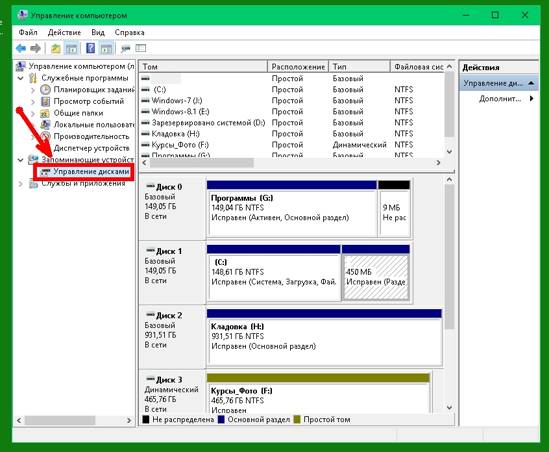
All our disks will be shown in the central area. Find the disk to be partitioned. This will be your system drive, marked with the letter With. (I already have this disk divided into two. Don't let that bother you.)
Right click on the disk With, and select the link Shrink Volume…

In the next window, you must specify Compressible space size. Go for at least 80 GB, otherwise you may run out of disk space very quickly. Please note that the size of the disk is indicated here in megabytes, not gigabytes. Be careful! The largest size available for compression is already specified in the size of the space to be compressed. If your disk is not large, then you can leave it.

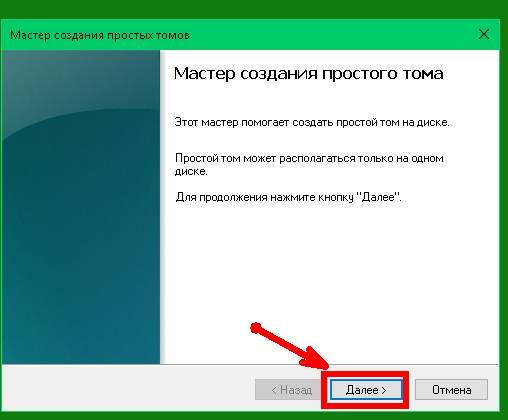
After creating a partition, you need to select a new partition, right-click on it, and select the Create simple volume link in the drop-down list. Without this, your new section will not be visible.

The Creation Wizard will open. simple volume. Click the button Further.
In the next window, we either leave everything as it is, or reduce the size of a simple volume so that one or more volumes can be created later. In this case, I leave everything as it is, and press the button Further.

In the next window, we assign a letter to that. I leave the letter suggested by the system and press the button Further.

In the next window, you can only change the name of the volume label, or you can rename it later. Personally, I leave everything as it is, and press the button Further.

After completing the creation of a simple volume and formatting, click the button Ready, and we see a new section, and going into the area This PC - Devices and drives, we will find a new disk.
It remains only to go back to System Protection (as described at the very beginning of the article) and enable system disk protection.
This is how you can partition the system disk without losing data.
In any case, I advise you to create disk backups and restore points before such responsible operations.
Video on how to partition a hard drive: