How to make headers and footers in Word? Once again, we do not underestimate Word features, and therefore do not use even half of its capabilities. Take at least such a function as a footer. Today we will talk about headers and footers in Word 2003.
How to make headers and footers in Word
A header or footer is an area located at the top or bottom of a document margin. In it, you can specify brief information about the document as a whole or each page separately. Using the toolbar " Headers and footers » You can even add a picture (since Word 2007) or a date and time that will be updated each time you open the document.
Headers and footers in a Word can be created only on a separate page or on all pages of a document. Top or bottom. Or up and down at the same time. It all depends on what you need to specify in the headers and footers.
In order for it to be displayed on all pages, it is enough to create it on one of them. Then it will be automatically installed on all subsequent ones. It is very comfortable. I don't think anyone would want to sit all day and create a header and footer on every page of a 200-300 page document.
I often need to print e-books for my mother, as she sees very poorly and does not like stitched sheets. In order for the sheets not to get confused, I create a header and footer at the top with the author's name, book title, page number and print date.
For this in Word 2003 I open a document and select from the menu – View - Header and Footer .

By default, the field for creating a header is opened. You can enter text directly in the header and footer area.

The cursor is already in a dotted frame and winks, as if asking to write something as soon as possible. I write the author, the title of the book and the year of publication.

Text can be formatted just like any other document text (for example, by changing the font size or color and centering the text on the page).

I click the icon, and where the cursor was, it is set:
- Page number.
- The number of pages in the document.
- Page number format.
- A date is inserted that will show the date the document was last opened.
- Time. It will also show the current time.
- Page settings. Here you can specify whether the header or footer is applied to the entire document or only to subsequent pages (if it is created in the middle of the document).
- This button turns off or on the main text. Why she didn't understand.
- This button is needed if you create another header and footer in the middle of the document and decide to do the same as in the previous one.
- Includes header and footer fields.
- Go to the previous footer.
- Go to the next footer.
- Menu for automatic data insertion.
Using the page number format, you can include the chapter heading (if there are chapters) in the display in the headers and footers and set from which page number to display it.

Here is my finished footer.
When finished, the toolbar must be closed to return to the main document. The dotted box will disappear and the header text will appear light grey.
In order to correct the text of the footer, just double-click on it and the input field will open again. To preview how the header and footer will look on the document, you must select in the main menu – File – Preview .
Now you know how to make headers and footers in Word .
Headers and footers in Word are a very good thing if you know how to use them. And using them is as easy as creating charts. Try it and you will like it.
Read about how to create headers and footers in Word2007 and 2010.
Instruction
Working with headers and footers in the editor Microsoft office Word starts with the "Insert" tab. Find the " Headers and footers" and select the area you want to design by clicking on the appropriate button - "Header" or "Footer". In the drop-down list, select the layout that suits you or the command "Change top / footer».
You can also access the headers and footers by clicking on the field in the document right click mouse and selecting the desired command from the context menu. To exit the header and footer editing mode, double-click the left mouse button in the document workspace.
To make headers and footers appear throughout the document and not appear on the cover page, click the Page Layout tab (Page Layout). In the Page Setup section, click the arrow button to open the Page Setup dialog box. Go to the "Paper Source" tab in it and set the marker in the "First Page" field in the "Distinguish Headers and Footers" group. Click on the OK button.
To create different headers and footers for even and odd pages, also go to the "Page Layout" tab and call the "Page Setup" dialog from the section of the same name. In the window that opens, go to the "Paper Source" tab and set the marker in the "Distinguish Headers and Footers" group opposite the "Odd and Even Pages" item.
To make different headers and footers for different pages, break your document into sections. To do this, go to the "Page Layout" tab and in the "Page Setup" section, click on the "Insert Page and Section Breaks" button. In the drop-down menu, select the section break option that suits you.
Make active the header and footer you want to change (see step one and step two). You will enter the header and footer editing mode, and it will also become available context menu on the Headers tab. Click on the "Transitions" button and, using the available buttons, move through the section headers, arranging them according to your needs. When doing this, make sure that the button "As in the previous section" is not active.
Sources:
- How to make headers and footers not on all pages 2013
- Word 2013: How to insert a picture in the header?
Working with texts in Word, users use this useful feature, like a footer.
It is really convenient, when printing a document, to take out additional information - the date of printing, the page number or the path to the folder with saving. All this can be done with the help of the footer. But there are situations when, when printing a multipage document, you need to indicate in the header and footer your names corresponding to the page or section.
To insert a header or footer correctly, you need to make sure that each chapter or section starts on a new page, whether the text is written almost to the end of the page or half of the page is left blank. This requirement is due to the fact that each page will have a different header.
To fulfill this requirement, you need the cursor to the beginning of the section or chapter of the document, then activate "Insert" on the toolbar and select the "Break" command. In the dialog box that appears, in the "New Section" group, you need to activate the "From the next page" function and click OK.
Next, using the "View" menu, activate the "Headers and Footers" command. In the opened panel of headers and footers, you can switch to any - header or footer. Depending on whether the chapter titles are formatted as Headings, you can simply enter the titles of the chapters in order in the headers and footers. The transition to the next section occurs after pressing the "Go to the next" button.
If the chapters or sections of the document are formatted using the appropriate styles, then in the "Insert" menu on the toolbar, activate the "Link" command, then select the "Cross-reference" subcommand. In the dialog box that opens, in the "Link Type" field, select "Title". In the "Insert link to" field, select "Header text" and then select the "For what header" command. Check the box next to the desired title and click "Insert". For each section, using the "Go to the next" button, we perform a similar procedure - insert the appropriate heading.
To insert the header correctly, you need to pay attention to the header present in the header, for example, from the previous section. In the upper right corner of the footer may be the name of the chapter or section, so you need to remove the link to the previous footer.
To do this, click the "As in the previous" button on the header and footer panel. We remove the text of the footer and insert the title from the "For which title" area.
Related videos
A user who is just starting to get acquainted with the Microsoft Office Word application (or a similar text editor) can find it difficult to understand the whole variety of terms, functions and tools of the program. For example, such a thing as a “footer” can make you think for a long time about what it is, what it is used for, and in what part of the document it is located.
document in text editor conditionally divided into several areas. The text is entered in the main (central) part of the document, but there are empty spaces around the edges, which are usually called fields. Headers and footers- these are the areas located in the top, bottom and side margins on each page of the document. Most often, headers and footers are used to insert page numbers into text, while the user does not need to enter each number himself. Numbering occurs automatically: each next page is assigned a value increased by one. Headers and footers can contain inscriptions: time, date, company name or document name. You can also place graphic objects in the headers and footers - a company logo or any other image. Why is it more convenient to use headers and footers to insert repeating text and graphic objects. The text or graphic object in the headers and footers does not change, does not move, is not distorted. There is no need to enter the same text on each new page. When headers and footers are active, the body of the document becomes uneditable, so its appearance does not change. Headers and footers can be quickly accessed by double-clicking the left mouse button on the top or bottom margin of the document. When headers and footers are active, an additional tab "Designer" becomes available in the context tools of the editor, with which you can change the appearance of headers and footers, insert the necessary objects. To use ready-made header and footer templates, go to the "Insert" tab. Choose from the section " Headers and footers»header or footer, from the proposed templates in the drop-down list, left-click on the option you like - this field will automatically switch you to the header and footer editing mode. To exit it, double-click in the main part of the document with the left mouse button.
For the convenience of working with text and its design in Microsoft Word there is a special function that allows you to create on the page headers and footers. You can easily put down the numbering of the document, links and a lot of other useful information in them.
Word 2007 headers and footers are graphic image or text, which are located at the bottom and top of the document page. The text in this case can be both on one page and the same for several pages.
Headers and footers are used for page numbering, section titles, chapters, first names, last names, organization names, dates, times, and more. Depending on what you want to indicate in the headers and footers. If you want it to be reflected on all pages, it is enough to make it on one of them. After that, it will automatically be displayed on all pages.
If the document does not have sections, then headers and footers can be deleted, inserted and modified. You can also use ready-made headers and footers in the document, which can be changed very easily. You can also create personal unique headers and footers, such as a company logo. You can save them in your own collection.
To add one header and footer for the entire document, select the "Headers and Footers" group in the "Insert" tab, then select the command you need by clicking on "Footer or Header".
After that, the header and footer will be displayed on all pages of the document. In order to change the format of the text, you need to select the text and use the formatting options located on the mini-panel.
To switch between footer and header, you need to click on "Go to end" or "Go to header" in the group navigation.
To insert a page number, press the "Page number" button. To insert the date or time, press the "Date and time" button. After you have chosen what you need, double-click in the document area, and then click on the "Close Header" button.
In order to insert text or graphics into the header and then save it to the collection, click the "Insert" tab, select the header and footer group. Then we select the header that we need, the top or bottom. Then select "Change header or footer", insert the text or image we need. To save the created header, select the text or image in the header, and then click Save selection as a new header (footer).
To change the header and footer, select the header or footer we need in the "Headers and Footers" group, click on the desired header variant in the collection. After that, the header changes throughout the document.
To remove a header from title page, click the Page Layout tab, then select Page Setup and click the Layout tab. After that, in the "Headers and Footers" group, check the box for the first page. And the headers and footers from the title page will be removed.
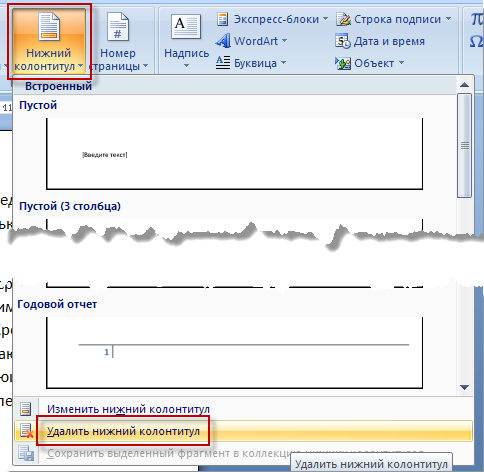
In order to remove headers and footers from all pages of the document, select the "Headers and Footers" group in the "Insert" tab. Next, select the header or footer you want to change (header or footer), click "Delete Header (Footer)".
In headers and footers, sometimes the titles of the document are indicated on odd pages, and the heading of the chapter on even pages. In order to create different headers and footers for these pages, you need to click on the "Insert" tab, select "Headers and Footers", then "Header (footer) header". click "Change header" or "Change header" Then check the box for even and odd pages. And now you can insert a header and footer for odd and even pages.
According to the Great Soviet Encyclopedia, “footer (from French colonne - column and Latin titulus - inscription, title) is heading data (title of the work, part, chapter, paragraph, etc.) placed above the text of each page of the book, newspapers, magazines. In the case of an electronic document, a header or footer is a document design element located in the upper or lower field. This can be the title of the entire document, its section, or the page number.
Instruction
According to the Great Soviet Encyclopedia, “footer (from French colonne - column and Latin titulus - inscription, title) is heading data (title of the work, part, chapter, paragraph, etc.) placed above the text of each page of the book, newspapers, magazines. In the case of an electronic document, a header or footer is a document design element located in the upper or lower field. This can be the title of the entire document, its section, or the page number.
P&G Placement Sponsor Articles on the topic "How to remove a header and footer on one page" How to remove a large space between words in Word How to remove a virus from RAM How to fix a runtime error
Instruction
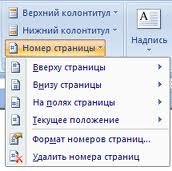
To create a header, go to the "Insert" command. Choose from three options: "Header" (the top box will open to enter text), "Footer" (the bottom box will open to enter text), or "Page Number". A list of menus will open from which you can select the item that suits you. The page number can be made not only on the top or bottom margin, but also on the right or left.
In order to close the header and exit to the main document, click on the “Close Header Window” icon or double-click with the right mouse button anywhere in the main document field.
Page numbers will change on each page, but any text header (document header, and so on) will remain the same throughout the entire document. However, there are times when headers and footers on different pages need to be different, for example, when it comes to different sections of a document, each of which has its own subheading, or when you want to remove a number from the first page.
In order for the headers and footers to be different, it is necessary to divide the document into sections. To do this, place the mouse cursor on the place in the document where you want to start a new section.
Go to the "Page Layout" command and click on the "Breaks" item. A menu will open with two options, "Page Breaks" and "Section Breaks". In the latter, select the “Next Page” sub-item, and from the place in the document where the cursor is, the document will be divided into sections.
You will see that the footer of the new section looks the same as the footer of the previous one. Double click in the header field. The workspace "Working with headers and footers" will open on the MS Word panel. You will see that the line "As in the previous section" is active in this area. Deactivate it. To do this, click on it with the left mouse button.
You can now enter different text in the new section's header field, or remove headers and footers from any of the sections.
How simpleOther related news:
Headers and footers are heading data that usually contain additional information (document location, author, chapter or section title) and are located above or below the main text. Headers and footers can be repeated and located on all or some pages of the document, article. Distinguish
Microsoft Word offers its users ample opportunities for formatting and editing text documents, including placing headers and footers at the top and bottom of the document, which contain page numbers, information about the author of the text, as well as some elements
You can remove pagination by going to the header and footer area, the areas that are found in the top and bottom margins of each page of a document. A header or footer usually displays text (page number, document title, file name, author's initials, etc.) and/or an image (such as a logo
Working with texts in Word, users use such a useful feature as a header and footer. P&G Placement Sponsor Related Articles How to Insert a Header and Footer How to Install a Keyboard How to Create network connection How to set up a proxy
Headers and footers are a means for marking up a document - an area of text or a picture, tables located in the top, bottom and side margins of each of the pages of the entire document. Sponsored by P&G Placement Articles on the topic "How to remove the footer" How to remove the header from the first page How to remove
Headers and footers are a convenient means of displaying information on all pages of a document, and you only need to enter data once. When you add a header, it is automatically displayed on the first page, but this can be easily fixed. P&G Placement Sponsor Related Articles "How