How to split system disk without data loss? It is not always possible to install HDD, so it may be necessary to split it into two or more logical partitions. Moreover, the size of modern disks allows you to do this, because the system itself does not need a lot of space. Most of all, this need arises on laptops. After all, they usually only have one hard drive installed.
If you are not familiar with computer management, don't worry. This will fix bad sectors and internal errors on your external hard drive. Finally, click "Apply" to save all changes. After that you can reuse external hard disk to save and store important data. You can also return the recovered data to an external hard drive again.
As we all know, many tools require to exclude all partitions that will result in data loss before the conversion process. On this page you can find answers to all questions. But it supports non-seasonal conversion hard drive. Click the "Apply" button on the toolbar and confirm your operation by clicking "Yes" on the pop-up dialog to confirm the changes.
There are several reasons for partitioning the system disk. The first is if you decide to install another system on your only drive. The second is the storage of personal (non-system) files on another drive, so that in the event of a system reinstall, they are safe and sound, and they do not have to be lost or even lost.
This breakdown can be done without third party programs, by means of operating system. I'll show you how it's done using the operating room as an example. Windows programs 10, but the same can be done in Windows XP/Vista/7/8.
Are you looking for a stable and complete software for a partition manager that can handle all partition operations? Are you the one who fixes problems with the system disk when it is out of place, the original partition is not suitable, when you need to create more partitions or resize the original partition? The updated software contains more advanced features, improving in quality and quality. You are annoyed by the imperfections of the computer, because it works slowly and gradually, and sometimes a certain program refuses to run when you need to use it urgently.
To do this, you must first disable system protection (in Windows XP, this step can be skipped).
Disabling system protection
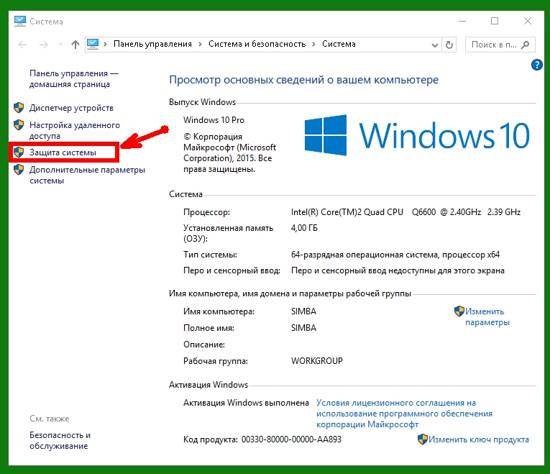
We start the conductor.

Find it in the list on the left This computer(or My computer, or simply A computer) and click on this icon right click mice. In the list that opens at the very end, click on the entry Properties.
Due to the small capacity, we often use it to work with the operating system. Saving time and energy. When installing an operating system on a computer, it is now highly recommended to create multiple partitions on the hard drive. Indeed, creating multiple partitions has many benefits. Thus, the created partitions can contain backup copies of important files, they can simplify backup data in case of formatting and better organize data on hard drives.
Download, install and configure software. It is reserved for non-commercial use. After downloading the file, run it. The steps are described below. If you want to change the software installation directory, click Browse, otherwise click Next.

A window will open System, in which you need to click on the link on the left System protection.
We select the disk with the system (I have a lot of disks, but the system is installed on the C drive for everyone), and click the button below Tune.
Create a shortcut in the start menu. If you want to change the default directory, click Browse, otherwise click Next. Create other shortcuts.
- Create a desktop icon.
- Check this box if you want to create a desktop shortcut.
The software does not require any specific settings to work. We do not detail this part in this article. No special software tweaks have been made to handle the various scenarios you will find later in this article.

In the next window, set the switch to record Disable system and press the button below Apply.
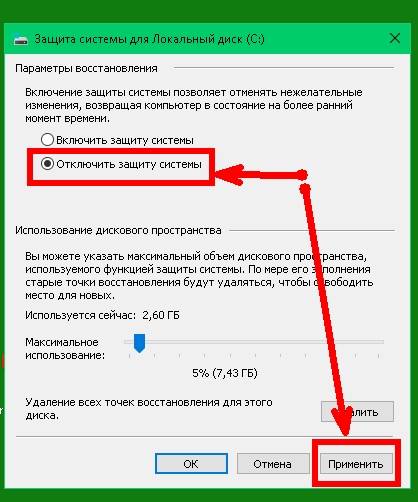
Click Yes, in to confirm your actions.
Changing hard disk partitions is not safe. While this software allows you to resize partitions without losing content, manipulation is not guaranteed. You need to make a full backup of your files. This backup must be done on external media. With this backup, you can restore your files if your computer crashes.
Scenario 1: Reduce the system partition. The first scenario in this article represents the case where you want to reduce the size of the system drive and increase the size of another partition using this free disk space. We will find these sections in the programming interface.

Disk partitioning
We open again Conductor, go to This computer, right-click on it, and in the list that opens, select the link Control.

Preview disks before changing partitions. In the next window, you will need to enter the new size of the system partition. Three masks are available. Unallocated space before: Unallocated space space size: partition size Unallocated space after: Unallocated space. Use your mouse to drag the panel representing your system partition to the desired size. Simply grab the edge of the panel with your mouse and hold left button mouse, drag the panel to the left.
You can also enter the right dimensions in input masks. We reduced the size of the system partition by about 2 GB. This space is now unallocated. Overview of the various sections. So far, there have been no changes to your sections. In the interface, you can see what your hard drive will look like after making changes. You will notice that there are two pending operations in the left menu and match the above changes.
In the window Computer management in the first (left area) click on the link Disk Management.
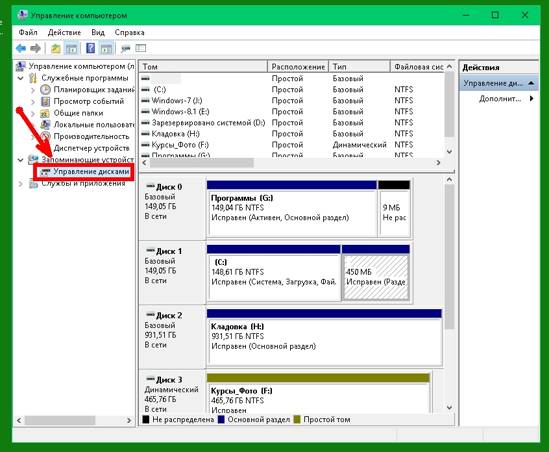
All our disks will be shown in the central area. Find the disk to be partitioned. This will be your system drive, marked with the letter With. (I already have this disk divided into two. Don't let that bother you.)
Changes to a partition require a reboot of the machine in use. Click Yes to restart your computer. You can undo changes by pressing a key on the keyboard. Don't touch the countdown time, the script will start automatically. The script will start operations in the order that was determined during the setup done in the previous steps. Our changes had two operations, they are displayed in the following screens.
After the script completes the changes, your computer will restart automatically. Let him install the hard drive. Rebooting the device is required to install the hard drive. The installation of new peripherals is complete. The second scenario in this article is a case where you want to expand the size of your system drive.
Right click on the disk With, and select the link Shrink Volume…

In the next window, you must specify Compressible space size. Go for at least 80 GB, otherwise you may run out of disk space very quickly. Please note that the size of the disk is indicated here in megabytes, not gigabytes. Be careful! The largest size available for compression is already specified in the size of the space to be compressed. If your disk is not large, then you can leave it.
Descriptions of these sections. Therefore, it is necessary to move the contents of the latter. Preview sections before modifications. The unallocated space that appeared in the software interface corresponds to the partition we just deleted.
Slide the panel to the right so that there is no more free space on the hard drive. If you make a mistake in the dimensions and want to make changes, click "Cancel" to cancel everything. If the changes suit you and you want to apply them, click Apply.
As in scenario 1, your computer will need to restart several times. For our scenario, the system drive now takes up all the space on the hard drive. Scenario 3: Create a new partition. The third scenario in this article represents the case where you want to create multiple partitions on a disk that initially contains only one. Therefore, we will reduce the size of the system partition and create a new partition with this space. Preview the score before the change.

After creating a partition, you need to select a new partition, right-click on it, and select the Create simple volume link in the drop-down list. Without this, your new section will not be visible.

Select a partition by clicking on it in the GUI or directly in the list of available partitions. Drag the panel to the left to get the desired size for the system partition. The disk space that we have removed from the system partition is now available, which is the unallocated disk space shown in the screenshot below.
Select unallocated disk space by clicking on it in the software interface or directly in the list of available partitions. We will create a new partition in this unallocated space. In the Label Markup field, enter a name for your section. We will create a logical partition. To do this, in the "Create as" field, select "Logical Partition". Choose the letter your new partition will take up by selecting it from the "Drive letter" dropdown.
The Creation Wizard will open. simple volume. Click the button Further.
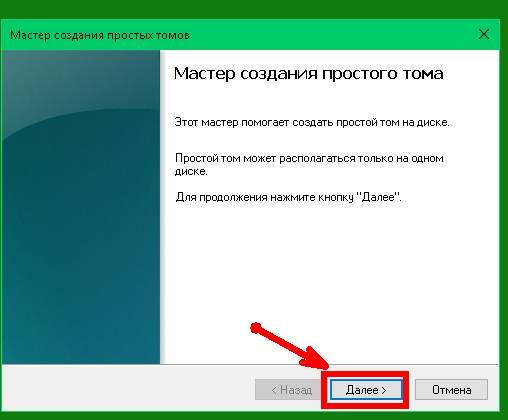
In the next window, we either leave everything as it is, or reduce the size of a simple volume so that one or more volumes can be created later. In this case, I leave everything as it is, and press the button Further.
No changes have been made yet. As in the previous scenarios, your machine will restart several times. As for our scenario, the system drive no longer takes up the entire hard drive and we have a new partition. In fact, the program offers tools for resizing partitions, merging, splitting, creating, deleting and formatting them. In other words, there is no need to use target drive, which is larger than the original: The hard drive you intend to run the copy on may also have a smaller capacity, if this is obviously large enough to hold all the data.

In the next window, we assign a letter to that. I leave the letter suggested by the system and press the button Further.

In the next window, you can only change the name of the volume label, or you can rename it later. Personally, I leave everything as it is, and press the button Further.
Difference between dynamic disk and basic disk
This is how partitions are managed and the system starts up. The partition contains one or more dynamic volumes that are not supported for installation.
Converting a dynamic disk to a basic disk
The steps to follow are few and simple. Then make a full backup of your data to avoid unpleasant situations.When the following screen appears, we recommend unchecking the "Join the Customer Experience Improvement Program" box. Finally, when the screen shown in the following figure appears, you can simply click the "Next" button without entering any details.

After completing the creation of a simple volume and formatting, click the button Ready, and we see a new section, and going into the area This PC - Devices and drives, we will find a new disk.
It remains only to go back to System Protection (as described at the very beginning of the article) and enable system disk protection.
Dynamic disks use a database that keeps track of information about dynamic disk volumes and other dynamic disks on your computer. Many people typically switch from a basic disk to a dynamic disk to get the benefits of mass storage. However, after switching to a dynamic disk, you may find that it's not as good as you thought.
Solutions to Change Dynamic Disk to Basic Disk
Mode 1: Deleting all volumes on a dynamic disk
This is the simplest and most common way to convert a dynamic disk to a base disk, but this solution does not guarantee data security, so all data on a dynamic disk is needed before it can be converted to a basic disk.This is how you can partition the system disk without losing data.
In any case, I advise you to create disk backups and restore points before such responsible operations.
Video on how to partition a hard drive:
It has long been known that partitioning a hard drive into sections is mandatory. And at least two: one partition is installed Windows operating system, the other stores all important data (movies, photos, music, documents). It is better if the disk partitioning procedure is performed during Windows installation , but you can painlessly perform it on the working operating room Windows system . This program will help us Acronis Disk Director Suite, which can not only partition a hard disk, but also combine several partitions into one.
Download latest version Acronis Disk Director Suite you can from the official website of the developer company: www.acronis.ru. Also on the above web page, download the documentation for the program in pdf format (link "Documentation"). It will come in handy when installing and working with Acronis Disk Director Suite.
Before experimenting with hard drive, we strongly recommend that you make backup copies of the information available on it. So you will be 100% sure that even in the event of a failure (for example, the electricity suddenly turns off during create partitions) your data will not be affected.
Partitioning a disk
On first start Acronis Disk Director Suite prompts you to select an interface mode. Select "Manual Mode" and press "OK". You can always switch between modes through the menu "View" - "Automatic mode" or "View" - "Manual mode".
To create a new section, select the section in the list and click the "Create Partitions" button.
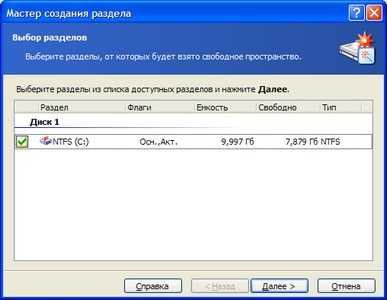
![]()
The Create Partition Wizard will start. First of all, you will need to select partitions from the list, due to the free space of which a new partition will be created. Mark the selected section with a checkmark and click the "Next" button.
Specify the size of the created partition in MB or GB. Acronis Disk Director Suite will indicate the minimum and maximum allowable sizes for the new partition. You just have to set the slider to the desired position and click the "Next" button. Don't choose too much small size for a partition on which an operating system is supposed to be installed or a large amount of information is stored. For the OS, a 50 GB partition is suitable, and for your data - from 100 GB or more. If you plan to store movies, music, photos and other multimedia content on the created partition, keep in mind that it takes up quite a lot of space. So, 1 film of medium quality pulls out 700 MB - 1.4 GB; 1 song takes about 5-7 MB of disk space; 1 uncompressed high-resolution photo - 1-3 MB.
Select the type of partition to be created by carefully reading the characteristics of each of the proposed types in the "Description" field. To store data, select the partition type "Logical"; for the operating system that will be loaded by default when the computer is turned on - "Active"; for the second operating system, the boot of which will be launched through the boot manager - "Primary". Click the "Next" button to continue.
Select file system for the new section. For Windows operating systems s versions 2000, XP, Vista, 2003, Windows 7, Windows 8 choose NTFS Windows 98-ME- FAT32. If you plan to install an operating system on a new partition Linux system, select the appropriate file system for it. Click the "Next" button to continue.

Assign a drive letter for the new partition by selecting it from the list and click Next.

Enter a description (label) for the new partition, which will be displayed in the My Computer window next to the drive letter assigned to the partition. This is for your convenience. If you are in doubt or do not want to enter anything, leave the field blank. Click the "Next" button to continue.

Acronis Disk Director Suite will show you the proposed hard disk structure after creating a new partition. The section to be created will be marked with a green check mark. If you're sure you've entered all the options correctly, click Finish. Otherwise, you have the opportunity to click the "Back" button and correct the settings of the new section that do not satisfy you.

After clicking the "Finish" button, you will be taken to the main window of Acronis Disk Director Suite and see the new partition with your own eyes.

However, the program has not started creating it yet: this task has been added to the list of pending operations in Acronis Disk Director Suite. To start the process of creating a new partition, click the "Run" button.

You will see a list of operations that the program is going to perform. Since we did not plan anything other than creating a new section, this list contains tasks that are directly related to this topic. Click the "Proceed" button to start the partition creation operation.

After restarting the computer, you will see blue screen with the results of Acronis Disk Director Suite. Wait a few seconds (minutes) for the program to finish creating the new partition.

The next time you boot the operating system, you will see the newly created partition.