An article on how to connect a computer to a TV using HDMI connectors.
The rules for connecting a TV to a computer and setting up a video card are described.
HDMI output - a special connector that is used to connect a video card to a monitor using an HDMI cable. The HDMI interface is more advanced than its "predecessor" VGA. Through the HDMI interface, video is transmitted to a much better quality.
Choosing an HDMI cable
I. If the TV has an HDMI output, we buy a cable that will connect the TV jack and the output Computer HDMI.
It is necessary to choose a quality HDMI 1.4b, HDMI 2.0 cable, with a bandwidth that allows you to play 3D and Full HD video at a resolution of 3840 × 2160.
An HDMI 2.0 cable is required for 4K TVs, for the rest, HDMI 1.4 may well be fine.
After connecting the TV to the computer with the correct cable, we will get the highest quality picture, otherwise we can only see the black screen of the TV.
II. If the TV does not have an HDMI output, you will have to use adapters.
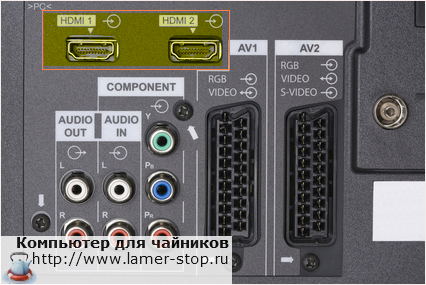
On sale there is a wide selection of wires and adapters with "plugs" for various interfaces. In order to choose the right cable, you need to know the right socket located on the TV panel. Most TVs have at least 2 outputs: RCA (or "tulip" - 3-color wiring, usually located on the front panel) and standard S-Video (4 or 9-pin "round" output, located on the rear panel, usually serving for cable TV connection). The cable we choose must have an interface supported by the TV - have a connector that matches the TV connector.
have 2 or more different connectors and are designed to combine cords of various interfaces. True, the quality of the "picture" with such a connection suffers.
But, one way or another, if you already have a cord or adapter, let's start connecting.
Sequencing
1. We connect the computer and the TV with a cable. The first step is to turn off both the computer and the TV from the network.
Then we connect the HDMI connectors of the computer and the TV with a cable:
- just insert one end of the cord into the HDMI output of the computer's video card;

(Picture 1)
- the other - to the HDMI input of the TV.
(Picture 2)
If your TV has multiple HDMI outputs, then connect to the one to which it is more convenient. We will select the image source using the TV remote control and the Source button.
2. Turn on both devices. First, turn on the TV.
Using the Source button on the remote control, switch the TV to External 1 mode.
An image will appear on the screen and the inscription "HDMI 1" if we connected to the first HDMI input.
If connected to the second input, then once again press the Source button.
The second turn on the computer (it's more convenient).
When the TV is on, while downloading WINDOWS screen TV should blink slightly - this indicates an external connection to it (hence, while everything is going right).
The HDMI signal is not received from the antenna, but from the computer's video card connected to the TV via the HDMI input.
3. Set up the video card. In principle, if the computer is not connected to the TV for the first time, this step is not needed - the video card is probably already configured by default, and the image will already be visible on the TV. But, if the computer is connected to the TV for the first time, the video card must still be configured.
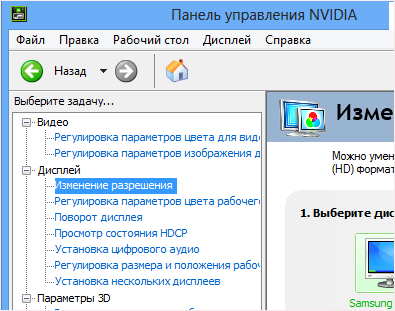
3.1. Go to "Control Panel / Hardware and Sound / NVIDIA Control Panel" - here are the settings for the GeeForce video card.
3.2. If our video card is from the RADEON series (or any other series from ATI), then its settings can be found in the tray above the clock and in the control panel.
Also, using the properties of the video card, you can set the desired resolution, desktop size (for example, full screen), screen settings and color correction, simply by clicking on the necessary tabs and selecting the desired parameters on them.
(Figure 3)
Solving connection problems
In comment No. 6, a site guest describes a solution to the problem with sound that is not played through the TV.

If there is no sound, select - install digital audio.
(Figure 4)
HDMI output (High-Definition Multimedia Interface) is needed to transmit the highest quality digital signal. It is used for video and audio broadcasting. So, HDMI, how to set it up? First, a little preface. It must be said that almost all personal computers are equipped with video cards with an output such as HDMI, in addition, HDMI is quite common even on those laptop models that use a standard integrated video card. Let's, for starters, we will try to explore the capabilities of your video adapter. In the event that your video card does not have an HDMI output, you can use the DVI or VGA channel using a special adapter, which is also called a DVI-HDMI connector. A feature of such adapters is the ability to transmit an audio signal.
How to set up a TV via HDMI? To set up HDMI, you will need instructions from the TV to which the connection will be made, where they will be written specifications. Be sure to make sure that the HDMI input is designed to receive audio. To connect to a TV, you only need an HDMI-HDMI cable, one end of which must be inserted into the computer's video card, and the other will need to be inserted into the TV's connector. If you need the monitor and TV to work at the same time, you will need to enable the feature such as synchronous operation of these devices.
Synchronous operation of devices
To do this, you will need to open the "Start" menu and go to the "Control Panel" (you can go there in any way convenient for you). Next, you will need to select "Screen" and go to the "Screen resolution settings" item. In the dialog box that appears, you will need to activate a feature such as "Duplicate Screen". From now on, the computer will transmit the same image to all devices connected to the video card. If you have a need for both displays to start working separately from each other, you will need to activate the "Expand Screen" mode. In this case, you will need to first assign the display as the main device of the computer.
How to set up sound via HDMI? To set up HDMI, you will need to adjust the audio signal transmission. To perform this action, open the "Control Panel" and click on the "Hardware and Sound" item. Then you need to select "Manage audio devices". A dialog box will appear on the screen, in which you will need the "Manage sound devices" tab. Well, here you need "HDMI Output". Click on its icon with the left mouse button, set "Default".
Now you need to click on the "Apply" button and close the dialog box with "sound devices". Next, as a test, you will need to run some video and make sure that the HDMI output and cable are working properly. It is worth noting that if you unplug the hdmi cable, then the standard audio port will turn on automatically. How to set up an HDMI cable? As you can see, the HDMI output is quite easy to set up and you don't need any special knowledge to do it. I almost forgot to tell you about which HDMI cable is better and which one should be chosen for further long everyday use.
Types of cables
There are two types of HDMI cables: high definition and HDTV. It is also worth touching on the topic of the length of the wires and take into account in advance that the length can vary from 1 to 10 meters; but do not forget that the longer the cable, the more likely it is that there will be signal loss. As a result, some manufacturers have sprung up to offer so-called "active" HDMI cables with various technologies that can be used to transfer data over very long distances. When you buy a cable, be sure to point yours to the wire as well as its connectors.
I have long wanted to write a detailed review article on how to connect a computer to a TV with an HDMI cable. But to write about what I do not know, and have not tried, I consider it a deception. I decided to wait for an opportunity, and he soon introduced himself.
Mom loves to watch all sorts of popular science films on YouTube video hosting. But in this case, I have to download them, then transfer them to a USB flash drive, and connect it to the TV. Such a process takes a lot of time, not to mention the fact that there is aggressive wear. hard drive computer.
And then I decided that it was better to save HDD, buy an HDMI cable and connect one of your TVs that does not have a Smart TV shell and a built-in Wi-Fi module to your computer. Everything turned out to be much simpler than described on many computer-related sites.
Surely many of you have accumulated a lot of films downloaded from the Internet, which are much more convenient to watch on a large TV screen. And if the computer is also connected to the Internet, then you can watch any online TV shows, feature and documentary films, and colorful slide shows.
I will describe how to connect a computer to a TV with an HDMI cable in order. Perhaps some of you will find this useful.
Connecting a TV via an HDMI cable is the easiest to set up and does not require a separate audio cable. The transmission of both video and sound occurs over one cable, which is very profitable and convenient.
I will show and tell on the example of a TV SAMSUNG UE32F4000aw with a diagonal of 50 inches, not quite new, but not old either.
We will need:
- HDMI cable
- HDMI TV
- graphics card with HDMI and DVI connectors
I had to buy 10 meters of HDMI cable, and it cost me one and a half thousand rubles. But compared to buying new hard disk is nonsense.
We lay the HDMI cable from the computer to the TV, and connect it. My TV has two HDMI connectors.
The instructions for the TV say that you should connect the set-top box, VD player and PC to the connector HDMI2, which in my case is at the top.
Connect the cable to the computer and TV only when the devices are turned off, otherwise it will fail.
We connect the other end of the cable to the HDMI connector of the video card.
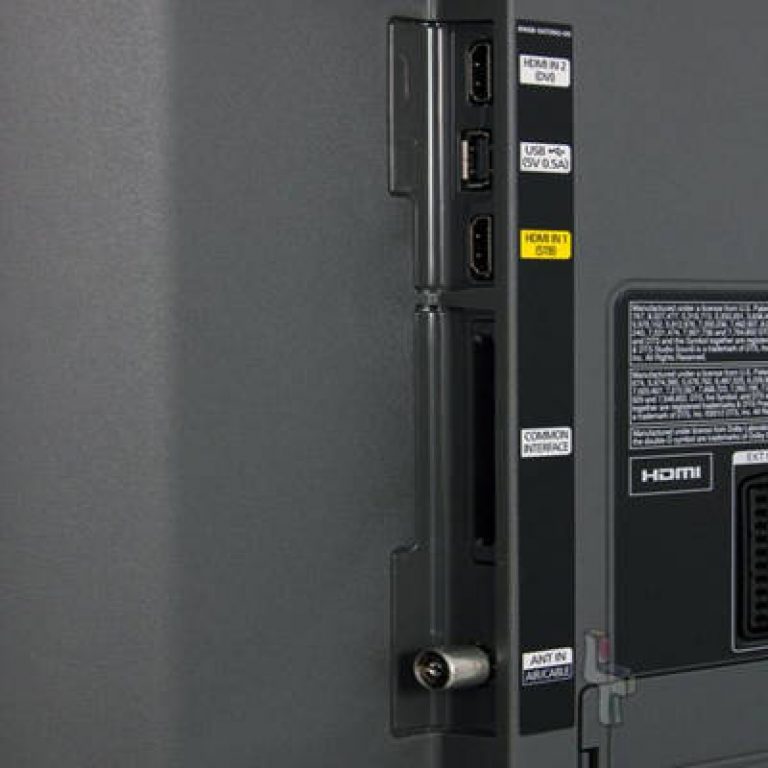
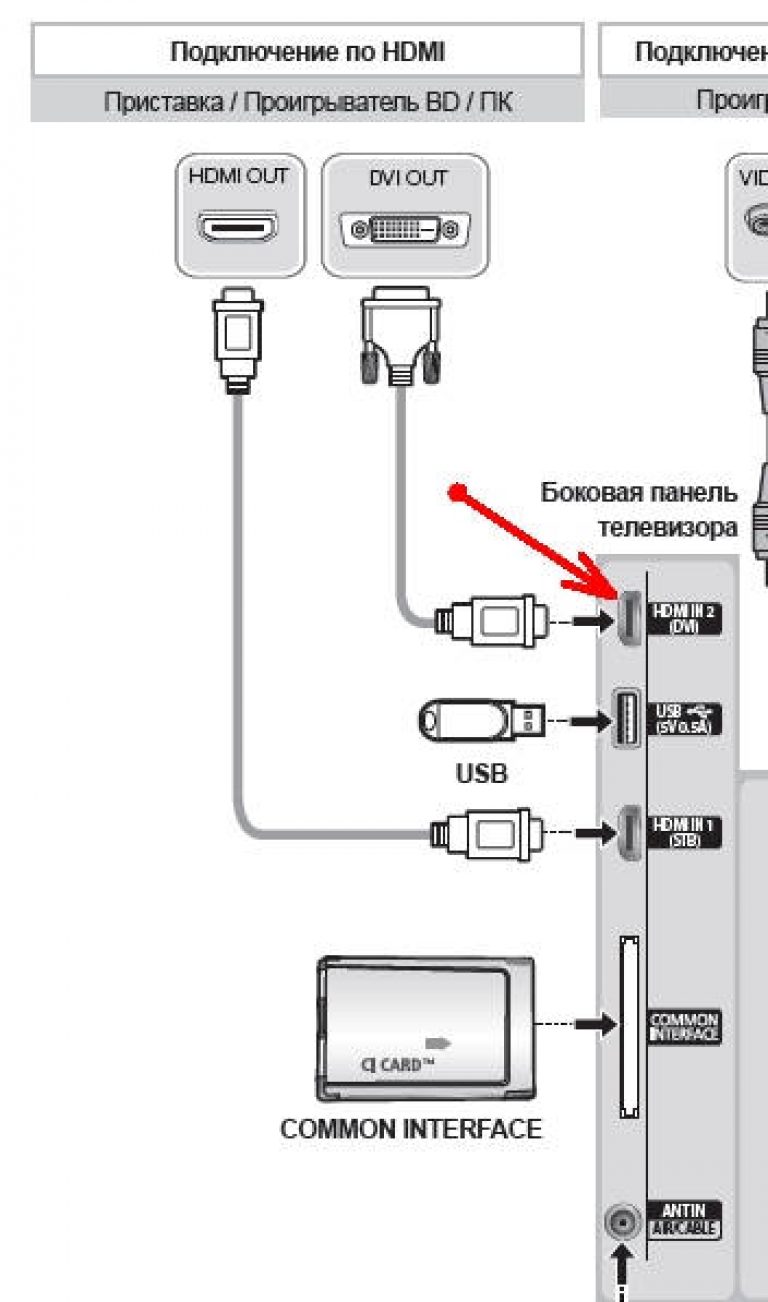 Fig. 4 HDMI connector on a discrete graphics card
Here's a little digression
Since I constantly work at a computer, and it is not very powerful for me, connecting a TV to it is not desirable. Otherwise, I will have to stop working and watch the same thing on the monitor as on the TV.
If my computer was more powerful, then it would be possible to set it up on two different monitors, one of which would be a TV and show movies, and on the second one could go about my business. To do this, it is better to have two video cards.
But since I have another computer, I made it a stand-alone TV set-top box. Therefore, the description below will refer to a single processor that can operate without a monitor.
To set up a TV connection, we need any working monitor. Once configured, it can be disabled and removed if you only use this computer for TV.
Connect the cable from the monitor to the video card connector DVI. When connected to a socket VGA monitor will not work. 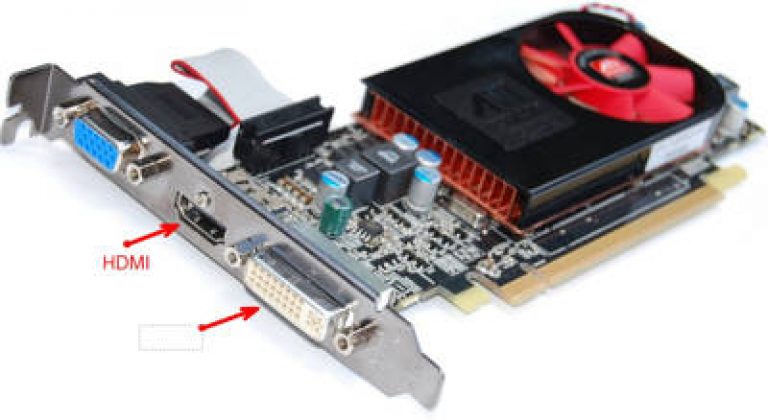
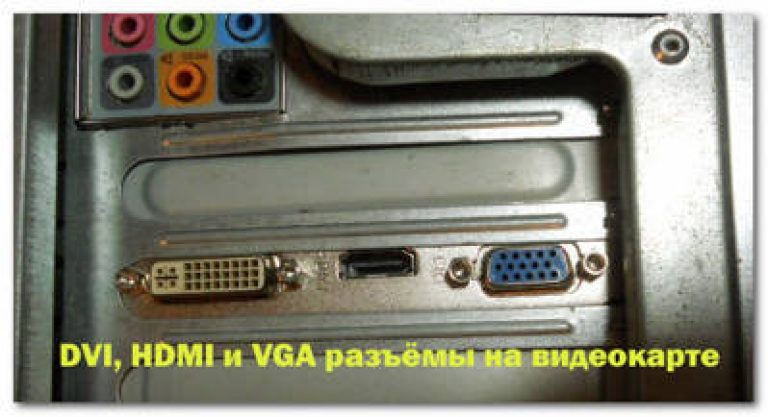
 Fig. 5 Built-in video card connectors on the back of the computer
If the cable from the monitor has a connector VGA then you need an adapter VGA-DVI. They usually come with the monitor.
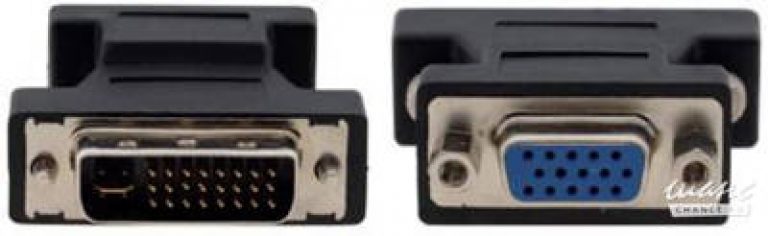
DVI and VGA Connector (Blue)
Now you can turn on your computer and TV.
Press the button on the TV remote Source(View and select available video sources)
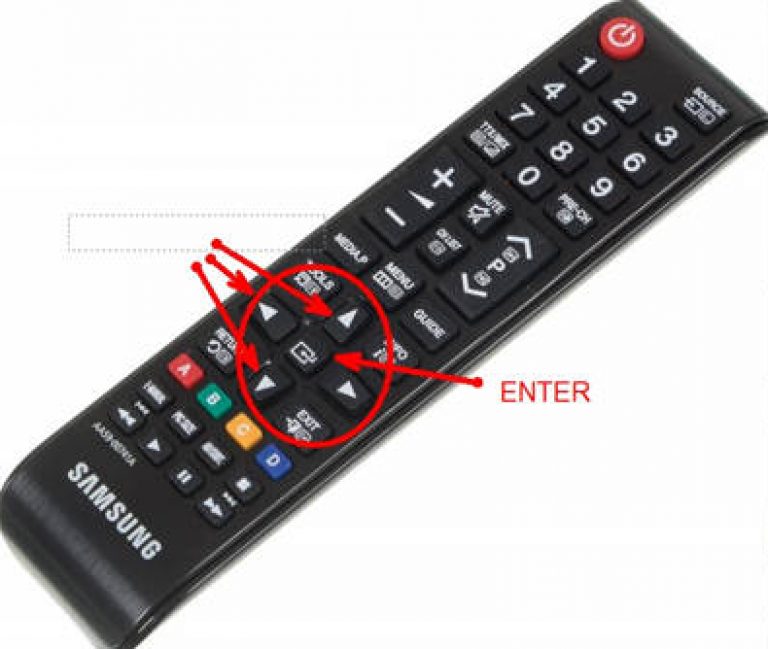
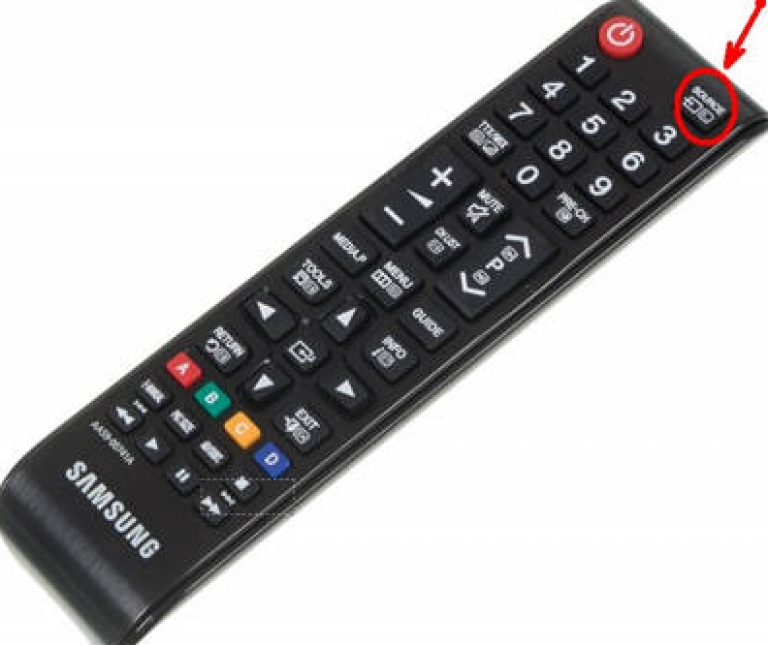 In the TV menu that opens, use the navigation buttons to select the source HDMI2DVI(because the HDMI cable is connected to this connector), and press the remote control button «
Enter»
In the TV menu that opens, use the navigation buttons to select the source HDMI2DVI(because the HDMI cable is connected to this connector), and press the remote control button «
Enter»
 A message will appear that the source is not found or something like that. This is normal and there is no need to panic.
Now let's go to the computer settings.
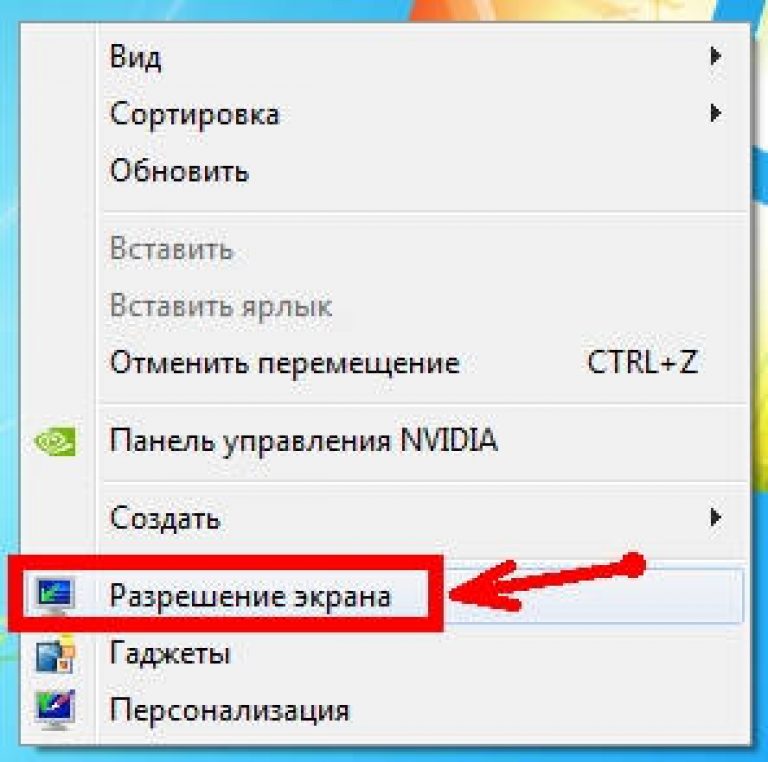
On the computer (I have Windows 7 installed), click right click mouse on the desktop and in the drop-down list, select the item " Screen resolution».
 In the opened window " Screen settings"Press the button" Define". If the computer does not detect your TV, then check the connection source (button on the TV remote Source). I chose the wrong connector first HDMI.
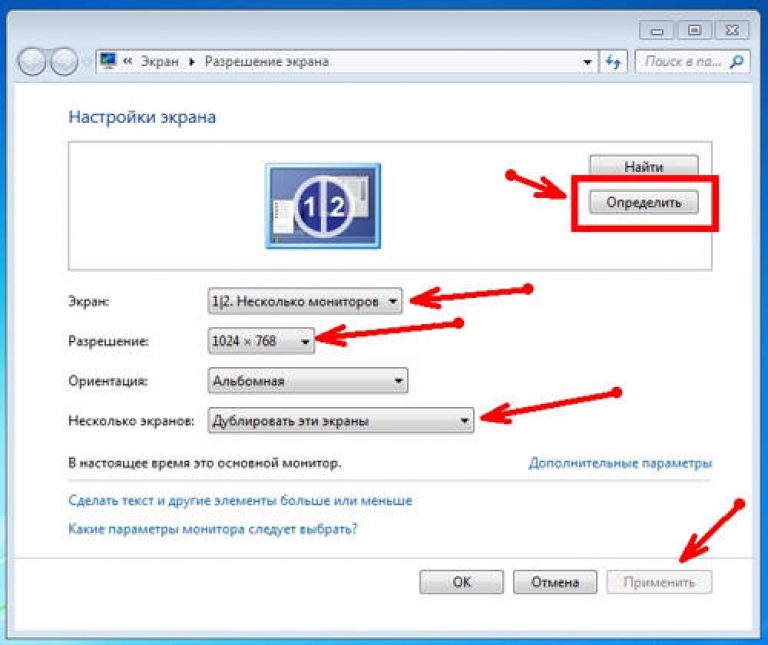 Once in the field Screen» the name of the TV appears, you can continue to configure.
Set your TV to the correct screen resolution. Usually the computer itself suggests the correct solution, so do not be too zealous.
In settings " Multiple Screens» install « Duplicate these screens". The same picture should be displayed on the TV as on the computer.
Now you need to set up the sound.
Right-click on the sound settings icon in the system tray, and select " Playback devices».
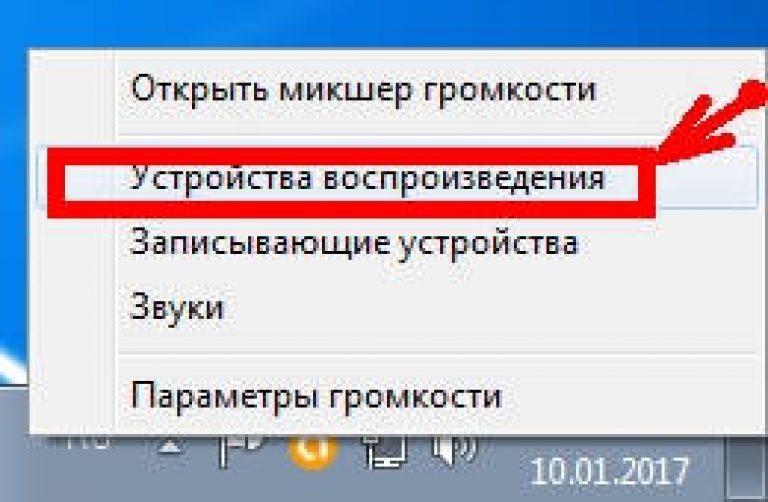
In the window that appears available audio playback devices, select the TV and click the button below Default', and then the button ' Apply».

I have both a SAMSUNG monitor and a TV, so the program writes SAMSUNG-1.
Everything. Now you can enjoy watching your favorite series on your TV. If you want to watch TV shows, then press the Source button on the remote control and select TV as the source.
By the way, if you also have two computers, and they are, then the computer through which films will be shown on the TV screen can be controlled using special programs through your work computer. In this case, you will not need to connect a monitor to the first computer.
If you are interested in this topic, then write about it in the comments, and I will write an article and make a video on it.
I do not connect the monitor, but start system unit and do all the settings directly on the TV using wireless mouse and keyboards.
First of all, it must be said that all modern video cards are equipped with this output for personal computers In addition, HDMI can be found on laptops, even on those models that use an integrated video card.
It is recommended to start explore the capabilities of your video adapter. If your video card does not have an HDMI output, you can use the DVI channel using a special adapter, which is also called DVI-HDMI connector. A feature of such adapters is the ability to transmit an audio signal.
In order to set up HDMI, you will need to study the technical specifications of the TV to which you are connecting. It must be ensured that it HDMI input is for receiving audio signal. All you need to connect is HDMI to HDMI cable, one end of which is inserted into the video card of the computer, and the other end into the TV connector.
If you want the TV and monitor to work at the same time, you must set the option for synchronous operation of these devices. To do this, open the menu "Start" and log in "Control Panel". Next, you need to select "Screen" and click on the item "Screen resolution settings".
In the dialog box that appears, you need to activate the function "Duplicate Screen". Now the computer will send the same image to all devices. If you need both displays to work independently of each other, you should activate the mode "Expand Screen". In this case, you will need to first assign the computer display as the primary device.
To set up HDMI, you also need to adjust audio transmission. For this you need to open "Control Panel" and select item "Hardware and Sound". Next, click on . A dialog box will appear on the screen, in which you should go to the tab "Sound Device Management". Equipment to be noted here HDMI Output by clicking on its icon with the left mouse button, and then clicking on the button "Default".
Next, click on the button "Apply" and close the dialog box. Now, as a test, you can run some video and make sure that the HDMI output is working correctly. It is worth noting that when the cable is disconnected from the port, the standard audio port will turn on automatically.
As you can see, setting up the HDMI output is quite simple and does not require any special knowledge. Finally, it is worth talking about how to choose the right HDMI cable.
These cables are of two types: to support high definition as well as to support HDTV resolution. As for the length of the wires, it can vary from 1 to 10 meters. However, it should be remembered that the longer the cable length, the greater the likelihood of signal loss. Therefore, some manufacturers offer so-called active HDMI cables which use various technologies to transmit data over long distances. When buying a cable, be sure to pay attention not only to the quality of the wire, but also to the connectors.
If you decide to connect your TV to a computer or laptop on Windows 10, then now I will show and tell you how to do it. We will connect in two ways: wirelessly WiFi networks, and using an HDMI cable. Under wifi connection i have enter connect via wifi router, and setting up DLNA technology. When from a computer, you can watch movies, photos, and listen to music on the TV. Well, connecting using an HDMI cable is a normal HDMI connection 🙂 With this connection, the TV will be like a monitor in Windows 10.
To be honest, there is not much difference whether you have Windows 7 or Windows 10. Both connecting to a TV via HDMI and via Wi-Fi are practically the same. But, let's consider the example of a laptop with installed Windows 10. I think this article will be relevant and useful for a long time.
We connect the TV to the laptop (Windows 10) via Wi-Fi. DLNA setting
We will not consider setting up Wi-Fi Direct technology (when you can connect a TV to a laptop without a router, without wires) and (not all devices support this technology). These are topics for separate articles.
If you want to connect your TV to your computer via wireless network, then it can be done like this:
- Connect your TV to the same network. Here are the instructions for , and the instructions for .
The main thing is that the laptop and TV are connected to the same router. By the way, not necessarily on Wi-Fi. One of the devices (or even both) can be connected to the router via cable.
After you connect everything, you can proceed to setting up the DLNA server on your computer. By running the server on your computer, you can watch movies on your TV. Please note that the desktop will not be displayed on the TV when using this method. You can only view certain files. On setting up a DLNA server, we have three articles:
- – in this article we started the server without third party programs, via standard means in Windows 10.
Despite the fact that they are written on the example of Windows 7, on Windows 10 the DLNA server setup will be exactly the same. I checked that the DLNA server running on a laptop with Windows 10 installed is displayed on the TV without any problems.
The instructions on the links above I have for LG TVs, and Philips. But, the server launched by the methods described above will work without problems on other TVs: Samsung, Sony, Toshiba, etc. Set up DLNA using the "Home Media Server (UPnP, DLNA, HTTP)" program (as I did in the Philips TV article). It can be called universal.
With wireless connection I think got it figured out. Let's move on to wires.
HDMI connection in Windows 10
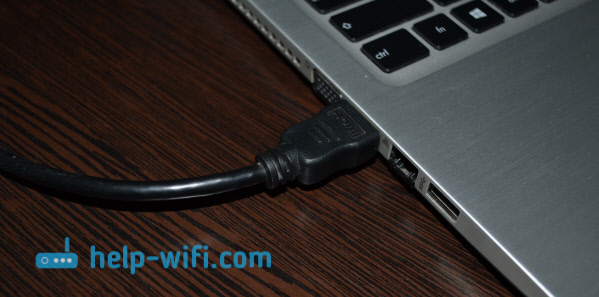
We take a regular HDMI cable. We connect one end of the cable to the TV in the HDMI connector. There can be several of them, connect to any.
We connect the second end of the cable to a laptop or desktop computer.
If the picture from the computer did not appear on the TV, then most likely, you need to select the signal source on the TV. There must be a special button on the remote control. Usually, it is signed INPUT, or SOURCES. Click on it, and select the HDMI connector to which we connected the cable as the source.
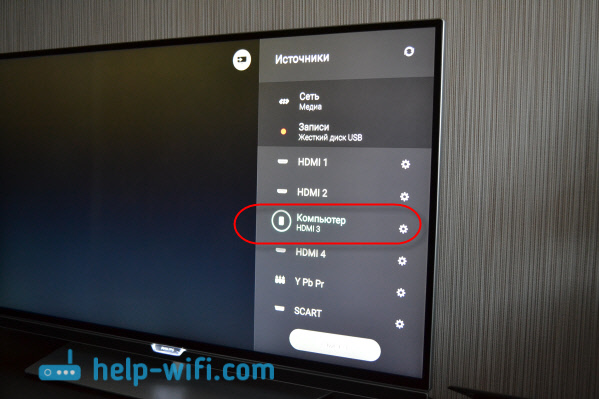
An image should appear on the TV.
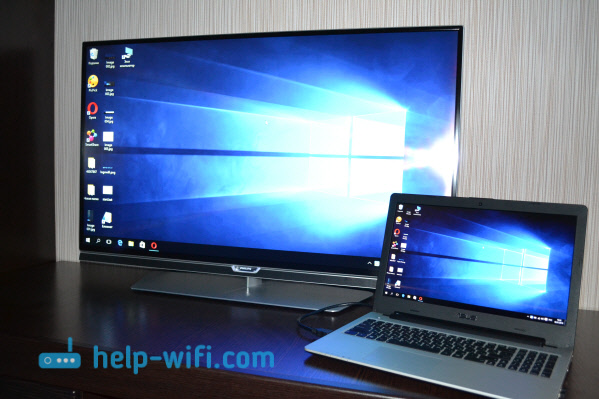
In Windows 10, you can control the second screen. In our case, this is a TV. In the ten it is called "Projection". To call this menu, just press the key combination Win+P. A menu will appear on the right, in which you can select one of 4 options.
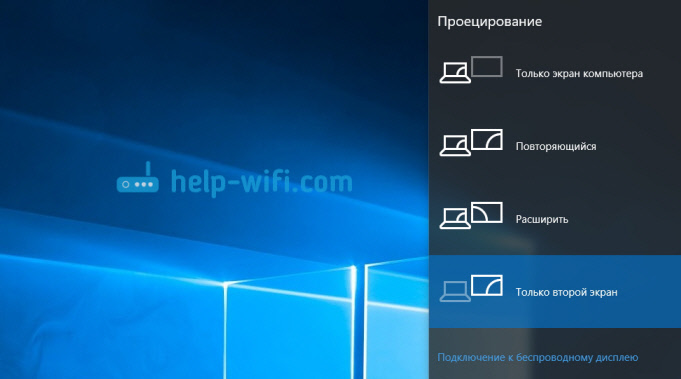
For example, you can display the image only on the TV.

That's actually all the settings.
If the sound on the TV does not work when connected to Windows 10 via HDMI
Perhaps, after connecting the TV to the computer, the sound will play not from the TV speakers, but from the laptop speakers, or connected speakers. This can be easily fixed.
Right click on the sound control icon in the notification bar and select playback devices.
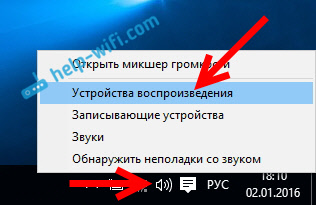
Your TV should be on the list. Right click on it and select Use by default.
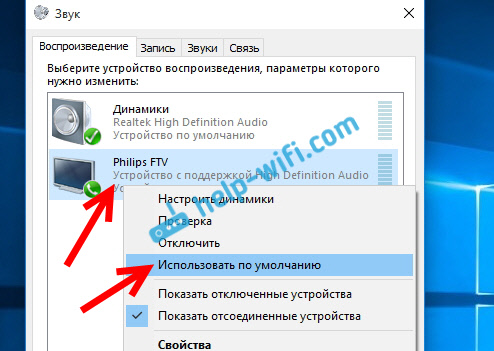
The sound will now play from your TV speakers.