With intensive use and lack of proper care, the printer can fail quite often. Reasons for this include clogged printheads, empty cartridge, broken photoconductors, paper wrinkle, and other problems.
Repairing a printer on your own is not easy - this requires at least a minimum of relevant knowledge, and sometimes also a special tool. However, many minor faults can be fixed at home. In any case, do not forget about preventive measures: protecting the printer from dust, turning it on and off correctly, etc.
Dot matrix printer problems
For a long time, dot matrix printers were the most common, due to their relative cheapness and ease of maintenance. Even today, despite the ever-increasing competition from inkjet and laser analogues, they are used all the time: in offices, apartments and institutions.
Inkjet printer problems
Inkjet printers almost immediately after their appearance won a large number of fans and are currently enjoying considerable popularity. Such success is largely due to the fact that inkjet printers provide high quality printing at their relatively low cost. At the same time, they are easy to maintain, and the use of color cartridges allows you to get high-quality color printouts.
Laser Printer Problems
Of all the types of printers, it is the laser that has the most complex design (especially for color printers). Since it includes a large number of different mechanisms, assemblies and assemblies, the probability of its breakdown increases. At the same time, there are many proven and effective methods for diagnosing and troubleshooting, thanks to which many problems are fixed quickly and without much difficulty.
Due to the complexity of the design of a laser printer, it is not easy to repair at home, however, in some cases, you can fix the malfunctions on your own. Sometimes the printer won't turn on. The reasons for this may be a lack of power (check if the power cable is connected to the mains, if it is in good condition, if there is voltage in the outlet), a blown fuse, a broken switch, etc. First of all, it is recommended to make sure that the power supply is available.
Any technique, as a rule, breaks down at the wrong time, and the printer in this case is no exception. Often it fails just when you need to print some important document. At the same time, in order to eliminate problems, the owners of such equipment are in a hurry to carry it to service center where you need to sit in line, wait for the reasons to be determined printer problems, their elimination, and so on. In other words, you will have to spend a lot of time, and you may not have time to do the necessary things. And everything is fine if there is simply no other way out.
But after all, it is often possible to fix problems without the services of specialists, but on your own and in a very short time. Of course, we are not talking about the failure of some components of the printer and its accessories. But rather about the most common problems that are not directly related to equipment failure.
Most Common Problems
Most often, a computer or laptop cannot detect the equipment, and therefore does not print the document. Why is this happening? The answer to this question is quite simple - the printer is not connected to the computer. It is this reason that is the most common, check if the wires are plugged into system unit and the printer itself. Perhaps they just moved away, and therefore the PC cannot determine the connection.
Another one common cause of problems in the work of the printer - a recent reinstallation of the operating system or viruses that have been infected via the Internet or removable media. The fact is that some virus programs can change the operation of the printer driver, as a result of which it is not recognized by the computer or does not receive commands to print a document. In this case, the problem is solved quickly by reinstalling the driver.
Another pretty common cause of problems, which you can fix yourself is the lack of ink in the cartridge. In this case, it should simply be replaced. The same procedure must be done if you are using an inkjet model, and the ink in it has dried up due to high temperature or a long pause in operation. in such cases is the only possible and correct way out of the situation.
When should you contact the master?
There are some issues that you can't fix on your own. Some of the more common problems include jamming the paper, smearing ink on the surface of the paper, turning off the printer intermittently or not responding to commands received, turning off the display, grabbing a large number paper and so on.
If you are faced with one of these problems, then it is better to contact a specialist, since an attempt to repair it yourself, without understanding causes of problems and mechanisms for their elimination, can lead to a complete failure of the printer. The specialist can determine the source of the problem and suggest the best solution.
Services of our company
Our company " " brings to your attention services for the repair of printers . Extensive experience and the availability of modern equipment makes it possible to quickly identify the existing problem and carry out the replacement of components, or repair of spare parts, if possible.
Our services will be affordable and convenient for you, and our specialists will not only fix all problems, but also give a full range of recommendations on the correct operation of printers to prevent their breakdown in the future!
What once plunged Windows users into boundless anguish, - installing a printer - today has become a relatively simple task. Gone are the cables of that awful parallel interface, and are replaced by reliable USB cables and built-in modules for wireless networking. However, there are two tricks in Windows 7 that can cause headaches even for users of the latest printers and auto-installed drivers.
The first hurdle you have to overcome in trying to get the printer working is clearing the print queue. A print queue is a set of documents that will be printed on a specific printer. For years, the print queue has been one of the most poorly made tools in the system, and in Windows 7, unfortunately, the situation has not improved. For example, try deleting (cancelling) one or more documents from the failed printer's print queue - you'll have to wait ages before this happens! The solution is to forcibly clear the print queue. Open the services window (Services, services.msc), click right click click on the Print Spooler service and select context menu Stop command to stop the service. Now open Windows Explorer, navigate to the \Windows\System32\spool\printers\ folder and delete all the files it contains. After making sure that the printers folder is empty, return to the Services window again, right-click the Printer Spool service, and select Start to enable the service again.
Second windows problem 7 - the lack of an easy and obvious way to uninstall the printer driver, and this is the number one ingredient in a complicated recipe for fixing a printer a la Windows 7. Of course, you can remove the printer itself: right-click on its icon on the Devices and Printers page (Devices and Printers) in the Control Panel and select the Remove device command from the context menu. However, the driver will not be deleted - only the device instance in the Control Panel will disappear. Before you blink an eye, thanks to Plug and Play device will show up again with the same bad driver you wanted to get rid of.
To fix the problem, open the Print Server Properties window: if there is at least one printer in the Devices and Printers list, select it and click Print Server Properties in the horizontal bar at the top window. (If there is no such button, type printui /s /t2 in the Start menu search box and press Enter.)
The printer driver cannot be uninstalled if it is being used by the printer. Before continuing, delete the printer instance in the Devices and Printers window.
Now go to the Drivers tab, select the driver you don't need and click Remove. In the Remove Driver and Package window, select the Remove driver and driver package option and click OK. Click on the Yes button, confirming that you are absolutely, completely sure that you want to remove this stupid driver, and finish the job in the next window by clicking on the Delete button. Phew!
Several factors affect the print time for a job.
Using special paper (such as transparencies, thick paper, and custom-size paper).
Device handling and boot time.
Complexity and format of graphic images.
The speed of the computer you are using.
USB connection.
I/O configuration.
The amount of installed memory.
Network operating system and its configuration (if any). Device language (PCL or PS).
Note Although the installation additional memory can solve the problem of memory, improve the processing of complex graphics and reduce loading time, it cannot increase the maximum print speed (ppm).
Troubleshooting Diagram
The control panel display is blank, no lights are on, and the unit's motors are silent.
Is food included?
The power switch can 1. be turned off.
The power cable may be disconnected.
The electrical outlet may not 2. work.
The internal power supply may not work.
Make sure the device is plugged in and the power switch is in the "On" position.
Check the electrical outlet. To do this, plug the device into an outlet that is sure to work.
The control panel displays an error message.
Does an error message appear on the control panel display?
The error message may appear for several reasons.
1. Follow the instructions on the control panel to resolve the issue.
2. For more information, see Control Panel Messages.
Main functions on touch screen, such as Copy and Email, are grayed out?
The transport lock of the scanner can be turned on.
Check if the scanner's transport lock is turned off. The scanner lock is located on the left side of the machine, below the scanner.
Paper Feeding Problems Do paper jams occur frequently?
The media does not meet specifications.
After clearing a previous jam, paper remains in the machine.
Packing tape, cardboard or 2. shipping locks left in the device.
Maintenance kit components must be replaced.
Make sure the media specifications match the device specifications.
Open all doors and trays and check for media jams.
Make sure it's installed correctly.
4. Install the device maintenance kit.
5. If the problem persists, contact the HP Customer Support Center.
Are originals fed through the ADF correctly?
The original may be printed on media that is too heavy or too light for the ADF.
The feed pad and rollers in the ADF may be dirty.
The ADF Maintenance Kit may need to be replaced.
If the original is printed on very heavy or light media, copy from the flatbed glass.
Clean the rollers and the ADF feed pad.
Install the ADF maintenance kit.
Copy problems
Are the copies empty?
Maybe the original is upside down.
1. Load your original face up in the ADF.
2. Place your original face down on the scanner glass.
3. If the problem persists, contact the HP Customer Support Center.
Are the copies from the ADF and the scanner glass of poor quality?
Copy settings must be configured for this original.
If the problem persists, contact the HP Customer Support Center.
Are poor quality copies coming out of the ADF only?
The ADF glass may be dirty.
Clean the scanner glass.
If the problem persists, contact the HP Customer Support Center.
Are poor quality copies made only from the scanner glass?
The scanner glass may be dirty.
Clean the glass to the left of the scanner glass.
If the problem persists, contact the HP Customer Support Center.
General printing problems
Can you print documents from your computer?
The computer cable may be damaged.
The printer driver may need to be reinstalled.
1. Try printing a configuration page using the control panel. Click Network Address, then Print.
If the page prints, the problem is with the printer driver or cable.
2. Reconnect the cables.
3. Reinstall the printer driver. The printer driver is on the CD
4. If the problem is not
resolved, contact the HP Customer Support Center.
Can you print over the network?
The network may be incorrectly configured.
1. Try connecting your computer directly to the device. If you are printing, the network configuration is the cause of the problem. See Troubleshooting network printer printing.
2. If the problem persists, contact the HP Customer Support Center.
Do you have problems printing from certain software applications?
The error may be caused by a software application.
Try printing from another program. If printing is in progress, the program is causing the problem.
Stapler problems
Jobs are stitched together?
The staple cartridge may be stuck.
The staple cartridge may need to be replaced.
Remove the staple cassette and check if it is jammed or empty.
If the problem persists, contact the HP Customer Support Center.
Email problems
Can you send attachments by email?
Is the message "E-mail gateway not responding" displayed on the control panel? Email not responding)?
The SMTP gateway may need to be reconfigured.
See Troubleshooting email.
Can you change the sender address in an email?
Your device may be configured so that you cannot change the sender address in an email.
You may need to sign in before you can change the sender address in an email.
To change these settings, use the Embedded Web Server.
Is it possible to change the file type or color setting in email attachments?
Change the settings using the control panel or the Embedded Web Server.
1. On the Control Panel, click Email, and then click More Options.
2. For information about changing settings using the Embedded Web Server, see Embedded Web Server.
Did you receive a "job failed" message when you tried to send an email attachment?
It is possible that the e-mail address to which the document is being sent is 1. incorrect.
The file might be larger than the maximum size allowed by the SMTP gateway.
Send a test email from your computer.
To change the maximum size allowed for email attachments, use the Embedded Web Server.
Fax problems
Is the Fax feature on the control panel grayed out?
You must specify the required settings before using the Fax function.
On the control panel, press
Administration, click Initial setup, and then click Fax Setup.
Configure the Country/Region, Date/Time, and Fax Header settings.
Is the Fax feature missing from the control panel?
The fax accessory may not be installed correctly.
Make sure the fax accessory is installed correctly and that none of the pins are bent.
Print a configuration page and check the status of the modem. Must be "Operational/
Enabled" If the modem status is different, then the problem is with the fax accessory.
Is the Fax feature set up correctly, but you cannot send faxes?
You must use the power cord supplied with the device.
The telephone cable may not be connected securely, or the telephone line may not be working.
The machine might be connected to a digital phone line instead of an analog phone line. Fax requires an analog phone line.
1. Always use the power cord that came with the device.
2. Check the telephone line, to do this, connect a telephone to it and make a call.
3. Make sure the device is connected to an analog phone line.
Is the Fax feature set up correctly, but you cannot receive faxes?
The line splitter or surge protector may be interfering with received faxes.
See Troubleshooting Fax.
1. Do not use line splitters or surge protectors.
3. Set the Fax Ownership to have fewer rings before answering.
4. Make sure the device is connected to a dedicated analog phone line. Do not use a twin line.
Troubleshooting general device problems
The machine is feeding media from the wrong tray.
The wrong tray may have been selected in the software.
For many programs, the tray can be selected from the Page Setup menu.
Remove media from all other trays so that the machine selects the correct media.
For Macintosh computers, use the HP Printer Utility to change the tray selection order.
The specified size does not match the size of the media loaded in the tray.
Adjust the paper width guides to match the size of the media loaded in the tray.
The machine does not pick up paper from the tray.
The tray is empty.
Load paper in the tray.
The paper guides are not set correctly.
To set the guides properly, see Loading media.
Tray 2, 3, 4, or 5 - Make sure the leading edge of the paper stack is even. Roughness may prevent the pressure plate from lifting.
Paper comes out curled.
Paper curled out of the top tray.
In the printer driver or on the control panel, select the shortest paper path.
Turn over the paper you are printing on.
Lower the printer fuser temperature to reduce curl.
The print speed may slow down automatically when printing on custom-sized media.
|
Job print speed is slow. |
|
|
Note. The speed may be slow when printing on small paper, when printing from Tray 1, or when using the High 2 fuser mode. |
|
|
Printing in progress PDF file or PostScript (PS), but the PCL device driver is used. |
Try using the PS device driver instead of the PCL device driver. (This can usually be done using software.) |
|
The job is printed on both sides of the paper. |
|
|
Duplex printing is enabled. |
|
Only one page is specified in the print job, but the device processes the reverse side as well (the page partially exits the device and then comes back).
Duplex printing is enabled. Even if the print job contains only one page, the reverse side will also be processed.
To change settings, see Opening printer drivers or online help.
Do not attempt to eject the page from the device until the duplex printing operation is completed. This may cause a jam.
Blank pages are printed.
The sealing tape has not been removed from it.
Remove and remove the sealing tape. Insert it into place.
The document may have blank pages.
Make sure the document does not contain blank pages.
Loose or damaged cable.
Disconnect the cable from the device and reconnect. Try printing a document that previously printed without errors. If possible, connect the cable and device to another computer and try to print a document that previously printed without errors. Finally, try using a new cable.
Printing is successful, but the text is incorrect, garbled, or incomplete.
The cable is defective.
If possible, connect the cable and device to another computer and try to print a document that previously printed without errors. Try using a different cable.
The device shows up on the network but is not receiving a signal. Check cable connections. Reinstall
software printer. Try printing a document that previously printed without errors.
Remove any stopped jobs from the print queue.
The device is not receiving mains power.
If the indicators are off, check the power cord connection. Check the power switch. Check the power supply.
The device is faulty.
Check the control-panel display for messages and indicators that indicate an error in the operation of the device. Remember (or write down) all messages, see Control Panel Messages.
Warning messages
Warnings report data and printing errors. Typically, these messages alternate with Ready or status messages and remain on the screen until the OK button is pressed. Some alerts can be removed from the screen. If Alerts to be cleared is set to Job in the device's Device Operation Options menu, the next print job will clear these messages.
Some error messages allow you to continue automatically. If the menu is set to Auto Continue, the unit will resume normal operation after this message has been shown on the display for 10 seconds.
Note If any key is pressed within these 10 seconds, the auto continue function determined by the displayed message is terminated and the function determined by the key pressed is executed. For example, pressing the Stop key pauses printing and prompts you to cancel the print job.
Critical Error Messages
Fatal error messages indicate a device failure. Some of these messages can be cleared by turning the device off and on again. These messages are not affected by the Auto Continue setting. If a critical error persists, maintenance is required.
10.XX.YY MEMORY POWER ERROR
The MFP cannot read or write to at least one e-label, or it is missing.
Reinstall or install a new one.
11.XX Internal clock error. Click OK to continue.
An MFP clock error has occurred.
After the MFP has been turned off and then on again, set the time and date on the control panel.
If the error persists, the printed circuit board may need to be replaced.
13.JJ.NT JAM IN TRAY 1
Tray1 has a media jam.
Remove jammed media from Tray1.
13.JJ.NT JAM IN TRAY 2
Tray2 has a media jam.
Follow the instructions in the dialog box.
13.JJ.NT JAM IN TRAY X
A media jam has occurred in the specified tray.
Follow the instructions in the dialog box.
13.JJ.NT JAM IN ENVELOPE FEEDER
A media jam has occurred in the envelope feeder.
Remove jammed media from the envelope feeder. Follow the instructions in the dialog box.
13.JJ.NT RECEIVER JAM
A media jam has occurred in the output tray.
Pull out the output tray and carefully remove the jammed media. Reinstall the output tray. Follow the instructions in the dialog box.
13.JJ.NT JAM INSIDE DUPLEXER Remove the duplexer from the lower left area.
13.JJ.NT JAM INSIDE TRAY 2 RIGHT DOOR
Media is jammed inside Tray2 behind the jam access door.
Follow the instructions in the dialog box.
13.JJ.NT JAM OPEN TRAYS
A media jam has occurred in one or more trays. Follow the instructions in the dialog box.
13.JJ.NT JAM UNDER TOP COVER
A media jam has occurred in the top cover area.
Follow the instructions in the dialog box.
13.JJ.NT JAM UNDER TOP COVER Remove it.
A media jam has occurred in the top cover area and must be removed to clear it.
Follow the instructions in the dialog box.
13.JJ.NT JAM UNDER TOP COVER Remove.
The media is jammed in several places under the top cover. Remove to clear jams.
Follow the instructions in the dialog box.
20 OUT OF MEMORY Press the OK button to continue.
The MFP has received more data than can fit in its memory. An attempt may have been made to transfer too many macros, fonts, or complex graphics.
Press OK to print the transferred data (some data may be lost), and then simplify the print job or install more memory.
21 COMPLEX PAGE Press the OK button to continue.
The page formatting process for the MFP was not fast enough.
If this message appears frequently, simplify the print job.
22 EMBEDDED I/O BUFFER OVERFLOW Click OK to continue.
Too much data was sent to the HPJetdirect Embedded Print Server.
Press OK to print the transferred data. (Some data may be lost.)
22 EMBEDDED I/O BUFFER OVERFLOW X Press OK to continue.
Too much data has been sent to the card in the specified slot (x). You may be using an inappropriate communication protocol.
Press OK to print the transferred data. (Some data may be lost.)
Check host computer configuration. If this message appears repeatedly, contact the authorized organization Maintenance HP.
30.1.YY SCANNER ERROR
An error has occurred in the scanner.
Check the scanner lock. Turn the MFP off and on again.
40 EMBEDDED I/O BUFFER TRANSFER ERROR Press OK to continue.
40 EMBEDDED I/O TRANSMISSION ERROR Click OK to continue.
The connection between the MFP and the card in the specified slot has been interrupted.
Press OK to clear the error message and continue printing.
40 SERIAL TRANSMISSION ERROR Press the OK button to continue.
An error occurred on the serial port while sending data to the computer (parity, framing, or line length error).
Press OK to delete the message. (Data will be lost.)
41.3 INCORRECT SIZE IN TRAY XX To use another tray, press the OK button.
The specified tray is loaded with media that has a feed side that is longer or shorter than the size configured for that tray.
Press OK to use another tray. Reconfigure the tray size so that the MFP uses the tray containing the media right size. If the message does not automatically clear from the control panel display, turn the MFP off and on again.
41.3 INCORRECT SIZE IN TRAY XX LOAD TRAY XX
This is most likely caused by two or more sheets of media stuck together in the MFP or the media tray is not properly adjusted.
Load the correct size media in the tray. Reconfigure the tray size so that the MFP uses a tray that contains media of the correct size. Follow the instructions in the dialog box.
41.3 MEDIA TOO SHORT CANNOT BE SENT FACE DOWN TO THE OUTPUT TRAY
The MFP cannot feed the selected media face down because it is shorter than the minimum media length.
Select the face-up output option, or load longer media into the tray. Resubmit the job. See Selecting print media.
41.3 MEDIA TOO SHORT DOUBLE-SIDED PRINTING IS NOT POSSIBLE
The MFP cannot duplex the selected media because it is shorter than the minimum media length.
Select single-sided printing or load longer media. Resubmit the job. See Selecting print media.
41.X ERROR Press OK to continue.
A temporary printing error has occurred.
Press OK to reset the error. If the error persists, turn the MFP off and then on again.
49.XXXXX ERROR To continue turn off then on the device.
A firmware error has occurred.
Disconnect third party devices.
50.X FUSER ERROR
A fuser error has occurred.
Make sure you are using the correct fuser. Reinstall the thermocouple. Turn off the MFP, then turn it back on.
If this message reappears, contact an authorized service organization.
51.XY ERROR To continue turn off then on the device.
A temporary printing error has occurred. Turn off the MFP, then turn it back on.
52.XY ERROR To continue turn off then on the device.
A temporary printing error has occurred. Turn off the MFP, then turn it back on.
53.XY.ZZ CHECK RAM DIMM SOCKET Press OK to continue.
There is a problem with the MFP's memory. The DIMM that caused the error will not be used. The following are the possible values for X:
X = device location
0 = installed memory
1 = socket 1
May need to reboot or replace specified module DIMM.
Turn off the MFP and replace the DIMM that caused the error. See Upgrading the printer's memory.
55.XX.YY DC CONTROLLER ERROR To continue, turn the unit off and on.
The print device does not communicate with the printed circuit board.
Turn off the MFP, then turn it back on.
56.X ERROR To continue turn off then on the device.
A temporary printing error has occurred. Turn off the MFP, then turn it back on.
If this message reappears, contact an HP authorized service organization. /p>
57.XX ERROR To continue turn off then on the device.
A temporary printing error has occurred. Turn off the MFP, then turn it back on.
If this message appears repeatedly, contact your authorized
Control Panel Messages
Control panel message
HP service organization.
58.XX ERROR To continue, turn off and on the device.
A temporary printing error has occurred. Turn off the MFP, then turn it back on.
59.XY ERROR To continue turn off then on the device.
A temporary printing error has occurred. Turn off the MFP, then turn it back on.
60.X ERROR To continue turn off then on the device.
The tray marked with an X does not lift properly.
Follow the instructions in the dialog box.
62.NO SYSTEM To continue, turn off and on the device.
There is a problem with the MFP firmware.
Turn off the MFP, then turn it back on.
64. ERROR To continue, turn off and on the device.
A scan buffer error has occurred.
Turn off the MFP, then turn it back on.
66.XY.ZZ OUTPUT DEVICE FAULT
An error has occurred in external device working with paper.
1. Turn off the MFP.
2. Make sure the device is properly installed and connected to the MFP and that there are no gaps between the MFP and the device. If the device uses cables, unplug them and plug them back in.
3. Make sure there is no packing material in or near the output device.
Control panel message
4. Turn on the MFP.
5. If this message reappears, contact an HP authorized service organization.
68.X NV MEMORY WRITE ERROR Press OK to continue.
Error writing to MFP non-volatile memory NVRAM. It is possible to continue printing, but there is a possibility of new features due to an error in the non-volatile memory.
68.X MEMORY ERROR PARAMETERS CHANGED Press OK to continue.
One or more MFP settings were incorrect and have been reset to factory settings. It is possible to continue printing, but there is a possibility of unpredictable functions due to an error in the non-volatile memory.
Press OK to reset the error. If the message does not clear, turn the MFP off and then on again.
68.X NV MEMORY OVERFLOW Press OK to continue.
The MFP's non-volatile NVRAM is full. Some parameters stored in NVRAM may have factory default settings. It is possible to continue printing, but there is a possibility of new features due to an error in the non-volatile memory.
Press OK to reset the error. If the message does not clear, turn the MFP off and then on again.
69.X ERROR To continue turn off then on the device.
A temporary printing error has occurred. Turn off the MFP, then turn it back on.
79. ERROR To continue, turn off and on the device.
A critical hardware error has occurred.
Turn off the MFP, then turn it back on.
Control Panel Messages
Control panel message
8X.YYYY JETDIRECT INTERNAL ERROR
A critical error has occurred on the HPJetdirect Embedded Print Server as indicated by message YYYY.
Turn off the MFP, then turn it back on.
8X.YYYY EMBEDDED I/O ERROR
The add-on card encountered a fatal error as reported in message YYYY.
Try the following to clear the message.
1. Turn off the MFP, then turn it back on.
2. Turn off the MFP, reinstall the card, and then turn on the MFP again.
3. Replace the accessory.
CURRENTLY NOT POSSIBLE FOR TRAY X TRAY SIZE CANNOT BE CUSTOM/CUSTOM
A 2-sided document was requested from Select a different tray or change
tray that is set to Any Size or Custom. Duplex printing is not allowed from a tray that is set to Any Size or Custom.
Control Panel Messages
Control panel message
configuration page.
Turn off the device and install HDD.
The requested job requires a hard drive, and the MFP does not have a hard drive installed.
Turn off the MFP and install the hard drive.
Out tray full
The specified output bin is full and printing cannot continue.
Unload the receiver to continue printing.
Paper exit path open
The paper path from the MFP to the output device is open. It must be closed before printing can continue.
1. If the receiver is set to 3 mailboxes, make sure the jam access door is closed.
2. If a stapler/stacker is installed, make sure the staple cartridge is fully inserted and the door is closed.
Authentication is required to use this feature.
You must enter a username and password. Enter your username and password, or contact your network administrator.
The Digital Sending service must be updated to support this version of the MFP firmware. Contact your administrator.
The Digital Sending Service is not supported by the firmware version installed on the MFP.
Check the firmware version.
Digital sending requires network connection. Contact your administrator.
Access Denied MENU LOCKED
The control panel feature you are trying to use is locked to prevent unauthorized access.
Contact your network administrator.
Load Tray 1 .
Load the envelope feeder.
The envelope feeder is empty.
Load envelopes into the feeder.
Close the top cover.
The top cover is open.
Close the top cover.
Close the right door.
The specified access cover is open.
Close the right doors.
Control Panel Messages
Control panel message
JAM IN DOCUMENT FEEDER
Remove the jammed media from the document feeder. Follow the instructions in the dialog box.
Jam in document feeder.
A media jam has occurred in the document feeder.
Follow the instructions in the dialog box. See Clear jams in the document feeder.
The document feeder tray is full.
The document feeder output tray holds 50 sheets of paper. The MFP stops working when the bin is full.
Remove paper from the document feeder output tray.
User name, job name, or PIN is not set.
One or more required items were not selected or entered.
Select the correct username or job name, or enter the correct PIN.
CANNOT COPY
The MFP cannot copy the document. If this message reappears, contact an HP authorized service organization.
To temporarily hide this message for faxing or emailing purposes, press IGNORE.
UNABLE TO SEND
UNABLE TO SEND JOB
To temporarily hide this message for faxing or emailing purposes, press IGNORE. If this message reappears, contact an HP authorized service organization.
Control Panel Messages
Control panel message
Cannot send a fax. Check your fax configuration.
The MFP cannot send a fax.
Contact your network administrator.
Incorrect reverse feeder connection
The envelope feeder is not attached correctly.
Remove and reinstall the envelope feeder. If this message reappears, contact an HP authorized service organization.
Incorrect duplex connection
The automatic duplexer is not properly attached to the MFP.
Remove and reinstall the device.
Invalid PIN. Enter a 4-digit number.
Wrong PIN format.
Enter a four-digit PIN.
Invalid PIN. Enter the PIN again.
PIN code entered incorrectly.
Enter the PIN again.
Not enough memory to download fonts/data Press OK to continue.
The MFP does not have enough memory to load data (such as fonts or macros) from the specified folder.
To continue without this message, click OK. If the message is repeated, increase the volume
No connection
To temporarily hide this message for faxing or sending e-mail, click Hide. If this message reappears, contact an HP authorized service organization.
The document feeder cover is open.
The document feeder cover is open.
Close the document feeder cover. Follow the instructions in the dialog box.
CLEANING DISK MEMORY % COMPLETE Do not turn off the device.
The hard drive is being cleaned up.
Contact your network administrator.
Selection error in document feeder.
An error occurred in the document feeder while feeding media.
Control Panel Messages
Control panel message
load more than 50 sheets or 20 pounds of paper in the document feeder.
Job Digital Submission failed. Job failed.
The digital send job failed. It cannot be sent.
Try sending the job again.
DUPLEXER ERROR Remove the duplexer. Install the duplexer in the turned off device.
The duplex unit has been removed.
Reinstall the automatic duplexer. (This may result in the loss of any print jobs in the MFP.)
SCAN ERROR Press the "Start" key to rescan.
Scanning was not performed properly, so the document must be rescanned.
If necessary, reposition the document before rescanning, and then press the Start key.
Connection error during digital send
An error occurred while digitally submitting a job.
Contact your network administrator.
Skewed in the document feeder.
The media in the document feeder is skewed.
Make sure the paper guides are aligned with the sides of the originals and that all originals are the same size. Remove any remaining media from the document feeder and close the document feeder cover. Follow the instructions in the dialog box.
Reinstall duplexer.
The automatic two-sided printing accessory has been removed and needs to be reinstalled.
Reinsert the automatic duplexer into the MFP.
Reinstall the output device.
The output device was removed or was not connected.
Make sure the output bin, 3-bin mailbox bin, or stapler/stacker is properly installed in the MFP.
Manual feed
The specified job requires manual feed from Tray1.
Load the required media in Tray1.
To override the message, press OK to use the same media type and size as the other tray.
Purchasing a cartridge
The number of pages has reached the lower limit. The MFP is set to stop printing.
To continue printing until the toner runs out, press OK.
Check the glass and remove any paper, then press START.
The scanner glass is in the digital send or copy job function, but the original needs to be ejected.
Remove the original from the scanner glass and press the Start key.
Check your device.
An output device error has occurred.
Remove and reinstall the output device. Check the indicator light on the device.
PAPER HAS BEEN WINDING ON THE THERMOELEMENT
A paper jam has occurred as a result of paper wrapping around the fuser.
Follow the instructions in the dialog box. See Clear jams.
Control Panel Messages
Control panel message
The authentication information is incorrect. Enter the information again.
Wrong username or password.
Enter the information again.
The digital sending server is not responding Contact your administrator.
The MFP cannot communicate with the server.
Check your network connection. Contact your network administrator.
TOO MANY PAGES IN JOB FOR STAPLER
The stapler can staple up to 30 sheets.
Jobs with more than 30 pages are stapled manually.
The Software Digital Sending service does not support this MFP. Contact your administrator.
The MFP cannot communicate with the specified IP address.
Check the IP address. Contact your network administrator.
Reinstall the output tray.
The standard output bin was disconnected when the MFP was turned on, or the stapler/stacker or 3-bin mailbox cable was not connected to the MFP.
Turn off the MFP. If you are using a stapler/stacker or 3-bin mailbox, make sure the cable is connected to the MFP. Reattach the output tray, and then turn on the MFP. Check the indicator light on the output device. If it's blinking or solid amber, see Troubleshooting general device problems.
The folder list is full. To add a new folder, you must first delete the existing one.
The number of folders that can be installed on the MFP is limited.
Delete the unnecessary folder to add a new one.
Authentication Required
Authentication is enabled for this feature or assignment. You must enter a username and password.
Enter your username and password, or contact your network administrator.
Novell registration required
Novell authentication has been enabled for this operation.
Enter your Novell network credentials to access the required feature.
The specified folder does not match.
The folder name was entered incorrectly or the folder does not exist.
Enter the correct folder name or add a folder.
Not supported by HP installed EconoMode is off.
Non-HP manufacturer installed or HP refilled.
Follow the instructions in the dialog box.
The email gateway is not responding. Job failed.
The gateway has exceeded the timeout value.
Check the IP address of the SMTP server. See Troubleshooting email.
The email gateway did not accept the job because the attachment is too large.
The size of the scanned documents has exceeded the server size limit.
Resend the job with a smaller file size, or send the job in parts.
Common causes of paper jams
The MFP is jamming media.1
Media does not match technical specifications.
Use media that meets HP specifications.
One of the components is not installed correctly.
Check if the installation is correct.
You are using media that has already passed through the MFP or scanner.
Do not use paper that has been previously used for printing or copying.
The input tray is not loaded correctly.
Remove excess media from the input tray. Make sure the stack of media does not exceed the maximum mark in the tray.
|
Media is skewed. |
The input tray guides are not adjusted correctly. Adjust them so that they fit snugly on the stack without curling the sheets. |
|
Media sheets are stuck together. |
Remove the media, fold the stack, rotate it 180°, or flip it over. Reload the media in the input tray. |
|
The media is ejected before it enters the output bin. |
Restart the MFP. Wait until the page has completely exited the output bin before removing it from the MFP. |
|
During 2-sided printing, the paper is ejected before the document is printed on the second side. |
Restart the MFP and print the document again. Wait until the page has completely exited the output bin before removing it from the MFP. |
|
Poor media quality. |
Replace media. |
|
The inner rollers of the tray do not pick up the media. |
If the media weight is over 120 g/m2, it may not come out of the tray. |
|
The media has rough or jagged edges. |
Replace media. |
|
Media sheets are perforated or embossed. |
Perforated or embossed media is not easy to separate. Feed sheets one at a time from Tray 1. |
The MFP is nearing the end of its life.
Check the MFP control panel for replacement warning messages, or print a status page to check the remaining life. See Using Information Pages.
The paper was stored incorrectly.
Replace paper in trays. Paper should be stored in its original packaging in a controlled environment.
The MFP packaging material has not been completely removed.
Make sure the packing tape, cardboard, and plastic shipping locks are removed from the MFP.
1 If the MFP continues to jam media, contact an HP Authorized Service Provider or HP Customer Support.
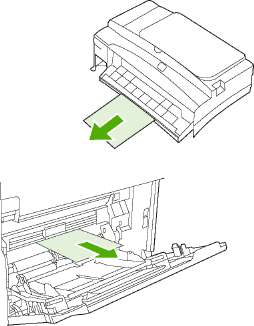
Clear jams
If a message appears on the control panel display, check for paper or other media jams in the locations shown in the illustration.
Top cover
Envelope Feeder and Tray 1 Area (Envelope Feeder is optional)
Tray 2 and optional 500-sheet tray
Duplex Printing Area (Duplexer is optional)
Paper output area
Document feeder
The following table lists jam messages that may appear on the control-panel display. You may need to check for the jammed media in the other locations that were listed in the jam message. If the jam is difficult to locate immediately, check the top cover area first.
When clearing a jam, be careful not to tear the print media. If a small piece of media remains in the device, it may cause new jams.
After a paper jam, toner particles may remain in the machine, which may cause poor print quality. Normal quality will resume after a few pages have been printed.
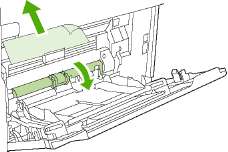
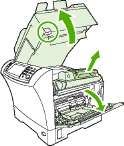
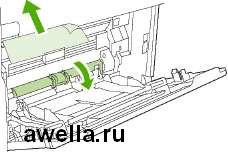
Clear jams under the top cover
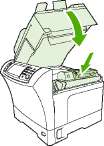
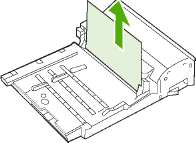
Jams that occur during printing can be cleared by the following method. 1. Open the cover and take it out.
To prevent damage, do not expose it to light for more than a few minutes. Cover with a sheet of paper while it is outside the device.

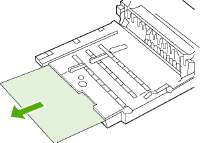
3. Gently pull the jammed media out of the device. Don't tear the paper.
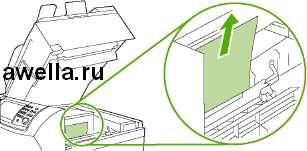
If the jammed print media is difficult to remove, open Tray 1 and remove the envelope cover. If a media jam is found, remove it.
Rotate the paper stop to check if there is any jammed media at the bottom of the printer. If jammed paper is found, remove it.
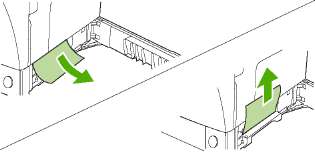
Clearing Paper Jams in the Optional Envelope Feeder
This section only applies to jams that occur when using the optional envelope feeder.
1. Remove any envelopes loaded in the envelope feeder. Reduce the weight of envelopes and lift the extension up until it is in the closed position.
2. Press and hold the release button on the left side of the optional envelope feeder. Grasp the optional envelope feeder on both sides and carefully pull it out of the machine.

3. Gently remove any jammed envelopes from the optional envelope feeder and machine.
Insert the optional envelope feeder into the machine until it stops. Gently pull on the optional envelope feeder to make sure it is secure.
5. Lower the envelope feeder tray. Increase the overall weight of the envelopes.
6. Reload the envelopes, pushing the bottom envelopes slightly further than the top ones.
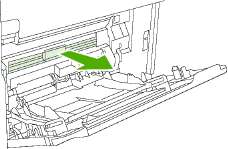
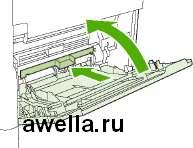
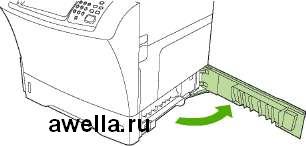
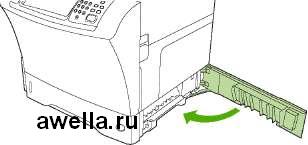
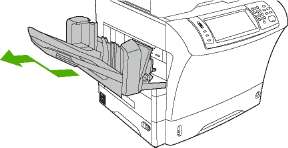
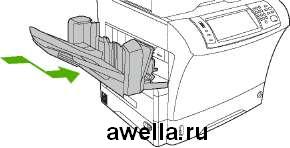
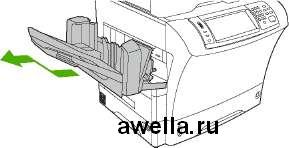
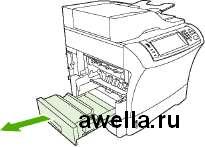
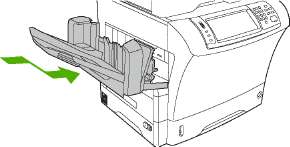
Clear the jam in the Tray 1 area
Use this procedure to clear jams in the Tray 1 area. 1. Open the top cover, open Tray 1, and remove.
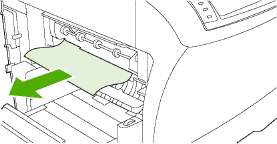
2. Use the green lever to lift the paper access cover.
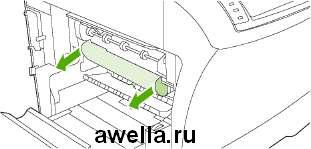
3. Gently pull the jammed media out of the device. Don't tear the paper. If part
paper is already pulled into the machine, follow the procedure in Clearing jams in the top cover.
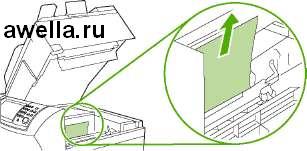
4. If the jammed substrate is difficult to remove, remove the cover covering the envelope feeder. If a media jam is found, remove it.

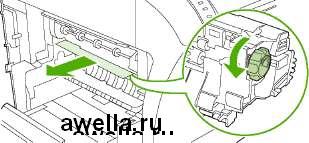
5. Turn the paper stop to check if there is any jammed media at the bottom of the printer. If jammed paper is found, remove it.
6. Reinstall the envelope feed cover and close Tray 1.
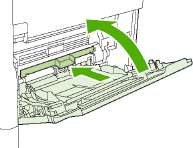
7. Reinstall and close the top cover.
8. If the paper jam message reappears, there is media jammed in the machine. Check if the jam is elsewhere.
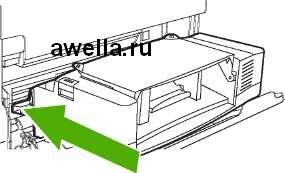
Clear jams in Trays 2, 3, 4, and 5
Use this procedure to clear jams in the Tray 2 or optional 500-sheet feeder area.
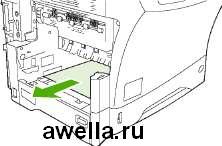
1. Pull the release lever to open the jam access cover.
2. Gently remove the jammed media from the top or bottom area to expose the jams.
Note To avoid tearing the paper and preventing toner from entering the machine, pull the media up or down.
3. Close the cover to access the jam.
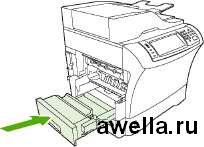
4. Pull the tray completely out of the machine and remove the damaged media from the tray.
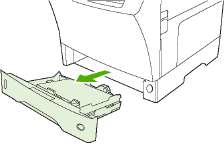
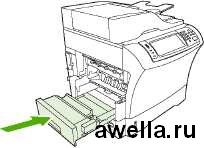
5. Slide the tray into the machine.
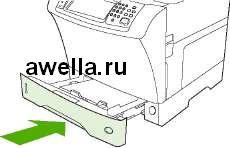
6. If the paper jam message reappears, there is media jammed in the machine. Check if the jam is elsewhere.
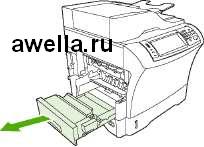
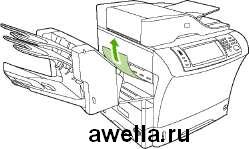
Clear jams in the optional duplexer
If a jam occurs during automatic two-sided printing, follow the procedure below to clear it.
1. Remove the output bin (either the stapler/stacker or mailbox).
2. Remove the optional duplexer.
3. Check for jammed paper in the optional duplex unit. Gently pull out the jammed paper.
4. Set aside the duplexer.
5. Check for jammed paper inside the machine. Gently pull out the jammed paper.
6. Replace the duplexer.
7. Replace the output bin (either the 3-bin mailbox or the stapler/stacker).
8. If the paper jam message reappears, there is media jammed in the machine. Check if the jam is elsewhere.
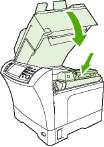
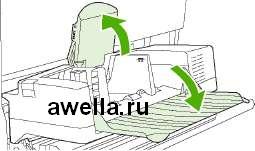
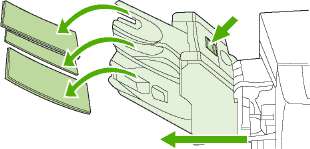
Clear jams from paper output areas
Follow these steps to clear jams in the output bin, 3-bin mailbox bin, and stapler/stacker.
1. If you are using the standard output bin, slide it out of the machine.
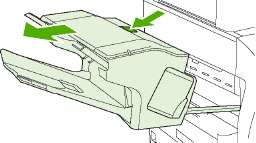
2. If you are using the 3-bin mailbox or stapler/stacker, remove all paper from the bin, and then press and hold the release button on the top of the product. Remove the receiver from the device.
3. If the jammed media is inside, gently pull it out of the device.
If the jammed media is inside the 3-bin mailbox or stapler/stacker, gently pull it up and out of the device.
When using the 3-bin mailbox, jammed media may be completely inside the machine. Open the jam access door on the top of the 3-bin mailbox and carefully remove any jammed paper.
6. Replace the output bin, 3-bin mailbox, or stapler/stacker. Insert the device at an angle and then slide it inward.
7. If the paper jam message reappears, there is media jammed in the machine. Check if the jam is elsewhere.
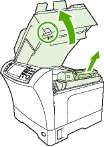
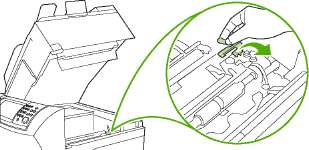
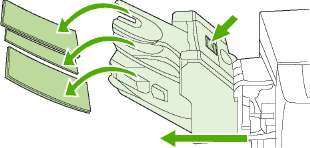
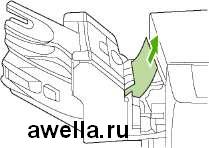
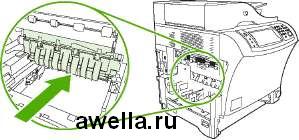
Clear fuser jams
Follow these steps to clear jams in the fuser area. 1. Turn off the device and wait 30 minutes for it to cool down.
Fuser temperature is too high. To avoid burns, wait 30 minutes for the fuser to cool before continuing with this procedure.
2. If using the standard output tray, grasp the handle on the bottom and pull the tray towards you and then up to remove it.
3. If you are using the 3-bin mailbox or stapler/stacker, remove all paper from the bin, and then press and hold the release button on the top of the device. Set the device aside.
4. Remove the optional duplexer or remove its cover.
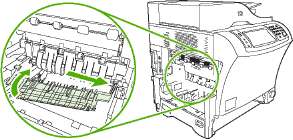
5. If you do not see jammed media inside the fuser, go to step 9.
6. If you can see the top or bottom of the jammed media inside the fuser, gently pull the media out.
If you can see the jammed media but not the top or bottom of the media, gently pull on the sides until one of the ends comes free. Then carefully pull the jammed media out of the fuser.
If the media tears when you try to pull it out, rotate the green dial on the fuser, and then carefully remove the jammed media. Go to step 13.
9. To remove the fuser cover guide, press the left edge to release the left latch. Then slightly lift the fuser door guide and remove it from the unit. Place your index fingers on the blue levers located at the bottom of the fuser on both sides. Place your thumbs on the grip points on both sides of the fuser. Press the blue levers and remove the fuser from the device.
10. Open the black cover on the top of the fuser and remove any jammed media.
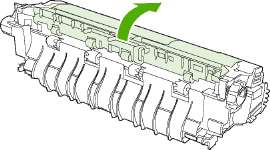
11. Reinstall the thermocouple. Press it down with your thumbs until it clicks into place.
12. To replace the fuser door guide, first insert the right latch into the hole, then lower and insert the left latch into the hole.
13. Replace the optional duplexer or its cover.
14. Replace the output bin, 3-bin mailbox, or stapler/stacker. Insert the device at an angle and then slide it inward.
15. If the paper jam message reappears, there is media jammed in the machine. Check if the jam is elsewhere.
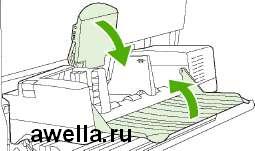
Clear jams in the document feeder
Follow these steps to clear jams in the document feeder.
1. Raise the document feeder input tray and check for any jammed media underneath. Carefully remove any jammed paper.
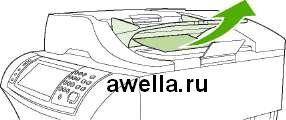
2. Press the document feeder cover release lever and open the cover. Carefully remove any jammed paper.
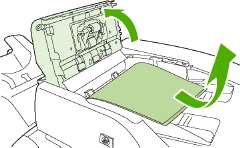
3. Raise the green document guide lever and check for any jammed media. Carefully remove any jammed paper.
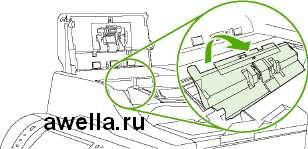
4. Close the document feeder cover.
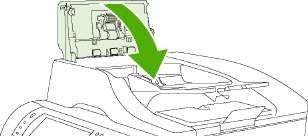
5. If the paper jam message reappears, there is media jammed in the machine. Check if the jam is elsewhere.
Clear repeated jams
Common Mistakes Related to Repetitive Jams
1. Make sure the media is loaded in the trays correctly and the paper width guides are set correctly (see Loading media).
2. Make sure the tray is set up for the size and type of media loaded and that it is not overloaded.
3. Try turning over the stack of media in the tray. For prepunched paper or letterhead, try using Tray 1.
4. Do not use media that has been printed on, or is torn, damaged, or irregular in shape. See Selecting print media.
5. Check media specifications. (See Selecting print media.) If the media does not meet its specifications, problems may occur.
6. There may be dirt in the device. Clean your device as described in Cleaning your device.
7. Make sure that any jammed or damaged media is removed from the device.
Repeated jams in the document feeder
1. There may be dirt in the document feeder. Clean the document feeder as described in Cleaning the Document Feeder.
2. Make sure the media is loaded flat and the media width guides are at the edges of the stack.
3. Make sure that no more than 50 sheets of 75 g/m2 paper are loaded in the document feeder.
4. If the original is folded or stapled in the middle, flatten it as much as possible and smooth out any wrinkles. Make sure the pages are not stuck together where the staples were.
5. Media that has been pre-punched or pre-punched may cause problems when feeding into the machine. If the top edge of the document is severely torn or frayed, try rotating it 180 degrees before copying.
If jams persist, contact an HP Authorized Service Provider.
Checking the Paper Path
This test will verify that all paper paths are working properly and troubleshoot tray setup issues.
1. Scroll through the list and click Administration.
2. Scroll through the list and click Troubleshoot.
3. Scroll through the list and touch Check Paper Path.
4. Click Print Test Page.
Fixing stuck parentheses
The built-in stapler is designed so that staples cannot get stuck in it. To reduce the chance of staple jams, make sure the media meets the following specifications.
Plain media: 30 sheets of 75 g/m2 paper Glossy media: 20 sheets
Thick media (weight 128-199 g/m2: Paper stack height should not exceed 3 mm)
Staples sometimes get stuck in the optional stapler/stacker. If jobs are not stapled properly or not stapled at all, follow these steps to clear staple jams.
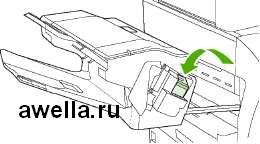
1. Turn off the device.
2. Press and hold the release button on the top of the stapler/stacker. Pull the stapler/stacker out of the machine.
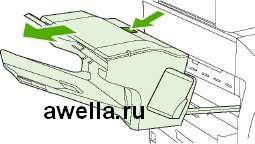
3. Open the cover.
4. To remove the staple cartridge, pull up on the green handle and pull it out.
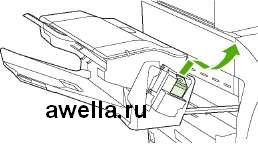
5. Raise the small lever at the back.
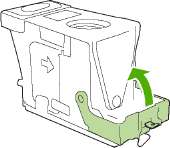
6. Remove the staples that are protruding from the staple cartridge.
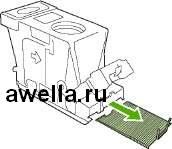
7. Close the lever at the back. Make sure it clicks into place.
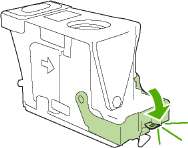
8. Reinsert the staple cartridge into the staple cartridge holder and push the green handle until it clicks into place.
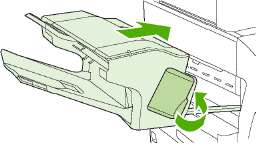
9. Close the cover and pull the stapler/stacker out of the machine.
Troubleshooting Print Quality
In most cases, print-quality problems are easily resolved through proper maintenance, using HP-compliant media, or running a cleaning page.
Print quality issues related to media
Using inappropriate media may result in poor print quality.
Use media that meets HP specifications. See Selecting print media.
The surface of the media is too smooth. Use media that meets HP specifications. See Selecting print media.
The structure of the carrier is not uniform in terms of humidity: too high or too low. Use media from another source or from a freshly opened pack.
Some areas of the media do not fuse toner. Use media from another source or from a freshly opened pack.
The letterhead used is printed on rough media. Use smoother copy media. If the problem persists, order media from a letterhead supplier that matches the specifications of your MFP. See Selecting print media.
Too rough media. Use smoother copy media.
Selected wrong setting drivers. To change the media type setting, see Managing print jobs.
The media is too thick for the selected option, and the toner is not fixed to the media.
Environmental Print Quality Issues
If the printer is operating in a high humidity or extremely dry climate, make sure that the humidity of the room where the printer is located is within the allowed range. See Environment for printing and paper storage.
Jam-Related Print-Quality Problems
Make sure all sheets are clean after being fed through the MFP. See Clear jams.
After a media jam, test print two to three pages to clean the MFP.
If the sheets do not pass through the fuser and cause image defects on other documents, print three pages to clean the MFP. If the problem persists, run the cleanup page. See Cleaning the device.
Examples of Image Defects
Use the table below, which contains examples of image defects, to determine what problem you are experiencing, and then read the appropriate sections of this guide to troubleshoot the issues you find. These examples describe the most common print quality problems. If the problem persists after following these suggestions, contact HP Customer Support.


Fading print (part of page)
2. The toner may be low.
3. The media may not meet HP specifications (for example, it is too damp or rough).
Light print (full page coverage)
1. Check if the installation is correct.
2. Make sure Economode is disabled in both the MFP control panel and the printer driver.
3. Open the Administration menu on the MFP control panel. Open the Print Quality menu and increase the Toner Darkness setting.
4. Try a different media type.
5. Perhaps it is almost empty. Replace it.
dots
Mottling may appear on paper after clearing jams.
3. Try a different media type.
4. Check for toner leakage. If it is leaking toner, replace it.
Toner skips

1. Verify that the environmental conditions meet the specifications of the MFP. See Environment for printing and paper storage.
2. If you are using media with a rough surface that could easily rub off the toner, open the Administration menu on the MFP control panel. Open the Print Quality menu, select Fuser Modes, and select the type of media you are using.
3. Try using smoother media.
vertical lines
1. Print a few more pages and see if the problem goes away on its own.
2. Clean the inside of the MFP and run the cleaning page.
3. Replace it.
Gray background
1. Do not use media that has already passed through the MFP.
3. Print a few more pages and see if the problem goes away on its own.
5. Open the Administration menu on the MFP control panel. In the Print Quality menu, increase the Toner Darkness setting.
7. Replace.
Toner smearing
1. Print a few more pages and see if the problem goes away on its own.
2. Try a different media type.
4. Clean the inside of the MFP and run the cleaning page.
5. Replace.
Toner shedding

Excess toner is considered here as toner that can be wiped off the page.
1. If the media is heavy or has a rough surface, open the Administration menu on the MFP control panel. From the Print Quality submenu, select Fuser Modes and select the type of media you are using.
2. If you can tell from the look that one side of the media is rougher, try printing on the smoother side.
3. Verify that the environmental conditions meet the specifications of the MFP.
4. Verify that the media type and quality meet HP specifications.
Recurring defects
1. Print a few more pages and see if the problem goes away on its own.
2. If the distance between defects is 44mm, 58mm or 94mm, it may need to be replaced.
3. Clean the inside of the MFP and run the cleaning page.
See also section Duplicate images.
Duplicate images
Similar defects can occur when using ready-made forms or a large amount of narrow media.
1. Print a few more pages and see if the problem goes away on its own.
3. If the distance between repeated images is 44mm, 58mm, or 94mm, it may need to be replaced.
Character Shape Distortion
1. Print a few more pages and see if the problem goes away on its own.
Page skew
1. Print a few more pages and see if the problem goes away on its own.
2. Make sure that no torn media is left inside the MFP.
3. Verify that the media is loaded correctly and that all necessary settings are correct.
4. Turn the stack over in the tray with the other side facing up. Also try rotating the stack 180°.
6. Verify that the environmental conditions meet the MFP specifications.
7. On the MFP control panel, open the Administration menu and align the tray. From the Print Quality submenu, touch Set Registration. Select a tray under Source (Source) and run a test page.
Bending or twisting
1. Turn the stack over in the tray with the other side facing up. Also try rotating the stack 180°.
2. Make sure the media type and quality meet HP specifications.
3. Verify that the environmental conditions meet the specifications of the MFP.
4. Try printing using a different output bin.
5. If you are using lightweight media with a smooth surface, open the Administration menu on the MFP control panel. From the Print Quality submenu, touch Fuser Options and select the type of media you are using. Select Low to reduce fuser heating.
Creases and wrinkles

1. Print a few more pages and see if the problem goes away on its own.
2. Verify that the environmental conditions meet the specifications of the MFP.
4. Verify that the media is loaded correctly and that all required settings are correct.
5. Verify that the media type and quality meet HP specifications.
6. If the envelopes are wrinkled or wrinkled, press down on them to flatten them.
If these steps do not resolve wrinkles or wrinkles, open the Administration menu on the MFP control panel. From the Print Quality submenu, select Fuser Modes and select the type of media you are using. Select Low to reduce fuser heating.
white vertical lines

1. Print a few more pages and see if the problem goes away on its own.
2. Make sure the media type and quality meet HP specifications.
3. Replace.
Strip tracks
This defect usually occurs when the cartridge has significantly exceeded its stated life. For example, this happens when printing a large number of pages with very low toner consumption.
1. Replace.
2. Reduce the number of pages that print with very low toner consumption.
White spots on a black background
1. Print a few more pages and see if the problem goes away on its own.
2. Make sure the media type and quality meet HP specifications.
3. Verify that the environmental conditions meet the specifications of the MFP.
4. Replace.
smudged lines
2. Verify that the environmental conditions meet the specifications of the MFP.
3. Turn the stack over in the tray with the other side facing up. Also try rotating the stack 180°.
4. Open the Administration menu on the MFP control panel. Open the Print Quality submenu and change the Toner Darkness setting.
5. Open the Administration menu on the MFP control panel. From the Print Quality submenu, open Optimization and set Line Info=On.
Blurred seal

1. Make sure the media type and quality meet HP specifications.
2. Verify that the environmental conditions meet the specifications of the MFP.
3. Turn the stack over in the tray with the other side facing up. Also try rotating the stack 180°.
4. Do not use media that has already passed through the MFP.
5. Reduce the toner density. Open the Administration menu on the MFP control panel. Open the Print Quality submenu and change the Toner Darkness setting.
6. Open the Administration menu on the MFP control panel. From the Print Quality submenu, open Optimization and set Transfer Speed=On.
Random image repetition
If the image on the front of the page (solid black) appears further down the page (as a gray patch), the toner may not have been completely removed from the last print job. (The repeating image can be lighter or darker than the field where it repeats.)
Change the tone (intensity) of the field where the repeated image appears.
Change the order in which images are printed. For example, place a lighter image at the top of the page and a darker one at the bottom.
Rotate the entire page 180° in the software application to print a light image first.
If the defect persists while the job is printing, turn off the MFP for 10 minutes and then turn it back on to resume the print job.
Troubleshooting network printer printing
HP recommends that you use the product CD to install and configure the product on a network.
Print a configuration page (see Using Information Pages). If an HP Jetdirect print server is installed, the configuration page will also print a second page with the network settings and their status.
For help and more information about the Jetdirect configuration page, see the HP Jetdirect Embedded Print Server Administrator's Guide on the product CD. To open the manual, insert the CD, click Printer Documentation, click the HP Jetdirect Manual, and then select Troubleshooting the HP Jetdirect Print Server.
Try printing the job from another computer.
To make sure the device works with the computer, connect the device directly to the computer with a USB cable and reinstall the software. Print the document from a program that previously printed normally. If you were able to print your document, there may be a network problem.
Contact your network administrator for help.
Troubleshooting copying
Avoid copying problems
You can improve copy quality by following the guidelines below.
Use the flatbed scanner to copy. This will produce higher quality copies than when you copy using the automatic document feeder (ADF).
Use high quality originals.
Load media correctly. If the media is loaded incorrectly, the page may enter the device skewed, resulting in loss of image quality and problems with the OCR program. For more information, see Load media.
To protect originals, use a ready-made or homemade backing sheet.
Make sure the media meets HP specifications. If the media meets HP specifications, persistent misfeeds are an indication that the pickup roller or pickup plate is worn. Contact HP Customer Support.
What once made Windows users feel boundless - setting up a printer - is now a relatively simple task. Gone are the cables of that awful parallel interface, and are replaced by reliable USB cables and built-in modules for wireless networking. However, there are two tricks in Windows 7 that can cause headaches even for users of the latest printers and auto-installed drivers.
The first hurdle you'll have to overcome in trying to get the printer to work is clearing the print queue. A print queue is a set of documents that will be printed on a specific printer. For years, the print queue has been one of the most poorly made tools in the system, and in Windows 7, unfortunately, the situation has not improved. For example, try deleting (cancelling) one or more documents from the failed printer's print queue - you'll have to wait ages before this happens!
The solution is to forcibly clear the print queue. Open the Services window (Services, services.msc), right-click the Print Spooler service, and select Stop from the context menu to stop the service. Now open Windows Explorer, navigate to the \Windows\System32\spool\printers\ folder and delete all the files it contains. After making sure that the printers folder is empty, return to the Services window again, right-click the Printer Spool service, and select Start to enable the service again.
How to uninstall the printer driver
The second problem with Windows 7 is the lack of an easy and obvious way to uninstall the printer driver, which is the number one ingredient in a complex fix recipe. Windows printer 7. Of course, you can remove the printer itself: right-click on its icon on the Devices and Printers page in the Control Panel and select the Remove device command from the context menu. However, the driver will not be deleted - only the device instance in the Control Panel will disappear. Before you can blink an eye, thanks to Plug and Play technology, the device will reappear with the same failed driver that you wanted to get rid of.
To fix the problem, open the Print Server Properties window: if there is at least one printer in the Devices and Printers list, select it and click Print Server Properties in the horizontal bar at the top window. (If there is no such button, type printui /s /t2 in the Start menu search box and press Enter.)
The printer driver cannot be uninstalled if it is being used by the printer. Before continuing, delete the printer instance in the Devices and Printers window.
Now go to the Drivers tab, select the driver you don't need and click Remove. In the Remove Driver and Package window, select the Remove driver and driver package option and click OK. Click on the Yes button, confirming that you are absolutely, completely sure that you want to remove this stupid driver, and finish the job in the next window by clicking on the Delete button.
When finished, restart Windows and reconnect the printer; this time a window will pop up asking for the driver and you can install something that will actually work.