By popular demand, today I will give a brief but informative instruction on how to create a direct Wi-Fi connection between computers on which Windows 7 is installed and combine them into a grid, that is, open general access to folders on both computers. Go!
First, we follow the same steps that have already been discussed in the article about. Namely:
Please refer to your provider's documentation for information on how to share files or directories. Physically separate the file by cloud provider. . Every time you share a file, it changes. Keep in mind that the file must be synced with your cloud provider.
If you share multiple files, make sure all files are fully synced. Just as encryption properties are inherited, permissions are also inherited from the main directory. When you add a file to a shared directory, anyone you share the directory with has access to that file.
1. After turn on wifi modules on both computers, go to the "Start > Control Panel > System and Security > System" section. Under Computer name, domain name, and settings working group"Go to the "Change settings" page and then click "Change". Default on Windows home group is called WORKGROUP - you can leave it, but check that on the second computer it is called exactly the same. I gave her the name "homelocal"
Encrypts and encrypts access rights for Alice and encrypts access permission for Bob and access authorization for Alice and Bob. We recommend that you do not transfer encrypted folders directly to other people. In particular, if you've enabled filename encryption, it's best to move the encrypted folder to an unencrypted folder and free it.
New files or folders
Existing unencrypted files or folders
Existing encrypted folders. Add the users or groups you want to share the file or folder with and confirm that the changes are synced by your cloud provider.- Create an encrypted folder in this root folder.
- Give it to the cloud provider.
- Create a new encrypted folder in this root folder.
- Click right click mice on.
- Copy existing unencrypted files to an encrypted folder.
- Delete existing unencrypted files.
- Split the unencrypted root folder per cloud provider.
- Create a new unencrypted root folder.
- Move the encrypted folder to this root folder.
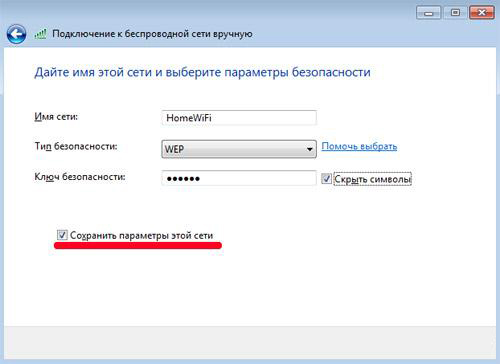
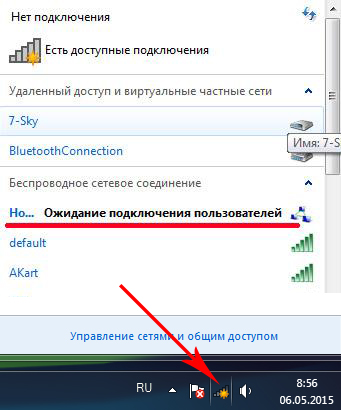
5. Go to the second computer and connect via wifi to this new network by entering her password. We indicate that this network is "Home"
In the Benefits of Groups section. Groups are a way to manage your users and their access rights. Unauthorized operations such as renaming, deletion, or ownership can only be granted and revoked by the owner of the group. You can set other members as owners and take ownership away from them.
Groups can have multiple different owners. You can distinguish owners and other members from the font: Owners are in bold, other members are shown in normal font. In addition to sharing files with individual accounts, you can also share files with a group of users. When you share a file with a group, the cryptographic key is encrypted with the group key and stored in the file.
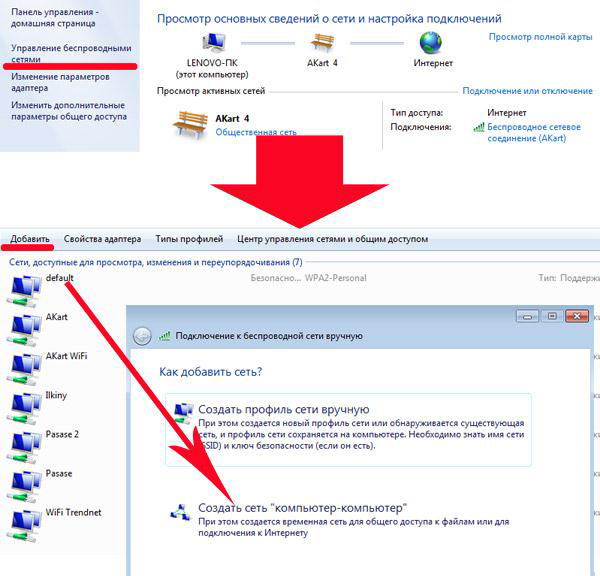
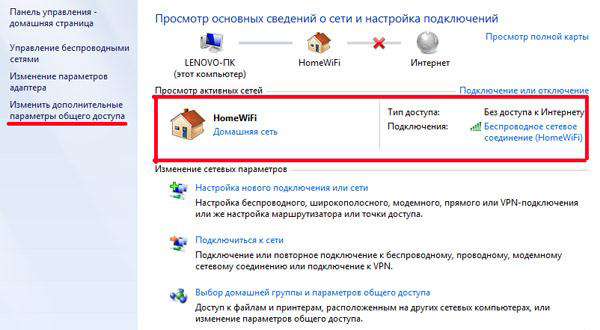
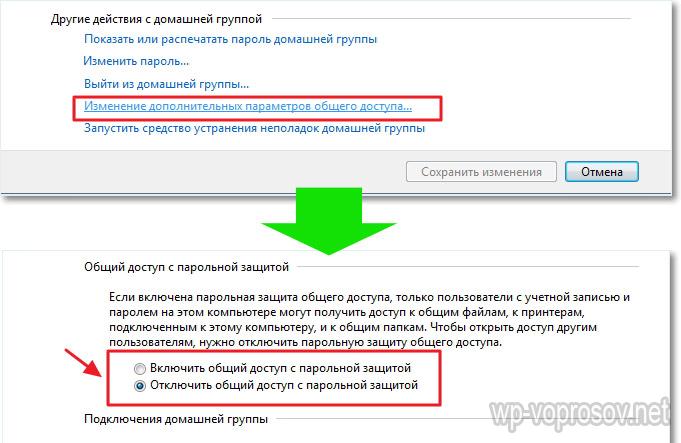
6. We return to the "Network and Sharing Center" on the first computer and go to the "Change advanced sharing settings" section.
7. Here you need to configure unobstructed folder sharing on this computer- wherever there is a similar setting, check the boxes for permission. Also disable "Password protected access".
Centralized Management: You don't have to click on all your files to view, share or remove access to anyone. No synchronization required: When you add or remove someone to a group, the changes are only made to your computer and servers.
- Thus, these changes can be made much faster.
- Since the authorizations within the files do not change, synchronization is not required.
8. We do the same on the second computer, starting from step 4.
How to open shared folders in Windows 7?
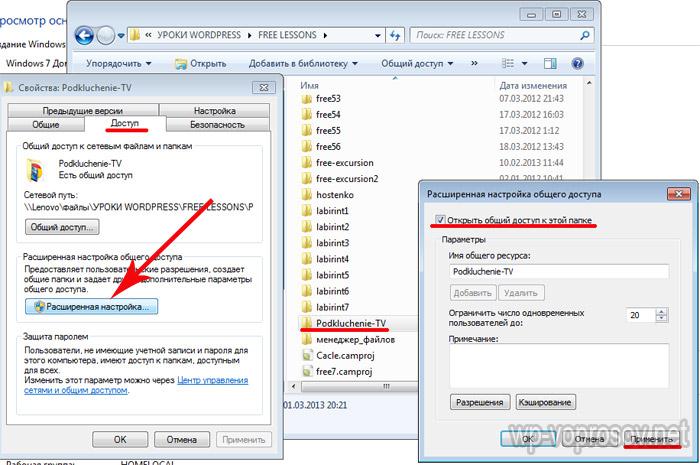
9. The only thing left is to share a folder. To do this, we find in the explorer desired folder, right-click on it and go to "Properties > Access > Advanced settings". Check the box "Share this folder" and save the setting with the "Apply" button.
Some apps are free, while other paid subscriptions offer large capacity, faster service or more security. File sharing is a very common activity for most online users, but file sharing also makes you vulnerable to various online threats, including identity theft, infections, or attacks. Here are a few useful tips to help you learn about the dangers of releasing files and how to prevent a malicious attack.
Peer-to-peer file sharing applications can compromise your personal data. Basically share data with people they know or deal with. But how can you identify the identities of these people on the Internet? In truth, it's almost impossible to test the source in file sharing apps. This means that the user on the other end may not be who you suspect.
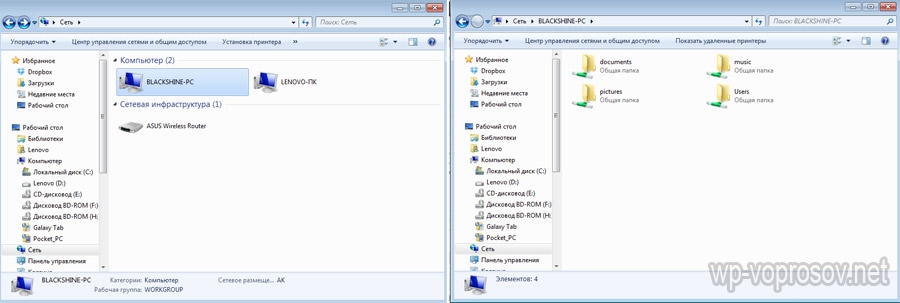
10. Do the same with all the folders that need to be shared on both computers. After that, going to the "Network" section, you will see both computers, and going inside them - shared shared folders on Windows 7.
In the case of illegal downloads such as music and movies, users download content without knowing the source. In both cases, there are security risks that can put you and your personal data at risk. Attackers use file sharing applications to install spyware, malware, viruses, trojans, and worms. To do this, you associate the content you want with these threats. When you upload content, you open the door to all possible security risks and without proper protection, you can lead to numerous security breaches.
That, in fact, is all. If you can’t connect to go into these folders, then try rebooting and connecting again, or disable firewalls - built into Windows or from third-party antiviruses - they can block your attempts to connect.
Finally - how to do the same, but on Windows XP
In addition, some file sharing interfaces display folders on your computer in such a way that attackers can also see data that you do not want to use. In addition, you may voluntarily share personal data, considering it safe, since the data is sent directly to known sources. The security features in file sharing apps don't deter all criminals, especially as attackers are constantly evolving online. If you want to protect files, don't share them.
Finally, some file sharing applications require open ports in your firewall. Firewalls are used to encrypt incoming and outgoing communications on your computer so that intruders cannot see what you are sending or receiving. By opening this barrier to allow downloaded content to be downloaded, you may expose your computer to the risk of attack.
In the operating room Windows system, which is multi-user, it is possible to restrict access of individual users to folders of other users located on a public partition hard drive. This is convenient because users will only have access to those resources that the administrator allows. For example, you want to restrict your child's access to folders that contain negative information.
When using file sharing apps, you can keep your personal data secure for yourself and your families most easily by keeping an eye on what is being sent and what you are downloading. The same can be said for the content you upload: do not share illegal or pirated content, download such content, and notify your children of the risks associated with it. If illegal content is found to have been shared or uploaded within your household - and unintentionally - as a parent, you could face fines or severe legal consequences.
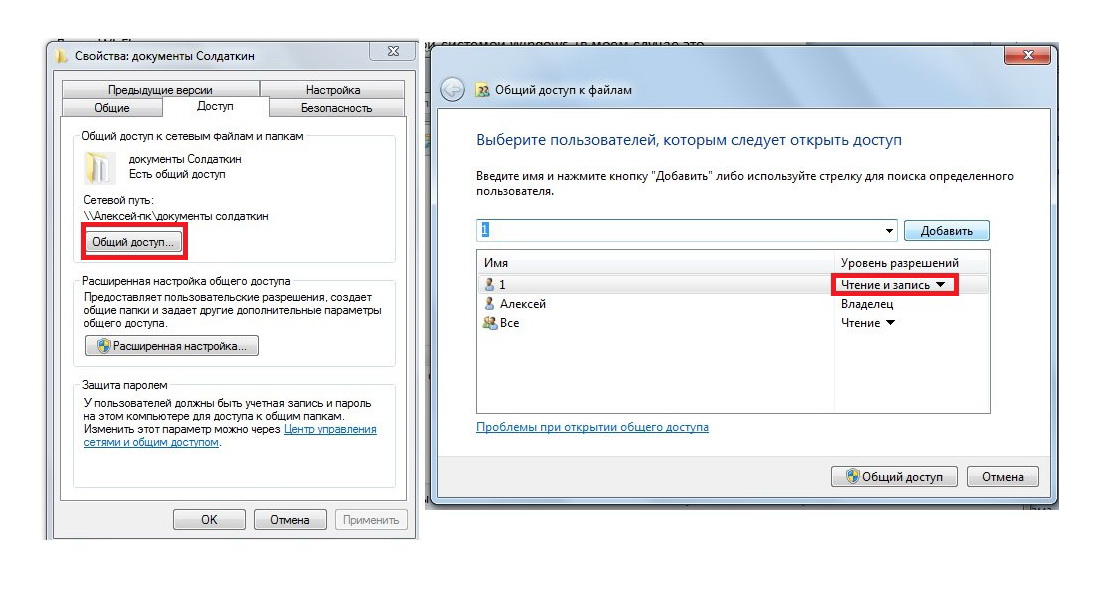
To configure access to a folder, go to the properties of this object. To do this, right-click on the folder and select the item in the drop-down menu ( Properties). Or click on the menu item ( File) Windows Explorer and select ( Properties). Then go to the tab ( Security). Here you will see that access to a particular folder is set by default to all users. To change access for a particular user, you must first add it to the list of users. Click the button (Change) and in the new window click on the button (Add). Here you should enter the username, as it is registered when logging in. If the user is located in another domain, then you should also select his location. For this, the corresponding button is used. After the name is entered, confirm all changes and press the button (OK).
If company ownership is used to upload or distribute illegal content, it may result in litigation prior to termination. Pay attention to what your kids are doing online and clean them up to avoid dangerous behavior. Think not only about what you need to report about file sharing apps, but also about what is best, but also make sure the antivirus software installed, activated and updated. Antivirus software scans your computer for incoming threats and detects most viruses, provided that it is always up to date.
The username should now appear in the list ( Groups or Users). Select a user and in the permissions area, check the appropriate checkboxes opposite the rights that the user should have for a particular folder. If you need to prohibit access to the folder, then put all the checkboxes in the column ( Deny). Confirm the changes and click (OK), the system will warn you that the rights ban has more than high priority before resolution. That is, it turns out that all other users will have full access to the folder, and the selected user will have a ban on access to the folder, which is higher than any permission.
Keeping this in mind and, if necessary, prepare your family accordingly, the chances of becoming a victim of an Internet attack are reduced to significant. You must also install and activate a firewall. Some operating systems have a built-in firewall. Make sure it is enabled and working properly. If your computer does not have a firewall, try allowing it before downloading or uploading files through a file sharing application.
These apps are great for viewing photos. Photos are displayed in full screen and you can quickly switch between editing and viewing. Open apps by tapping or clicking the corresponding tile on the home screen or by searching, then open the app.

AT operating system there is inheritance of rights from root directories and drives to all other folders located in this location. This means that the permissions for folders and all subfolders will be the same as for the root drive. This is handy because changing each subfolder for an individual user is too time consuming. However, such inheritance is not always convenient. After all, it will be impossible to change access rights for user groups. However, inheritance can be disabled for a particular folder. To do this, on the tab ( Security) folder properties click on the button ( Advanced). In the window that opens, on the tab (Permissions), click on the button (Change permissions) and uncheck ( Add permissions inherited from parent objects). You will now be able to change the current permissions regardless of the settings in the parent directory or hard disk partition.
Photos app. If you have photos on your camera or smartphone, you can import them using this application. Camera application. You can view photos taken with the camera app in your own recordings folder. Swipe from the bottom of the screen or right-click to view application commands, and then tap or select My Pictures.
Share your experience with others
Choose whether you want to upload photos, videos, or both. For photos, select to upload photos with good quality or to upload high quality photos with best quality. To share your photos or videos with other people or groups, follow these steps. Share photos and videos from your library. In the Photos app, navigate to the folder containing the photos or videos you want to share. Swipe on the photos or videos you want to share or right click on it.