It doesn't take a genius to understand that our lives consist of communication. And the virtual world is even more so – continuous, global communication. This is understandable, this is normal, and it seems like there is nothing to add. You write to each other, share news, experiences, or just work in text editor. A short period of time passes, and you need to change the input language, your gaze is directed to the usual lower corner, and desired panel then no! Very often, Windows 7 owners complain that the “language bar” has disappeared. And immediately thoughts arise, has the language really disappeared? Windows panel 7 how to restore it and return it to its place? Everything happens for the first time in our lives. Don't despair, read on and you will understand how to enable the language bar in Windows 7, it's actually not that difficult.
I’ll tell you in a nutshell what kind of panel this is. So, the language bar, so you understand, is a set of certain tools on the desktop. It then shows you the current keyboard layout. Displays manual input, speech recognition, and others useful features your PC. But you can just use hotkeys, advanced users will say. They will say something, they will say it, but, just like beginners, they will look at this panel to switch the language layout. Funny? Yes, but it's a fact. So, let's start saving your panel.
How to enable the language bar in Windows 7?
There are several ways to return the above panel to its place:
- Thanks to the control panel functions;
- Using the power of the registry;
- By accessing the Task Scheduler service.
Now about these methods in more detail.
1. Using the control panel capabilities.
We concentrate and perform the following manipulations:
Note: if you have less than 2 languages in the “General” tab, then this panel will not appear in its usual place. You need to add at least 1 more language using “Add”.
2. Using the registry.
This method should be used as follows:
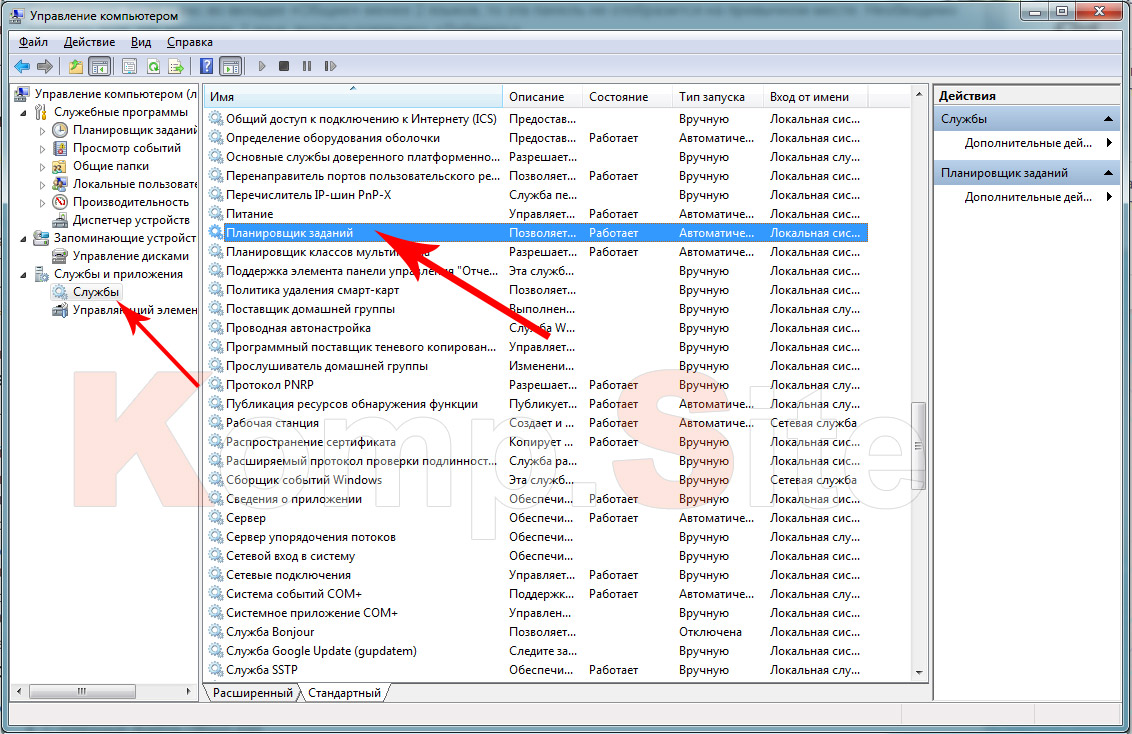
3. We resort to the help of the “Task Scheduler” service.
You can easily check the operation of this service, just follow the step-by-step prompts:
How to restore the language bar in Windows XP?
I decided to minimize the information on XP, since few people have it left, but if suddenly there is such a person, you are welcome, click the plus sign and read
Let's look at 3 ways to return the Windows XP language bar:
- Using the “Toolbar”;
- Using "Region and Language";
- Using the ctfmon.exe file.
1. Using the “Toolbar”.
This is the most quick way, in which you need to perform a few simple steps:
- Click on the taskbar with the same right mouse button;
- Select “Toolbar” from the list;
- Next, click on the “Language panel” option;
- Opposite you need to put a bird.
2. Using "Region and Language".
If you want to return the language bar in this way, you must adhere to the following points:
- We turn to our painfully dear “Start” button;
- go to the “Control Panel”;
- In the “Language and Regional Standards” menu, we find the “Languages” tab and click on the “More details” button;
- A window will open where you need to select “Languages and services text input", where in the first tab there will be "Parameters";
- Let’s look down the tab and see “Language Bar”; click on it and move to “Language Bar Options”;
- And then in the empty box, check the box “Display the language bar on the Desktop”;
- And in the final phase, we put “OK” in all previously opened windows.
3. Using the ctfmon.exe file.
This file is used to launch the language bar; it starts working when the system boots and runs continuously in the background.
- Click “Start” and then open the “Run” dialog box;
- Type msconfig in the search bar and click “OK”;
- In the open window there will be a “Startup” tab;
- Place a checkmark next to ctfmon.exe;
- And reboot the PC/laptop.
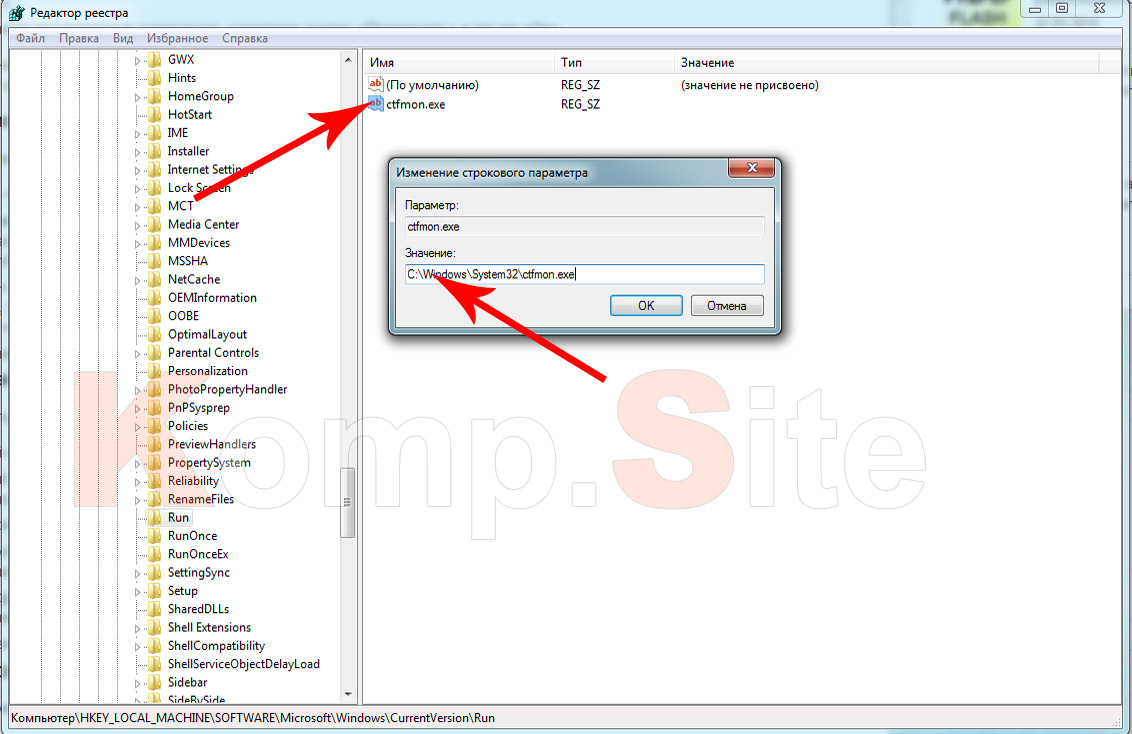
It also happens that ctfmon.exe is missing from the system configuration. Then click on “Start”, open “Run” and enter regedit, then press “Enter”. Following the given path “HKEY_USERS”, then go to the “.DEFAULT” folder, where we will find “Software” and enter it, and then we will find “Microsoft” and in it we will find “Windows”, which contains “CurrentVersion”, and then “Run” is just a stone’s throw away. On the right side of the window, click right click mouse, select “Create” and “String parameter”. In the “Parameter” field, enter ctfmon.exe, and in the “Value” field, write the following - C:\WINDOWS\system32\CTFMON.EXE. At the end of the procedure, reboot the PC.
The Windows 10 language bar has disappeared, how can I restore it?
Well, if you are the owner of 10 Windows versions, then you can display the language bar using the following methods:
- Through the "Control Panel";
- Through the registry
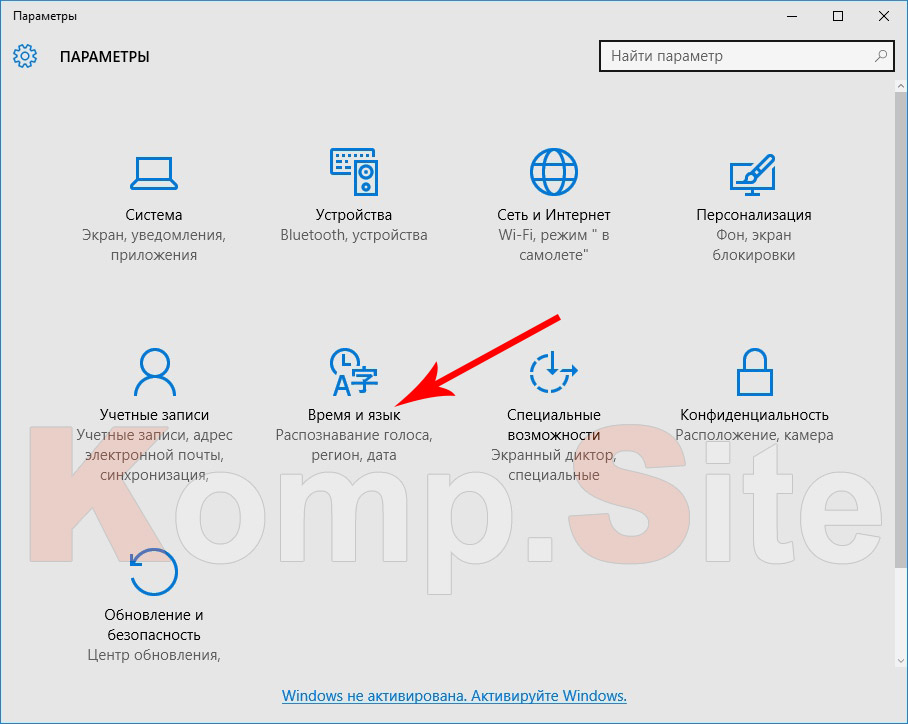
1. Go to the “Control Panel”.
To display the desired panel, you need to go through the following steps:
2. Through the registry.
If you fail using the first method, then you need to turn to the second:
- Press the combination of the “Windows” and “R” buttons and in the “Run” window enter regedit and confirm “Ok”;
- In the registry that opens, we follow this path: from the “HKEY_CURRENT_USER” folder go to “Software”, find “Microsoft” in it and look for the “Windows” folder in which the “CurrentVersion” folder is placed and already in this directory we find “Run”;
- In the right part of the window that opens, right-click and click on “Create”;
- And then open the “String parameter”;
- Right-click on it and select “Edit”;
- In the “Parameter” line, write its name (something), and in the “Value” line, write “ctfmon” = “CTFMON.EXE”;
- Click “Ok” to save everything and restart the computer.
As for restoring the language bar in Windows 8, in fact, the algorithm for returning it “to operation” is similar to the previous described version.
Well, that's all, friends. Now you have joined the ranks of those seasoned PC users who have the same knowledge. By the way, if you forgot, let us remind you that hot buttons for changing the language on your computer can be assigned to you and have a key combination of either Alt + Shift or Ctrl + Shift, and leave whatever combination you like. Read, comment.
Setting the language in Windows implies not only switching to the desired input language, but also a number of parameters, which include keyboard layouts, installing and removing languages, specifying the location, as well as regional standards- the monetary unit of the country in which the user lives, the format of date, time, decimal numbers, etc. used there.
Language and regional standards are configured slightly differently in Windows XP and Windows 7, so let's look at both settings.
Setting the language in Windows XP.
In Windows XP, access to the language setting is done through the Control Panel - shortcut " language and regional standards". The settings window for the options we need opens.
The window is divided into tabs, each of which performs language setting and installation regional settings.
On the "tab" Regional settings"The formats of time, date, numbers, and monetary units accepted in a given region are established. For more detailed settings of regional parameters, click the "Settings" button. In the window that appears after clicking the button, you can very accurately and in detail specify the settings of the options.
In particular, you can select the separator of the integer and fractional parts (usually it is either a period or a comma), the number of fractional signs, which is used by default in the future operating system. The digit group separator and number of digits per group allow you to group digits of numbers for easier reading. The following options are used as default options in Excel.
For monetary units, the type of positive and negative numbers, the unit itself and other settings are indicated.
In the time parameters, you can set the separator for time components (hours, minutes, seconds), the designation of time before lunch and after lunch (if not 24-hour format), and the general time format.
For the date, a short and long format and a component separator are set.
To configure the language on the "Languages" tab, click the "More details" button.
This action will open a window with more detailed language settings.
From the drop-down list, select the default language on your computer from those installed on the system.
To add another language to use, click the corresponding button. A language selection window will open.
The keyboard layout refers to the way you enter characters in a given language. Select an available layout from the list (Windows usually offers a default layout). You can add multiple layouts to each language.
The "Language Bar" button in the language settings window allows you to specify the location and behavior of the Windows language bar.
More interesting is configure keyboard settings. Click the appropriate button and wait for the settings window to appear.
Here, in the additional keyboard settings, you can configure to disable CAPS LOCK mode. By default, it is disabled by the corresponding keyboard key, which is used to enable it. However, you can configure disabling with the Shift key (enabling CAPS LOCK mode will still be performed with the corresponding button). You can also change the keyboard shortcuts for in various ways switching The easiest way to change the language on a computer is to change the input language one by one. By default, this operation is performed by pressing the Shift+Alt keys. Click on the line labeled “Switch between input languages” and select the option that suits you best from the ones offered.
As you can see, switching the input language can be done either by the combination Ctrl+Shift or Alt+Shift.
Additionally, you can add a keyboard shortcut to enable a specific input language. To do this, stand on the line that says “Switch to... [the input language we need]” and press the “Change keyboard shortcut” button again. In the window that opens, change the key combination.
Setting the language in Windows 7.
From the links under the category name you can already open some of the most popular language settings. However, we will click on the category name and move on.
The category is divided into two subcategories - "Date and Time" and "Language and Regional Standards". We are interested in the second subcategory - click on its name and get into the window that is already familiar to us Windows 7 Regional and Language Settings.
This window also contains several tabs. On the "Formats" tab, formats for currency units, dates, and times are set. For detailed settings, there is an "Advanced Settings" button, which opens a settings window similar to .
We will not consider in detail all the options presented in this window - everything is similar to Windows XP.
The "Location" tab of the "Regional and Languages" window allows you to specify the user's location in order to know what software products to offer, in what languages to communicate with technical support, etc. For example, if you try to download from the Microsoft website Internet Explorer or add-ons to it, you will immediately be offered a browser in the language that corresponds to the location specified in the Windows settings. Many sites and programs use this data to make the user’s work more comfortable and relieve him of the need to once again indicate in which language he needs software products.
The "Languages and keyboards" tab is designed to configure the keyboard layout, keys for switching the input language, as well as adding and removing languages from the system.
Click "Change keyboard" and you will be taken to the window for selecting the default language, setting the removal of languages and changing keyboard shortcuts, which is already familiar to us from Windows settings XP.
The "Add and Remove" buttons allow you to add additional languages and layouts to the system and remove them accordingly. From the drop-down list, specify the default language used when loading the OS.
The language bar settings pin it to the taskbar or place it anywhere on the desktop.
On the "Keyboard Switching" tab, just like in Windows XP, you can configure disabling CAPS LOCK mode using the Shift key, as well as changing keyboard shortcuts for switching input languages. Additionally, you can assign a keyboard shortcut to enable each language. Moreover, here this combination will be simpler than in Windows XP (there 3 keys were used for this at once).
It often happens that the icon for switching the keyboard layout from Russian to English and vice versa disappears on the taskbar. We won’t look into why this happens now, but will look at several ways to restore the language bar.
Method 1: Toolbar.
Right-click on the taskbar at the bottom of the screen. In the menu that appears, select “Toolbar” => “Language panel”. Press the left key once to check the box.
If it doesn’t help, go to method No. 2.
Method 2. Language and Regional Standards.
Click “Start” = > "Control Panel", = > "Region and Language" = > "Languages" = > “More details” = > “Language bar”. Check the box next to “Show the language bar on the desktop.”
If the checkbox is present, but the language bar is not displayed, uncheck the box and click “OK”. Then we repeat the previous steps. In some cases this helps.
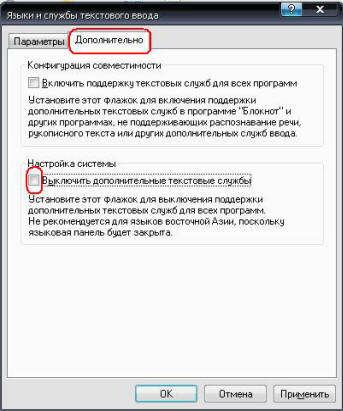
If the Language Bar button is not active,

Then go to the “Advanced” tab and uncheck the “Enable additional text services” checkbox. Click “Apply” and “OK”.
Method 3. File ctfmon.exe
Ctfmon.exe launches the language bar on boot Windows and runs in the background constantly.
Firstly, check the presence of this file in the system: C:\Windows\system32\ctfmon.exe.
If the specified file exists, then skip the following steps and go to point"Secondly". If the file is missing, restore it like this:
1. Insert the installation Windows disk XP
2. "Start" = > "Run" = > sfc /SCANNOW = > "OK." This command will also check other system Windows files for removal.
2. Install.
3. We use it.
Good luck and all the best!