The width of a column on a worksheet can be between 0 and 255. It corresponds to the number of characters that can be displayed in a cell formatted with a standard font. The default column width is 8.43 characters. If the column width is 0, it is hidden.
Line Height can have a value between 0 and 409. It represents the height of the line in points (1 point corresponds to approximately 1/72 of an inch, or 0.035 cm). The default line height is 12.75 points (approximately 1/6 inch or 0.4 cm). If the row height is 0, the row is hidden.
Make a column width match the column width of another column

Change the default width for all columns in a sheet or workbook
The default column width value specifies the average number of characters in the default font that fits in a cell. You can specify a different default column width for a worksheet or workbook.Tip To set the default column width for all new books or worksheets, you can create a workbook or worksheet template and use it as the basis for new books or worksheets. To learn more, select Save Table as Template.
If you are working in the "Page Layout" mode (tab View, Group Book View Modes, button Page layout), column width and row height can be specified in centimeters. By default, in this mode, the units of measurement are centimeters, but you can also select millimeters and inches (on the tab File select item Parameters, then - Additionally and in the section Screen select the desired value in the list Units on a ruler).
Changing column widths with the mouse
Define a line with a specific height
Change the line height to match the content. To automatically adjust all rows on a sheet, click the Select All button and double-click the border below one of the row headers. With it, you can create rows and columns of cells to display information different ways. In addition, the program simplifies the configuration of various aspects spreadsheets, such as size and number of cells.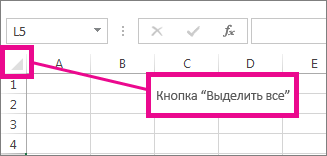

Individual cell resizing
However, it can be difficult to resize just one cell. Although it looks like a simple function and should exist, this option was never present in the program. To change the height or width of a particular cell, you must change the height and width of the entire row or column that contains that cell. Allowing cell resizing can severely distort the worksheet and make it unintelligible and unusable.
However, if you still need to leave the cell larger, but don't want to resize your row or column, this can be useful in some cases: merging cells. Cell merging basically merges two or more adjacent cells into one. This allows you to select a cell and then as many cells in a row as you want in a row or column, and merge them into a single cell that is the size of the volume. So you can artificially resize a cell, leaving it larger, without changing the height or width of the rest of the row or column that contains it.
Do one of the following:
If you prefer to see column widths and row heights in centimeters, switch to Page Layout View (tab View, Group Book View Modes, button Page layout). In page layout mode, you can specify column widths and row heights in centimeters. The default units in this mode are centimeters, but you can also select millimeters and inches (in Excel 2007, click button Microsoft Office , then - Excel Options and select section Additionally. In Excel 2010, choose from the menu File paragraph Parameters and then section Additionally).
Although merging cells does not help to leave a smaller cell, this action can be useful if you want to keep a larger cell without affecting the size of other cells. Then click right click click on the selected cells and select Format Cells. Then go to the Alignment tab and select Merge Cells. But that time is over! Everything has become much easier.
However, there are some basic principles. The table usually consists of a header. The latter contains the headings of the various columns. This allows the reader to understand the architecture of the painting. If the table has columns or rows containing totals, they should also be distinguished, for example, by higher lubrication.
Setting a given column width
Automatically change the column width according to the contents of the cells (autofit)
Advice. To quickly adjust the width of all columns of the sheet, click the button Select all and double-click any border between the two column headings.
Changing the width of a column to match the width of another column

Change the default width for all columns in a worksheet or workbook
The default column width value indicates the approximate number of characters in the standard font that will fit in a cell. You can specify a different default column width for a worksheet or workbook.
How to set column size via formatting
Another fundamental point: columns with data in the same units must have same width. In other words, if your table contains multiple percentage columns, each of them should have the same width. Likewise, all columns containing sums must be equal sizes.
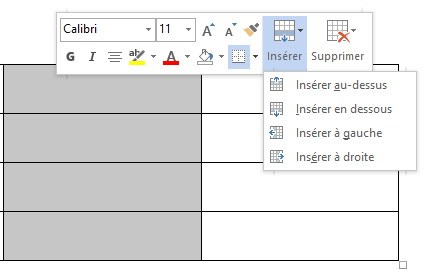
All are available through the "Insert - Table" tab. The little down arrow gives you access to all methods.
- This option is the most commonly used.
- Paint a picture.
- This option allows you to draw the table with the mouse.
Advice. If you want to define a new default column width for all new workbooks and worksheets, you can create a workbook or worksheet template and then create new workbooks and worksheets based on it. See Save a workbook or sheet as a template for more information.
To draw a table, place the cursor where you want to insert the table. Click and hold the mouse button. Choose the number of columns and rows you need and let go: by default, your table takes up the full width of your page. The first step is to adjust the dimensions of your array to suit your needs. To do this, place the mouse in the lower right corner on the small white square opposite: your cursor will take the form of a double arrow. Resize the table by moving the mouse to the right or left depending on whether you want to enlarge or reduce it.
Change the column width with the mouse
Do one of the following:
Setting a given line height
Change row height to fit cell content
Advice. To quickly adjust the height of all rows in a sheet, click the button Select all and double-click the bottom border of any row's header.
Release the desired measurement once. Alternatively, select the table and then activate the Layout contextual tab. Find the auto-adjust icon and click the small arrow. To make your table fit the width of the screen, select this option.
Resizing a cell or column
You can add a column or row at any time. In both cases, the procedure is the same: select a row or column, right-click, and then from the Insert Text menu, select the option you are interested in. To add a row at the end of a table is even easier! This manipulation automatically adds new line to your table. To adjust the column size, you have several options.
Change line height with mouse
Do one of the following:
Did you know?
If you don't have an Office 365 subscription or latest version Office, you can check out the trial version:
How to quickly reduce and set the same size of cells in Excel. Most often, this is necessary when you urgently need to edit some form for the treasury or bank. Those who work in accounting often face the problem of creating and submitting documents for reporting. I rarely have to work in Excel, but if they ask for help, I can’t refuse. Just yesterday, a woman from our accounting department came to me and almost crying asked for help editing an Excel document. I do not understand anything in accounting, but sometimes I am simply surprised and outraged by the insanity of the demands of our treasury. They require you to fill out a form in some form, and you can take the form of this form only on the Internet or the Garant system. Naturally, on such a form there is either a website logo or a link from Guarantor, and the treasury does not accept such documents. So our accountants are suffering with such documents.
Change cell size
If your action is limited to one cell, place the mouse in the lower left corner of the cell. Click and place the cursor on the right edge of the cell. Then drag the handle to the right depending on whether you want to increase or decrease the cell.
Change line height
To adjust the line height with the mouse, place the cursor on a horizontal line. Your cursor also takes the form of a double arrow: you can move up or down on your cursor.I just had to select everything that was on the form page and paste it into another excel file. Everything is fine, but all the data of the form stretched to the original size of the cells. Initially, the cell size is 8.43.
Now we need to reduce all the cells so that the document would fit on one sheet when printed. There are several ways to quickly set the desired cell size in Excel, but I'll show you two of the easiest.
Similarly, the menu, Table Properties, Line tab allows you to assign a very precise height to your line. Nothing prevents you from defining another measure, such as a point. For each element in the table you can change. Sometimes you will need one cell to insert two or more cells. First you must select the cells to merge. The latter can be located next to each other or one above the other. You can then use the Tables and Borders toolbar, the Eraser tool is the easiest option - or go to the Tables menu, Merge Cells.
Method 1.
- Select the required number of cells.
- Right-click on any cell with a Latin letter at the very top of the table column
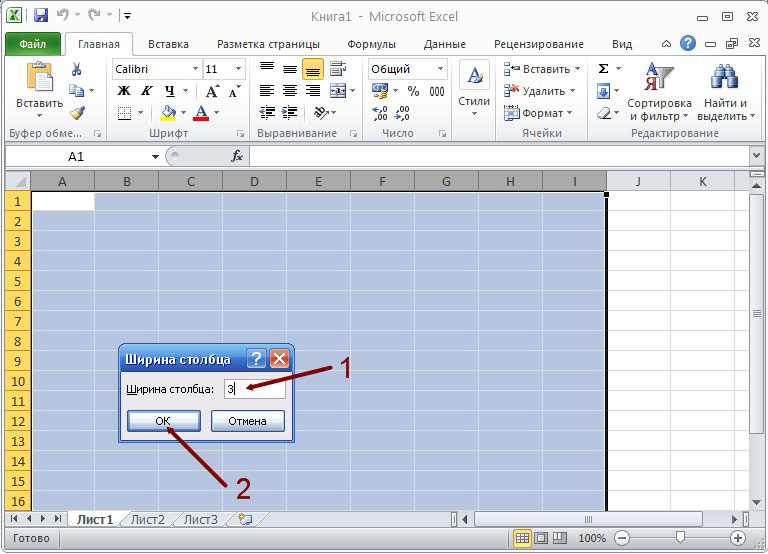
- Select an item from the dropdown menu Column Width...
- In the opened window Column Width set your number and press the button OK.
Then draw your lines where you want: vertically separate two cells, horizontally to add a row. Due to manipulation on your board, the height of your lines or the width of your cells can vary greatly. It's easy to fix this problem: just select columns or rows and click on the icon or compare columns or rows.
Finally, you must go through the Table menu, Table Properties, Column tab, and then resize the cell. The easiest way to place text inside a table is to use the Tables and Borders toolbar. Little reminder: to display the latest, click on the icon.
Now cell size in excel will be the one you specified.
Method 2.
You can not select the required number of cells, but change their size at once in the entire sheet.
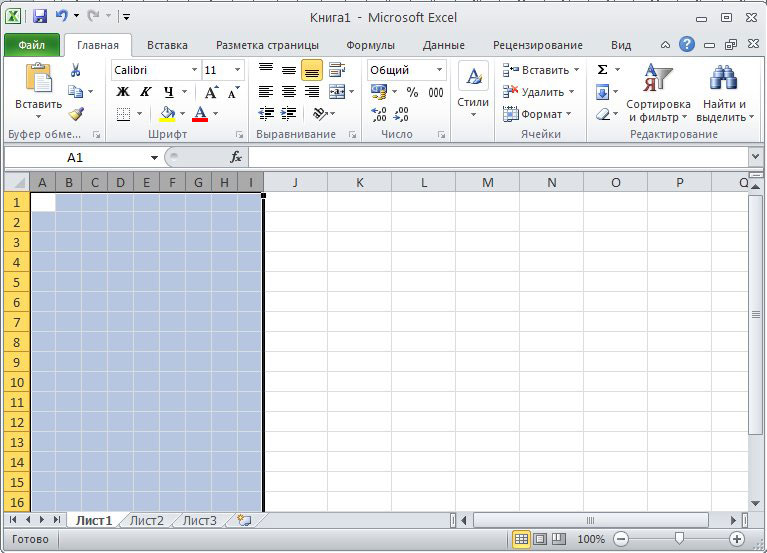
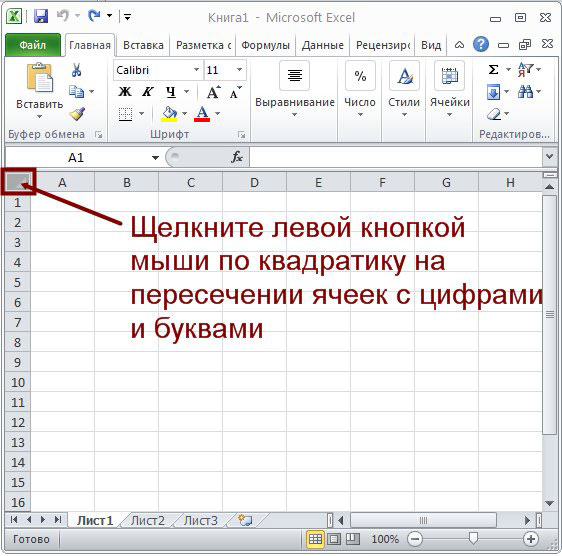
- Left-click on the square at the top left at the intersection of rows and columns
- You should select the entire sheet of the document
This toolbar has an icon to help you align text. Clicking on the little down arrow will give you access to all alignment options. They react to all situations. You can go line by line, cell by cell, or apply alignment to your entire array.
The word offers another interesting icon: change the text orientation. This icon allows you to position text vertically. The second and this time it is read from bottom to top. The third click returns the text to starting position. Clear cell text.
- Now move the mouse cursor to the intersection of any column (where Latin letters are written). When the cursor changes to a cross, press left button mouse, and without releasing it, reduce the size of the column to the size you need, and release the mouse button.
Thus, you have changed the size of the cells in the entire sheet of the Excel document.
Activate the menu "Table", "Table properties". Click the Options button at the bottom of the dialog box. Enter small values in the Default Cell Margins box. These values apply to the entire table. Place a tab in the table. Despite the visibility, it is still possible to use tables within a table.
Put your table on the page
Your table can be positioned anywhere in the document. To do this, place the cursor over the table: pay attention to the double arrow on the square in the upper left corner of the table. Place the cursor on this field and move the table with the mouse to the desired location. You can place your painting in the center of the text: the latter then dresses up your painting, spreading it out to the sides. You can control the space between the table and text using the Command tab, Table Properties. Then click the Position button and change the values in the Distance text box.