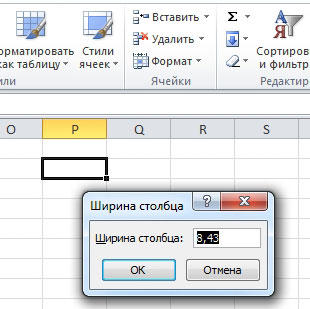
The width of a column on a worksheet can be between 0 and 255. It corresponds to the number of characters that can be displayed in a cell formatted with a standard font. The default column width is 8.43 characters. If the column width is 0, it is hidden.
Line Height can have a value between 0 and 409. It represents the height of the line in points (1 point corresponds to approximately 1/72 of an inch, or 0.035 cm). The default line height is 12.75 points (approximately 1/6 inch or 0.4 cm). If the row height is 0, the row is hidden.
Scroll down to the table. Check the "Preferred Width" box to enable the text box next to it. Add length to the table by inserting additional rows. You can also add columns this way, though it won't affect the size of the table.
Hover over the left or right border of the table. You will see the cursor change to a double-headed arrow. This process also works on the bottom border of the table to make the table longer, but does not work on the top border. Eliminate entire rows from the table, which will shrink it by highlighting the row.
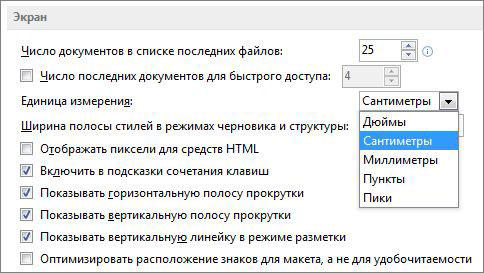
If you are working in the "Page Layout" mode (tab View, Group Book View Modes, button Page layout), column width and row height can be specified in centimeters. By default, in this mode, the units of measurement are centimeters, but you can also select millimeters and inches (on the tab File select item Parameters, then - Additionally and in the section Screen select the desired value in the list Units on a ruler).
Drag this line up or down or left or right to resize this part of the table. You can change lines individually, in groups, or all at once. Select the line or lines you want to customize. To select a group of lines and drag the mouse pointer over the line numbers.
When you are in page layout mode, line heights are measured in inches instead of points, and you can make line height settings here. If you prefer to use centimeters or millimeters instead, change the page ruler to metric.
Select the Advanced tab and then scroll down to the Display section. It may differ slightly or significantly from other versions or products. Alan Shembera began writing for local newspapers in Texas and Louisiana. His professional career includes both Computer techologies, information editor and income tax preparer. Sambera now writes full-time about business and technology.

However, you can easily change the height and width for one or more rows and columns. Default column width for all columns. The default row height for each row depends on the largest font size and the font selected in any of the cells in that row. However, you can choose a specific height for any of the rows, as well as a specific column width for any of the columns.
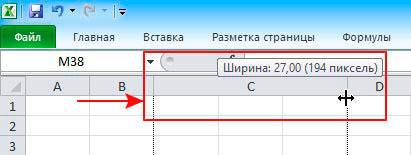
The height can be different for different rows, and the width can be different for different columns. If you want to adjust one line, you can move the cursor over the bottom of the line until it becomes a double arrow bar. As you drag the cursor, the changing height is displayed in a popup window.
Do one of the following:
If you prefer to see column widths and row heights in centimeters, switch to Page Layout View (tab View, Group Book View Modes, button Page layout). In page layout mode, you can specify column widths and row heights in centimeters. The default units in this mode are centimeters, but you can also select millimeters and inches (in Excel 2007, click button Microsoft office , then - Excel Options and select section Additionally. In Excel 2010, choose from the menu File paragraph Parameters and then section Additionally).
Change line height with mouse
You can do the same to change the width of a column: drag the double arrow pointer left or right on the right border of the column. The column width to the left of the border changes the width. The width of other columns does not change. You can be more precise when specifying the height of one or more lines by entering a specific number for the height. To do this, move your mouse over the row header until it changes into a right arrow. If you don't see the row headers.
Choose Row Height from the pop-up menu. You can specify the exact width for one or more columns. Select columns with column headings as you would for rows, but drag left or right to select multiple adjacent rows. Here is what our worksheet looks like with the height of the first three rows and the width of the first three columns changed.
Setting a given column width
Automatically change the column width according to the contents of the cells (autofit)
Advice. To quickly adjust the width of all columns of the sheet, click the button Select all and double-click any border between the two column headings.
Changing the width of a column to match the width of another column
Change the default width for all columns in a worksheet or workbook
The default column width value indicates the approximate number of characters in the standard font that will fit in a cell. You can specify a different default column width for a worksheet or workbook.
You can change the line height to the default height, but many of these are not necessarily the default height. The current default height will be the one that matches the largest font size and font used on that line. In other words, the line-height of the selected line will be adjusted to automatically match the contents of that line.
To automatically fit on one line, you can move the mouse over the bottom border of the desired line header until it turns into a double-arrow bar, as if you were dragging the border to change the line height. The line height changes to match the maximum font size and font used on that line.
Advice. If you want to define a new default column width for all new workbooks and worksheets, you can create a workbook or worksheet template and then create new workbooks and worksheets based on it. See Save a workbook or sheet as a template for more information.
There is also an option to autofit the width of selected columns, but it works in a slightly different way. When you select one or more columns and then select "Auto Focus Column Width" from the "Cell Size" menu in the "Cells" section of the Home tab, the selected column will only resize if any cell in that column has content. Otherwise, if all cells in a column are empty, the size of that column will not be affected.
You can also automatically change the width of a column to fit the widest content in that column by moving the mouse over the border on the desired column of the column until it turns into a double arrow bar, just like dragging the border to change the width of the column. The column width is adjusted to fit the widest cell content in that column. This also only works with columns that are not completely empty.
Change the column width with the mouse
Do one of the following:
Setting a given line height
Change row height to fit cell content
Advice. To quickly adjust the height of all rows in a sheet, click the button Select all and double-click the bottom border of any row's header.
Because the default row height is affected by the font and font size assigned to the cells in each row, you cannot specify a value for the default row height. However, the default column width for all columns in the current worksheet can be changed.
The width of all columns on the current sheet is resized to the specified width, no matter how wide that content is in any of the cells. Are your tables always as small as they can be? This article covers common methods for reducing file size.
My files always seem to grow to epic proportions. Large files may take longer than necessary to open, be more difficult to ship via e-mail, may result in extra pages being printed, may increase the chance of "out of memory" error messages, or cause other unusual spreadsheet behavior.
Change line height with mouse
Do one of the following:
Did you know?
If you don't have an Office 365 subscription or latest version Office, you can check out the trial version:
When creating a table in Excel, you usually need to adjust the size of the cells - make them larger or smaller. In order to make them the same in height and width, many users try to move the slider “by eye”. Even though the setting shows the gap in numbers, this method is not very convenient and takes a lot of time.
However, it should be noted that reducing the file size should not be everything and end all simulations. For example, arrays and data tables can reduce the size of a physical file and, as a result, increase the requirements for system memory. The following list is not an exhaustive list, but covers some of the main ideas.
Before moving on to more active sets, do the simpler things first. If your file contains redundant calculations, unused charts, and obsolete sheets, remove these items before implementing any of the following alternatives. Similarly, graphics and pictures take up a lot of space: consider reducing the size of graphics and using compressed images.
In some cases, you need to set the exact size of the fields
A column spacing in an Excel table can be any value between 0 and 255 units. It determines the number of characters that will fit in an object that is formatted using the base font. The base value of the vertical range is 8.43 units. If set to zero, the vertical row will be hidden.
Sometimes the last cell of a worksheet may be outside the range of your actual data used. Clearing redundant rows and columns to reset the last cell can help resolve these issues. Sometimes the final cell may have many rows and columns from the original final cell. The above suggestion removes unnecessary formatting etc. after the end cell - but what about the seemingly empty cells that would be in the spreadsheet's active range?
This allows you to select all cells in the active range that are considered empty. Now we need to clear all their contents. To do this, go to the Home tab on the ribbon and select Clear All in the Editing group. This action structures the book in a compressed folder with lots of binaries. The exact amount of compression depends on the contents of the book. However, these types of files may take longer to open, close, and save.
The height of the bar in the Excel table can be set in the range from 0 to 409 units. As with the column width, setting it to zero will hide the bar, only this time it's horizontal. The horizontal row height unit corresponds to approximately 0.035 centimeters or 1/72 of an inch. The base value is 12.75 points.
But this is just an intermediate step. Redundant formatting within the range should also be removed. Then save the file as the original file type. Note the significant reduction in file size. Finally, save the workbook as the same file type, but use a new filename. This last action can also eliminate additional inefficiencies within the file.
With it, you can create rows and columns of cells to display information in a variety of ways. In addition, the program makes it easy to customize various aspects of the table, such as the size and number of cells. However, you may be blown away if you only want to resize one cell. Although at first this may seem like a simple feature that should be present, it was never included as a feature within the program. To change the height or width of one particular cell in your spreadsheet, you must change the height or width of the entire row or column containing that cell.
When working in Page Layout view, you can specify the size of the strip of objects in centimeters, millimeters, or inches. To change the measure, click "File" - "Options" and in the "Advanced" category, find the "Screen" section. In the drop-down menu "Units per Ruler", set the system of measures that suits you best.
Setting a given column width
If you only want to resize one cell without resizing the cells in the corresponding row or column, it will create extreme distortion in the spreadsheet and make things unreadable and unusable. However, if you absolutely must make one cell larger, but don't want to change the size of the row or column it's in, there's one solution that can be useful under certain circumstances: cell merging. Merging cells essentially means merging two or more adjacent cells into one.
The horizontal spacing of a row of objects is adjusted to accommodate longer numbers or sentences. This is done according to several principles:
- To change the value of one column, drag its right border to the left or right, setting the desired value.
- To set up an arbitrary number, select them and drag the border of any. To edit two or more non-adjacent vertical ranges, select the first one, hold down Ctrl and click on the others. Adjacent - select the far left or right, then hold Shift and select the opposite.
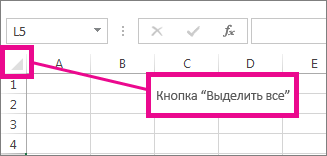
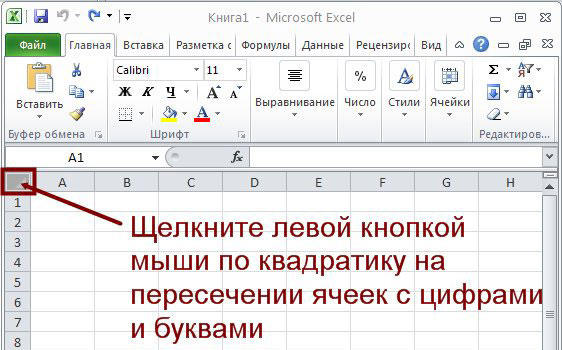
- In order to apply editing to all columns, first mark them on the corresponding button (at the intersection of the markup of numbers and Latin letters) or press Ctrl + "A".
The only drawback of the variant is that it is not very accurate.
This allows you to select a cell and then as many cells as you want in a row or column extending directly from it and merging them into one cell, which then becomes the size of all those cells. So you can artificially resize a cell to make it larger without changing the height or width of the rest of the row or column that contains it. Once cells are merged, the new cell can be selected, used, and formatted just like any other cell in the document.
While merging cells won't help you make one cell smaller, it can be useful if you need to increase the size of an individual cell without affecting the size of the other cells around it. In version 5, a new table tool made it easier to set rows and columns of information. Version 5 additional elements controls and options give you more options to overcome difficult tables.
How to set column size via formatting
Algorithm:
- Select an arbitrary number of columns;
- In Cell Size, click on Column Width;
- Enter a value in the field.
How to make spacing between column borders equal
If you need to change the value so that it equals the value of another:
- Mark the object with the desired indicator;
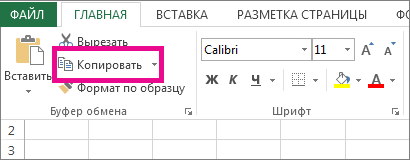
- In the Clipboard group on the main tab, click Copy;
- In the same place, click on the drop-down menu under "Paste" and select the link "Paste Special" (at the very bottom);
- In the Insert area, click on Column Widths.

You can also select two or more bands in the table, and then adjust any of them with the mouse pointer. The edit will be applied to everyone.
How to set the default width of all vertical rows
The bar size tells you approximately how many characters in the base font will fit in the element. You can specify your own value for the column, which will be applied by default:
- For one sheet - mark it with the left mouse click;
- For multiple pages - select any, then click on others while holding Ctrl;
- For the entire workbook - right-click on any page and click "Select All Sheets".
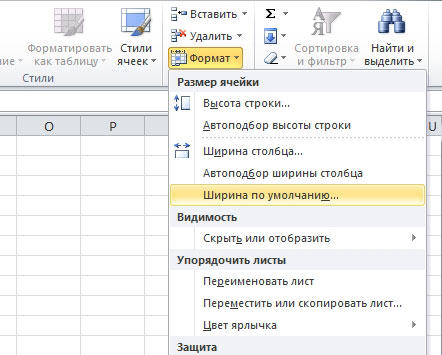
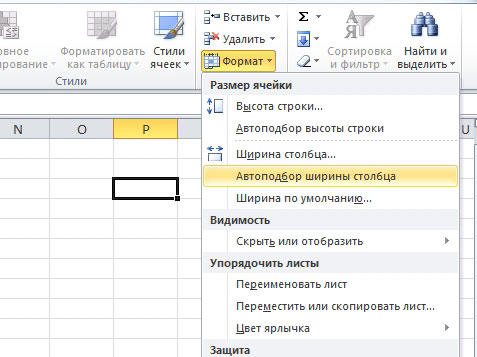
- In the "Home" tab, click "Format";
- In the Cell Size area, select Default Width;
- Enter a new value in the field.
How to make a template for creating sheets and books
In order to set the parameters of elements in future sheets and Excel books, you can create templates. Based on them, new tables will have custom parameters. For this you need:
- Open the book you want to use as a template;
- Click "File" - "Save As";
- Enter the template name in "File name";
- In the "File Type" drop-down menu, click " excel template” or its analogue “with macro support”, if they are in the book and will be needed in the future;
- Click Save.
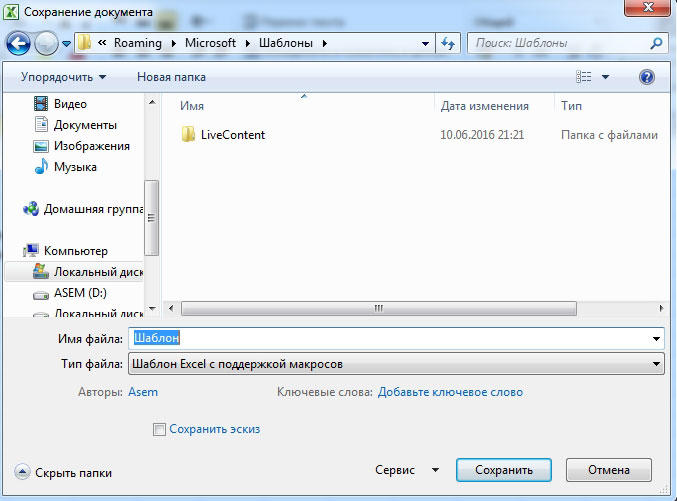
The document will be moved to the templates folder, where it must be selected to create a book next time.
How to edit the gap of a horizontal row with the mouse
Here, as in the case of the width, you need to mark an arbitrary number of vertical columns, then drag any border. Moving up will make the object bigger and moving down will make it smaller.
How to set horizontal span span via formatting
Algorithm:
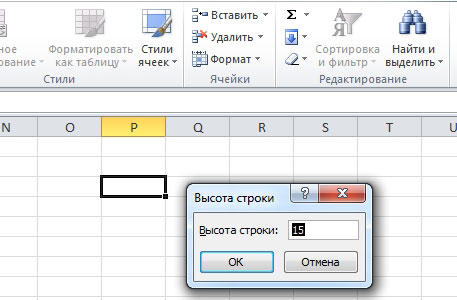
- Mark an arbitrary number of columns;
- In the "Home" tab, find the "Cells" area and click "Format";
- In Cell Size, click Row Height;
- Enter a value in the field.
Automatic change depending on the content of the elements
Thanks to this function, the elements themselves will edit the value depending on how much data is written to them:
- Choose an arbitrary number of columns;
- In the "Cells" group on the main tab, click "Format";
- In Cell Size, click AutoFit Column Width (or Height).
This can also be done by clicking on the right edge of the vertical bar and the bottom edge of the horizontal bar (any of the ones checked).
Outcome
Setting the element spacing allows you to change the value, and accordingly - the amount of data that it contains. To do this, Excel has several editing methods and display mode options.