Majority personal computers today they have more than one HDD. And each individual disk, as a rule, is divided into several sections. In this regard, the operation of changing the drive letter or partition is not so rare.
Sponsored by the placement of P&G Articles on the topic "How to assign a drive letter" How to set a new password How to boot from a floppy disk How to change the appearance of icons
Instruction
To be able to change the drive letter or partition, you need to have sufficient rights, so the first step of the procedure should be to log in with administrator rights.
Expand the menu on the "Start" button and select the "Control Panel" command.
The next steps in Windows 7 and Vista are slightly different from Windows XP.
For Windows 7 and Vista: In the Control Panel, click the System and Security link, and then in the Administrative Tools section, click the Create and Format Hard Disk Partitions link.
In Windows XP: In the Control Panel, click the Performance and Maintenance link and then the Administrative Tools link. In the administration panel, double-click "Computer Management". Then, under Storage, click Disk Management.
The following steps are almost the same in Windows 7, Vista and XP.
In the window titled Disk Management, click right click mouse over the drive or partition whose letter you want to change, and select Change Drive Letter or Drive Path.
In the window that opens, click the "Edit" button. In the next window, select the desired letter from the drop-down list opposite the inscription "Assign a drive letter (A-Z)".
The OS will require confirmation of the letter change - click the "Yes" button.
Close both windows by clicking the OK button. As a result, the letter of the selected drive or partition will change.
How simpleOther related news:
Problem with changing the drive letter or removable storage device in the operating system Microsoft Windows can be solved by standard means of the system without the use of additional software third party developers. P&G Placement Sponsor Related Articles "How
It happens that when Windows installation or disk partitioning operations assign the wrong drive letter. Agree, it doesn’t look very nice when drive C immediately follows drive E. Sometimes you need to swap drive letters. In this case, you can completely get by with regular
In some situations, to provide more convenient operation with hard drive there is a need to create new partitions or change the characteristics of existing local drives. You will need - Partition Manager. Sponsored by P&G placement Articles on the topic "How to change the partition letter" How to
It's no secret to anyone that operating system windows mounts disks connected to the system, assigning them Latin letters in alphabetical order. Sometimes this is not very convenient, for example, many would like to separate dvd-rom from local hard drives computer. Sometimes changing the drive letter is required for
Surely you have already encountered such an unpleasant situation when a different letter was assigned to one or another partition of one hard disk or DVD drive. It turns out that the letter priority in the title of the sections can be changed using the standard Windows tools. P&G Placement Sponsor Articles on
Changing the letter of the hard drive designation in Windows operating systems is carried out using the Disk Management snap-in. 26 letters are allowed, from A to Z. The letters A and B are reserved for removable drives. The rest of the letters can be used for drive names. Sponsor
It happens that the user, for some reason, needs to change the letter designation of a hard, optical or removable disk. This operation is very simple, although not obvious, and is performed using the operating system of the Windows family. P&G Placement Sponsor Articles on How to Change
Faced such a problem: when connecting any external hard The USB drive/flash drive is not assigned a letter by the system. Those. The drive shows up in device manager but doesn't show up in explorer. In order for a disk to become available in the system, it has to manually assign a drive letter each time through the Disk Management console (Disk Management) - which is somewhat annoying. It seems that some function of automatic partition detection on external hard drives does not work.
How can the problem be solved?
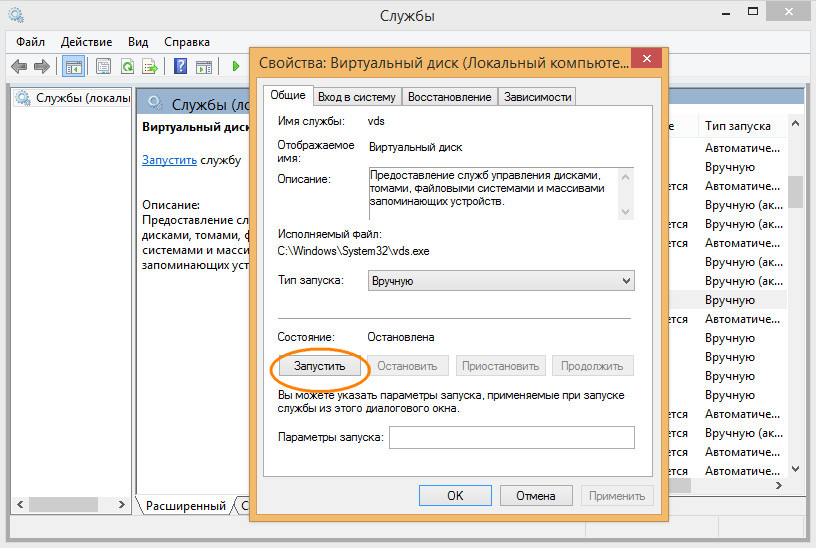
First check if the service is running virtual disk(in called Virtual Disk). You can check the service status through the service management console ( services.msc).
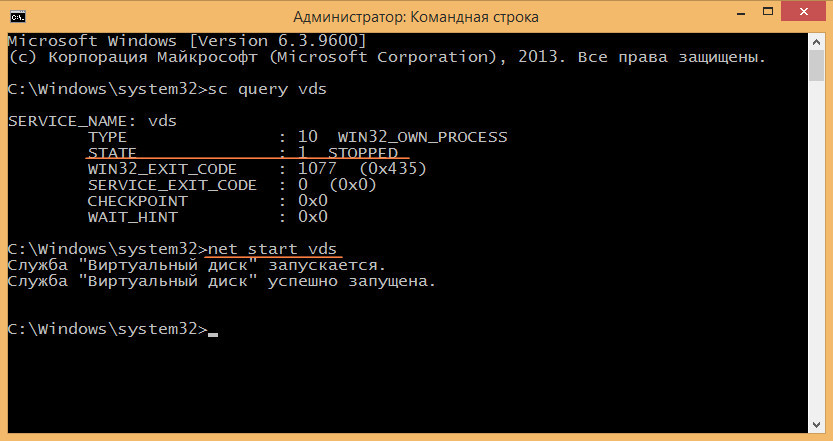
or from the command line:
Sc query vds
SERVICE_NAME: vds
TYPE: 10 WIN32_OWN_PROCESS
STATE: 1 STOPPED
WIN32_EXIT_CODE: 0 (0x0)
SERVICE_EXIT_CODE: 0 (0x0)
CHECKPOINT: 0x0
WAIT_HINT: 0x0 
If the service is stopped, start it from the graphical snap-in (Start button) or like this:
Net start vds

Check if the problem persists. If it doesn't help, check if the feature is enabled auto mount new volumes.
Note. When the automount feature is enabled, Windows automatically mounts file systems new disks connected to the system and itself assigns drive letters to partitions. If automount is disabled, Windows detects new drives but does not produce them automatic installation and does not assign drive letters to new volumes.
Open a command prompt window (with administrator rights) and run the commands:
diskpart
Within diskpart, check if automatic mounting is enabled for new volumes:
DISKPART>automount
Automatic mounting of new volumes disabled.
As we can see, automount is disabled. Let's turn it on
DISKPART> automount enable
Automatic mounting of new volumes enabled.
Let's finish working with diskpart
DISKPART> exit
Leaving DiskPart... 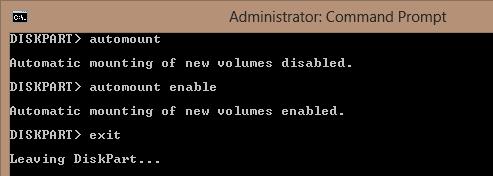
Note. By the way, the automount function is also responsible for the fact that the next time the drive is connected, the partitions on the external drive will be assigned the same letters as the previous time it was connected (naturally, if these letters are not occupied). To clear the saved associations, you need to use the command automount scrub.
Restart your computer and check if the letters are assigned external drives.
13334When a user connects a flash drive or removable disk to the computer, the operating Windows system detects a new device and assigns one of the letters of the Latin alphabet to it, thanks to which the storage medium becomes available in Explorer. But it also happens that for some reason the system stops correctly detecting removable drives. In this case, the media may be visible in the device manager, but at the same time it is not displayed in the "This PC" section.
This problem is solved in an elementary way. The user only needs to go to the disk management section and manually assign a letter to the lost device. But you must admit, changing the settings every time you connect a flash drive to your computer is somehow not very convenient. Yes, this is what the system should be doing. How to restore the normal operation of the Windows components responsible for assigning drive letters?

In the list of services, find and
![]()
if it turns off, turn it on.
You can also check the status of this service by running the sc query vds command from an administrator-run CMD console. If the service is disabled, the option STATE will matter STOPPED. To run it, immediately run the net start vds command in the console.
If this method does not solve the problem, after virtual disk you will need to check the operation of the automatic mounting of new volumes. When the automount function is disabled, the operating system, although it detects disks connected to the computer, does not install them and does not assign letters to them. To check, we will use the console utility.

Open as administrator command line and run the diskpart command. After the utility starts, use the automount command to check if the automount feature is enabled. If it is disabled, enable it by issuing the automount enable command. Quit Diskpart ( exit), close the command prompt and check the result. Now everything should work.
You may be interested in:
The System compression feature in Windows 10 will save space on the system drive
How to assign a letter to a hard drive?
Master's response:
To change the letter designation hard drive Windows uses the Disk Management snap-in. It is allowed to use 26 letters of the Latin alphabet: from A to Z. The letters A and B denote removable drives, and all the rest can be used for drive names.
Log in as a computer administrator. Call the main menu of the system "Start", select "Control Panel" to start changing the drive letter. Select the "Performance and Maintenance" item and go to the "Administration" item.
open double click"Computer Management", select the "Disk Management" section, which is located on the left pane of the window. Select the drive you want to rename. Right-click on the field of this disk to call the service menu.
Then you should select the command "Change drive letter or path to the drive" and click on the "Add" button to assign a specific drive letter. You must specify the item "Assign a drive letter (A-Z) and select a letter from the list provided. Click "OK" to confirm your choice.
Apply the command "Change drive letter or path to the drive", then you need to click on "Change" to be able to edit the letter. Select "Assign drive letter (A-Z)" and enter the desired letter from the list that appears. Confirm the change by clicking the "OK" button.
After that, using the "Change drive letter or path to the drive" command, just click on the "Delete" button. Confirm the action by clicking on the "Yes" button. And in a situation where an error message appears and it is impossible to change the drive letter, click "No". Then close all programs that use the data in this volume. Again, try to replace the letter in the way described above.
If this does not help, then select "No" again and remove the drive letter as described above. Click on the "Yes" button and the letter will be removed after the system reboots.