Are you ready to plan for next year? How about supporting your brand in front of customers as 2016 kicks off?
It's hard to design a monthly plan from scratch or put together hundreds of pages of a personal diary. Don't worry, we've got everything ready! We start with a quality calendar and diary templates.
Print-ready with Custom Design options
GraphicRiver has many printable 2016 calendar and planner templates. All of them are designed for daily, weekly, monthly and yearly planning.
When reviewing options, pay attention to color, font, images, and overall impression. Ask yourself, “Does this fit my brand?” If yes, this is most likely the template for you. Choose the one that aligns with your goals and will present your business in a professional manner.
3. Add your trademarks and customize them
Another consideration is what assets will the template need and how will you set it up? Most of these templates are made for Adobe InDesign, so you will need this program for customization. Or you can work with your printer. This is a viable option.
4. Insert your unique information
In addition to basic assets like photos or your company logo, consider a deeper customization. These could be dates you want to notify clients about, deadlines for your team, international holidays, or other special dates unique to your company or niche.
You can add any information. Open the template files and customize them yourself or work with a professional.
5. Printing and use
New Year's Eve is the time to fill gift bags for your employees or clients. Now is the time to collect what you need, maybe a bottle of wine, decorated with a corporate calendar.
Plan ahead to print the template and have it ready. There are many online printing companies that you can use or work with a local printer.
Any of the printable calendar templates listed in this article may be suitable for your needs. Just add your business information and brand assets and you're ready to print and get results!
A diary (planner) and a method for transferring text to fabric or paper.
DIARY
and method of transferring text to cloth or paper
Usually, creative people have a lot of ideas and plans in their heads, and they also need to remember various family and social affairs, find time to relax, congratulate friends on significant events, plan purchases, trips, etc. My head can't remember everything, so to-do lists are a common thing for me. But making notes on different pieces of paper is very inconvenient, standard diaries also do not quite suit me - I need to open them every time, flip through them, look for the right days. So the idea was born to make the perfect desktop planner for me.
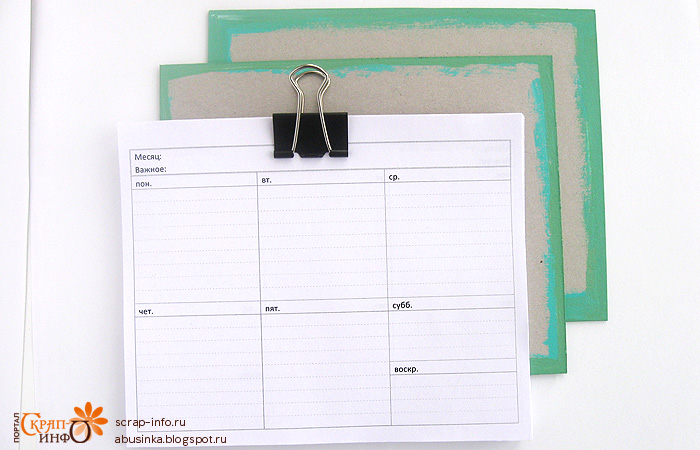
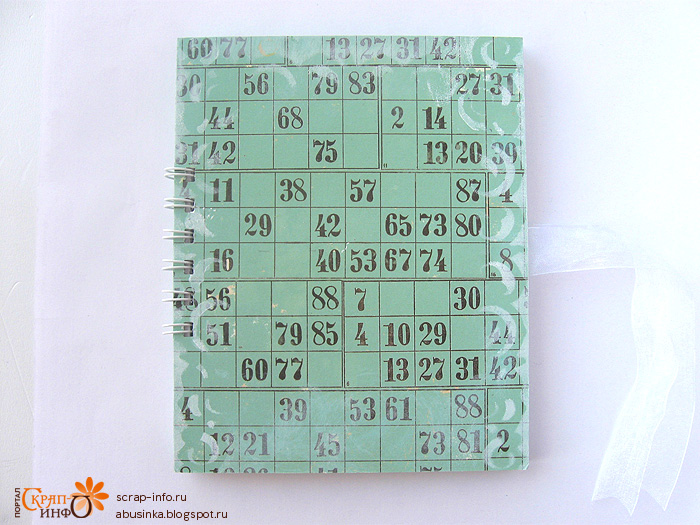
1. We prepare the inner sheets.
I created a page template in Word and printed these sheets on both sides. You can download the template link .

Considering that there are 52 weeks in a year, and 4 tablets are obtained on a sheet, 13 sheets are enough for a whole year.
2. We cut and trim the sheets to the desired size, I have it 17.5 cm by 14 cm. I fastened one edge with a clip and then cut the entire stack on a breadboard mat with a clerical knife along a metal ruler.
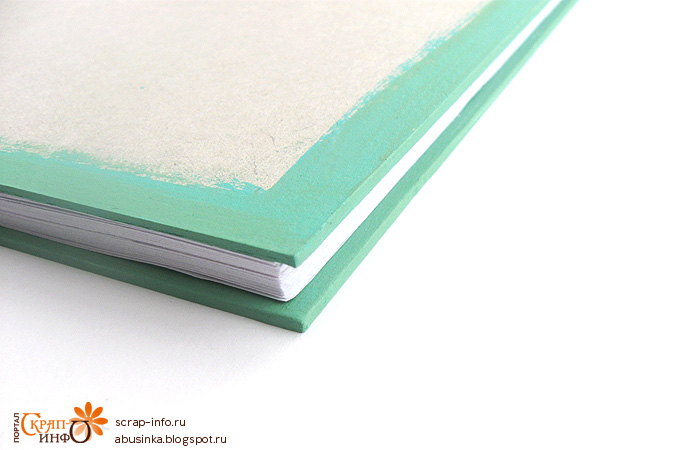
3. From thick cardboard we cut out two covers 0.5 cm larger than the inner sheets, my dimensions are 18 cm by 14.5 cm. We tint the side sections of the cover with acrylic paint of a suitable color.
I do not recommend using distress ink or other water-soluble dyes. It is likely that you will touch the diary with wet fingers, or splash water on it (the year is long, anything can happen, especially if there are children in the house). So that nothing is smeared or dirty, it is better to use resistant paints.
4. We glue and sew the ties. For my idea, I need strings.

I have organza strings and I stitched them well to the cover for strength.

5. Glue the covers with scrap paper on the front side
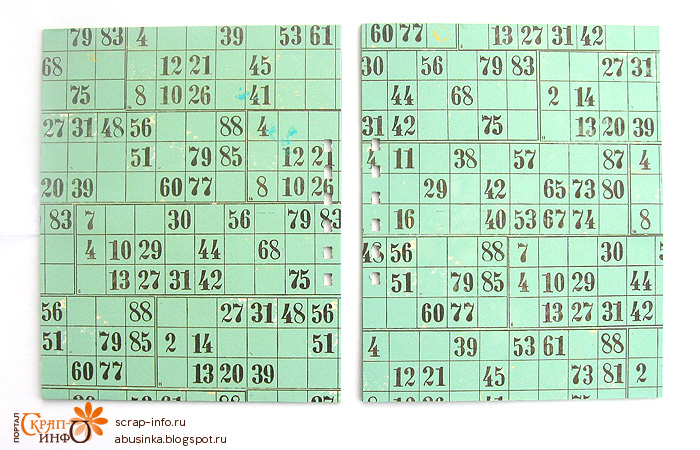
and on the reverse side (these will be endpapers)

6. Using a binder, we punch holes and connect everything with a spring.

7. Decorate the cover to your liking.
I tried to do something in the Boho style. I took fabric as the main substrate, stitched lace on top.
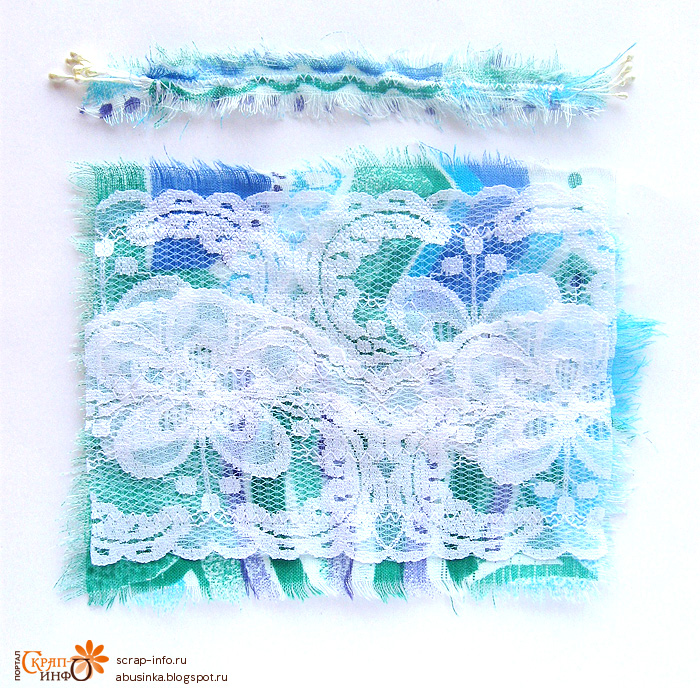
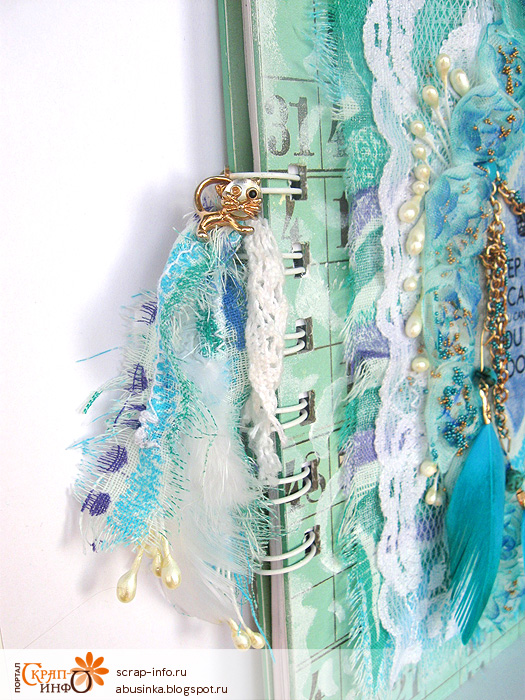
The strip on the left is a decorative string for the spring. I connected two thin strips of fabric with a zigzag stitch and sewed stamens at the ends.
I decided to use a piece of the same fabric as a central element.

And now I’ll tell you how to transfer the inscription to the fabric (like decoupage).
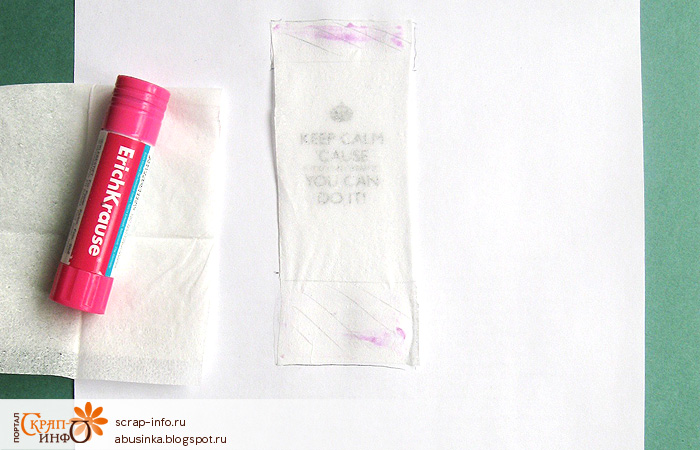
First, glue a piece of masking tape on the back of the fabric, it will make the fabric denser and will not allow it to stretch and warp.

We print the selected inscription on the sheet and separate one layer from the paper three-layer handkerchief, it is with its help that I will transfer the inscription.
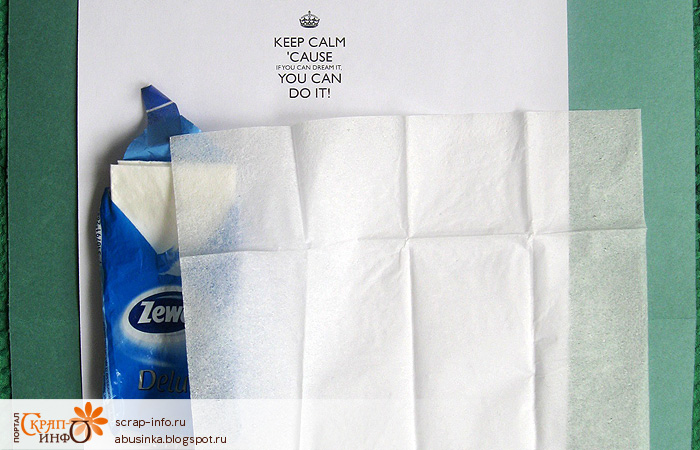
We cut out a piece from a paper scarf a little larger than the inscription and glue it on the printout. Important: we glue only a narrow strip at the top and bottom, where the inscription itself, the handkerchief and paper are not glued together. I glued it on children's pink glue, or you can fix it with the same masking tape.
Once again we print on this sheet (on a laser printer, so that later it does not smear from water / glue)

We get a printout of the text on a thin layer of paper handkerchief.

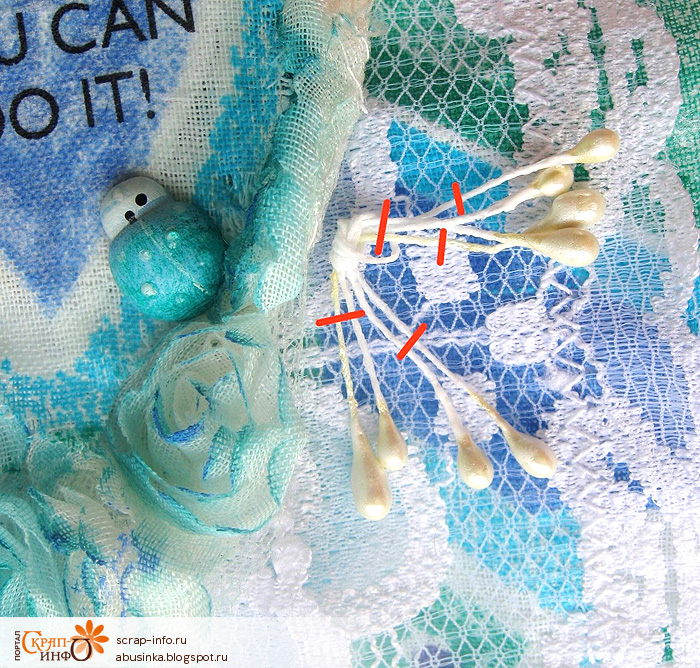
I chose an inscription quite suitable for both scrapbook and life plans in general: “keep calm, because if you can think of it, you can do it!”
Cut the inscription to the right sizes. The paper is translucent and is easy to do by attaching a printout to the piece you are going to decorate.

We coat the fabric with PVA glue (or special decoupage glue), carefully apply the text and smooth it with a brush. We also cover the top with a thin layer of glue. If the PVA is thick, you can dilute it a little with water.
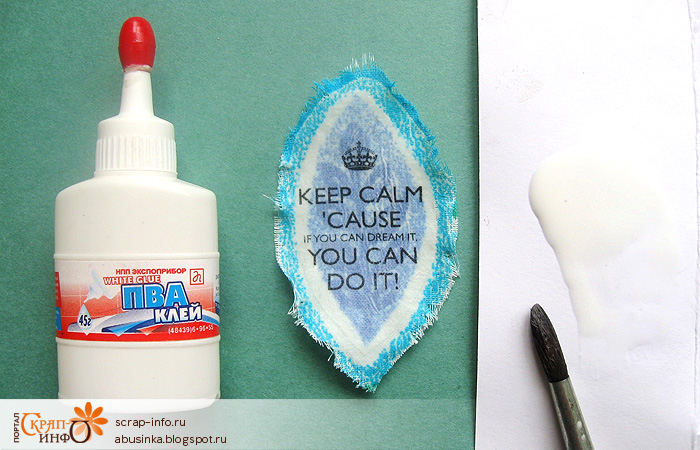
We are waiting for complete drying and you can use our element! For example, I also made an inscription on scrap paper in the same way. On the right side of the window, if you look closely, you will certainly see traces of a napkin, but if you do not know that it is there, you may not notice it. The glued one layer of the napkin is almost completely transparent (you can see all the details of the window behind the inscription)

Back to cover decor.
As jewelry, I chose my hairpin with feathers and an earring in the shape of a kitten, I no longer wear these jewelry, but I like them and are dear as a memory. Maybe you also have single earrings or jewelry from which you "grew"?

Next I worked with paint. Tinted the white braid in the desired color.
Tip: if you are tinting, tinting something, use several different shades of color and you will get a more voluminous and interesting effect.

I went through the paint through the mask on the endpapers
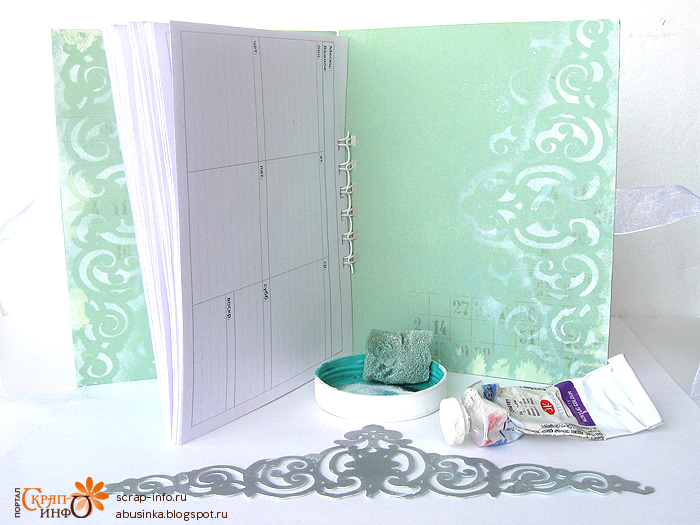
and some on the cover:
Then I glued, pinned, sewed all the decor to the bottom fabric backing. Everything needs to be glued onto the cover itself at the last moment, because if you glue it first, then it will be difficult to sew something or fasten it with brads.

Another secret of mine, I usually tie the stamens in a knot and sew under the decor. I intercept in several places with threads, it turns out tightly and you can distribute the stamens as you like and they will always remain in their places.
When all the details are securely fixed, you can glue everything on the cover. At the end, I added some microbeads and halves of pearls.

When decorating the work, try not to forget about the laws of composition, so that in the end everything turns out beautifully and harmoniously. For example, I deliberately sprinkled a little more microbeads on the upper right to balance the gold chain on the lower left, and the turquoise cow at the bottom is diagonally opposite the turquoise brads at the top.
I attached an earring to the side, tying a prepared ribbon on it and stringing a piece of lace and a white feather onto the earring.
Actually everything is ready, you can use it for its intended purpose. To do this, I bend the covers and tie the ribbons at a certain distance - a very stable design is obtained.
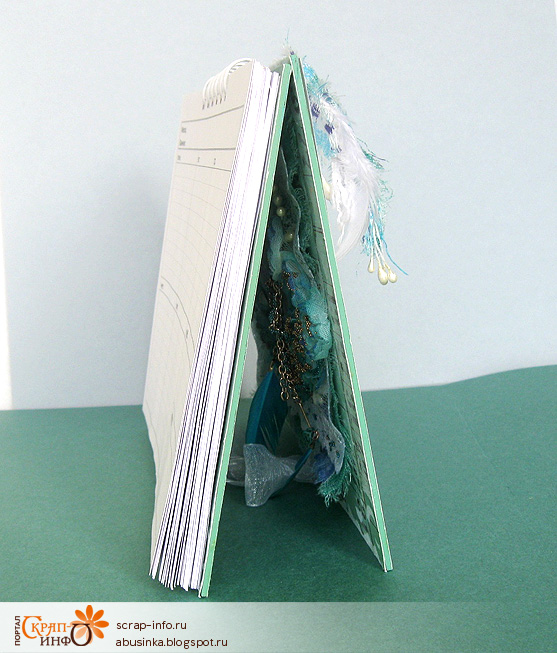
Everything! You can plan things for the week ahead. This planner is on my desktop. For me given format turned out to be the most convenient - the whole week before my eyes!

I wish you to have enough time and energy for all your plans. Enjoy your creativity!
Our lives have never been so busy before. We go to meetings, we work on projects, we try to meet deadlines at work, and besides that, we organize our personal lives, so it can be very difficult to keep everything under control.
Calendars are an important part of our lives, they help organize our activities, meetings, receptions and events. The calendar has huge potential: it is used as a time sheet, to create a school or work schedule, to track projects, etc.
You can create a calendar for a month or a year in several ways. You can create a calendar from scratch manually using Excel, but this can be a time consuming process. You can also use the built-in and pre-formatted calendar template in Excel. You can choose from enough a large number calendar templates, such as a 12-month calendar, a monthly calendar, a weekday-only calendar, or a calendar with notes. These templates have been pre-created and pre-formatted, you just need to populate them with your events.
But how to choose the easiest one to use from all this variety of templates in Excel? We looked through all the templates and found the best calendar templates in Excel - monthly and yearly.
Download Monthly or Yearly Calendar Template in Excel
smartsheet
How to Create a Monthly or Yearly Calendar Template in Excel
The calendar template is extremely easy to use. All you need to do is choose a calendar type (monthly or yearly) and add your own scheduled events to the template. You can also customize the font type, size, and color. If you choose a monthly calendar, you first need to change the name and dates for the month you want.
Here are some additional steps to customize the template for your needs:
1. Format the monthly calendar template
- To change the name, double-click the name field, delete the formula, and then enter the new month in the cell.
- You will then need to renumber the date cells. You can enter the dates manually or use the auto-fill feature, which we'll talk about in "How to Create a Monthly Calendar in Excel 2007 and 2010" (point 4).
2. Add events to the monthly or yearly calendar template
- Whichever template you choose, double-click on a cell in the date window and enter an event. To enter multiple events for the same day, click on another cell in the date cell.
- To place the text in the center, click on the cell. Then, in the “Home” tab, find the “Alignment” section, and then click on the “Align Center” icon (in the form of five lines of text in the center).
3. Change font and color
- Click on the cell with the text you want to change and then go to the Home tab, where you can change the font type, size and color, use bold, apply italics or underline.
- To change the background color of the heading with the names of the days or the added event, select the cell, click on the icon in the form of a bucket of paint and select a fill color.
You can also personalize the calendar template by adding a photo, such as your company logo. Open the "Insert" tab, click "Illustrations". Upload the required image. It will be added to your table and you can drag it to the right place.
How to create a monthly calendar in Excel 2007 or 2010
To create a monthly or yearly calendar in Excel, use the following instructions:
1. Adding headers with day names
First of all, you will need to add the days of the week as headings, as well as the name of the month.
- Leave the first row of your table empty. In the next (second) line, enter the days of the week (one day for each cell).
- To format headings with days of the week and make sure there are none extra spaces, select the days of the week you just entered, and on the Home tab, in the Cells section, select Format. Select "Column Width" and set the width to 15-12, depending on how wide you want your calendar to be.
2. Adding a calendar name
- In the first empty line, we will indicate the current month as the name of the calendar. To do this, we use the formula. Click on the cell in the first row and in the field “ fx” above an empty line, enter the function =TODAY() . This way, Excel will know that you want to display the current date in this field.
- Please note that the date format is incorrect. To correct this error, click on the cell with the date. In the “Home” tab, go to the “Number” section and select “Date” in the drop-down menu. Then select "Additional Date Format" and choose the required format.
To center the title, select all the cells in your title bar (including the cell with the month displayed) and go to the Home tab and click on the Merge and Center button.
3. Create days in the calendar
Now let's start creating the main body of the calendar. We will use borders to create date cells.
- First, select your entire spreadsheet.
- Then click on the paint bucket icon in the Home tab and choose white color. Your spreadsheet should now have a white background.
- Then select five or six cells located under the heading with the first day of the week. In our case, this is Monday.
- While the cells are still selected, click on the border icon in the Home tab and select the appropriate cell border option. This way we will create a frame for the first date cell.
- Select the newly created cell and copy it into the table under the rest of the headings with the days of the week. This will create copies of your cell for other days of the week.
Repeat these steps for all five rows of your table. Your calendar should now look like this:
To add borders around headings with days of the week, select the rows with the days of the week, click on the border icon and select all borders.
4. Adding dates
We have created the basic structure for the calendar, now let's start filling it with dates. You can enter dates manually for each cell, or you can use the automatic filling function that Excel has. Here's how to do it:
- For each row in the calendar, enter the first two dates of the current week in the first two cells of each cell. For example, if the first of the month is Wednesday, enter 1 for the first Wednesday and 2 for Tuesday.
- Then hold the "Shift" key and select both cells with numbers.
- Drag and drop the bottom right edge of the selected cells to autofill the remaining cells of the week.
- Repeat these steps for the entire month.
Note. The first two dates for each row must be manually entered before you can drag-and-drop and auto-populate all week cells.
How to create an annual calendar in Excel
Basically, you've just created a monthly calendar template. If you want to use the calendar only periodically for certain months, you can use the same calendar by simply changing the name of the month and changing the numbering of the days.
You can also use your monthly calendar structure to create a yearly calendar. For this:
- At the bottom of the table right click mouse click on the “Sheet1” tab.
- Click "Move or Copy".
- Check the box next to the “Create a copy” option and click “OK”.
- Make 12 copies, one copy for each month of the year.
Note. For months with 31 days, you will need to add an extra row to the calendar.
Once you have created 12 copies, you will need to open each one and change the name to the corresponding month. In addition, you will need to change the numbers for each month either by manually changing the dates or by using the auto-fill feature that we cover in "How to Create a Monthly Calendar in Excel 2007 and 2010" (point 4).
Personalizing Your Calendar in Excel
It's very easy to create custom settings for your monthly or yearly calendar in Excel. You can color-code certain calendar events, such as business meetings or birthdays, or change font sizes. You can even add your company logo to the calendar.
1. Font Formatting
- To enlarge the title font, click on the title bar. Inside the “Home” tab, you can change the font type and size, use bold, apply italics or underline.
To change the font size of the day headings, select all headings. Inside tab “
Home” you can format the font type and size.
- To format date markers, select all the dates in the cell. Inside the Home tab, you can change the font type and size.
2. Color change
You can change the font color or background color of your calendar. Color coding can be especially useful for marking certain kinds of events.
- To change the color of the name, click on the line with the name. Inside the “Home” tab, in the drop-down list, you can select the color you need.
- To change the background color of the heading of your days of the week, select an entire row, click on the paint bucket icon, and choose a fill color. You can also just change the color of the text by following the steps in point 1.
- To assign a specific color to an event, enter your event or appointment in the date box. Then select the text, click on the paint bucket icon and choose a fill color.
3. Add illustrations
You can personalize your calendar by adding images such as your company logo. For this:
- Inside the "Insert" tab, click on "Illustrations" and select the "Pictures" option. Upload the image you want to use.
- The image will be added to your spreadsheet, after which you can drag it to any place in the table.
If you would like to add your logo or image to the top of the calendar, you will need additional space to accommodate the image. For this:
- Right-click on the first line containing the title and select Paste.
- Click "Add...line".
- Repeat these steps for as many lines as you need.
- To make the background of new lines white, select the new lines, click on the paint bucket icon, and choose white as the color.
- To remove the border lines above the title bar, select the title bar, click on the border icon and select the “No border” option.
Print a calendar in Excel
Your personalized and formatted calendar may be difficult to print. The sides of the calendar may not fit on the printed page, so you end up with a two-page calendar. Here is how you can fix this problem:
- Inside the “Page Layout” tab, select the “Orientation” > “Landscape” option.
- In the "Fit" section, change the width and height to 1 page.
Your calendar will now fit on one page when printed.
How to find the Microsoft calendar template
Microsoft has created many different calendar templates. You can choose from multi-page calendar, yearly calendar, weekly calendar and many more.
To start using the template available in Excel:
- Click "File" > "New".
- Enter the word "Calendar" in the search box.
- You will see a huge number of types of calendars, but for our example, we will take “Calendar for a month for any year”. Click "Create".
This is a calendar for one month (month and year can be any).
- Select the cell with the name of the month and click on the arrow on the left side of the cell. Select the desired month from the drop-down menu.
- Enter the calendar year in the cell to the left of the month name.
- Select the cell with the name of the day of the week located in the upper right part of the calendar and click on the arrow that appears. Select the first day of the month from the drop-down menu.
You can also explore the online catalog of Microsoft templates and select the category of calendars on the left side of the page.
How to insert a calendar using Visual Basic
You can insert a pre-built and populated calendar directly into Excel using the CalendarMaker macro using the Visual Basic Editor. You'll need to turn on Excel's developer mode and use a programming language, but that's easy enough to do, and Microsoft provides sample code for creating a calendar.
1. Enable developer mode
First, you will need to enable developer mode in Excel. For this:
- Click "File" > "Options".
- On the left side of the pop-up window, select the Customize Ribbon option.
- In the Main Tabs section, make sure there is a check mark next to the Developer field, and then click the OK button.
You now have a new tab in your ribbon at the top of your Excel spreadsheet.
2. Insert a calendar with Visual Basic for Applications code
Smartsheet's pre-formatted templates let you create calendars in no time. Months, days of the week, and dates are pre-built, and you have room to add descriptions, comments, and hours for each activity.
Here's how you can use the Smartsheet Calendar Template:
1. Choose a calendar template
- Open the site and sign in to your account (or try a free 30-day trial).
- Go to the "Home" tab, click on the "Create" button, and then select the "View Templates" option.
- Enter the word “calendar” in the “Search templates” field and click on the magnifying glass icon.
- You'll see a list of suggested templates, but for our example, we'll choose Daily Calendar for 2016. Click on the blue "Use Template" button located in the upper right corner.
- Choose a name for your template and a location where you want to save it and click OK.
2. Enter calendar data
A template opens containing already formatted months and dates for all of 2016. Sample content is included in the calendar for reference.
- Specify calendar events in the Action column. You can also add additional details to the Description, Hours, and Comments columns.
- To add multiple events for the same date, you must create a new row. Right-click on a row and select "Insert Row Above" or "Insert Row Below", and then in this new line specify the month, day of the week, date, and action.
- If you want to delete a row, right-click on the cell in the row you want to delete and select "Delete Row".
On the left side of each line, you can attach files directly to a task or start a discussion about an event, adding extra context to your calendar.
3. Switch to calendar view
All your calendar data is in this table. Then, with a simple click of a button, you can automatically populate the calendar with this data.
- On the left side of the toolbar, click on the calendar icon to switch to the calendar view.
Now you can see all your data in the calendar (the current date will be highlighted in blue). You can edit or add events directly from the calendar view by double clicking on the green bar at the top of each cell. You can also change the date of any event by dragging and dropping the green bar to another cell in the calendar.
Any changes to this calendar view will be automatically added to your spreadsheet.
Setting up your calendar in Smartsheet
Customizing your calendar to give it a personal touch is easy in Smartsheet. With just a few clicks, you can add your company logo or use color coding for your events.
1. Changing the color scheme of events
- Right-click on the green bar and select the "Color Options" option.
A window with a color palette will appear, using which you can change the color scheme of the calendar entry.
2. Change the color scheme of the calendar
- To change the background color of the entire calendar, select " Account” in the upper left corner of the screen.
- Click Save.
Select Color & Logo. With this option, you can change the color of the background, tabs, and calendar strips, as well as choose a color from predefined configurations.
You can always return to the default color and logo settings.
3. Adding a logo
The default setting is the Smartsheet logo in the top right corner. You can change this by uploading your own company logo. For this:
- In the upper left corner, select the "Account" menu item.
- Select Color & Logo.
- In the “Logo” section, click the “Select” button and select a file with your image. Once the file has downloaded, click Save.
- Your new image will be added to the calendar.
Email, print, and share your calendar
Make your calendar available to colleagues, friends and family. You can print, export or send to e-mail your calendar from Smartsheet.
To email a calendar:
- On the toolbar to the left of the table, click on the envelope icon.
- Select the "Send as Attachment" option.
- In the To field, add a recipient or recipients by selecting from your contact list or by typing an email address.
The "Subject" and "Message" fields are pre-filled, but you can delete this text and type your own.
Choose how you want to attach your calendar: how PDF file or Excel spreadsheet, as well as the way the calendar is delivered: immediately or on a regular basis later.
To share your calendar with a link:
- At the bottom of the calendar, click Post.
- Use the sliders to select a publishing method.
- A pop-up window will appear containing a link to publish. You can copy and paste this link, opening in this way general access to the calendar, or use the embed code to add the calendar to any web page.
To print a calendar:
- On the left side of the toolbar, click on the printer icon.
- Select date range, paper size, orientation, and more. Then click "OK".
- A PDF version of your calendar will begin downloading, which you can then print.
The easiest way to create a calendar
There are many ways to create a calendar, but you should always make sure that you choose the one that will save you the most time (for example, templates with pre-built data and functions that are easy to edit). After all, a calendar should help you be more organized without too much effort, not force you to extra work, forcing you to learn how to create it from scratch.
Find out how easy it is to create a calendar. Try a free 30-day trial of Smartsheet.