Most of such enterprise and multicomponent systems as SAP , OracleDB use in their platform an operating system based on linux . In view of this, such close attention is paid to them by IT auditors. Today in the article we will present to your attention several free tools presented in the form of scripts and using regular OS mechanisms to provide an express audit of the security configuration.
The following system commands and scripts used for express audit of security options of Linux OS systems are based on the security audit recommendations published by the ISACA community in the UNIX/LINUX Operating System Security Audit/Assurance Program manual.
1.Verifying Accounts
1.1 List all users
The list of users is stored in /etc/passwdfile. To get a list of users, you can use the following script:
- bin/bash
- # userslistinthesystem.sh
- # count and Lists existing "real" users in the system.
- echo “[*] Existing users (sorted alphabetically):”
- grep ‘/bin/bash’ /etc/passwd | grep -v 'root' | cut-f1
- -d':' | sort
- echo -n “[*] Number of real users found: “
- grep ‘/bin/bash’ /etc/passwd | grep -v 'root' | wc -l
During the audit, you need to check the list of blocked and unblocked users ( accountName ). The following command will work for this:
- #!/bin/bash
- # passwd –s accountName
1.3 Viewing statistics for all users
- #!/bin/bash
- #!/bin/bash
- # ac -d
- #!/bin/bash
- # ac user
The psacct or acct system applications run in the background and keep track of each user's activity on the system, as well as the resources they consume. To check the activity of users in the system, run the following script:
- #!/usr/bin/envksh
- last -Fa|awk ‘
- /wtmp begins/ ( next; )
- /still logged in/ ( next; )
- $0 == reboot ( next; )
- NF > 0 (
- if(NR > 1)
- printf("
”); - printf("User:t%s
”, $1); # user - printf(" Start:t%s %s %s %s
”, $3, $4, $5, $6); - if($9 == "down")
- printf(" End:shutdown
”); - printf(" End:t%s %s %s %s
”, $9, $10, $11, $12); - if(substr ($NF, 1, 1) == “(“)
- t = $NF;
- h = "localhost";
- t = $(NF-1);
- h = $NF;
- gsub(“[()]”, “”, t);
- printf("Time On:t%s
”, t); - printf("Remote Host:t%s
”, h);
2. Checking the password policy
2.1 Accounts with an empty password
During the audit, you need to make sure that there are no or blocked accounts in the system that allow you to log into the system without entering a password. This rule can be checked with the command:
# cat /etc/shadow | awk -F: ($2==””)(print $1)’
2.2 Password complexity check
During the audit, it is necessary to check the password complexity settings to reduce the risk of brute-force (brute-force) or dictionary attacks on the password. Pluggable Authentication Modules (PAM) must be used to set this policy on the system.
The auditor can check the appropriate setting in the configuration file:
# vi /etc/pam.d/system-auth
2.3 Checking password expiration
As part of the audit, you should check the password expiration setting. To check the password expiration time, use the command change.
This command outputs detailed information password expiration date, and the date it was last changed.
The following command is used to view information about the "age" of passwords:
#chage -l username
To change the password expiration time for a specific user, you can use the commands below:
#chage -M 60 username
#chage -M 60 -m 7 -W 7 userName
Options (to set the password expiration date):
-M - maximum expiration date in days.
-m is the minimum expiration date in days.
-W - warning setting in days.
2.4 Use of repeated passwords
Authorization settings in the system must comply with the password policy. The file containing the password history is located in /etc/security/opasswd.
To check, follow these steps:
for RHEL: open file '/etc/pam.d/system-auth':
# vi /etc/pam.d/system-auth
for Ubuntu/Debian/Linux Mint: open file '/etc/pam.d/common-password':
# vi /etc/pam.d/common-password
Add the following line to the 'auth' section:
auth sufficient pam_unix.so likeauthnullok
To disable the use of the last six passwords, add the following line:
Password sufficient pam_unix.so nullokuse_authtok md5 shadow remember=6
After executing the command, the system will keep a history of the previous six passwords, and if any user tries to update the password using any of the last six, he will receive an error message.
3. Secure connection settings
The Telnet and Rlogin remote connection protocols are very old and vulnerable, due to the transmission of the password over the network in unencrypted form. A secure protocol must be used for a remote and secure connection Secure Shell (SSH).
The auditor also needs to ensure that the option root login
disabled, default SSH port changed, remote access allowed only for specific authorized users. The settings to be checked are in the SSH configuration file:
1. #vi /etc/ssh/sshd_config
3.1 Login as superuser (root login)
During the course of the audit, the auditor should verify that remote login with root superuser rights is prohibited.
# PermitRootLogin = yes
3.2 Verify service account SSH login
During the audit, the auditor should check the service account with a passwordless SSH login. Typically, system administrators use this feature for programmed backups, transferring files and running scripts in remote control mode.
Check your sshd_config settings (/etc/ssh/sshd_config) are correct one last time.
# PermitRootLogin without-password
# RSAAuthentication = yes
#PubkeyAuthentication=yes
3.3 Checking access lists in DenyHosts and Fail2ban
During the audit, it is necessary to check the settings of access lists DenyHosts
and Fail2ban
. These are scripts used to monitor and analyze SSH access logs and protect against password brute force attacks.
DenyHost Features:
- saves and tracks logs from a file /var/log/secure , marking all successful and unsuccessful login attempts, and filters them.
- monitors failed login attempts
- sends email notification of blocked hosts and suspicious login attempts
- Saves and tracks logs from files /var/log/secure and /var/log/auth.log , /var/log/pwdfail
- highly customizable and multi-threaded
- monitors log files on a regular basis
4. Checking system logs
During the audit, you need to make sure that the SysLog daemon is running, and that all significant events that occur in the system are recorded in the event logs. The audit should also ensure that the event log retention policy takes into account the requirements of applicable law and security policy.
4.1 Event logs in Linux:
/var/log/auth.log – authorization system log (logins and authentication mechanism).
/var/log/dpkg.log - log of installing/removing packages using dpkg.
/var/log/yum.log - log of installing/removing packages using yum.
/var/log/faillog - A log of failed login attempts and their limit for each account.
/var/log/kern.log – kernel log, (detailed log of messages from the Linux kernel).
/var/log/maillog or /var/log/mail.log – mail server log.
/var/log/wtmp – login log (logging time and duration of all system users).
/var/run/utmp - information about users currently logged into the system.
/var/log/lastlog - records of previous logins.
/var/log/boot - information that is logged during system boot
5. Protecting system files
5.1 Protecting the GRUB bootloader
To protect the GRUB bootloader, the administrator needs to use password encryption in MD5 format :
# grub-md5-crypt
After executing the command, the administrator needs to open the file /boot/grub/menu.lst or /boot/grub/grub.conf and add MD5 password:
# vi /boot/grub/menu.lst
#vi /boot/grub/grub.conf
The newly created MD5 password can be added to the GRUB configuration file.
5.2 Protecting the boot directory /BOOT
During the audit, you need to check the status of the directory /boot, since the core of the system and related files are located in the directory /boot. You need to make sure that this directory has read-only access, which prevents unauthorized changes to important files on the system. To check, open the /etc/fstab file and check the configuration:
The file must contain the line:
LABEL=/boot /boot ext2 defaults,ro 1 2
5.3 Checking open ports and active connections
The following script can be used to check the services running on the system:
#!/bin/bash
if (($(ps -ef | grep -v grep | grep $service | wc -l) > 0))
then
echo "$service is running!!!"
else
/etc/init.d/$service start
fi
View network connections
# netstat -anop
or
# lsof -i(lsof -ni)
or
# iptraf
Listening ports
Using the Netstat command, you can view all open ports and related commands. Script example:
# netstat-tulpn
A script for port scanning is:
scan() (
if [[ -z $1 || -z$2]]; then
echo “Usage: $0
return
fi
localhost=$1
local ports=()
case $2 in
*-*)
IFS=- read start end<<< “$2”
for ((port=start; port<= end; port++)); do
ports+=($port)
done
;;
*,*)
IFS=, read -ra ports<<< “$2”
;; *)
ports+=($2) ;;
esac
for port in “$(ports[@])”; do
alarm 1 "echo >/dev/tcp/$host/$port" &&
echo "port $port is open" ||
echo "port $port is closed"
done
}
iptables firewall
During the audit, you must check the configuration of the Linux firewall to prevent unauthorized access. To control traffic, rules must be created in iptables that will filter incoming, outgoing and forwarded packets based on the IP address and TCP/UDP port number.
# iptables -n -L -v --line-numbers
ICMP/broadcast requests
During the audit, you need to verify that systems are configured to ignore pings and broadcast requests. To do this, make sure that the file “/etc/sysctl.conf” added the following lines:
# ignore ICMP requests:
net.ipv4.icmp_echo_ignore_all = 1
# ignore broadcast requests:
net.ipv4.icmp_echo_ignore_broadcasts = 1
5.4 Checking for installed updates
The systems must have the latest updates installed:
# yum updates
# yum check-update
6. Checking automatically executed CRON jobs
The auditor should check who is allowed and forbidden to execute jobs in cron. Cron access is controlled using files /etc/cron.allow and /etc/cron.deny.
# echo ALL >>/etc/cron.deny
7. SELINUX Forced Security Check
During the audit, it is important to check the status SELinux
. This mechanism must be enabled in the system.
There are three modes SELinux
:
- Enforcing: The SELinux policy is enforced. SELinux denies access based on SELinux policy rules.
- Permissive: The SELinux policy is not enforced. SELinux does not deny access, but the denials are logged as actions that would be denied if the policy was set to enforce.
- Disabled: SELinux is disabled. Only discrete DAC rules are used.
During an audit, you can use the following script to check the status of SELinux or use the system-configselinux, getenforce, or sestatus commands:
ENABLED=`cat /selinux/enforce`
if [ “$ENABLED” == 1 ]; then
echo “SELinux is enabled, disable? (yes/no):”
read disable
if [ $disable == "yes" ]; then
echo "disabling selinux"
setenforce 0
fi
fi
LBSA script to check basic security options
LBSA (Linux Basic Security Audit script) is a basic Linux security configuration audit script. The script must be run from a command line with privileges root, or ideally scheduled to run on a regular basis using cron to systematically check for configuration changes.
The purpose of this script is to quickly audit security settings and download a report describing possible settings that can be changed to provide a higher degree of security. In the event that there are no recommendations for any option, the script simply displays one line with the processing of the check, and the final decision always remains with the administrator. Before running a test, the developers strongly recommend that you read the manual and study the recommended sections for more information.

In the current edition (Version 1.0.49), the script scans for the following options:
- vulnerabilities in account settings
- vulnerabilities in SSH settings
- vulnerabilities in temporary directories and directories of the file system loaded into RAM (for example, in /tmp, /var/tmp /dev/)
- file permissions, state of system directories
- -configuration of DRBD and Hearbeat services
The script is quite large, so we didn't put it on the page.
Conduct a server security audit once a month to timely detect possible problems related to the penetration of intruders into the server.
If you do not see any signs of third-party activity on the VPS or site, perform the following series of checks and adjustments to protect the server from hacking.
Application layer settings
If CMS is installed on the server, then check if all the latest updates are installed.
Joomla
Find the changelog.txt file in the root directory of the site, where you will find information about the CMS version. If it is out of date, update Joomla.
Wordpress
Search for the wp-includes/version.php file for the CMS version information. If it's outdated, update Wordpress.
DLE
Search for the engine/data/config.php file, look for the version_id line and make sure the version is up to date.
Also check engine/ajax/updates.php and upgrade/index.php files ($dle_version parameter).
1C-Bitrix
Search for the /bitrix/modules/main/classes/general/version.php file, where you will find information about the CMS version. Also check the /bitrix/admin/update_system.php file. If the version is outdated, update 1C-Bitrix.
Drupal
Find the changelog.txt file in the root directory of the site, where you will find information about the CMS version. If it's out of date, update Drupal.
Check the kernel version in the /modules/system/system.info file.
Also, you can detect the CMS version through the control panel.
Check web server.
Apache
Open the Apache configuration file (depending on the version, these may be httpd.conf, httpd2.conf, apache.conf, apache2.conf files) and check if it contains a directive that disables the output of information about the version of the web server:
ServerTokensProd
If this directive is not present, then add and save the file.
Search for the secure.conf file, open it for viewing, and check its contents against the following example:
Your secure.conf should not be significantly different from the above example.
Check the installed MPM with the command
Apachectl -V
For stronger security, use mpm_itk unless you absolutely need mpm_prefork.
If you want to change MPM, do a reinstall after making backup copies of the configuration files. After reinstallation, check if the owner of the site and all its directories is the user.
Nginx
Open the web server configuration file (nginx.conf), go to the http section and check if it contains directives that limit the number of connections from one IP address:
Limit_zone slimits $binary_remote_addr 5m; limit_conn slimits 10; or (for recent versions) limit_conn_zone $binary_remote_addr zone=addr:10m; limit_conn addr 10;
If these directives are not present, then add and save the file.
Block some user agents to block unwanted traffic. In the http section of the Nginx configuration file, add the directive
If ($http_user_agent ~* LWP::Simple|BBBike|wget|msnbot) (return 403;)
Block referral spam by adding the directive to the http section of the Nginx configuration file
If($http_referer ~*(babes|forsale|girl|jewelry|love|nudit|organic|poker|porn|sex|teen))(return 403;)
ISPmanager
Perform the following checks in the ISPmanager control panel.
Check if access to the control panel is restricted by IP address.
Set up data backup if it is not enabled. We recommend using an external drive for backup to prevent data loss along with the archive.
PHP
Open the php.ini configuration file and add the following directives.
Expose_php=Off - turn off the transmission of PHP version information in the HTTP header; sql.safe_mode=On - enable SQL safe-mode; post_max_size=8M - size limit for data transmitted by the POST method; disable_functions exec, system, passthru, proc_open, shell_exec - disable some functions for security reasons.
NTP
In the NTP configuration file (/etc/ntp.conf by default), add lines to disable recursive requests:
Restrict default kod limited nomodify notrap nopeer noquery restrict -6 default kod limited nomodify notrap nopeer noquery restrict 127.0.0.1 restrict -6::1
Bind
Place the following lines in the named.conf file to disable recursive queries:
Allow-recursion( 127.0.0.1; 82.146.32.0/19; 78.24.216.0/21; 92.63.96.0/20; 62.109.0.0/19; 188.120.224.0/19; 149.154.64.0/21; 37.230.112.11; 94.250.248.0/21; );
Checking the owner of the site directory
Check who owns the site's main directory and all of its subdirectories.
In the ISPmanager toolbar, go to the “System” -> “File manager” section and open the site directory. Make sure the Owner and Group columns are for the user who owns the site. To change these attributes, click the Attributes button on the toolbar.
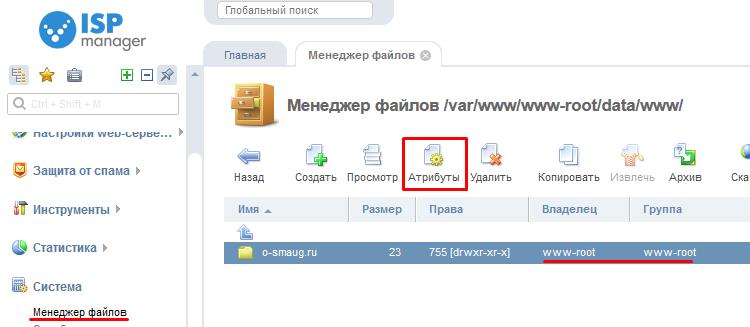
Valid site owner names are apache, www, www-data if you use mpm_prefork. We recommend using mpm_itk to improve security.
If the site contains shared folders (for example, upload, tmp), then the owner name 777 is valid for them. Make sure that this user is set to only the necessary directories by running the command
Find ./ -perm 0777
It will find all folders and files owned by 777.
Operating system level settings
rhunter
Use the rkhunter utility to identify potential server vulnerabilities.
To install the utility, use the command:
Yum install rkhunter - CentOS OS apt-get install rkhunter - Debian/Ubuntu OS make all install clean -C /usr/ports/security/rkhunter or pkg install rkhunter - FreeBSD OS
To update the database of this utility, run the commands
Rkhunter --update
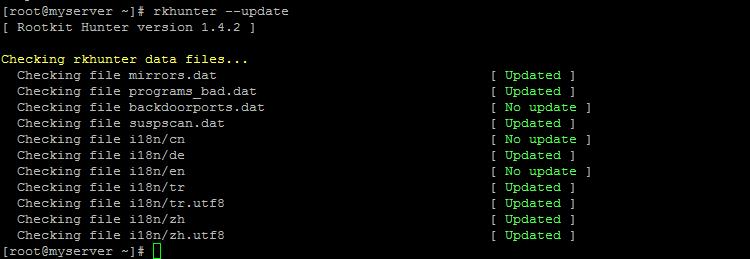
Rkhunter --propupd
Run a system check with the command
Rkhunter -c --cs2

During the verification process, you need to press the Enter key several times to continue. Upon completion, a summary of the test result will appear.
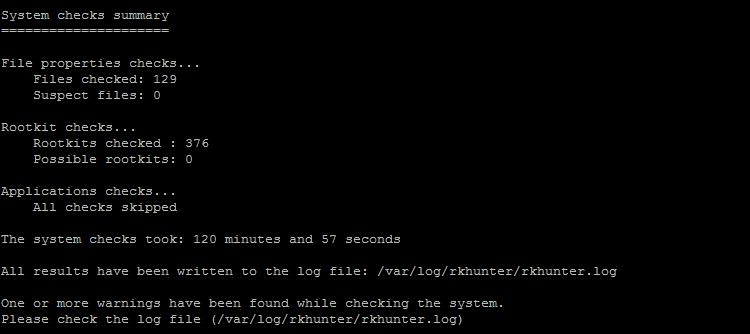
The results of the check are placed in the log file /var/log/rkhunter/rkhunter.log, review it for warnings and errors.
sysctl
Use the sysctl utility to manage system kernel parameters. Open the /etc/sysctl.conf utility configuration file and enter the following lines.
Disable the ability to route incoming traffic, as an attacker can use this ability to spoof IP addresses:
net.ipv4.conf.all.accept_source_route = 0
Disable replies to ICMP requests over the broadcast channel - this will help prevent smurf attacks:
Net.ipv4.icmp_echo_ignore_broadcasts = 1
Disable logging of invalid error messages:
Net.ipv4.icmp_ignore_bogus_error_responses = 1
Enable memory overflow protection:
Kernel.exec-shield=1 (CentOS)
Enable ASLR memory usage:
kernel.randomize_va_space = 2
Disable the ability to forward ICMP messages:
net.ipv4.conf.all.accept_redirects=0 net.ipv4.conf.default.accept_redirects=0
If you are not using a VPN or other special applications on the server, disable forwarding:
Net.ipv4.conf.all.forwarding=0
Enable SYN flood protection - use of SYN cookies:
Net.ipv4.tcp_syncookies=1
Set the number of attempts to send SYN-ACK packets:
Net.ipv4.tcp_synack_retries = 3
Set the time after which the server checks the connection if it has not been used for a long time (default is 2 hours):
Net.ipv4.tcp_keepalive_time=1800
Set the number of connection checks before it is terminated:
Net.ipv4.tcp_keepalive_probes=3
Set the socket timeout in the FIN-WAIT-2 state:
net.ipv4.tcp_fin_timeout=30
fstab
Check the fstab configuration file (/etc/fstab), which contains information about disks, partitions, and storage devices, and how they are mounted on the system.
vi /etc/fstab
Note that non-root partitions must have the nodev option. If /tmp is mounted on a separate partition, add nodev, noexec, nosuid for that partition.
rsyslog
Check the system log file /etc/rsyslog.conf.
Vi /etc/rsyslog.conf
Pay attention to the following lines, which should look like:
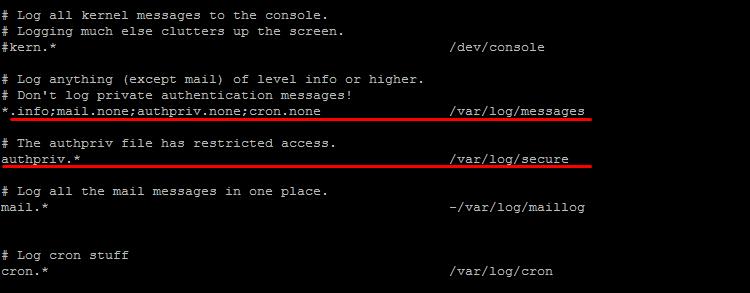
Also make sure the log file is not empty, i.e. logging is correct.
sudo
Check if the sudo (or su) utility is properly configured, which allows the user to run certain commands and programs as root. The settings for this utility are located in the configuration file /etc/sudoers or /usr/local/etc/sudoers. Open it for editing
Vi /etc/sudoers
Find the line that is written by default and allows the root superuser to run any commands.
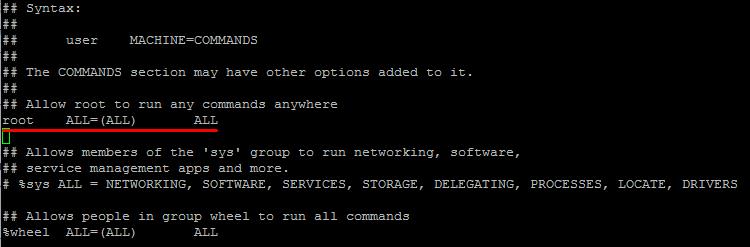
To give all users the privilege to run commands as root, add the following line:
ALL ALL=/bin/su or ALL ALL=/usr/bin/su
To give a specific user the privilege to run only certain commands as root, add the line:
%users ALL=/sbin/mount - the users group will only be able to use sudo with the mount command user ALL=/sbin/mount - the user user will be able to use sudo only with the mount command
Network level settings
Check which ports are open on the server and which services are using them by running the command
Netstat -tuplnw | awk "(print $4,$NF)" | sort | uniq
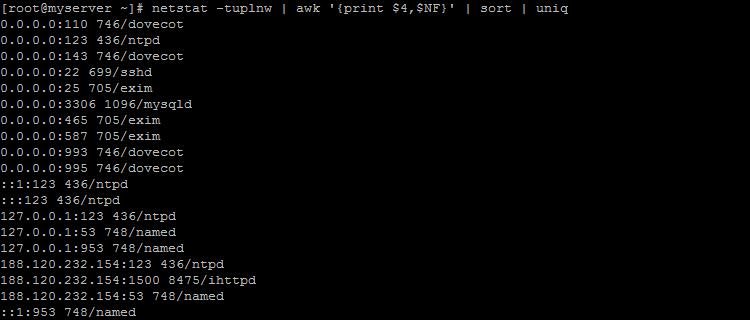
For example, the entry 127.0.0.1:53 748/named means that the named service is using port 53. Check that only the necessary ones are among the running services, disable all others.
FTP
Set the port range to use for passive FTP mode. To do this, open the configuration file of your FTP server for editing and add the lines:
for vsftpd.conf:
pasv_min_port=1028 pasv_max_port=1048
for proftpd.conf:
Passive Ports 1028 1048
Don't use the FTP protocol unless absolutely necessary, use SFTP instead. If FTP is still required, add the following lines to the configuration file:
for vsftpd.conf:
Xferlog_enable=YES (ftp logging) anonymous_enable=NO (deny anonymous user connections) anon_upload_enable=NO anon_mkdir_write_enable=NO
for proftpd.conf:
in section
iptables
Check if the firewall is configured correctly. For iptables run the command
Iptables-nL
This command prints all iptables firewall rules to the command line. Also, these rules can be viewed and edited in the firewall configuration file /etc/sysconfig/iptables - for CentOS OS, /etc/network/if-up.d/ispmgrfw - for Debian/Ubuntu OS.
In the firewall rules, close all ports except those used by the services running on the server. To do this, change the lines
:INPUT ACCEPT :FORWARD ACCEPT :OUTPUT ACCEPT to :INPUT DROP :FORWARD DROP :OUTPUT DROP
To open the necessary ports, add lines like
A INPUT -p tcp -m tcp --dport 53 -j ACCEPT -A INPUT -p udp -m udp --dport 53 -j ACCEPT -A INPUT -p tcp -m multiport --sports 53,80,25,443,953 -j ACCEPT
where 53 is the port number to open.
Before making changes to the firewall configuration file, make a copy of the working file.
Firewall rules can be configured from the ISPmanager control panel.
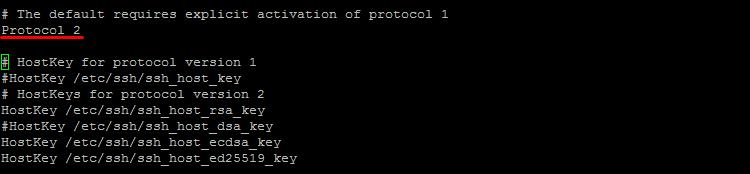
SSH
Open the SSH configuration file:
Vi /etc/ssh/sshd_config
Check that the following lines are not commented out:
Protocol 2 (to use the second version of the protocol) IgnoreRhosts yes (do not use the .rhost file) HostbasedAuthentication no (do not authenticate the host) PermitRootLogin no (deny root access) PermitEmptyPasswords no (do not use blank passwords) PermitUserEnvironment no (prohibit the user from setting environment variables) PasswordAuthentication yes (allow password authentication)
Enable SFTP by adding the following line to sshd_config:
Subsystem sftp /usr/lib/openssh/sftp-server
Check the mail queue for overflow and make sure that there are no spam messages among the messages.
Run the mailq command and view the list of messages. If the list is very large, selectively check for messages that may be spam. By identifier (for example, BD65F10DEE4) determine the sender of the letter. Command
Exim -Mvh message_id
displays the header of the email, and the command
Exim -Mvb message_id
will display the body of the message.
Among the message headers, the From: field contains the sender, and X-PHP-Originating-Script contains the script to which the message was sent.
Software
Check server software for vulnerabilities.
CentOS OS
Run a command that lists installed software files recently modified:
Rpm -qVa - to display all files, rpm -qVa | awk "$2!="c" (print $0)" - to print files except logs.
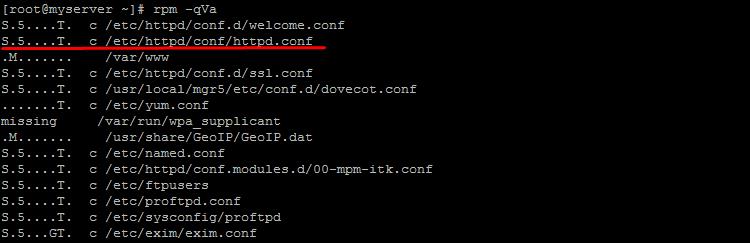
Analyze which files have been changed and how, using the following parameter values:
S - file size modified M - default permissions modified 5 - MD5 checksum modified D - major/minor numbers for the device modified L - symbolic link modified U - file owner modified G - group modified T - file modification date (mtime) modified ) c - configuration file d - documentation file g - file not included in package l - license file r - README file
For example, the line S.5....T. c /etc/httpd/conf/httpd.conf means that httpd.conf is a configuration file, its size, checksum and last modification date have been changed. Since this is a configuration file, these changes are not suspicious.
Pay attention to files that have their checksum values changed for no apparent reason. For such files, run the command:
Stat /usr/sbin/sshd && file /usr/sbin/sshd where usr/sbin/sshd is the path to the file.
As a result of the command, detailed information about the change in this file is displayed on the screen.
Execute the command:
Yum --security update
to install security-update.
Debian OS
Run commands that check MD5 checksums for installed programs:
# apt-get install debsums # debsums -c
Run the following commands to check security-update:
# echo 'deb http://security.debian.org wheezy/updates main contrib non-free' >> /etc/apt/sources.list # grep security /etc/apt/sources.list > /etc/apt/secsrc .list # apt-get -s -o Dir::Etc::sourcelist="secsrc.list" -o Dir::Etc::sourceparts="-" upgrade
To install security-update, run the command:
# apt-get -o Dir::Etc::sourcelist="secsrc.list" -o Dir::Etc::sourceparts="-" upgrade
Verify that all repositories have gpg reconciliation by running the commands:
# grep -ri gpgcheck /etc/yum.conf # grep -ri gpgcheck /etc/yum.repos.d/ Make sure the lines look like: gpgcheck=1 # grep -ri AllowUnauthenticated /etc/apt/
Rows of the form
APT::Get::AllowUnauthenticated "true";
should not be.
Unused Services
CentOS OS
chkconfig --list
Chkconfig --del service_name where service_name is the name of the service.
Debian OS
Run a command that lists unused services:
sysv-rc-conf
To disable the startup of an unused service, run the command:
Sysv-rc-conf off service_name where service_name is the name of the service.
Linux server security is very important to protect your data, intellectual property, as well as time at the hands of crackers. For security operating system Linux answers System Administrator. In this article, we'll look at twenty things you need to do with your Linux operating system to keep it safe and secure at all times. If this home computer, then about security, perhaps, it makes no sense to worry so much, strong passwords and blocking access to ports from the Internet will be enough. But in the case of a public server, you should pay attention to ensuring its protection.
These instructions will work for any distribution, whether you're using CentOS, Red Hat or Ubuntu, Debian.
1. Communication encryption
All data transmitted over the network is open for monitoring. Therefore, it is necessary to encrypt the transmitted data, where possible using passwords, keys or certificates.
Use scp, ssh , rsync, or sftp to transfer files. You can also mount a remote filesystem to your home directory using tools such as shhfs.
GnuPG allows you to encrypt and sign your data with a special private key. There are also functions for key management and access to public keys.
Fugu is a graphical SFTP file transfer tool. SFTP is very similar to FTP, but the entire session is encrypted. This means that no passwords or commands are transmitted in the clear. Therefore, such transfers are less vulnerable to third parties. You can also use FileZilla, it's cross-platform FTP client with support for FTS over SSH / TLS and SSH File Transfer Protocol (SFTP).
OpenVPN is an efficient and lightweight VPN client with support for SSH encryption.
2. Try not to use FTP, Telnet, Rlogin and RSH
On most networks, usernames, passwords from FTP, Telnet, RSH commands can be intercepted by someone on the same network using a packet sniffer. The general solution to this problem is to use OpenSSH, SFTP, or SFTP, which adds SSL or TLS to regular FTP. Run the following command to remove NIS, RSH and other obsolete services:
yum erase inetd xinetd ypserv tftp-server telnet-server rsh-serve
3. Reduce the amount of software
Do you really need all installed web services? Do not install unnecessary software to avoid vulnerabilities in these programs. Use your package manager to see installed programs and remove all unnecessary:
yum list installed
$ yum list package
$ yum remove package
dpkg --list
$ dpkg --info package
$ apt-get remove package
4. One machine - one service
Run different services on separate servers, or virtual machines. This limits the number of services that can be compromised. For example, if an attacker can hack into Apache, then he will gain access to the entire server. Including services such as MySQL, server Email and so on. You can use software such as XEN or OpenVZ for virtualization.
5. Keep the Linux kernel and software up to date
Applying security patches is a very important part of keeping a Linux server secure. The operating system provides all the tools to keep the system up to date and upgrade to new versions. All security updates should be applied as soon as possible. Here, too, you need to use your package manager. For example:
Or for Debian based systems:
sudo apt update && sudo apt upgrade
You can set up Red Hat or Fedora to send you email notifications when new security updates are available. Also you can customize automatic update via cron, or you can use Debian's aptcron to notify you to upgrade your system.
6. Use security extensions in Linux
The Linux operating system comes with various security patches that can be used to protect against misconfiguration or malware. But you can also use additional access control systems for applications like SELinux or AppArrmor.
SELinux provides various security policies for the Linux kernel. Here it is possible to control access to any system resources using roles. A particular resource can only be accessed by a program whose role allows it, and even superuser rights do not matter. SELinux greatly increases the security of a Linux system, since even root is considered a normal user here. More details are described in a separate article.
7. User accounts and strong passwords
Use the useradd and usermod commands to create and maintain user accounts. Make sure you have a good and strong password, it should contain at least eight characters, preferably in a different case, among which there should be special characters or numbers. For example, 8 characters, of which seven are letters and one character or number. Use tools like John the ripper to find weak user passwords on the server, and configure pam_cracklib.so to enforce the password policy.
8. Change passwords from time to time
The change command allows you to specify the number of days before the forced password change date. This information is used by the system to determine when the user should change it. These settings are in /etc/login.defs. To disable password aging, enter the following command:
change -l username
To get information about the password expiration date, enter the command:
You can also configure everything manually, in the /etc/shadow file:
(user): (password): (last_modified):(max_days): (minimum_days): (Warning):(deactivate):(expiration_lines):
- Minimum days- the minimum interval between password changes, that is, how often the user can change the password.
- Maximum days- how many days the password will be valid, after this period the user will be forced to change the password.
- Warning- the number of days after which the user will be warned that he needs to change his password.
- expiry_string- the number of days since January 1, 1970 when the account will be completely disabled.
chage -M 60 -m 7 -W 7 username
It is also desirable to prevent users from using old passwords, otherwise all efforts to force them to change passwords will be nullified.
9. Block Accounts After Failed Login Attempts
On a Linux operating system, you can use the faillog command to view failed user login attempts. You can also use it to set a limit on failed login attempts. All information about failed login attempts is stored in the /var/log/faillog file. To view it, type:
And to set a limit on login attempts for a specific account, use:
faillog -r -u user
You can also manually block or unblock accounts using the passwd command. To block use:
passwd -l user
And to unlock:
passwd -u user
It is also advisable to check if there are accounts with empty passwords in the system. To do this, run:
awk -F: "($2 == "") (print)" /etc/shadow
Also check if there are any users with group or id 0. There should be only one such user, and this is root. You can check with this command:
awk -F: "($3 == "0") (print)" /etc/passwd
There should be only one line:
root:x:0:0:root:/root:/bin/bash
If there are others, delete them. Users, and especially their weak passwords, are one of the most vulnerable things that can break security in linux.
10. Disable Superuser Login
To keep your linux system secure, never log in as root. You can use sudo to get the necessary permissions and run the desired command as root. This command allows you not to disclose the superuser password to other admins, and also contains tools for monitoring, restricting and tracking actions.
11. Server physical security
Linux server security must include physical security. You must restrict physical access to the server console. Set the BIOS to not support booting from external media such as DVD, CD, USB. Also set a password on the BIOS and GRUB bootloader to protect their settings.
12. Disable unnecessary services
Disable all unused services and daemons. Also do not forget to remove these services from startup. You can list all active services on Red Hat systems with the command:
chkconfig --list | grep "3:on"
To disable the service, use:
service stop
$ chkconfig service off
Find everything open programs ports:
The same can be done with the nmap scanner:
nmap -sT -O localhost
Use iptables to close all ports that should not be accessible from the network. Or stop unnecessary services as described above.
13. Remove X server
The X server on the server computer is completely optional. You don't need to run a graphical environment on a dedicated Apache or Email server. Remove this software to improve security and performance.
14. Set up Iptables
iptables is a user-space program for configuring the Netfilter firewall built into the kernel. It allows you to filter all traffic and allow only certain types of traffic. Also use TCPWrappers - ACL system to filter internet access. You can prevent many types of DOS attacks with iptables. Network security in Linux is a very important aspect of overall system security.
15. Set up the kernel
The /etc/sysctl.conf file stores kernel settings that are loaded and applied during system startup.
Enable execshield buffer overflow protection:
kernel.exec-shield=1
kernel.randomize_va_space=1
Enable IP Spoofing Protection:
net.ipv4.conf.all.rp_filter=1
Disable IP address forwarding:
net.ipv4.conf.all.accept_source_route=0
Ignore broadcast requests:
net.ipv4.icmp_echo_ignore_broadcasts=1
net.ipv4.icmp_ignore_bogus_error_messages=1
Log all forged packages:
net.ipv4.conf.all.log_martians=1
16. Partition your hard drive
Separation hard drive into partitions depending on the purpose of the files improves the security of the Linux OS. It is recommended to make separate sections for such directories:
- /home
- /var and /var/tmp
Make separate partitions for Apache root directories and FTP servers. Open the /etc/fstab file and set special options for the desired partitions:
- noexec- do not execute any programs or executable files on this partition, only scripts are allowed
- nodev- do not allow symbolic or special devices on this partition.
- nosuid- do not allow SUID / SGID access for programs from this section.
17. Use Disk Space Limitation
Limit available disk space for users. To do this, create a disk quota in /etc/fstab, remount the filesystems, and create a database of disk quotas. This will improve security on Linux.
18. Disable IPv6
The next generation Internet protocol IPv6 will replace the already used IPv4 in the future. But at the moment there are no tools that allow you to check the security of an IPv6-based network. Many Linux distributions allow IPv6 by default. Hackers can send unwanted traffic and admins won't be able to track it. So if you do not need this service, disable it.
19. Disable unused SUID and SGID binaries
All executable files for which the SUID or SGID flag is enabled are potentially dangerous. This flag means that the program will be executed with superuser rights. And this means that if the program has some kind of vulnerability or bug, then the local or remote user can use this file. Find all such files with the following command:
find / -perm +4000
Find files with the SGID flag set:
find / -perm +2000
Or we can combine it all in one command:
find / \(-perm -4000 -o -perm -2000 \) -print
$ find / -path -prune -o -type f -perm +6000 -ls
You will have to study each found file in detail in order to understand how much this or that file is needed.
20. Public Files
It is also desirable to find files that can be modified by all users on the system. To do this, use the following command:
find /dir -xdev -type d \(-perm -0002 -a ! -perm -1000 \) -print
Now you need to check whether the rights for the group and the owner of this each file are set correctly and whether this poses a security risk.
It is also desirable to find all files that do not belong to anyone:
find /dir -xdev \(-nouser -o -nogroup \) -print
21. Use a centralized authentication system
Without a centralized authentication system, user data becomes inconsistent, which can lead to stale credentials and forgotten accounts that should have been deleted long ago. The centralized service will allow you to maintain control over user accounts and authentication data on different Linux systems and Unix. You can synchronize authentication data between servers. But don't use NIS service, better look towards Open DAP.
One of the interesting implementations of such a system is Kerberos. It allows users to be authenticated using a secret key on networks where packets can be intercepted and modified. Kerberos uses a symmetric key to encrypt data and requires a Key Management Center to function. You can set up remote login, remote copy, secure copy of files between systems and other tasks with a high level of security.
22. Logging and auditing
Set up logging and auditing to collect and save all failed login attempts and hacking attempts. By default, all logs, or at least most of them, are located in the /var/log/ folder. In more detail, we talked about what certain ones are responsible for in a separate article.
You can watch logs with utilities such as logwatch or logcheck. They greatly simplify reading the logs. You can view not the entire file, but only the events you are interested in, as well as send yourself a notification to your email address.
Monitor the system with the auditd service. The program writes to disk all the audit events that you are interested in. All audit settings are stored in the /etc/audit.rules file. At system startup, the service reads all the rules from this file. You can open it and configure everything as you need, or use a separate utility - auditctl. You can set the following points:
- System startup and shutdown events
- Date and time of the event
- User events (for example, access to a specific file)
- Event type (edit, access, delete, write, update, etc.)
- Success or failure when executing an event
- Recording Network Settings Change Events
- Recording user and group changes
- Monitor file changes
23. Protect your OpenSSH server
Allow only the use of protocol 2:
Disable login as superuser:
24. Install IDS
The IDS or Intrusion Detection System attempts to detect suspicious, malicious activity such as DOS attack, port scanning, or even attempts to hack into the computer by monitoring network traffic.
It is good practice to deploy such software before the system is made available from the Internet. You can install AIDE, it is HIDS (Host based IDS) which can control all aspects internal device your system.
Snort is a network intrusion detection software. It is capable of analyzing and logging packets and analyzing network traffic in real time.
25. Protect your files and directories
Linux has excellent protections against unauthorized access to files. However, the permissions set by Linux and file system mean nothing when an attacker has physical access to a computer and can simply connect HDD computer to another system to copy your data. But you can easily protect your files with encryption:
- To encrypt and decrypt a file with a password, use GPG
- You can also protect files with OpenSSL
- Directory encryption is done with ecryptfs
- TrueCrypt is a free disk encryption tool for Windows and Linux
findings
Now the security of the linux OS on your computer will be greatly increased. Don't forget to set complex passwords from time to time. Write your favorite system security tool in the comments.
In this article, we will get acquainted with the main utilities for Linux hardening. In Russian, this is called something like "checking the level of security of Linux systems and assessing the correctness of configs in terms of information security." Of course, we will not only review the programs, but also give examples of their use.
Your own auditor, or security on your own
Administrators, and even more so, IS auditors often face the task of checking security a large number hosts in a very short time. And of course, there are specialized tools in the Enterprise segment to solve these problems, for example, such as network security scanners. I am sure that all of them - from open sources of the OpenVAS engine to commercial products like Nessus or Nexpose - are known to our readers. However, this software is usually used to look for outdated and therefore vulnerable software and then run patch management. In addition, not all scanners take into account some specific features of the built-in security mechanisms of Linux and other open source products. And last but not least, the price of the issue matters, because only companies that allocate budgets for this business are able to afford commercial products.
That is why today we will talk about a specialized set of freely distributed utilities that can diagnose the current level of system security, assess potential risks, for example, “extra services” sticking out on the Internet, or an unsafe default config, and even suggest options for correcting the found shortcomings. Another advantage of using these tools is the ability to replicate typical farm test scripts from any number of Linux systems and form a documented test base in the form of logs and separate reports.
Practical Aspects of Security Auditing
If you look through the eyes of the auditor, then the approach to testing can be divided into two types.
The first- this is compliance with the so-called compliance requirements, here the presence of mandatory security elements prescribed in any international standard or "best practice" is checked. A classic example is the PCI DSS requirements for payment IT systems, SOX404, NIST-800 series, .
Second- this is a purely rational approach based on the question "What else can be done to enhance security?". There are no mandatory requirements - only your knowledge, bright head and skillful hands. For example, this is updating the kernel version and / or application packages, enabling, forcing, setting up a firewall.
Everything related to the second approach is usually called a special term. hardening, which can also be defined as "actions aimed at strengthening the level of initial security of the operating system (or program) mainly by regular means."
Compliance with compliance requirements is usually checked in preparation for passing a mandatory audit such as PCI DSS or other certification audit. We will pay more attention to the Hardening component. All major developers offer for their products Hardening Guidelines- guides containing tips and recommendations on how to enhance security, taking into account the regular security mechanisms and the specifics of the software. So, Red Hat, Debian, Oracle, Cisco have similar manuals.
INFO
Hardening is a term from the information security world, which refers to the process of ensuring the security of a system (program) by reducing its vulnerability and, as a rule, using only standard utilities or protection mechanisms.
sudo apt-get update sudo apt-get install lynis
And for RPM-oriented distributions (after adding the appropriate repositories):
Yum install linus -y
Installation on macOS:
$ brew search lynis $ brew install lynis
To start Lynis, it is enough to specify at least one key. For example, to run all available tests, you should specify the -c switch (check all, check all):
# Typical sudo lynis audit system test suite # Complete sudo lynis audit system -c test suite # Scan a remote host audit system remote 


Before an audit, it is always a good idea to check whether a new version Lynis:
Lynis update info && lynis update check
The Lynis utility, in addition to the standard one, has one more mode - unprivileged run:
Lynis audit --pentest
If you want to put the name of the auditor who started the test, just add the -auditor parameter
Sudo lynis audit system -c -auditor Daddy
At any stage of the audit, the verification process can be continued (Enter) or forcibly terminated (Ctrl+C). The results of the tests performed will be written to the Lynis log in /var/log/lynis.log . Please note that the log will be overwritten each time the utility is launched.
To test on a systematic basis in automatic mode, you can assign the appropriate job to the Cron scheduler using the -cronjob switch. In this case, the utility will run according to the specified template (config) and will not display any interactive messages, questions, or warnings. All results will be saved to the log. For example, here is a utility launch script with a default config once a month:
#!/bin/sh AUDITOR="automated" DATE=$(date +%Y%m%d) HOST=$(hostname) LOG_DIR="/var/log/lynis" REPORT="$LOG_DIR/report-$( HOST).$(DATE)" DATA="$LOG_DIR/report-data-$(HOST).$(DATE).txt" cd /usr/local/lynis ./lynis -c –auditor "$(AUDITOR)" --cronjob > $(REPORT) mv /var/log/lynis-report.dat $(DATA) # End
Save this script to the /etc/cron.monthly/lynis directory. And don't forget to add paths for saving logs (/usr/local/lynis and /var/log/lynis), otherwise it may not work correctly.
You can see a list of all commands available for calling:
Lynis show commands 
Particularly curious can look at the settings from the default config:
Lynis show settings
Brief instruction on working with the utility:
man lynis
The options for possible statuses based on the results of the check are limited to the following list: NONE, WEAK, DONE, FOUND, NOT_FOUND, OK, WARNING.

Running Individual Tests in Lynis
In practice, it may be necessary to carry out only a few tests. For example, if your server performs only the functions of Mail Server or Apache. We can use the -tests option for this. The command syntax is as follows:
Lynis -tests "Test-IDs"
If you find it difficult to understand due to the large number of test IDs, then you can use the group parameter -test-category . With this option, Lynis only runs test IDs that fall into a specific category. For example, we plan to run firewall and kernel tests:
./lynis -tests-category "firewalls kernel" 
In addition, the functionality of Lynis is extended by various plugins that you can add on your own, or you can put new ones in an existing directory.
Correction Suggestions
All Warnings will be listed after the results. Each one starts with the warning text, then the test that generated it is indicated in brackets next to it. The next line suggests a solution to the problem, if one exists. In fact, the last line is a URL where you can see the details and find additional recommendations on how to fix the problem.
Profiles
The profiles that manage auditing are defined in files with the extension .prf located in the /etc/lynis directory. The default profile is named predictably: default.prf . The developers do not recommend editing it directly: any changes you want to make to the audit are best added to the custom.prf file located in the same directory.
Continued available to members only
Option 1. Join the "site" community to read all the materials on the site
Membership in the community during the specified period will give you access to ALL Hacker materials, increase your personal cumulative discount and allow you to accumulate a professional Xakep Score rating!