A month ago, it contains compared to its predecessor, but today I would like to draw attention to one of them. At the operating system presentation at WWDC in June of this year, Craig Federighi announced improved support for multiple screens in Mavericks, and a couple of days ago I was able to put his words to the test.
Using a regular HDMI cable (not ) I connected my MacBook to an external 27-inch monitor. At first, no major improvements were noticed: the image appeared very quickly, and then the monitor duplicated the image from the laptop. There is nothing surprising in this; a similar “trick” can be pulled off by Windows computers.
However, an active AirPlay icon immediately appeared on the top bar of Mavericks. Clicking it revealed the option to turn off the monitor's video repeat and ended up with almost two computers instead of one.

Laptop display and external monitor turned out to be independent of each other, but at the same time did not lose touch. The Dock can be used on only one of the screens by moving the cursor to the bottom edge of the monitor. At the same time, you can run different applications on two monitors - for example, watch a full-screen movie on a laptop and open it at the same time mail client on the external display. Very comfortably.
But the most interesting thing is that the monitors can “communicate” with each other. To move a window running application from the laptop to the monitor, just pull it in the direction where the external display is located. As the program begins to disappear from the laptop screen, it will appear on another monitor. It is noteworthy that the application will be automatically optimized for the new resolution.
Particularly impressive new feature works with Mac Pro. supports up to six simultaneously connected displays, which will turn you almost into Tony Stark. The user can “stretch” the same Safari over the entire workspace (I don’t know why this is needed, though), and also control each monitor as if it were a whole separate computer.
So the next time you connect your Mac to an external monitor, don't close the laptop's lid. Make the most of your workspace.

If you are thinking about buying an external monitor, then first read the note about. In it, I told you what you need to pay attention to in order for the macOS interface to be correct size. There are many nuances there.
This note will discuss ways to connect a monitor to a MacBook, as well as three options for using it:
- Video repeat of monitors
- Extended desktop
- MacBook with the lid closed, like a system unit
Options for connecting a MacBook to a monitor
It all depends on what generation of MacBook you have. In models prior to 2015, Apple used a Mini DisplayPort connector. Models after 2015 use exclusively USB-C connectors.
In both cases, you will need to use a special adapter to connect your MacBook to an external monitor.
 On my MacBook Air Mini DisplayPort connector so I connect it via cable Mini DisplayPort - DisplayPort, which I bought at a local store
  MacBook 12 only has one USB-C, so I had to buy an adapter USB-C - DisplayPort, which also has an additional charging port
 In rare cases, a monitor may support a direct connection with a USB-C cable, and the cable will not only transfer the image from the laptop to the monitor, but also charge the laptop from the monitor.
Alas, such monitors are still rare birds in our area.
Which connector to use on the monitor
There are only two modern options: DisplayPort or HDMI.
I recommend always choosing DisplayPort, as HDMI has a frequency limit for higher resolutions. If you connect your MacBook to a 4K monitor or TV via HDMI, you will get a picture with a frequency of 30 Hertz. With a DisplayPort connector there will always be the required 60 Hertz. But keep in mind that .
Here are some suitable options:
- mini DisplayPort to DisplayPort, 8- Suitable for all MacBooks up to 2016 release. They have a separate miniDP port;
- USB Type-C to DisplayPort, 15- suitable for everyone MacBook Pro Model 2016 and older. These laptops have 2 or 4 USB-C ports. The wire itself delivers 4K resolution at 60 Hertz;
- USB Type-C to HDMI, 8- the adapter has additional port charging so it is suitable for 12-inch MacBook with one USB-C port. It will accurately produce 60 Hertz at 2K resolution. Not sure about 4K;
1. Mode “Video repeat of monitors”
When you connect the display for the first time, a video repeat of the image will automatically turn on: the same image will appear on the screen of the laptop and the external monitor.
This mode is well suited when connecting a projector or large display for presentations. But for real work- No.
Video Mirroring mode sets macOS to the same maximum supported resolution on both displays. If you have an 11-inch MacBook Air (1366x768 pixels), then an external 2k monitor (2560x1440) will work at the resolution of the MacBook Air. Of course, the picture will be cloudy and large.
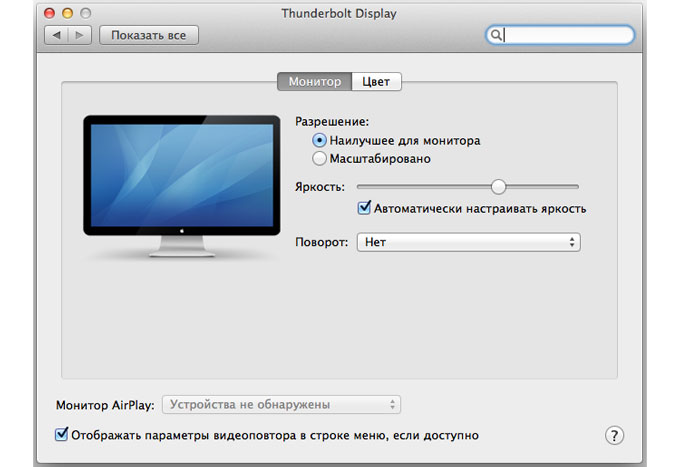
To turn off video repeat mode, uncheck the box. Enable video repeat of monitors V:
▸ System Settings ▸ Monitors ▸ Location
 Turning off video replay of monitors
 2. Extended desktop
In this mode, both displays become one. Unlike video replay, the screens here operate independently and support their maximum resolutions.
In the screenshot below, the blue rectangles correspond to the connected displays. Their size is proportional to the installed resolutions. The larger rectangle (top) corresponds to my Dell P2418P monitor, and the smaller one (bottom) corresponds to the MacBook Air display.
 The monitors are in Extended Desktop mode.
 The white stripe at the top of one of the rectangles represents the menu bar and determines which display is the primary one. To select another display as your primary, click on the white bar and drag it to the desired screen.
The displays can be repositioned by dragging their corresponding rectangles. This is to ensure that the connected displays are arranged in accordance with their actual location on the table, so that the cursor can move correctly.
 Specify how displays are arranged on the desktop and which one should be the main one
 In terms of efficiency, this is the most the best option connections, since you have both screens at your disposal at once. By the way, if you place the monitor on some kind of stand above the MacBook, you can continue to use its keyboard and touchpad, thereby avoiding the expense of purchasing an external keyboard and mouse.
 My Dell monitor works as the main one, and the laptop acts as an additional
 3. MacBook with the lid closed
This mode will appeal to those who want to work with an external monitor as their only and main one, thereby making the MacBook something like “ system unit" Convenient if you want to hide your laptop somewhere away in a drawer, or there is nowhere to place it on the table.


SeenDa Laptop Stand
To “wake up” your MacBook when the screen lid is closed, you need to connect external keyboard and mouse/trackpad, and be sure to connect the computer to an external power source. Otherwise, when you close the lid, it will simply “fall asleep.”
If you are using bluetooth mouse and keyboard, make sure they can “wake up” the computer.
▸ System Settings ▸ Bluetooth ▸ Advanced...
 This option will allow you to “wake up” the laptop when the lid is closed
 In conclusion
Personally, I used the second method (extended desktop) for a long time and continued to use the laptop keyboard and touchpad. Nowadays, I often prefer the option with a closed lid. And as manipulators I use a mechanical keyboard and mouse.
If your laptop is weak, then the option with a closed lid will not load its video system so much. Also a plus.
Users, especially those who love computer games, I’m interested in the question: can an iMac be used as a monitor? The answer is simple, you can. Many will say that for these purposes you can buy a separate external monitor, instead of using a full-fledged computer. A full-fledged Apple monitor with a high resolution will cost around 42 thousand rubles, while on an iMac you will spend from 80 thousand. At the same time, for 80 thousand you will get a full powerful computer with an excellent screen. You don't need to buy anything if you already have one old version monoblock, which remained idle.
iMac can be used as a peripheral monitor for Apple devices, because it has a high screen resolution. You need to put the device into peripheral display mode. This mode makes it possible to use the all-in-one PC to display images from another device.
Connecting iMac to Mac
In order to establish a connection you will need:
- Mac computer or laptop. The device must have a Thunderbolt connector. If you don't have one, Mini DisplayPort will do. If your equipment is equipped with a Thunderbolt 3 port adapted for USB - C, use a special Thunderbolt 3 (USB - C) / Thunderbolt 2 adapter from Apple.
- Thunderbolt or Mini DisplayPort cable.
- An iMac that the user plans to connect as an external monitor. operating system must be OS X 10.6.1 or later.
Not every candy bar model can be connected as a peripheral screen. Only models can be connected: iMac with a diagonal of 27″, Late 2009 and Mid 2010. The connection uses a Mini DisplayPort or Thunderbolt connector. To establish a connection, you will need a Mini DisplayPort to Mini DisplayPort cable. All-in-one PCs with a release date from mid-2011 to mid-2014 are connected. The Thunderbolt port and cable of the same name are used for connection.
Turn on the all-in-one PC that will be connected as a display. Log in on another device in account macOS. Connect the cable to the connectors. After the connection is made, simultaneously press the “F2” + “Command” buttons on the input panel of the peripheral PC. The display will show the operating screen of the second device. To complete the docking process, hold down the “F2” + “Command” buttons.
If "F2" + "Command" doesn't work

If pressing the buttons does not start displaying the screen of another computer, do the following:
- Check if it supports this model peripheral monitor mode.
- Switching to this mode is possible if you have logged into your macOS account on the second PC.
- Check the functionality of the keyboard. Use only your native keyboard. With a third-party input panel, commands may fail to execute.
- If in the “keyboard” section of the system settings there is a checkmark next to the item “Using the “F1”, “F2” and ...” keys, simultaneously hold down the “Command” + “Fn” + “F2” buttons.
- Check the accuracy of the devices connected via cable. Check if the cable is working properly. If you find creases, twists, or bare areas, replace the cord with a working one.
- For PC Windows, the peripheral screen mode does not work. The iMac must run on macOS.
How to disable the mode?
To exit, disconnect the cable, or simultaneously hold down the “F2” + “Command” buttons on the input device of the computer connected as a monitor. Disconnection will occur automatically when one of the computers is turned off. The same thing will happen when one of the devices goes into sleep mode.
Settings
To fully use your iMac as a peripheral display, you'll need to customize your screen settings. Use a second PC to adjust the brightness of the external screen. In system settings, open the “monitors” section. You can also adjust the brightness level on the candy bar itself through the input panel (brightness control buttons).
To play sound through the monoblock speakers, open the system settings on the “main” PC and go to the “sound” section. In the section, specify audio playback via iMac. You can adjust the volume using the volume keys from the main PC.
You can connect 2 devices as an external screen. Computers must be connected via Thunderbolt ports and special Thunderbolt cables . The aimaks are not connected sequentially in a chain, but only to the main device via Mini DisplayPort or Thunderbolt port . There is a limit on quantity. All processes that are running on the iMac, which you connect as a peripheral monitor, remain in background activity during screen mode.
How to connect PS4 to iMac?

You can connect your PS4 to your iMac using the ExtremeCap U3 capture card. With its help, the user can even record games. For correct operation devices, you need to download the firmware for ExtremeCap U3 from the official website. A high-resolution monitor is perfect for gameplay. Resolution plays a big role for very dynamic games, such as fighting games.
If the user encounters a slight delay, lowering the graphics level to 720 p will help. The user will find instructions on how to use and connect the gadget in the device package. You can also use the capture card to connect the set-top box to your TV. The cost of ExtremeCap U3 ranges from 10 thousand rubles.
Connecting iMac to TV
You can use Apple TV, but it's not required. Display the image of the candy bar screen on a TV monitor without an additional gadget. The computer display resolution is high, but watching movies on a larger screen is more enjoyable. To connect your PC to your TV you need a Thunderbolt, Mini-DVI or Mini DisplayPort connector. Need Thunderbolt/Mini DisplayPort to HDMI adapter supportive sound. HDMI cable and TV with HDMI connector.
Follow the connection sequence:
- Connect the Thunderbolt to HDMI adapter to your PC, then connect the HDMI cable to it. Connect to TV.
- Start your PC.
- Turn on the TV and use the remote control to select the HDMI image transmission interface.
Mirror display broadcasting (one image on two displays) is disabled in the system settings in the “monitors” section. To adjust sound settings, go to the “sound” section. In the “output” subsection, set the audio output via HDMI. You can scale the display using hotkeys after studying them in the “universal access” section.
It would seem that what could be simpler than connecting a MacBook to an external monitor? We take a laptop, a monitor, connect them with a suitable cable and enjoy the picture on the big screen. In theory, this is true, but in practice, many users are faced with numerous pitfalls. In this material, we will try to consider the main problems that may arise for a user who decides to increase the display space of his MacBook using an external monitor.
Let's consider the most common situation in which we have a MacBook and any external monitor or even a TV. They must be connected to each other using a suitable cable. Owners Cinema Display And Thunderbolt Display Feel free to skip this part.
How and how to connect an external monitor to a MacBook
All modern computers Apple equipped port Thunderbolt, which is backwards compatible with the Mini port DisplayPort. In turn, Mini DisplayPort is used on older MacBook models. Even earlier, in the days of plastic MacBooks, a connector was in use Mini-DVI. Also now Apple has the most common connector in some computers HDMI. They are equipped with it, for example.
Accordingly, the first thing you need to do is make sure what connectors your monitor to which you plan to connect is equipped with. Additionally, it is important to know exactly which port your MacBook has. In any case, the list of possible cables and adapters ultimately comes down to the following set:


This list of adapters and cables will be sufficient to connect most MacBooks to all modern monitors. Moreover, all presented accessories can be purchased directly on the Apple website. Cheaper alternatives are available at any electronics store or on eBay. There are exactly two important notes. Firstly, when purchasing, it is important to make sure that the adapter you are looking at is for Mini DisplayPort, and not regular DisplayPort. Also, if you plan to transmit audio to the monitor, then the cable or adapter must support this feature. Audio transmission via HDMI in MacBooks appeared in 2011 models.
Owners of the latest generations of Apple Cinema Display and Thunderbolt Display are deprived of the pleasure of purchasing any cables separately. Cinema Display, with different variations of the name, has been produced since 1999 and is most often found with a DVI-D connector, and then Mini Display Port. If you are the happy owner of an old Apple monitor and a new MacBook, then you will still need one or another adapter. In other cases there should be no problems. Modern Apple monitors have a built-in cable with a Mini DisplayPort connector (in Cinema Display) or Thunderbolt connector (in Thunderbolt Display) and immediately have built-in cables with corresponding connectors, as well as a MagSafe power cable that allows you to charge your MacBook.
Selecting the mode of operation with an external monitor
So, the MacBook is successfully connected to the monitor. Now let's try to decide on the operating mode, of which in the case of Apple laptops there are exactly three.
First and the simplest operating mode is video repeat of monitors. In this mode, the image on the MacBook display and monitor is completely duplicated. In this mode it is convenient to work with a projector or in other situations when you need to display your work on a large screen. Of course, this mode imposes a limitation on the maximum resolution of the external monitor; it cannot exceed the resolution of the MacBook display.

Second and, perhaps, the most popular operating mode is the extended desktop. In this case, one monitor is literally a continuation of the other, and the user has the opportunity to use the area of two displays at once: the built-in MacBook and an external monitor. To activate this mode, just connect the monitor to a running MacBook or connect an external monitor and open the laptop lid.

IN system settings You can change the order of the monitors, and also select the main one. The main monitor will display a menu bar at the top of the screen. Additionally, if your monitor is tall enough, it's entirely possible to use your MacBook's trackpad and keyboard as input devices. The same thing, by the way, is true for the first option.
Finally, third The mode involves using a MacBook as a system unit and with the lid closed. For implementation this option You will need to purchase and connect an external keyboard and mouse or trackpad to your computer, since you will not have access to the laptop’s input devices.
To activate this mode, you must close the MacBook lid and put it into sleep mode. Then connects Charger and monitor. To wake the laptop from sleep mode, you will need to press a key on the mouse or keyboard. The MacBook will use the external monitor as its sole and primary image output source.

In this case, it may not be possible to wake up the MacBook. The fact is that in OS X, by default, the ability to wake the computer from sleep using devices connected via Bluetooth is disabled. If you have a keyboard and/or mouse connected in this way, then you need to go to Settings - Bluetooth - Advanced and activate the corresponding option.
We solve possible problems
Now, having connected the monitor and choosing the most convenient operating mode, you can safely use your MacBook with an external monitor. If you periodically work separately on a laptop and separately on a MacBook with an external monitor, then you will probably find the application useful. size control and the position of the windows depending on the display used.
Connecting more than one monitor to a MacBook is no longer such a simple process. For these purposes, it is most convenient to use Thunderbolt Display, and then connect other Thunderbolt-enabled displays in series to the Apple monitor. Otherwise, often only one or in rare cases two connectors for image output will limit the flight of imagination. As a last resort, you can use a USB to HDMI adapter.
For many, the priority question is whether it is possible to connect an additional monitor to iMac computers. In fact, it is possible to connect additional displays for video playback and other purposes. Also possible:
- configure your computer so that either the same image is used on two monitors, or a different one;
- distribute programs across different monitors to save space;
- use the monitor as an enclosed display.
Preparatory work for connecting an additional monitor to the iMac
- First of all, you should make sure whether there is a need for an adapter and what ports are available on your device.
- In addition, you should check how many monitors can be used. To complete this procedure, you will need to go to the “About This Mac” section, then go to the “Support” section and click on the “Specifications” button. This will open a web page containing all the information regarding monitor support.
How to use Desktop Extend Mode on iMac?
It is worth noting that thanks to this function you have the opportunity to use two workspaces at the same time. In order to wisely use the resulting space, you will need to use the Mission Control program.
In case a specialized Dock stands at the bottom of the screen, it can be displayed on any connected monitor. To do this, you just need to hover your mouse cursor over it.
How to enable desktop extension mode?
- The first thing you'll need to do is connect a secondary display to your Mac device.
- Then in system settings you need to select monitors.
- Next, follow the “Location” link.
- You need to look to see if there is a checkmark on the video repeat of the monitors. If it is standing, then it needs to be removed.

How to change monitor layout and main display on iMac?
In order for you to be able to move applications and use windows on different monitors, you will need to arrange the displays in the order in which they are located on your desk. It's worth noting that all icons appear on the main monitor.
