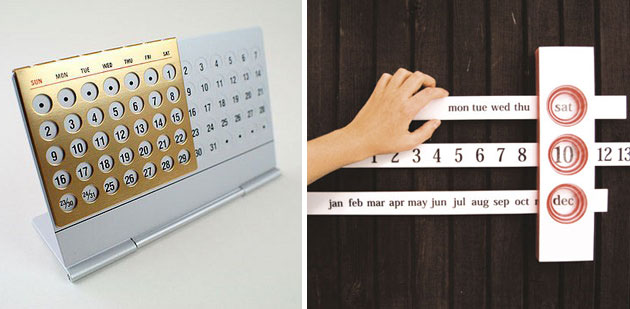
Of course, you can buy such a calendar, but it’s much nicer to make a waiting calendar with your own hands. We are sure that the children will be happy to take part in the creative search and give interesting ideas and help implement them.
If the phrase “advent calendar” is new to you, we suggest reading our article. She will answer the question of what Advent is. Will introduce you to the history of advent calendars and Advent traditions. And, importantly, he will tell you how advent calendars help in the development of children.
And now, according to our tradition, we offer you to look at a selection of new, original and easy-to-make ideas for DIY advent calendars.
1. Advent calendar made from boxes and rollsThis advent calendar is like a big bird house. You don't have to go to the store to make it. Just look around and look at the boxes, rolls of paper towels or toilet paper. Small figurines of birds can be used as thematic gifts.
Another advent calendar made from boxes, which is shown in the first picture, you will find
2. Winter forestIf your family loves forays into nature, your child will like this advent calendar made of colored paper and rolls: mountains, Christmas trees, a fire and a favorite dog.
3. Advent calendar “City”With this waiting calendar, you can make a plan map of your area and spend the whole month “visiting friends.”
4. DIY Advent calendar in the form of Santa Claus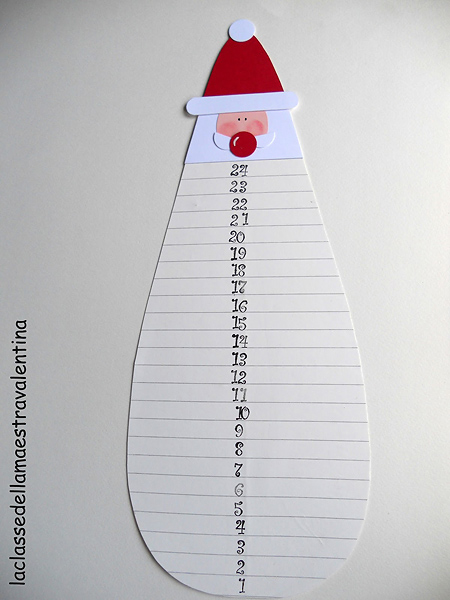
This Santa Claus is a great trainer for practicing your cutting skills with scissors.
5. Sweets for those with a sweet tooth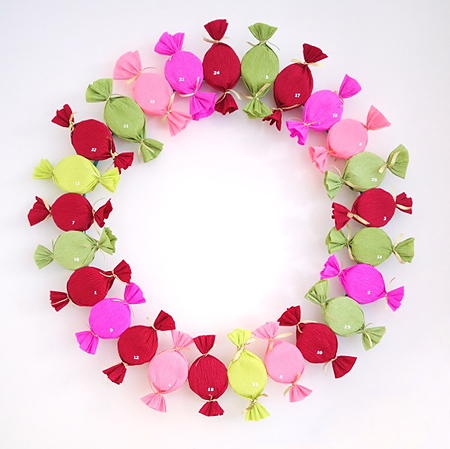
Advent calendar in the form of a garland of candies. You can put sweets or small toys in small plastic boxes.
6. Advent calendar “City Streets”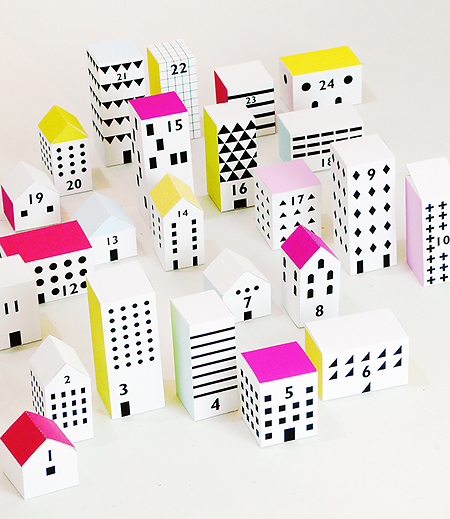
Another opportunity to practice your navigation. Make a school out of boxes or kindergarten, shops and nearby houses. Create the shortest or longest route, for example to a toy store.
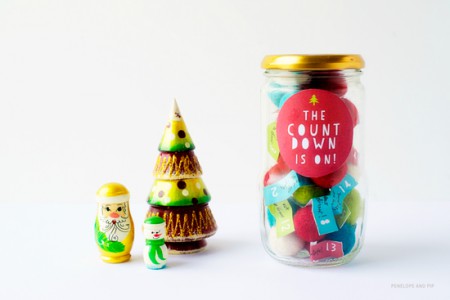
7. Waiting calendar made from pompoms in a jarSuch a simple waiting calendar is comparable to a daily kind word or good wish. Glue strips of stickers onto the pompoms and place them in a small jar. Every day the child will take out one pompom and read your little notes.
Very cute and laconic boxes with the date written in chalk. Decorate the Christmas tree with them or place them around the room. Or maybe you will play “Zarnitsa” every day and this cute gift will be a treasure.
10. Advent calendar “Mini Forest”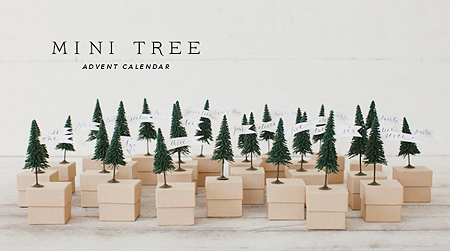
Our review ends with this mini-forest made of boxes and small trees. It will cheer up anyone. Place funny erasers or sharpeners, a tape measure, and counting material in the boxes. Make sensory boxes or a set of sorters out of them. Any flight of fancy.
3. Be sure to look at the large selection of calendars in
How to make a calendar
with your own hands?
Very soon, anxious people will start running through the streets with trees in their hands - that means it’s getting closer New Year. This is not only the time of Olivier salads and crackers, it is also the time of changing calendars (at home and at work).
How to make a calendar with your own hands, original and unique, which no one else in the world will have?
will help you in this matter.
The Calendar Design program is constantly evolving and improving. IN new version new types of photo calendars have appeared, the collection of ready-made templates has been expanded, holiday dates for 2016 have been updated...
Create original calendar Even a child can do it - it’s so easy and simple to work in this magical and pleasant program.
How to make a calendar with your own handsFirst, of course, you need to download the Calendar Design program and install it on your computer...
Download "Calendar Design"
The installer size is 53 MB (the program contains many templates with beautiful pictures). There are no viruses or “useful add-ons”. The calendar maker will work great on Windows XP, Vista, 7, 8, 10.
I have already told you the process of creating calendars in this program, so today I will pay attention only to some details that I forgot about last time.
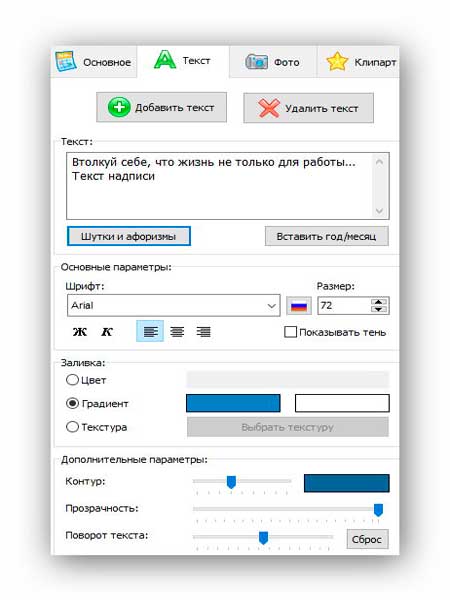
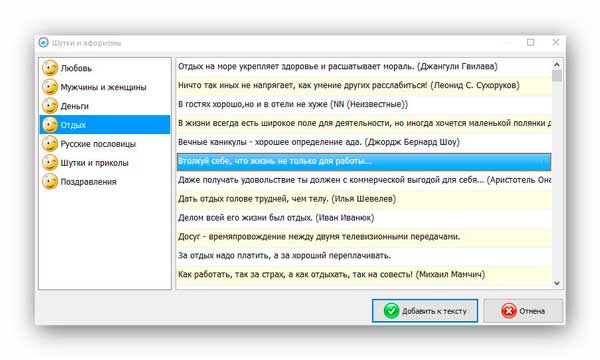
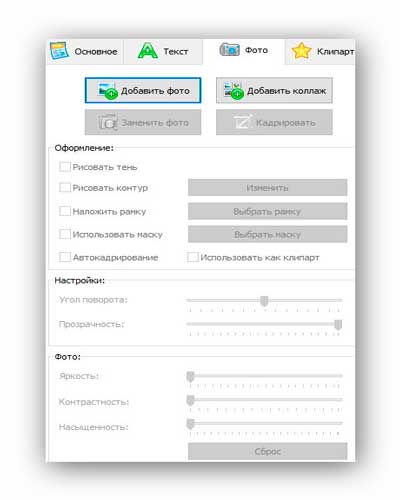
It turns out that the “Text” tab has a nice and unusual feature - a huge collection of aphorisms that can be added to the calendar you are creating...
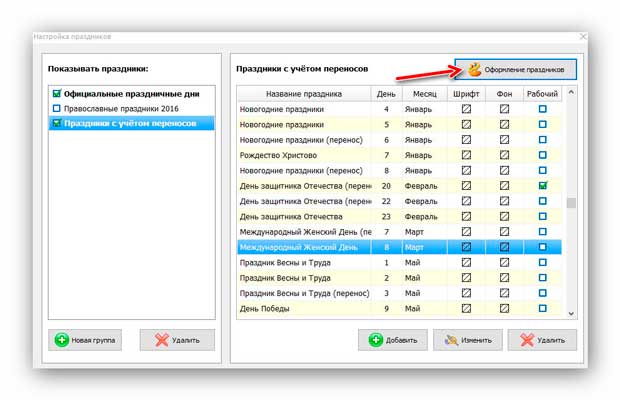
You can also easily customize the display of holidays in the program.
(change the background, font size and color, divide them into groups...)...

Absolute originality of the calendar can only be achieved by using your personal photographs from life (memorable dates, beautiful places visited...) in the design...
Don't forget about convenient and useful panel at the bottom of the program window...
The manufacturers’ website also has its own description of how the program works (with ready-made examples), if you want, take a look at them
The Calendar Design program is paid (it has a free trial period, without the ability to print created calendars) and many users may wonder why buy it for use once a year?
Firstly, by today’s standards it is very inexpensive, and secondly, you don’t have friends and acquaintances? This original calendar is a wonderful gift for the New Year holidays. And finally, are you in your last year of living (one hundred years of your life)?
Now you know how to make a calendar with your own hands, go for it. I suggest watching a review video from the authors of the program described above...
To new useful and interesting computer programs.
Instructions
The easiest way is to download a special program for creating calendars, and then print the result. If for some reason this kind of program is not available to you, do it differently. Print out the 14 pictures you like or draw them. 2 sheets go to the cover. Below, under each of the twelve pictures, write the month, days of the week and days of the month. If you don't want to write or draw, just print out this panel and glue it to your drawings.
Use a hole punch to make holes at the top of each sheet, and then thread the spring through. You will get a changeover Wall calendar. The calendar sheets printed on the printer will be small in size. If you want to make a large calendar, you need to either draw it on sheets the right size, or find large pictures and stick them above the schedule and the name of the month. The last sheet usually contains the calendar grid for the next year.
Making a poster calendar is even easier. Just draw your calendar on a large sheet of paper. Or find a poster and then glue a calendar grid to it. If you decide to print pictures of your future calendar, be it a poster or a flip calendar, use only high-resolution images. Otherwise, the calendar will be coarse-grained and ugly. Choose your image carefully. If it's a desk calendar, you'll have to admire the picture for a month, and if it's a poster, you'll have to admire it for the whole year.
You can try to create a calendar in Photoshop. This program is not designed specifically for creating calendars, but it does include a wide range of image processing. Photoshop is installed on almost every computer, and many video tutorials have been developed specifically for it. You will master this program without difficulty. Well, if none of the options suits you, you can choose the highest quality, but also the most expensive option - order the calendar that you need from a special printing company.
How sometimes you want to give a gift just like that, from the heart with your own hands. One of the options for such a gift is a flip calendar. It will not only bring joy to your family, but also help you know exactly what date it is today. Of course, to save time you can go, for example, to a photo salon and order a calendar there, but this involves additional costs. A handmade calendar will tell the future owner about your care and tenderness.
You will need
- Thick cardboard for the base and thin cardboard for the sheets themselves, 13 photos, glue, a simple calendar, a binding spring and decorations of your choice.
Instructions
Make the base. It should be shaped like a pyramid and allow the sheets of the future calendar to easily flip over. The optimal height is 14-15 cm, width 19-20 cm (for standard 10x15 photographs). The part of the base that is the support must be level and firmly on the table surface. If desired, it can be decorated, or, for example, covered with beautiful self-adhesive paper or stylish wrapping paper.
Design the sheets of the future calendar. To do this, the size of the sheets is adjusted to the size of the base (a little smaller is possible). Glue a photo and a cut-out month from the calendar onto each sheet. Sheets can also be decorated, their appearance the result of your imagination. Fold the sheets in the correct order.
The last step in creating such an original gift is attaching the sheets to the base. This is done using a binding spring. It is necessary to fasten the pages so that they can later turn freely on the basis. The calendar is ready. Evaluate its appearance and decorate as necessary.
Video on the topic
We take the second picture and place it on the other side of the document. If necessary, use Free Transform to flip or shrink the image.
Now you can position the calendar grid. To make it not too small to read, we will place half the year on one side, and the second half on the other. Using the “Text” tool, type the year. Here you can enlarge the font, change the opacity or color, and change the position. We do it along the edges
Every year on New Year's Eve, my children and I collect the accumulated postcards, posters and other little things to make a calendar with our own hands for the next year, and to make a weather calendar. Our family loves to travel and bring back souvenirs from each country. We buy our favorite cards, calendars and even buttons with colored paper. For what?
Firstly, memory, and secondly, any detail will be useful in creating a calendar with your own hands.
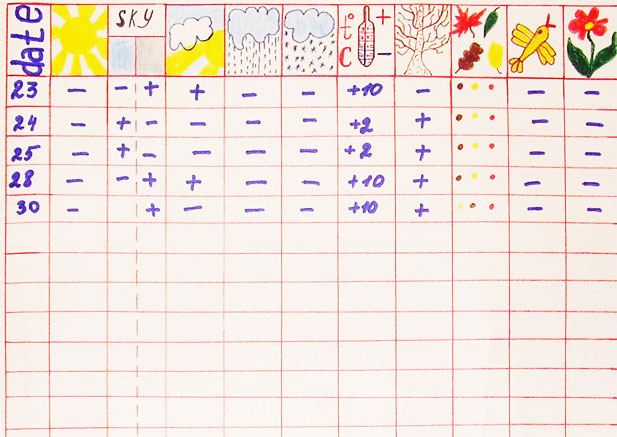
I'll start, perhaps, with calendars that reflect the weather outside the window. Many adults will frown in displeasure. They say that schoolchildren make weather calendars, only on assignment, and only under pressure. I don’t know, in our family the nature calendar is simply made and kept for the whole year.
And if a couple of years ago on the wall in the nursery there was one such calendar with lined tables for schoolchildren to keep a weather diary. This year we are preparing another weather calendar for our little daughter.
She does not yet know how to read or write, but she is keenly interested in the world around her. My daughter is learning to recognize colors. Understands the difference between “hot” and “cold”, “rainy” and “sunny”. She happily helps her brother color the tables in his weather calendar, and demands the same one.
It’s not at all difficult to make a nature calendar for little ones. It is enough to have hard cardboard, pictures of each season, colored paper, markers and a roll of wire on hand.
First we draw and cut out a large circle from cardboard. Then we divide it into four parts. Each part is painted in its own colors. Winter – white, spring – green, summer – blue (like the sea), or lilac (like flowers), autumn – yellow. When our workpiece is dry, we will divide each share into three more parts and write the names of the months.
Now it’s a small matter: we attach the hand to the wire, like on a mechanical watch, and check that it is movable. We decorate each season on the calendar with thematic pictures and mount the entire structure on the wall so that a small child can easily reach it.
![]()
You will have to tinker a little with a weather calendar for a schoolchild. If you follow the strict rules by which weather calendars are built in textbooks, you can end up with a boring spectacle, and it will also take up a lot of space on the wall. My son and I simplified our task a little.
We took an old desk wall calendar as a basis, carefully removed the used sheets from the spring, adjusted the album sheets to fit, and used a hole punch to make several holes in the blank pages. We drew weather tables on each sheet of the future desk calendar. We signed the names of the months, the measurement scales, and assembled the finished product. This calendar will hang in the nursery until the beginning of next December, and then it will go to school along with the report of the young meteorologist.
![]()
Some will say that modern stores have a large selection of beautiful calendars. That you can order a calendar under a family photo, hang it on the wall and admire the happy faces. Someone will remember the calendars on mugs and T-shirts. I don’t argue with the fact that there is a wide choice of ready-made calendars. I just want to tell you how great it is to make a calendar with your own hands with your children.
![]()
After all, you don’t have to make a calendar for your home. You can come up with a gift option, or decorate a child’s room with unusual installations on the theme of numerology. Or you can make a calendar with your own hands, which will not only count down the days until the new year, but also help in the development of your child.
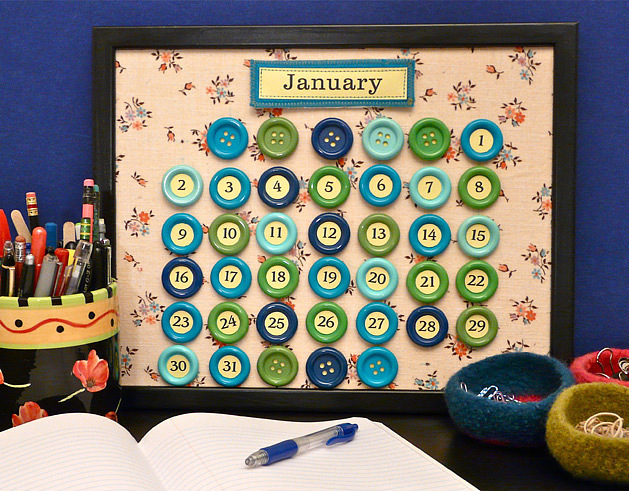
For example, use buttons when creating a handmade calendar. First, ask your child to help choose the right size buttons - development of fine motor skills. Then arrange them on the canvas according to height - the development of logical thinking and imagination. Cutting circles for numbering - developing the ability to work with scissors. Glue buttons to the base of the calendar, help in decorating the base and decorations - the development of perseverance and creative thought. And many many others.
A calendar for a child can be made universal by attaching the name of the month with strong Velcro, and changing the days of the week using lacing. That is, when we make a calendar with our own hands for a baby, we put great educational and developmental meanings into it!
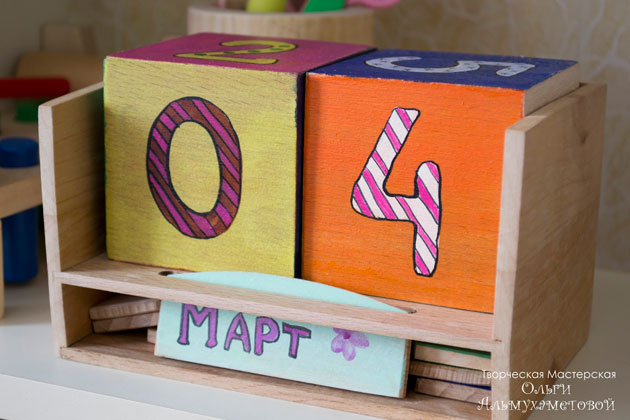
If you are making a calendar for a small child, use large pieces. How do you like the cubes? Just wrap them in beautiful paper, glue a picture of your little one’s favorite character on one side, and a number on the other side. You can make perpetual calendars from cubes using a special wooden blank or a construction set as a stand.
We all remember how we loved to receive gifts as children. Often a small gift was more valuable than verbal praise. Later, we wrote little notes with wishes, hiding them under the pillow, started keeping a diary, and so on.
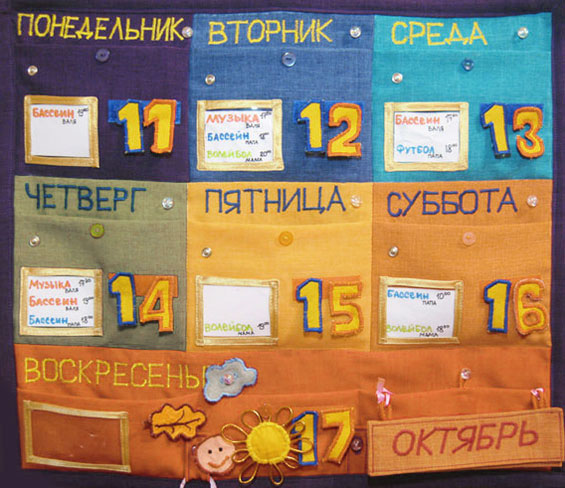
These memories inspired me to make a calendar with my own hands, not just a set of symbols and decorations, but something functional and useful. Somehow an old folder from under the “Kassa-Azbuka” caught my eye. There were still numbers in the pockets, and this gave me an idea: to make a calendar with pockets. Naturally, you can’t make it for all 12 months, but who’s stopping you from making the calendar universal.
No sooner said than done. I bought pieces of fabric. At home I cut it, stitched the edges, embroidered squares for numbers and pockets. The son prepared the numbers and the weekly table, the husband drew up the names of the months, even the little daughter took part, testing the resulting design when she put several dolls in her pockets.
And you know, this type of calendar not only decorates the interior, but also actually works. All I need to do is put a note with a reminder in the pocket of the desired date, my son will see it and do everything. On the contrary, he is pleased to leave notes in his pockets for us, with wishes and requests.
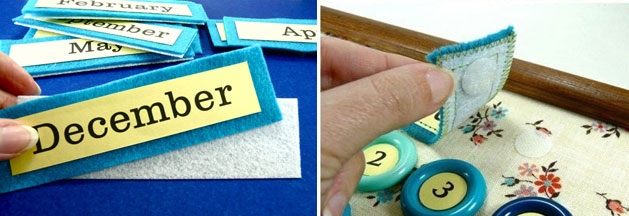
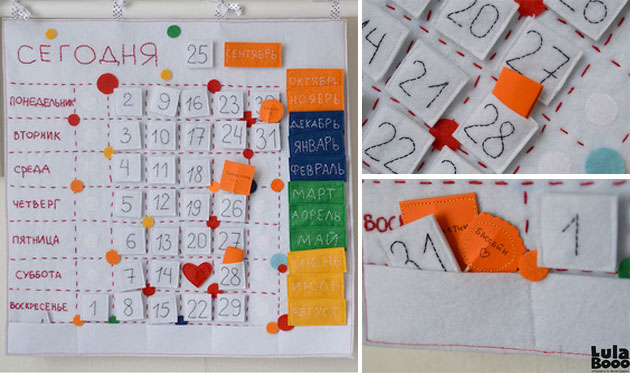
Another interesting option for a homemade calendar: a felt calendar. Making it yourself is not particularly difficult. Sew hard cardboard into the base, and present each number in the form of a pocket with numbers. By the way, the idea of changing the names of the month and days of the week would work well here. All you have to do is buy Velcro and sew them in the right places. Master class via link
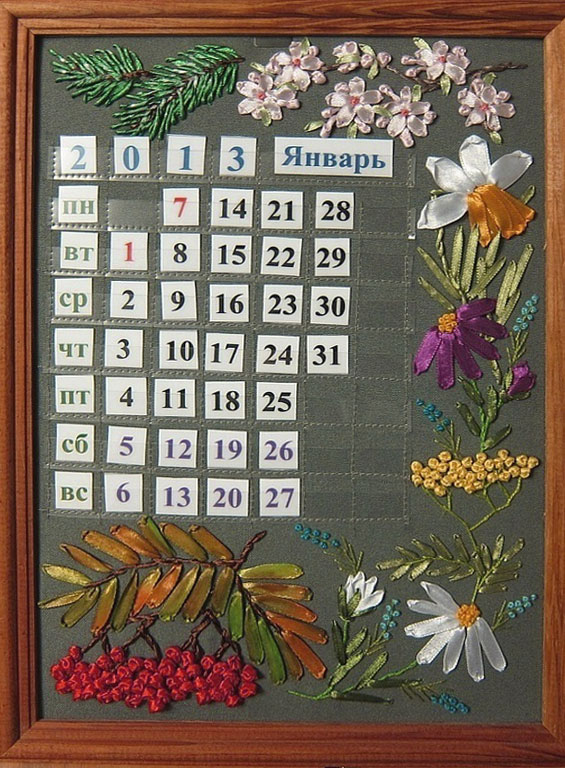
In general, there are a lot of original solutions in creating calendars. You can embroider the calendar on canvas or fabric and leave it in a large frame. You can make a calendar and put it in a frame with glass, on which you can write reminders, notes, and mark important dates with a marker. 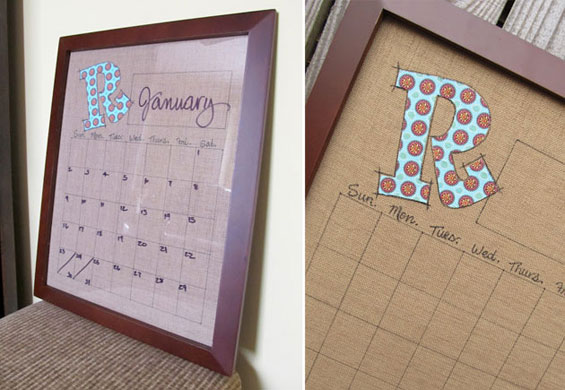
You can come up with an office version of the calendar. To do this, you need to make several round holes in a thick album sheet and print out the necessary numbers, names of months, weeks and days of the week. Looks very original!
The main thing to remember is that joint creative work with children brings together people better than any movie or ride on amusement rides. Every mother can make a calendar with her own hands, just as she can make a nature calendar with her children. You should use your imagination, remember your distant childhood and not rush anywhere.
Now it has become fashionable to make and give calendars. On the one hand, specialized programs have appeared that allow you to create your own calendar in literally five minutes. On the other hand, the printing base has expanded. For example, in a photo lab you can print an A3 picture for not much money. And if you add a little, you will get an A2 and even A1 size print. So huge homemade calendars, which contain photographs of places and people close to the hero of the day, are accepted with great gratitude and are considered for a long time, and by all the guests. And then this imprint hangs before your eyes for a whole year, reminding you of the festive event. In this article I would like to write a review about my own experience with the AMS Calendar Design program.
Why draw calendars yourself?First, let me explain how this works for me, not the latest software specialist. Adobe Photoshop, Adobe Lightroom, suddenly it occurred to me to waste my time on some “leftist” program, which has a lot of limitations compared to professional editors. How did it happen that having a licensed subscription to Adobe products, I suddenly spent extra money to buy the Calendar Design program?
To answer this question, I will have to tell, at least briefly, how a calendar is made, say, in Adobe Photoshop CC.
As an example, I’ll show you one of the latest products:
The client wanted THIS! In principle - nothing extravagant. Almost minimalism. But before the calendar appeared, we had to spend considerable time searching for an up-to-date calendar grid. Then it was necessary to recolor the names of working days (Mon., Tue., etc.). Then the grid had to be disassembled into two columns (initially it was generally a horizontal version).
In a word, all this took a lot of time and considerable effort even for me. It was then that I first thought about having some special program that would allow me to quickly and easily make calendars.
And then one day my colleague, who knew about my wishes, recommended that I look at the Calendar Design program.
Calendar Design Program
I’ll say right away that the program is paid. It comes in two versions: basic version and pro version. The cost, respectively, is 950 and 1950 rubles. True, I was lucky enough to take advantage of the discount and save 30% on the pro version.
The program can be downloaded from the official website and used completely free of charge for 10 days. Personally, this trial period was enough for me to decide to purchase.
I suggest you look at what the program can do.
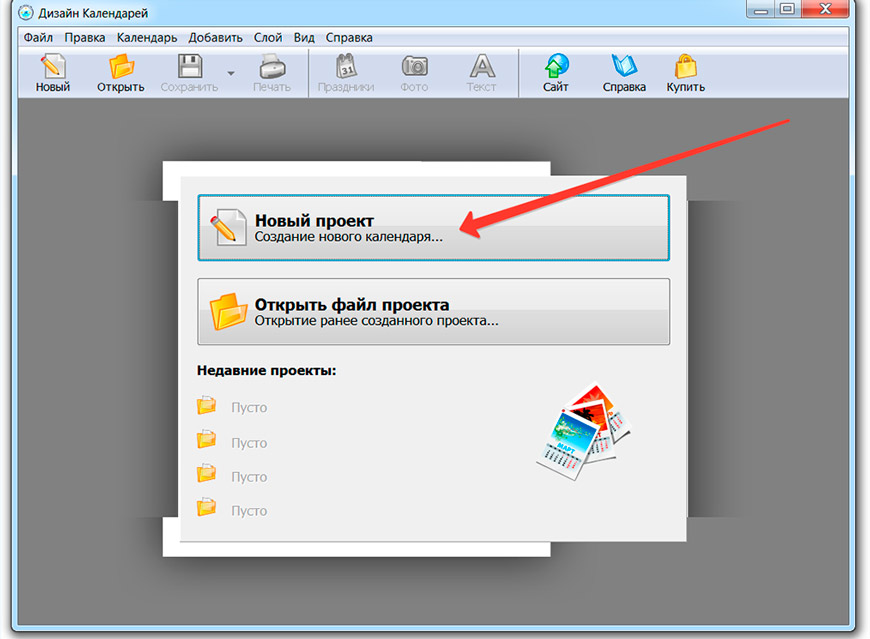
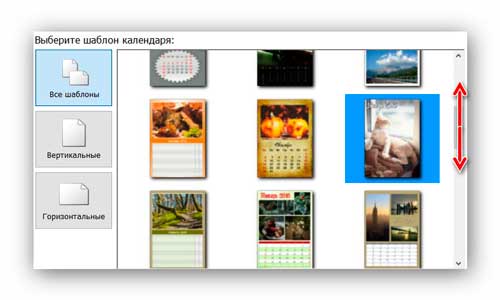
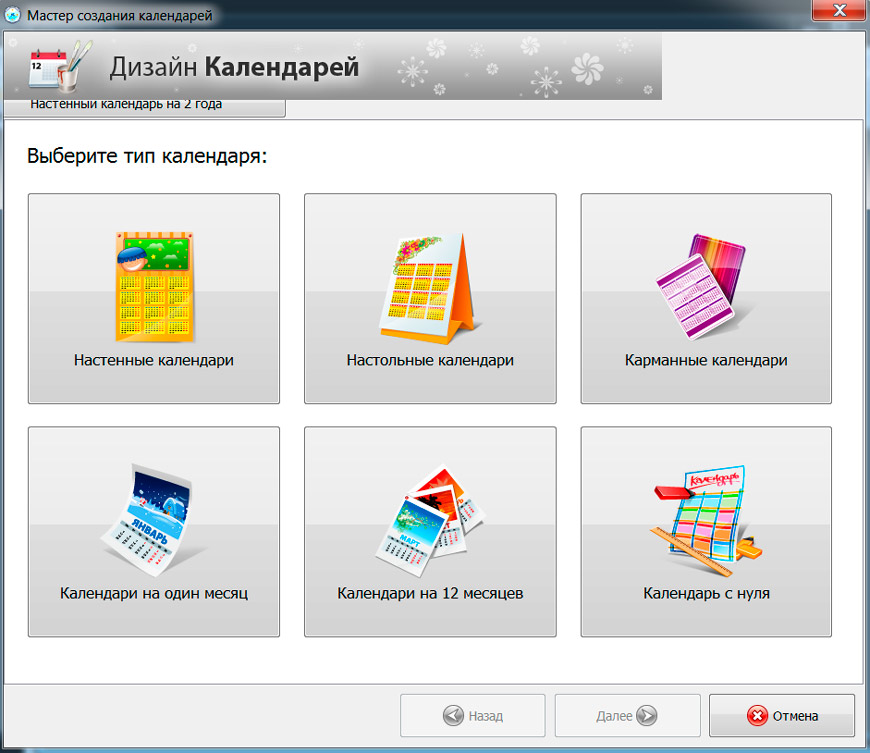
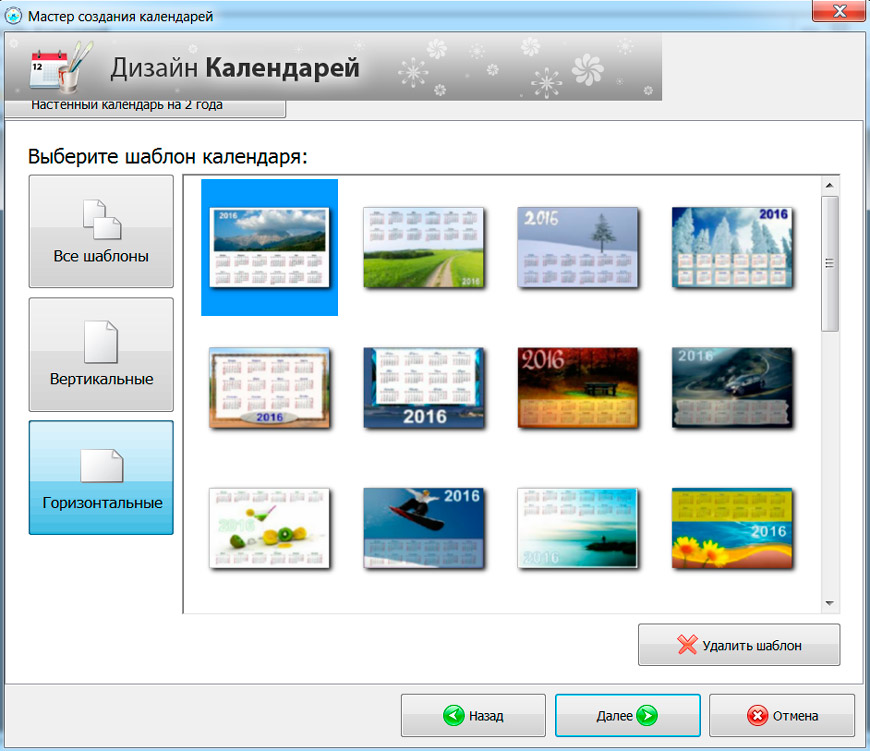
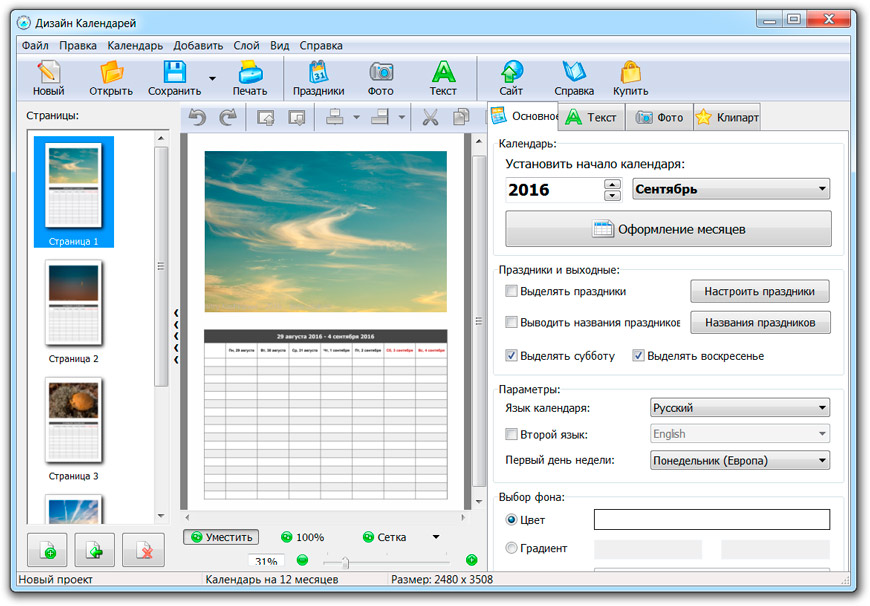
Previously drawn and saved calendars can be later opened and modified. You can start a new project. Next you are asked to select the calendar type. After all, they come in different varieties - tabletop, wall-mounted, for one month or for a quarter:
Next, you should select a design template. I know that when you hear the word “pattern”, true connoisseurs of aesthetics and unique design begin to get a nervous tic. However, you should not rush to judgment and make hasty conclusions. The fact is that during subsequent processing the calendar can be changed beyond recognition. It will really turn out to be strictly individual.
And the template as such simply allows us to have the necessary calendar grid, the search for which is usually the main problem. It becomes especially acute when creating a two-year calendar. For example, from September 2016 to August 2017. Try to find a calendar grid for next year on the Internet right now. And in good resolution, with transparent background. I think this will not work out right away (if at all).
So I immediately liked the Calendar Design program, if only because it would forever save me from a long and painful search. Drawing the mesh manually is cheaper either to shoot yourself right away, or to get it and use Corel Draw. There is a plugin that solves the problem.
After choosing a template, we need to set the size of the future calendar. It all depends on what we are going to print it on. If we only have an A4 printer at our disposal, then we need to choose the appropriate size. You can order the calendar to be printed in a photo lab. Then the size can be made larger. In any case, it is advisable to first ask the laboratory itself what size they can print and how much it will cost.
For example, in one of my “familiar” laboratories, a canvas measuring 30x45 cm will cost 100 rubles, and a format of 60x90 centimeters costs almost 1,600 rubles. And this will be a real “wet” photo print, and not a print made on an inkjet printer or plotter.

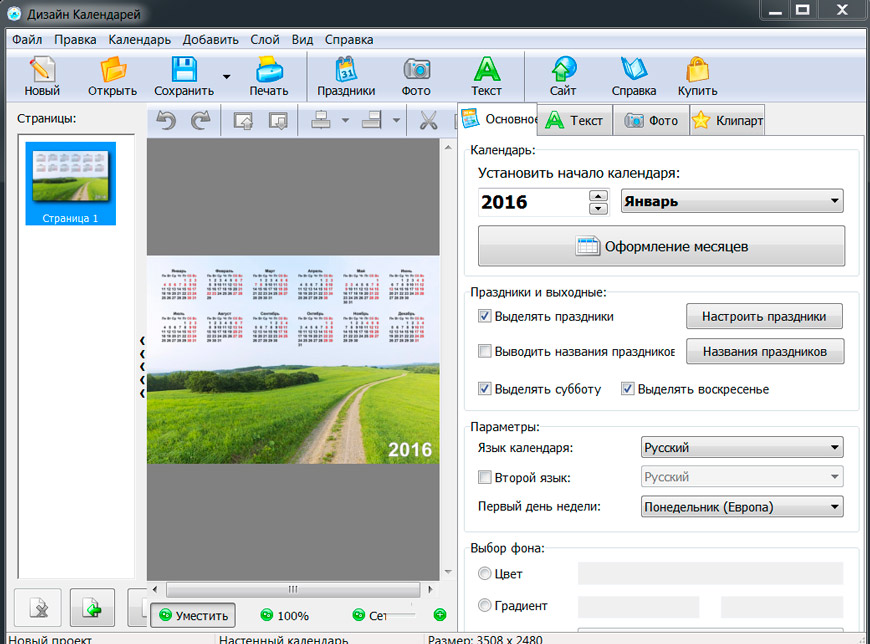
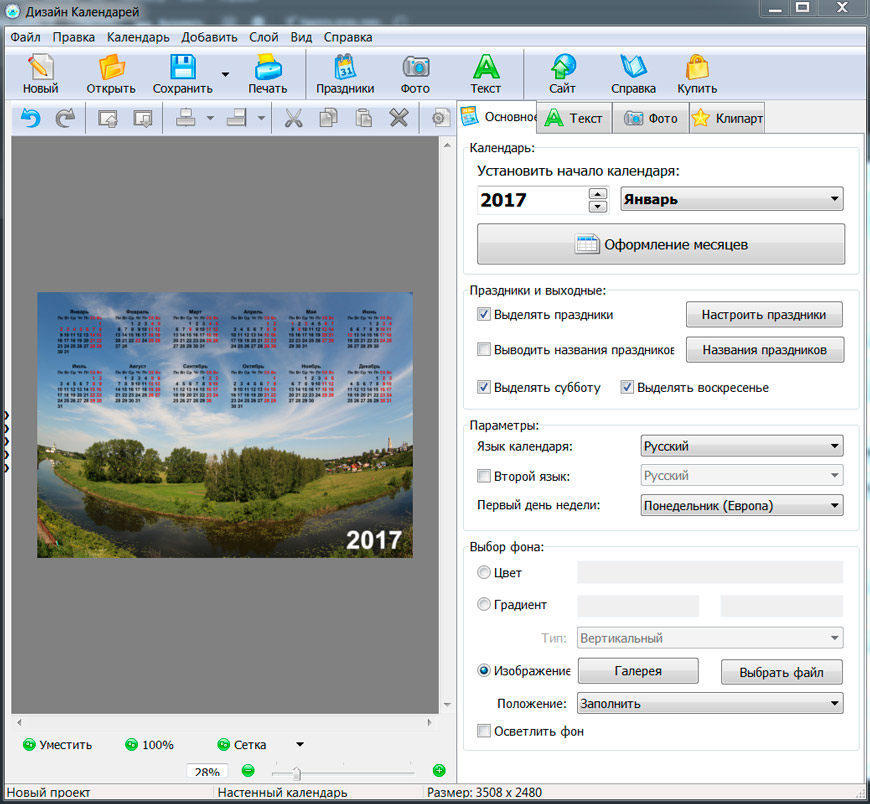
After all the settings, we see a ready-made calendar, created automatically based on the template we selected. In principle, if no special theme is required in the design, you can immediately print the calendar.
By the way, in the free trial version you can print the resulting calendar on a printer, but you cannot save it as a file for printing, for example, on a photo machine.
For the most part, in the design of calendars that are made with one’s own hands as a gift to friends or as a way of fawning over one’s superiors, it is usually customary to use some special images in the design that will be pleasing to the recipient.
For example, you can replace the background photo with another one. Or even use some kind of abstract drawing. You can go even further and simply fill the calendar background with some color or gradient.
This is worth doing if the calendar contains inscriptions and photographs in addition to months. Then the background image will no longer make sense. It will still be closed.
Of course, when working with inscriptions and additional photographs, we will not have the same flexibility as in Adobe Photoshop. For example, we won't be able to make the shadow behind the text appear lighter or more blurry. However, you can choose the size of the inscription and the background so that even this non-adjustable shadow looks normal.
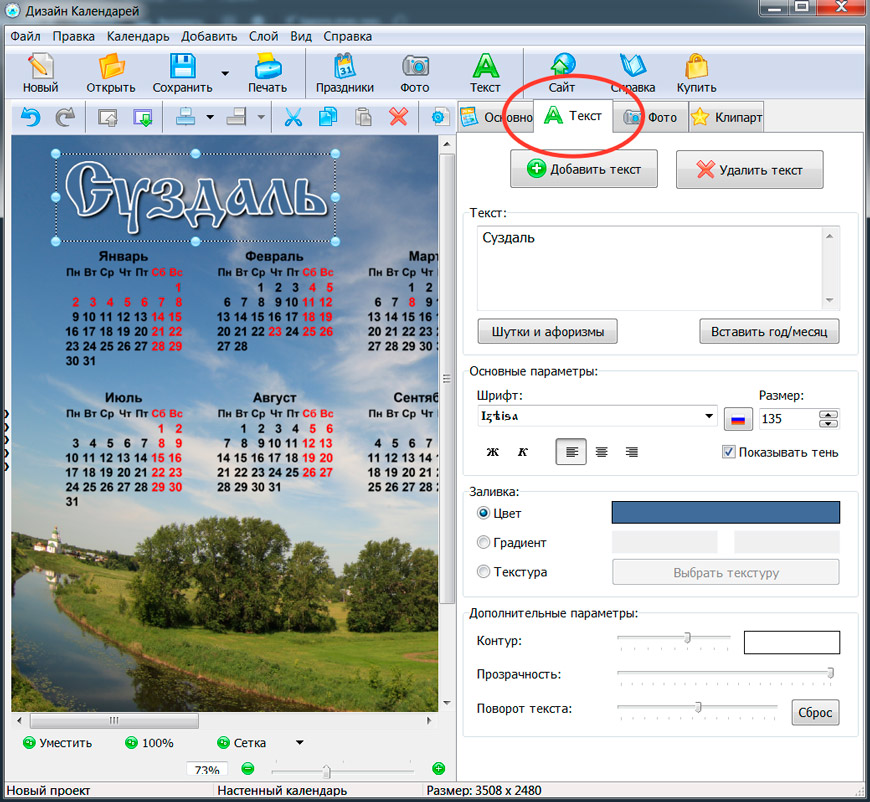
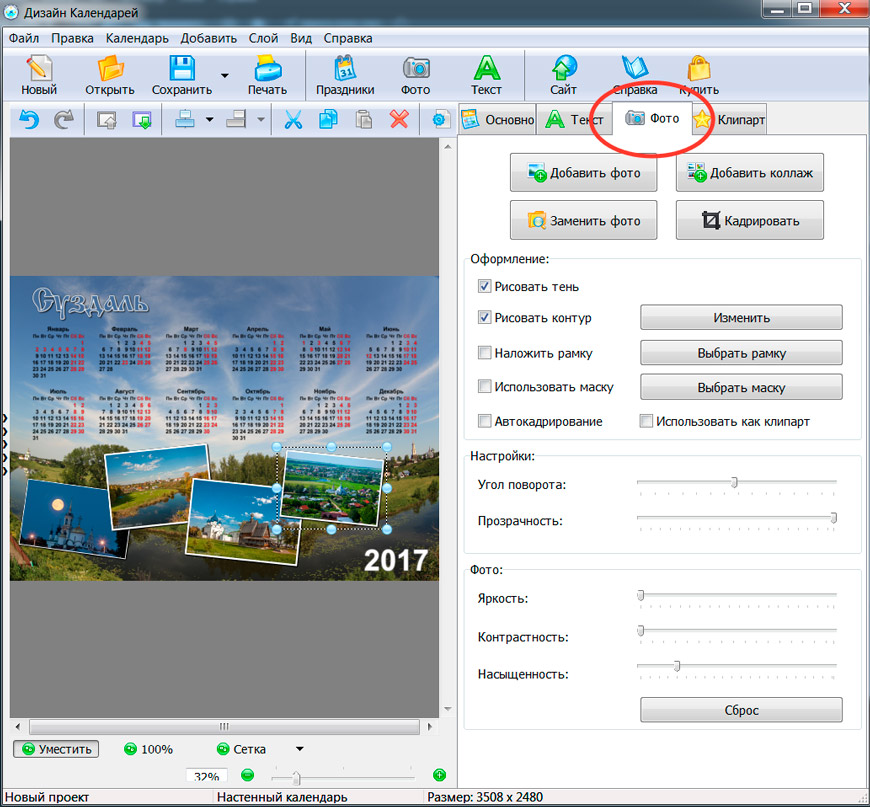
The big advantage of the program compared to its analogues is the ability to take a color sample directly from the image when choosing a font color. Many calendars, including those sold in kiosks, suffer from the same drawback. The font color in them is often chosen very poorly. The inscription looks like an alien element and spoils the entire composition.
This occurs because a color is selected for the font that is not in the background image. Look at the previous picture: the font color in the word “Suzdal” corresponds to the color of the sky against which the word is located. If it weren't for the white frame and shadow, we would hardly be able to read it. The inscription would simply blend into the background.
However, as you can see, the word looks quite harmonious. Why? Simply because the main condition for choosing a color is met - a color is taken that is already present in the background image (or in the composition as a whole). If we took purple or orange here, the inscription would look like a patch.
Similarly, you can customize the font colors in the calendar grid itself. For example, red names and numbers of weekends do not look very good on a blue son. But if you make them yellow, it will be a completely different matter. Similarly, you can change the black color to white if we are dealing with a dark calendar background.
Except background image You can insert additional photos into the calendar. Their number is limited only by the free space on the total calendar area. In principle, you can completely abandon the background image and concentrate the main semantic load on individual well-chosen photographs.
You can work with each photo separately. You can change its size, rotate it, add a border or shadow.
All this, of course, can be done in Adobe Photoshop. However, there are several thoughts that speak in favor of the Calendar Design program as a highly specialized tool.
- For a user who has no idea at all about graphic editors, mastering Calendar Design will be faster than Adobe Photoshop. In other words, to get the same external result, it will take different amounts of time to initially master the programs.
- The cost of a perpetual license of the Calendar Design program in the basic version is equal to the cost of just three months of using a license for Adobe Photoshop. That is, if a person is going to constantly draw calendars (for his own needs, or to order), it is much more profitable for him to purchase Design Calendars.
- Even professional users of Adobe Photoshop from time to time need a simpler tool to quickly satisfy some client who is not particularly demanding of design delights.
As a result of understanding the pros and cons of the program for creating calendars, I came to an unexpected conclusion. Why haven’t I drawn calendars as gifts for relatives and colleagues before? After all, this is such a simple and convenient sign of attention! It turned out - because there was simply no time (and sometimes too lazy) to draw a calendar layout in Adobe Photoshop.
If you have a simpler tool in your hands, then the time required to prepare the layout is reduced significantly. Let there be some restrictions - who knows about them except me! No one will notice that the shadow is too dense, and the frame of the photos is solid, not gradient. Now that there is a specialized program, it will be easier to fulfill orders from third-party clients and prepare pleasant surprises for friends and relatives.
Additional and less obvious features of Calendar Design include, for example, creating a calendar for weekly planning. It is printed on a regular printer, maybe even without a picture, and has empty cells for planning things.
For those who are constantly stressed by a pile of things to do, I think it will be useful to have such a planner on hand. As practice shows, you just have to write down all your problems on paper and it becomes clear that the snowball is not so big that you fall into despair. And if you make it a rule to solve at least one important task every day, in less than a couple of weeks you will be able to breathe a sigh of relief.
The main thing here is to plan everything properly. And this is where a weekly planning calendar comes in handy. This feature alone makes you fall in love with the Calendar Design program.
Disadvantages of the programSo as not to create the illusion of reading a custom article, I would like to tell you in a nutshell what I didn’t like about the program.
The first, not so important, but what caught my eye is the inconsistencies of interface elements. There is a feeling of some blurring of the picture in certain windows. For example, this is what the window that appeared every time you started it looked like, warning you that you would soon have to pay for a license:
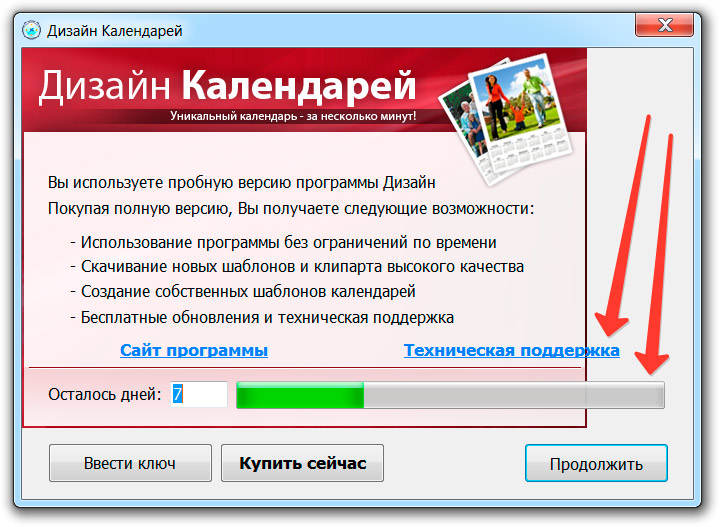
You know, this is, of course, not a chassis. Moreover, in the rest of the interface similar problems No. However, already at the start I thought that “can’t our people write normal programs, without glitches.” A suspicion immediately arises that there will continue to be constant problems and ease of use will disappear. Fortunately, this assumption was not confirmed.
The second thing that was somewhat disappointing was the inability to customize the calendar grid font color for each month separately (or for several selected months). Let me explain the essence of the problem.
Imagine that the background of your calendar is divided into two parts - dark and light (for example, sky and earth). If you take a dark font color, it will be readable on the light part of the background, but will be lost on the dark part. If the font color is light, then everything will be the opposite and also ugly.
It is clear that you can take a different background. But what to do if the customer insists on his own version?
It is in this case that it would be appropriate to make part of the months “white” and the second part “black”. By placing the whites on a dark background and the blacks on a light background, we would immediately solve the problem. Alas, Calendar Design does not allow us to manage each month separately. Perhaps this will appear in future versions.
Third, price. I personally don’t mind the fact that it’s not a sin to pay for a good thing. Moreover, if you get into some promotion, you can also save a lot. For example, I managed to buy full version for 1300 rubles instead of 1900! However, for many people, the paid basis for using the program puts an end to it. Many people will simply return to searching for other, preferably free, options on the Internet, rather than paying once and forever solving the problem of creating DIY calendars.
Without in any way condemning such tactics; situations, as they say, are different for everyone, I decided that it was easier for me personally to pay. After all, you can earn money again, but lost time will never come back.
ConclusionAs you probably already understood from the text of the article, the Calendar Design program made a pleasant impression on me. While not claiming to be a global universal tool for graphics processing, it nevertheless copes with its task perfectly. Having such a program on your computer, you can easily and quickly create calendars with the desired design, the desired size and the desired start date.
This address Email protected from spam bots. You must have JavaScript enabled to view it. . The cost of one layout is 100 rubles. The cost of 5 layouts is 300 rubles. The cost of a layout with your photo is 500 rubles.