Installing new icons in Windows 7 is not that hard. They are included directly in some categories of personalization tasks, and are carried out by standard devices of the system itself, without involving any addition to the software.
In the next step, we need to download the archive with the selected icons to your computer and then unpack it in any place convenient for you. Next, open the main menu of the system, click the "Start" button, while going to the "Computer" section we need. We need to open the link of the system drive we need and the folder called System32 should be selected.
The files of the entire downloaded archive must be selected and called by pressing the right mouse button in the context menu. Next, you should click on the item "Copy, then place in the System32 directory.
We call the connected section of the computer window by right-clicking on the mouse, and it is worth selecting the "Personalization" section. Then use the "Change Desktop Icons" click to select the checkbox in the replacement. Click "Change Icon", press and indicate the direction to the section we need.
Let's use the given parameter change. To do this, you need to go to the main menu called "Start" and then go to the "Control Panel" section. Open the link "Tune system view and performance" by double-clicking the mouse and uncheck the box "Display thumbnails instead of icons". Then, in order for the corrections we have prepared to be saved, click the "Apply" item.
You need to return to the main "Start" menu and then go to the "Run" command. In the "Open" line, type regedit, and confirm the start of the system list editor program, click the OK icon.
Expand the line: HKEY_LOCAL_MACHINE\Software\Microsoft\Windows\CurrentVersion\Explorer and create a directory in the section called Shell Icons. We open the directory we just made and call the associated menu by pressing the right mouse button, in the right section of the open connected window. Select "New" and select the "DWORD Value" section. Next, we type 3 in the "Parameter" section we need and approve our data by pressing the OK cursor.
The parameter that you have created needs to call the context menu by pressing the right key of the device and specify "Change". Then, to this name, we should enter the whole path of our name in the line that we need under the name "Value" of the created conversational window, after that we confirm the saving of the changed parameters performed, now press the OK cursor.
We complete the operation of the program of those list editor, restart our PC so that our parameters are applied.
In the Windows operating system, each element on the desktop has its own icon. Our article will tell you how to install icons.
If you want to change the default look of folders and files, you can do so at any time using custom icons. This is easy to do with a few simple steps.
Change process
- You need to download a collection of icons from the Internet or create them yourself. The main thing in this business is to make sure that the downloaded or made icons for which you will change the standard icons have an .ico extension. In the case when the images have the .png format, you need to use special programs that are designed to convert from one format to another. You also need to remember the directory (folder) in which you saved these icons;
- Before you learn how to install icons for Windows, you need to remember that most of the desktop icons are shortcuts to programs. In order to set an icon for a shortcut, you need to move the mouse cursor over the file or folder whose icon you want to change. Then, click on the selected element with the right mouse button and select the item called "Properties" from the menu. Next, you need to go to the "Shortcut" tab and click on the button that says "Change icon", which is located at the bottom of this window.
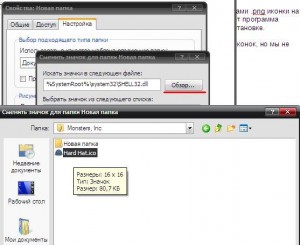
- In the window called "Change Icon", you must click on the "Browse" button and specify the path to the desired icon. When you select an icon, you will immediately see its reduced size (thumbnail). Next, you just need to click the "Ok" button in order to confirm your choice. In the main window "Properties (file or folder name)" you need to click "Apply" and close this window.
Folder icons
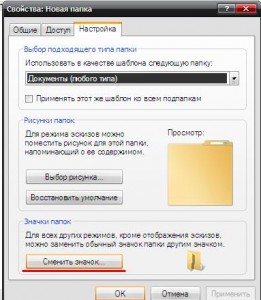
To set a new icon for a folder located on the Desktop, you need to call the "Properties" of this folder in the same way as in step number 2. Since it's not a shortcut, there won't be a tab called "Shortcut". Now you need to go to "Settings", which is in the section called "Folder Icons", which, in turn, is located at the bottom of the window. Next, you need to click on "Change Icon". In the new window, select the desired icon from the thumbnails offered to you, or specify the path to your own file. It remains only to confirm the choice by clicking "Apply" and close the window.
Icons for other elements
Icons for the folder "My Documents", "My Computer", "Network Places" or "Recycle Bin" need to be changed as follows:
- Right-click anywhere on the desktop.
- Select "Properties" from the menu.
- In the "Display Properties" window, go to the tab called "Desktop" and click "Customize Desktop".
- Next, you need to select the element whose icon you want to change, and click the button labeled "Change Icon".
Now you know how to install icons on the desktop!
Instruction
Since the standard Windows tools provide for the possibility of setting images in the ICO format as icons, it would be quite logical to convert the PNG icon into the . To do this, use one of the free online converters designed specifically for this purpose: www.convertico.com or www.converticon.com.
Despite the absence of the Russian language in the interface, it will not be difficult for a user who is not familiar with English to convert. You just need to specify access to the PNG file on your computer, click the Convert (or Export) button and save the resulting ICO icon on your hard drive.
The next step is to complete the installation. To do this, right-click on the shortcut for the program or folder and select "Properties" in the context menu. On the Shortcut tab (for shortcuts) or Settings tab (for folders), click on the Change icon button and specify the path to the file that you previously converted to ICO. Click the OK button to finish and the changes will take effect.
It cannot be said that the operating Windows system allows you to fully customize your appearance, but nothing will stop you from changing the icon. This can be done with the help of some manipulations with the label properties.
Instruction
Convert your icon from PNG format to ICO format. This is required because operating system requires from icons exactly the ICO format. To do this, go to the site favicon.ru and click on the "Select file" button. In the window that opens, specify the path to the icon (its size should not exceed 300 kilobytes) and click "Open". Click on the "Create favicon.ico!" button. Will open new page, in the center of which there will be a blue hyperlink with the inscription "Download favicon.ico!", click on it and save the icon to the desired location. This site is no longer needed, you can close it.
Set icon. There are several ways to do this, depending on what you want to change the icon of. If it's a folder, right-click on it, then click Properties > Settings > Change Icon, specify the path to the icon, and click OK. If it's any other shortcut, right-click on it and choose Properties > Shortcut > Change Icon from the menu that opens. Next, specify the path to the icon and click OK.
In addition, there are more fast way change the icons of objects that are on the desktop. But not all, but only those that exist there from the very beginning: “My Computer”, an empty and full “Recycle Bin”, “Network”, etc.
Windows 8 was the first desktop OS from Microsoft to introduce a new Metro interface (later renamed Modern) for touch devices. This step started long haul to combine the mobile and desktop editions of Windows in the face of a universal platform within which the same applications work with minimal differences in appearance. The design of the system has also been redesigned in accordance with modern trends in graphic design.
The new Metro UI interface was simple and concise, and the main control used in Windows 8 - tiles - replaced the classic shortcuts on . A big problem appearance system was that the icons for shortcuts in Windows 8 looked the same as in Windows times 7, creating an unnecessary contrast between the new and old design. That is why many users decide to replace the standard windows icons 8 on solutions from third-party developers.
Where to download icons for windows 8
Windows Phone 7, and later Windows 8, were able to form around themselves a large and friendly fan community, within which thematic sites and forums developed, accumulating news from the Microsoft world in one place. Some of the sites, such as wincore.ru, have dedicated entire sections where users download themes and icons for Windows 8.
In order to download the icon pack, you will need:
- Visit wincore.ru using any browser.
- Open the "System Design" section from the side menu of the site.
- Familiarize yourself with the range of materials presented on the site.
- Open the page of the collection you like.
- Scroll down the page and find the download link.
The downloaded archive may be:
- A regular archive (Zip or Rar), files from which must be installed manually, through the corresponding Windows menu.
- Kit with built-in installer.
- A collection of icons ready to work with a third-party installer.
If the description states that IconPackager is required for the collection to work, then it should be downloaded from the same site where the desktop icons were downloaded from.
How to install icons on windows
The procedure for installing icons differs depending on the type of archive you downloaded. So, if the collection is intended for manual installation, then the icons for folders in Windows 8 should be changed in the same way as it was done in previous editions of the OS. The user will need to right-click on the folder icon and call its properties, go to the "Settings" tab and click on the "Change Icon" button, where in the dialog box that opens, you need to select one of the downloaded icons, after unpacking the archive.
Replacement standard icon to a newWorking with archives with built-in installers should also not cause difficulties. As in the case of conventional programs, you will first need to unpack the icons for the PC in separate folder, and then run the installer. To restore the standard system icons, you will need to uninstall the program from the Programs and Features menu.
WATCH VIDEO
In turn, the IconPackager program, although it looks somewhat complicated, is also easy to learn. The application replaces any icons for any file types, and is able to assign other icons for system elements. The user needs to install the program and select icons for Windows 8 in it, packed into a file in *.ip format. Further, all work is carried out automatically.
Now you know how to download and install icons and icons for windows folders 8. Still have questions? Write, we will answer and help.
17 Nov 2011In this lesson, I will tell you How to install icons on the desktop
This method works on Windows XP, Windows Vista, Windows 7
On our site, a lot of icons have a .png format, and to install the .png icon you downloaded to any folder, you need to change the extension to .ico. For this, there is a program Aveiconifier. After converting the icon from png to ico, you can proceed to install it.
At the moment there are many ways set icons but we will not consider all, we will install them through Windows
Icon setting:
1. Take any folder or shortcut. I'll take a folder as an example.
2. By clicking the right mouse button, go to the properties.
For a folder - Go to the settings tab
For Label - Tab Label

3. Click change icon (below)
4. Choose your icon in .ico format
5. Look at our result

If you want to change the system icons "My Computer, My Documents, Recycle Bin, etc." we perform the following manipulations:
- For Windows XP
1. RMB ( Right button mouse) on an empty spot on the desktop
2. Open properties

3. Go to the "Desktop" tab
4. Click on the "Settings" button

5. Select the element that you would like to change

6. Click "Change icon" and again select the previously prepared icon.ico