For a quick visual search or to decorate the appearance of folders (directories), custom icons are placed. The recommendations will show how to change the folder icon in windows 7, 8 to your own.
There are enough ways to change the icon of a particular directory or all, using Windows tools, third party programs. Create new folder or choose an existing one and follow the steps below.
If you work in a corporate environment, this can happen all the time with special software applications using proprietary formats. You need to manually edit entries in the registry, which is not difficult. Fortunately, there are several free programs that get the job done without any mess. Open "My Computer" and go to "Tools" and then. Scroll down to the file extension you want to change the icon for, and then select it from the list.
Programs to change the folder icon
Types is a very simple application that only does one thing. It would be nice if the program was a standalone executable that didn't require installation, but unfortunately that's not the case. In any case, once you install it and run it, you will get a box with all currently registered file types on the system and their icons.
How to change the appearance of a folder
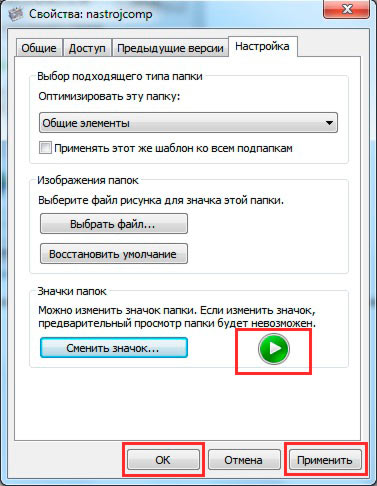
To change the folder icon in Windows 7, 8, you will need to follow a few simple steps. Select a directory in File Explorer and right-click on it. Click "Properties" in the menu.
In the properties window, move to the "Settings" tab. In the third area, click the "change icon" button.
On the Class tab, you can see the path to the associated program for that file type. The tab we are interested in is the icon. If you don't find any useful icon here, you can read my previous post or grab it. Just select the icon and then close the properties window. You will also see the icon change in the title area at the very top of the properties window.
The program is invoked and is better than types because it doesn't need to be installed on the system. Once launched, you can scroll down to the file extension you are looking for using the first column. This is the same as the Actions tab in Types. If you work a lot with a particular file type and want better than the default, these two programs are the best.
In the dialog box, select from the list standard icon(located in the SHELL32.dll file) or click "browse", specify the path to your image (ico) and click "open". For training, download the archive with icons here.
We recommend that you use 256 x 256 pixel image files to display icon sizes correctly on the desktop or in File Explorer. If you decide to return the default view of the folder, click the "restore defaults" button. Once you have made your final selections and completed your actions, click OK.
Too many icons filling up the taskbar? You can choose one of the following options. Each file will have a different icon, depending on which program is installed to open it. On another computer, the file icons may differ slightly depending on the installed programs. Place the mouse pointer over the icon to view some information about the file.
Folders are used to organize files. They have yellow badges. For example, if you have photos stored in the "Picture" folder on your computer's hard drive, as well as on external drive, you can view them all together in the Image Library. When you place your mouse pointer over Libraries in the panel on the left of the screen, you will see a small arrow. The screenshot shows two folders in the Picture Library - "My Pictures" and "Public Photos".

Look at the preview in the properties window. Then click "apply" and OK.
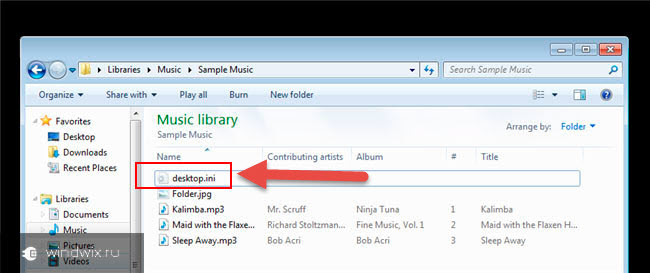
As a result, a desktop.ini configuration file is created in the folder, in which the parameters and the path to the image are specified. To see it, you need to show hidden folders and Windows files 7.
What is the difference between a library and a folder?
Follow these step by step instructions to create a new folder. You can browse libraries to quickly find the files you need, even if those files are in other folders or systems. A folder is just a container for storing files. The library does not contain files. However, the library provides a single, aggregated view of multiple folders and their contents.
In what folder is it copied?
When adding folder paths, files or folders are not duplicated or copied in any way. The library only stores the file or folder path. Each library has two folder paths by default, one in the user's profile folder and one in shared folder profile. You can copy a file to a library or save a file to a library without selecting a folder path. The default location for each library is the first folder path you add to the library.
You can manually create or edit the file instead of using dialog boxes. Create a text document (txt), name it desktop and change the extension to (ini). Open it and copy these lines:
[.ShellClassInfo]
IconFile=full path to the icon (ico)
IconIndex=0
Save the changes to change the folder icon in Windows 7, 8. The lines in the existing desktop.ini may differ, you just have to write the path to the picture.
What happens to my files when I delete a library?
However, you can change these locations. If you remove a folder path from a library, remove only the library representation of that folder. When a folder path is removed from the library, the folder and its files are not removed. Deleting a library does not delete folders.
Library content sorted according to folder location
The contents of the library are arranged in the folder path by default, but you can use the Arrange By Control element to choose a different layout. For example, you can sort a document library by author, modified date, bullet, type, or name.Not always possible change the folder icon to your picture, for example, this is not applicable for the Windows directory. You also can't change the icon inside the library, first right click on the folder and select "folder location" from the menu. Then follow the instructions above.
How to change the icons of all folders
In this way, you can change all folder icons at once in Windows 7 by setting a custom picture. You will need administrative access. This will change the icons for all PC accounts. The icons also change when you change the Windows theme, if it supports such features.
You can also enable window preview and big badges to display a more detailed view of the content in the library. When you use libraries, all files and folders stay where they are. Libraries allow you to view groups of related files without moving them around. This feature provides you with an improved tool that makes it easier to find and organize files using metadata.
What are the network requirements for adding a remote folder to a library?
Tell your friends and family that they can easily organize their files with Libraries without having to drag and drop files. You can organize your files in almost any way, whether or not the files are in different folders or on different systems.
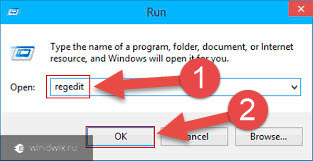
1. In the start menu search bar, type regedit and hit enter.
2. When the UAC window appears, click yes. These messages are annoying, so I suggest you read how to disable User Account Control in Windows 7.
3. In the left panel of the registry, find the Explorer section (the picture shows the full path). Right-click on Explorer, hover over "new" and select "partition". Name it Shell Icons and press enter. If this section exists, skip this step and go to step 4.
How can my friends and family use the libraries?
Libraries can help your friends and family organize and find files more easily. This reduces the chance that important files will be lost. Using the libraries is intuitive and easy. The path to the My Documents folder is stored in the following registry key, where is the path to each location.
Changing the location of the My Documents folder
Any change to the default location is saved to the next location and the above path is also updated. The ability to change the location of the My Documents folder is not available when viewing the properties of the My Documents folder. In the Destination field, enter a new path to the My Documents folder, or click Move to locate the folder and optionally create a new My Documents folder. If the path you entered does not exist, you will be prompted to confirm the creation of a new folder. Click Yes to move the files from the old My Documents folder to the new location, or click No if you don't want to move the files. If you click No, the files in the old location will not be deleted, but will not be visible in My Documents after the change.
Restore default path for my documents
- Right-click "My Documents" and select "Properties".
- Click Restore Defaults.

4. Select the created, existing Shell Icons. In the right pane, right-click, hover over "new" and select "string parameter". Write it type 3 and press enter.

How to change the storage location of the My Documents folder
Any modification to the default configuration is written to the next location, and the previous path is also updated. In the Destination field, enter a new path to the My Documents folder, or click Move to navigate to the file and optionally create a new My Documents folder. If the path you entered does not exist, you will be prompted to confirm that you want to create a new folder. Click "Yes" to move the files from the old My Documents location to the new one, or "No" if you don't want to move those files. Please note that if you click No, the files in the old location will not be deleted, but will no longer appear in My Documents after the change. There are many ways to customize our equipment.
5. Right-click parameter "3", click "change". In the value area, write the path to the ico file, for example, C:iconcapapka.ico and click OK. It is recommended to use an image size (ico) of 256×256 pixels.

6. Pay attention to the bit depth of Windows 7, if you have a 32-bit system, immediately go to step 7. If 64 bit is installed Windows version 7, then go to the section shown in the picture below and follow steps 3 to 5.
There are so many of them that many times we do not know that our team has something that can be done. After changing the appearance of our system with custom themes that abound on the web, changing appearance our desktop with many icons and even adding features with many programs, it is time to change the look of our folders.
Change icons in folders
This not only allows us to give a brighter look but also helps us to easily recognize our files and organize them more in a simple way. The process is very simple and can be done on all the folders we want. The only thing we have to do other than change the icons is to get the ones we want to use in our folders.

7. To change the folder icon to Windows 7, restart your PC.
If you want to return the regular folder icons, then visit the Shell Icons subsection and delete type 3 by right-clicking on it. Select "delete" from the menu, then click "yes". For the 64 bit edition, do these steps in two places. Restart your computer.
Click the Change icon button that you will find at the end of the folder settings tab. You will now find a new window where you will need to select the icons you wish to use. Click the Browse button and find the folder where you saved the icon you want to use in the folder.
- Find the folder where you want to change the icon.
- Click right button mouse in the folder and select "Properties" from the menu.
- Click the "Customize" tab, last tab in the folder properties window.

Programs to change the folder icon
There are paid and free utilities to change the folder icon. Consider free products. I would like to emphasize that the programs do not bring more benefits than the use of regular funds. Such applications include IconTo (we will dwell on it in more detail), FolderIco. To change the icon of a folder or their group, do this:
If we want to apply the same icon to multiple folders, we will only have to select them and repeat the process from the step. If the time comes when you want to get rid of those custom icons, there is a very easy way to do it. Just select the folders you want to restore, go to the folder properties, go to the settings tab, click the "Change Icon" button, and finally click the "Restore Defaults" button.
Status icons for files
The app displays special icons to let you know what's going on. You will see icons in several different places. The icons that are overlaid on individual files and folders represent the status of that file or folder.
Status icons in the system tray or menu bar
depending on your operating system these icons can be displayed in different colors. However, an article translated automatically is not always perfect. It may contain syntax errors, grammar or word usage, more or less the same as a foreigner may err when speaking a language that is not his own.1. Download IconTo here and install.
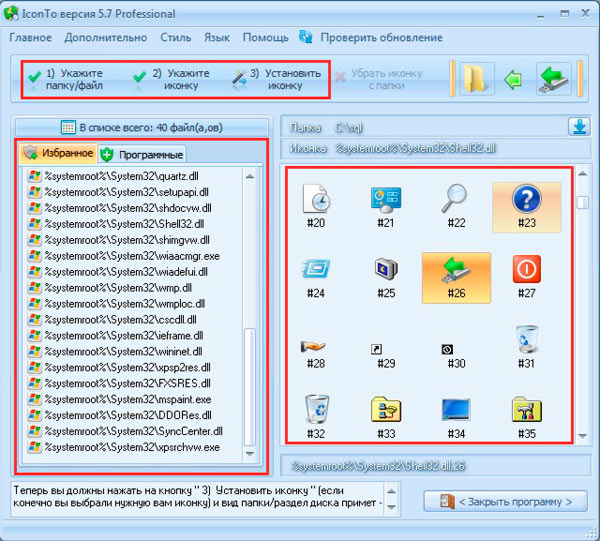
2. Run the program, click "specify folder/file" and choose to install for one folder, for several or for a specific file type.
![]()
4. Select one icon from the standard ones, in the "favorites", "software" tab or click "specify an icon" to select your picture. Then click "set icon" and enjoy the result.
Microsoft is not responsible for any inaccuracies, errors, or damages caused by the mistranslation of content or customer use of it. In case of errors and suggestions, you can fill out the questionnaire at the end of this article. If your computer has been assigned enough time to complete initialization of service loading before restarting, and one or more system icons are still not displayed in the notification area after reboot, you can reactivate them by deleting two subkeys from the registry.
That's all, I explained how to change folder icon in windows 7, 8. Feel free to use the capabilities of the operating system itself. Programs do not give such a desired result. If the topic went beyond icons, learn how to change the Windows 7 start menu icon to improve the look of the OS.
Hello blog readers.
Many users, in an attempt to make their operating system look unique, change everything they can. These are window colors, backgrounds, sounds, icons, and often the whole design together. I have already touched on various topics related to this area. At the same time, I did not tell you how to change the folder icon in Windows 7. Well, in the article below, I will just tell you about it.
This procedure is simple and does not require any special skills from users. In general, to change the directory picture in Windows 8 or similar versions, you need to follow a few simple steps:
It is best to use files that are no larger than 256×256 points. To return the standard image, simply click on " Restore default". At the end, we confirm the actions.
Before the final movements, you can preview the icon to be set. If everything is fine, press " OK».
If you want to know which folder the icons are stored in - Shell32.dll. Rather, it is a library that is responsible just for icons.
As a result, a configuration file is created in the directory. It contains the necessary parameters and the path to the picture. It is hidden by default. To see it, you need to go to the directory tab " View" and then to " Parameters. Here, the check mark is removed from the item that hides these types of documents.
Manually( )
How to change folder icon manually? Simple - you can create the above file yourself:
It is worth noting that not all directories can be changed to your own picture. For example, for the Windows partition, this is prohibited.
All folders( )
The first thing to do is a restore point. Only after that proceed to the procedure itself:
So you can change the pictures on the directories in Windows 10 and other versions.
Disk( )
If you want to put a new picture on a flash drive or any other partition, refer to this article. Here is a detailed description of how this can be done.
There are a lot of videos that show how other pictures are installed on files or disks. But in general, the above information is enough to achieve the goal.
It is worth noting that you can install almost any icons, even as in Mac OS. The main thing is that they are of the right size and have the appropriate resolution.
I hope this article helps you achieve what you have in mind. Subscribe and tell others about the blog!