What are profiles in Mozilla Firefox? This is a set of settings, user information. Firefox can be run with a specific profile, and then Firefox will have its own settings, plugins, external display, and more. It's almost like having Firefox installed and configured separately.
This way you can create profiles for different users or for one user, but for different tasks.
For example, I needed profiles:
- for everyday work on the Internet - social media, authorization on the necessary sites, the necessary bookmarks, your own history of visiting;
- for work - this is authorization, remembering authorization on specific sites. Authorization of other accounts in social networks And so on.
- for mom 🙂 Link to classmates in bookmarks in the most prominent place and authorization with memorization on the same site 🙂
Application may vary.
So what exactly is stored in profiles:
- Bookmarks and browsing history
- Passwords
- Special site settings
- search engines
- Personal dictionary
- Autocomplete fields
- Cookies
- Security certificate settings
- File type management
- User styles
Also, for each profile, you can set your own design and add-ons installed in Firefox in the current profile will also be available only in this profile.
How to manage Firefox profiles?
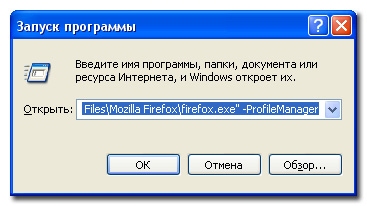
To do this, you need to start Firefox with the parameter. You can do this, Start -> Run and then enter (before that, you will need to close all open Firefox windows, otherwise executing the following command will simply launch the browser, not the profile manager)
firefox.exe -Profile Manager
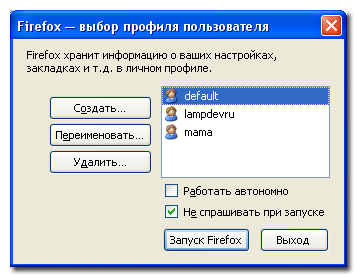
I just want to note that the checkboxes in the window affect the current launch of the browser. Work offline - means that the browser will work offline (with)CEP.
If you select any of the profiles and check the "Do not ask at startup" checkbox, then the next time you start the browser without specifying a profile, it will start with the selected profile. If you remove the checkbox, then every time you start the browser, a choice will be offered. personal profile. If you checked the “Do not ask at startup” checkbox, but after that you needed to change the profile loaded by default, then you will need to start the profile manager again, as described above, and set the necessary settings.
Where is the profile stored? In my Windows XP files are stored here. One profile - one folder, for example zwv9xv8q.lampdevru.
C:\Documents and Settings\username\Application Data\Mozilla\Firefox\Profiles
C:\Documents and Settings\username\Application Data\Mozilla\\Profiles |
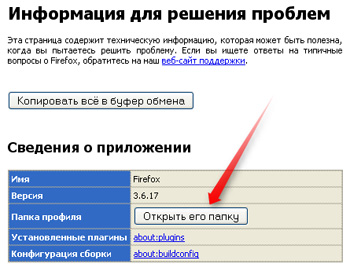
You can also open the profile folder by doing the following: select the menu item Help -> Troubleshooting Information or in a new tab in the address bar we write about: support, the page loads, we see the following
How to start Firefox with the right profile?
To do this, the executable file must be launched with the parameter -p profilename. For example, you can create a shortcut and write the following in the "Object" property
Often, to solve problems with Firefox, it is recommended to create a new profile. This article explains how to do this.
For Windows
In order to create a new profile, be sure to close all Firefox windows!
All operations with profiles are performed using the Profile Manager. It can be called by launching Mozilla Firefox with the parameter -p or -ProfileManager .
Calling the Profile Manager
We press Start → Run and in the opened window in the field Open enter:
Firefox.exe -p
you can also use the "Browse" button and find where the firefox.exe file is located (Default C:\Program Files\Mozilla Firefox\ but it might be different if you installed Firefox on a different drive or folder. For example D:\Firefox\firefox.exe ) and add the key at the end -p.
or type the following at the command line:
or in the properties of the Firefox shortcut on the desktop or in the panel quick launch (right click on the shortcut → Properties, tab "Shortcut" in the "Object" field, add the key -p). The result will be something like this:
"C:\Program Files\Mozilla Firefox\firefox.exe" -p
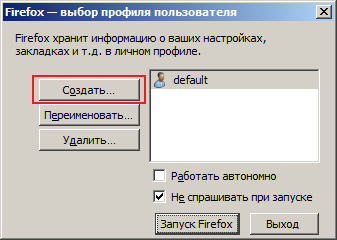
The Profile Manager window will open (Firefox - user profile selection). With it, you can create a profile anywhere on any drive, including network drives, rename or delete a profile. It should be noted that when creating and selecting a new profile for operation, the old one remains in its place, but becomes inactive.
Create a profile
Click on the "Create" button to create a new profile:
In the window that opens, we read that it says: “Firefox stores information about your settings, settings, etc. in your personal profile. If you are not the only user of this copy of Firefox, you can use profiles to separate the data used. To do this, each user must have their own profile. If you are the only user of this copy of Firefox, you must have at least one profile. If you want, you can use multiple profiles to store different sets of settings. For example, you can keep a separate profile for personal use and for work. and click "Next".
In the window "Profile Wizard" enter the name of the new profile (in this case new profile). If you want to place the profile in a different location, then select the folder where the created profile will be located by clicking the "Browse" button. Then click "Finish".
That's it, a new profile has been created.
Choosing a new profile
Now choose a profile new profile in the list of profiles (by clicking on the line with the left mouse button) and click on the button "Launching Firefox". To open the Profile Manager by clicking on the Firefox shortcut, uncheck the checkbox "Don't ask at startup".

This will open Firefox, which will have all the default settings and will not have your bookmarks and extensions (possibly causing the browser to work incorrectly), search plugins, etc. All settings are intact and remain in the old profile.
To revert to using the old profile, you need to open the Profile Manager (as described above) and select it from the list of profiles. The default profile is usually called default. Also in the Profile Manager, in addition to creating a profile, you can rename and delete unnecessary profiles.
For Linux
If Firefox was installed from a binary file (*.rpm, *.deb), then you can call the Manager in a way similar to that described above. Only for this, in the executable line, you just need to specify
Firefox-ProfileManager
If the installation was done from an already compiled archive, then it is necessary to specify the full path to the executable file (provided that the console command for quickly launching Firefox was not previously added by the user manually).
For Mac OS X
To launch the Profile Manager, you need to open the Terminal (“Applications → Utilities → Terminal”) and enter the launch command (this command must begin with the “/” symbol):
/ Applications/ Firefox.app/ Contents/ MacOS/ firefox-bin-profilemanagerIn some cases, instead of "firefox-bin" just "firefox" is used, then the command will look like this:
/ Applications/ Firefox.app/ Contents/ MacOS/ firefox-profilemanagerFirefox has the unique ability to create an unlimited number of profiles. In other words, you can have several completely independent FF browsers with different configurations at the same time, and at the same time only one unpacked distribution is used. This is so convenient that now no one has less than two profiles. Of these, the main (default) is a working, proven, stable FF, with which you constantly browser and-not. The second (test) is designed for testing and experimenting with extensions, skins and all sorts of gadgets. The solutions tested on it and normally working are then transferred to the main FF. They also make separate profiles for family compatibility, for example, with a beloved little sister who changes skins daily (after which FF inevitably falls), or with an idiot brother who clogs bookmarks with links from dubious sites.
Create profiles
After you have unpacked the archive and got the Firefox folder, write the full path to the executable file on the command line, to do this, go to: Start> Run and through Browse go to firefox.exe. Now manually add the -r key through the space, i.e. the last file on the line should look like: \firefox.exe -p. Click OK and observe the Choose User Profile window. It already has a default profile, let it remain the main one.
It is easy to understand and create another one (or as many as you need), giving them names.
Now it would be just right to put a password on the main profile, thus protecting yourself from the playful pens of your sister or brother, but, unfortunately, such a feature is not provided in FF. Can someone make an extension?..
Launch profiles
FF allows the use of three browser launch options. The first is if you tick Don't ask at startup in the selection box. In this case, when clicking firefox.exe, the profile selected last time will be launched. This looks normal when profiles are rarely switched (for this you will need to go to command line and run with the key). The second option is to uncheck the box. Now, at startup, a selection window will pop up, where you mark one of your 99 profiles and then launch it. And finally, the last option allows each profile to have its own label. They do it this way. In the Firefox folder, create a couple of shortcuts to the firefox.exe file, rename them, say, default and test. Now, right-click on the properties of each created shortcut, on the Shortcut tab in the Object line, add the path with pens: c:\...\firefox.exe –p default (Respectively for the second one: …\firefox.exe –p test).
Working with profiles
However, the preparation is over, the labels are in place, and now you can make the filling with a feeling of deep satisfaction. If you are getting acquainted with FF for the first time, then I recommend transferring bookmarks to the main profile (default) and doing nothing else. All perversions with extensions and themes are carried out on a profile dedicated to this. If you are already using FF, but still for some unknown reason have only one profile, then immediately start creating additional ones in the same way as the procedure described above. But here it is advisable to proceed differently. For example, you have created a test profile. Now go here: c:\Documents and Setting\%User%\ Application Date\Mozilla\Firefox\Profiles\... In the Profiles folder you will find two profiles: *.default and *.test. (Instead of asterisks - a set of letters and numbers). Copy the contents of *.default to *.test (replacing whatever it asks). As a result, you will get two completely identical FFs, while continuing to work with the default profile, and mocking test without fear. In the case when the experimental profile collapses, you simply kill it through the selection window, and in its place from the main one make another one in the described way. If, after working out, you are ripe for the introduction of innovations, then it is easier to rewrite the contents of the test profile to the default profile than to bother with new installation something there ... When using replacements, you can forget about uninstalling crooked extensions and themes.
Let me make an addition, or how I work with profiles:Immediately after installing FF, I go into its working directory and create a PROFILES folder. I start FF with the -p parameter and create a new profile (there will be no default profile, because I haven’t launched it (FF) yet), pointing it to the profiles folder. A profile is created, similar to default, but with my name. And it is not located in% APPDATA%, but in the program directory, which is very convenient, IMHO. For bullying, I simply copy the existing profile to a folder with a new name, and when creating the profile, I specify it as the working directory. I get two identical profiles.
Advantages of the method - no MOZBACKUP is needed, etc. A full backup of the browser is made by simply archiving the program directory.
Another plus is that it is easy to transfer the program from machine to machine.
The Mozilla profile stores information related to a specific user in the profile - individual settings, mail, passwords, browsing history, cookies, bookmarks, cache (the cache can be moved by the user in the "Settings"), additional extensions installed. The profile (default, by default) is created automatically at the first start of the program. As necessary, you can create any number of profiles - for each of several users (corporate users create tens or hundreds of profiles), for trial installation of extensions, for experimenting with settings (individual users with experience, as a rule, work with two or three profiles ). The profile created by default when you first start Mozilla (default) has no advantages over profiles created later - if necessary, feel free to move or delete it (don't forget to do backup profile). Default profile location
(should be allowed to show hidden and system files):
C:\Documents and Settings\[login]\Application Data\Mozilla\Profiles\[profile name]\[set of letters and numbers].slt\ Profile Manager There are several ways to open the Profile Manager window: Start -> Programs -> Mozilla - > Profile Manager Via the command line, for example:
"C:\Program Files\Mozilla\mozilla.exe" -p From the menu:
Tools -> Select another profile... -> Arrange profiles
Tools -> Switch Profile... -> Manage Profiles... In the profile manager, you can create a new profile, run one of the existing profiles, delete a profile. Creating shortcuts for each of several profiles In the program folder, right-click on the file mozilla.exe, select the "create shortcut" command, right-click on the shortcut, select "Properties", add in the "Object" line after the closing quotes -p "Mozilla-prof" (space, dash, Latin p, space, quotes, your profile name, quotes). For example: "C:\Program Files\Mozilla\mozilla.exe" - p "mozilla-profi"
Repeat for each profile. With Mozilla set as the default browser and several profiles, opening pages from disk occurs through the profile manager - so that the page opens immediately in a specific profile, add the -p switch and the profile name to the HTML file parameters to the path to seamonkey.exe.
File Explorer -> Tools -> Folder Options -> File Types -> HTML -> Advanced -> open -> edit -> Application executing the action ->
For example:
G:\INTER\SeaMonkey\seamonkey.exe -url "%1" -p "SeaMonkey-P3" Migrate profile by files When creating a new profile in a new location, some files can simply be moved from the old to the new profile.
* bookmarks.html- bookmark file.
* cookies.txt- cookies.
Tools -> Cookie Manager -> Manage Stored Cookies
Tools -> Cookies Manager -> Organize Saved Cookies.
* hostperm.1 - list of sites with permission-prohibition to set cookies, display images, launch pop-up windows.
Tools -> Cookie Manager -> Manage Stored Cookies -> Cookie Sites
Tools -> Cookies Manager -> Organize Stored Cookies -> Cookie Sites.
Tools -> Image Manager -> Manage Image Permissions
Tools -> Popup Manager -> Manage Popups
* mimeTypes.rdf- sets the behavior of the browser in relation to certain types of files.
Edit -> Preferences -> Navigator -> Helper Applications
Edit -> Preferences -> Navigator -> Applications
* history.dat- "history" - a list of visited pages (when you restart after the transfer, links to pages will be saved or deleted, depending on the time limit set in the settings)
Edit -> Preferences -> Navigator -> History
Edit -> Preferences -> Navigator -> Browsing Log
* user.js- user settings, created and modified by the user.
* userContent.css
* userChrome.css- created and modified by the user.
* abook.mab, history.mab- address book files.
* Mail- mail folder in the profile - save entirely.
*panacea.dat- mail file in the profile - save in its entirety.
Profile files with a more complex migration scheme.
Files with new names are generated for password and form files in the new profile - files copied from another profile will not be automatically picked up.
* 12695138.s .s) - previously saved passwords.
Launch a browser with a new profile, save the password on any page - a new .s file with a new name will appear in the profile. Rename the old .s file with this new name
about:config, find the line signon.SignonFileName
user_pref("signon.SignonFileName", "27038953.s");
* 12695281.w(arbitrary set of numbers, plus .w) - form data.
Launch a browser with a new profile, open the form manager, enter and save any information - a new .w file with a new name will appear in the profile. Rename the old .w file with this new name
Or copy the entire contents of the old file and replace the contents of the new one with it.
Or, copying the old file to the new profile, copy the file name to the clipboard, open via the address bar about:config, find the line wallet.SchemaValueFileName
user_pref("wallet.SchemaValueFileName", "27138354.w");
replace the value of this parameter (file name) with the one in the buffer.
Transferring an entire profile If you need to transfer (duplicate) an existing profile with all settings and extensions installed, proceed as follows: new folder with the name selected for the new profile, copy the folder with the name [a set of letters and numbers].slt from the folder of the old profile to it, start the profile manager and create a new profile, the name of which should match the name of the new folder, and the location should be one level higher new folder, so that the manager picks up a new folder, and does not create another one. In the folder chrome find a new profile and open it in text editor, with search and replace functionality, chrome.rdf file. In it, you need to replace the paths to files from the old profile with new ones, that is, insert, for example, the following lines into the search and replace boxes: Search:
file:///C:/Windows/Application Data/Mozilla/Profiles/Moz-profile01/wl4n oyh6.slt
Replacement:
file:///G:/Inter/Moz-profile02/wl4noyh6.slt In most cases it is enough to replace the paths in the file chrome.rdf, but still, it's better to check the entire profile folder (fixed paths to files can be contained in prefs.js panacea.dat, etc.). Profile names should never be repeated (at least as long as the same registry.dat and mozver.dat files are in place). Pay attention to the extension settings - you may decide to change the location of certain folders or files. Transferring Mozilla to another machine Also applies to transferring Mozilla to the same machine when reinstalling operating system. In this option, the profile location is not default, the path to the profile folder is the same.
1. Copy (save on external media) the profile folder with the folder [
set of letters and numbers ].slt inside.
2. Copy (save on external media) folders plugins and searchplugins. If plugins and search plugins were not updated after installation, you do not need to save them.
3. Some extensions place their own settings file (.js) in the Mozilla\defaults\pref\ folder - check if there are [extension name].js files in it. If there are, save them.
4. Install Mozilla in a new location.
5. Paste the saved plugins, search plugins and settings files (.js) into the appropriate folders of the new installation.
6. Paste the profile folder with the folder [set of letters and numbers].slt inside to the same place where it was in the old place.
7. In the profile manager, create a new profile with the same name as the profile folder; in the path selection window, specify the folder one level higher so that the path in the manager itself, as a result, ends with the profile folder.
Saving user files (profile, plugins)
* The easiest way to save (backup) a profile is to periodically copy it entirely to separate folder. There will be problems with the profile - try replacing it with a saved version.
* In case of system reinstallation, it makes sense to periodically save the profile folder on external media.
* Separate story with cache folder. It is, by default, located in the profile folder and can be saved with it. Or the cache folder can be located in the settings in a different place and saved, if necessary, separately.
* From the Mozilla program folder, it is worth saving the folder with search plugins (searchplugins) and plugins folder (plugins). Some of the files are hidden in the plugins folder.