As part of installed program"Word" has a huge number of different fonts. But sometimes they are still not enough. This is all the more true when you are doing something creative and want to embellish your work with a beautiful, catchy font.
In this article we will talk about how to "Word". We will figure out where to download fonts, where to unzip them, what tools to use for installation, and much more. It is noteworthy that the procedure is the same for all versions of Word, so by following this instruction, you can install them on both the 2003 and 2016 versions.
The second way is to use a text field object and write it to that text field. Text placed in a text field has several advantages. It can move freely around the document without any restrictions, and it can be rotated. If you don't like appearance default text box, especially the white fill and black outline, it's easy to set the Format tab to "none". Use the Fill Form and Form Structure drop-down menu.
The default white paper color might seem a little boring for our text effect, and it might be a good idea to set it to a different color. Go to the Design tab and select a dark gray color from the Page Color drop-down menu. As for any other color drop-down list, the first two columns with gray remain the same, but the eight columns on the right side change depending on the selected color palette. After changing the background, the black text inside the text box is almost invisible now, but that's great, we'll fix it in a minute.
Download and unpack
The process of installing fonts in Windows is quite long, but because of this, it is not difficult. Guided by the above instructions, you will completely cope with the task in a few minutes. So, let's get down to the story of how to install a font in Word.
It needs to be downloaded first. However, beware of unreliable sites. Instead of a beautiful font, they can reward you with a virus, which is highly undesirable. One thing can be said for sure: if you downloaded a font in the EXE extension, then delete it immediately. Fonts are downloaded in only two formats - TTF and OTF. The ZIP format is also allowed, but only if the font has been zipped.
Master of the Almighty Format
There are drop-down menus for filling text, an outline, and all other possible effects, as well as sub-menus and sub-menus and sub-menus. It's certainly not an easy way to customize the effects, and we only have access to a limited number of presets and options. The best place to adjust the setting is in the Format area. The Format panel is an important area for setting all the advanced options, but there is no standard way to display this panel.
Set Text Fill and Outline
Before moving on, remember that there is only one format area, but the contents of that area change based on the selected content. This is different from a text box, for body text, and for an image. Since this will be our base station for setting up the entire effect, this good habit keep this panel open at all times. With the background color set and the format bar still open, select the text field and enter any word, such as "Effect". In the Format area, select Text Options, open Text Fill Settings, and change the text fill from Solid Fill to Gradient Fill.
Here is a list of sites that are one hundred percent reliable:
- dafont.com
- fontsquirrel.com
- fontspace.com
- 1001freefonts.com
After downloading the fonts from this site, they will be downloaded in a ZIP archive. You will need to unzip them. Use any archiver for this. Choose any folder to extract, but just remember where it is located, this is necessary for the next installation steps.
From the Preset Gradients drop-down menu, select the yellow top spotlight. This will create a subtle shading, as if the light source is shining from above. To make the text a little more interesting, we will also add an outline. The scheme is good, but too strong. We can open the "Connection Type" drop-down menu and select "Double" which will split the path into two: one visible above the text and one outside the text.
All we need to do is increase the opacity to make this outline less visible. A value around 60% seems to be just fine. With the text box still selected and the format bar still open, click the Text Effects tab. As the first effect, we will add a simple drop shadow below the text. Because the background color of the page is quite dark, the effect is quite subtle, which is normal and probably doesn't need any further tweaking. If you want, you can also try adding a reflection effect.
Preparatory activities
Before you install the fonts, you need to carry out some preparatory activities. They consist in opening the necessary windows in Windows and are designed to facilitate and speed up the installation process. So, let's now talk about what windows you need to open on the desktop.

Share document
Choose any preset, but increase the blur value to make the reflection less visible and not too distracting. In just a few steps we have a nice text effect and we can do it. Otherwise, the document may look different. However, you lose the ability to edit text effects and possibly also the ability to edit text.
For more information, please read this helpful tutorial. Here is a list of the main findings. Resizing objects later can lead to unexpected complications. There is a distinction between "body text" and text placed inside a text field. For text effects, text placed inside a text box is preferred. Format panel - the best place to change any formatting - make sure this panel is visible at all times.
- Whenever possible, set the paper size as the first step.
- Most text effects look best at very large sizes.
First of all, use the explorer to navigate to the folder where you extracted the font. Most often, this folder will be called FONT, which translates into Russian as "Font". By clicking on it, leave the window open.
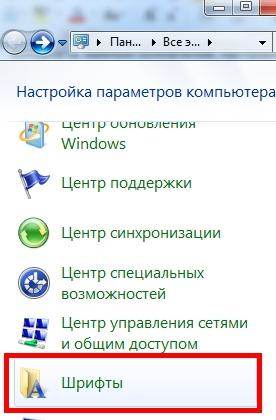
Now you need to go to In different Windows versions it is done differently. If you have Windows XP, Vista or 7, then you need to enter the "Start" menu and click on "Control Panel". If Windiws 8.1 or 10 then click right click mouse on the Start menu and select Control Panel. If you have Windows 8, then you can use the keyboard shortcut Win + X.
It has been completely revised by our staff to make it up to date, accurate and up to date - with special assistance from Laura Spencer. In text documents, the font can matter. But in the vastness of the Internet, more fonts are still waiting to be discovered.
Here you can find a good list of the most popular modern fonts. Download the new font and unzip it. . Images are the essence of the website, which by now probably knows about each of you. However, lyrics, as the heart of a website, cannot be neglected.
From Web Safe Fonts to Web Fonts
Every web design includes at least one, sometimes two, selected fonts that are defined for the headings and texts of the stream. At the beginning of web design, websites are still far from different from their font from other sites. This happened because only a few fonts were installed on all computers. These standard texts always displayed correctly on all websites and were therefore called "web safe fonts". Drawback: These entries were used too much and were quickly monotonous and not very creative.
Login to the desired service
Continuing to talk about that, it is impossible not to mention where it is necessary to go further. At this stage, we should get into the font installation service, in Windows it is called "Fonts". It is located in the "Control Panel". It is for this that we opened the window of the same name.
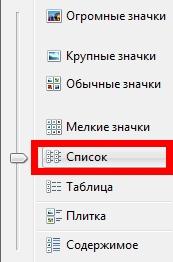
To make it easier to find the service we need, change the display of icons to "Small" or "Large". It's just that in the category view it will be quite difficult to find the necessary element. The View menu is located at the top right of the Control Panel window. Find and select the appropriate item. Now, among all the icons and elements, find the "Fonts" service. Its icon is displayed as a folder with the letter "A" next to it.
Of course, at that time there were bright and rarely used fonts that could stand in the sea of standard scriptures. However, they will likely be installed on all visiting computers. These fonts are currently stored online on the Internet, not locally on computers, and are automatically downloaded with site content.
This ensures that each website is always rendered in the font that was provided for it. Now it's not a big problem to turn on unusual fonts to your website. Of course, various sources have been developed over the years that allow web fonts to be searched, purchased, and used.
All preparations have been made, now we go directly to how to add fonts to Word.
Installing fonts
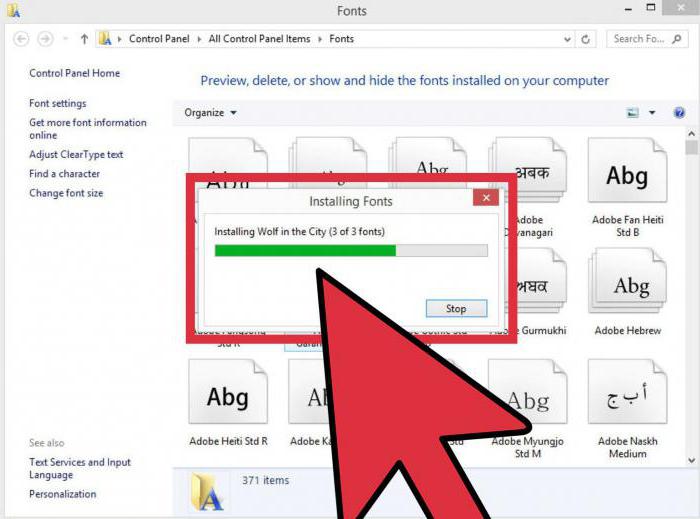
So, before going to Word, open the Fonts window itself and place next to the one in which the folder with fonts is open. All you have to do is drag the OFT or TTF files (depending on which fonts you downloaded) into the fonts window. The installation process will begin immediately after that. It doesn't last long. To make sure that the fonts are installed, look in the "Fonts" window for the name of the fonts you downloaded.
If you now want to find a suitable font, you can use it to display the text entered in the window preview in different fonts. You can specify different font properties in the pages panel, including font size, font size, and font width.
How to find out the name of a font?
In the All Categories section, you will find additional font features, which we will briefly explain to you here. Small thin lines may appear that partially connect individual letters. Display: With this option, you get mostly fonts, which should be noticeable when it comes to ads, for example. These entries are rarely used as flow text fonts, as they only work with large font sizes and single words. Handwriting: As the name suggests, the fonts in this category are made up of very strong curved lines. They look handwritten and elegant, which is why they are used for writing letters, for example. The peculiarity of this is that all letters have same width, and all text is forked.
- Decorations can be found at the beginning and end of the alphabet.
- Today, this book is mainly used for invoicing.
You should also pay attention to the fact that often fonts are downloaded in their various guises. So, the same font can have two more versions: italic and bold. If so, then move all three files to the "Fonts" window.
That's it, the font is installed. By the way, if you don’t know how to change the font in Word to the installed one, then it’s very easy to do it. In the program, open the drop-down list "Font" and select the name of the installed font there. To make it easier to find them, they are listed in alphabetical order.
If you find a suitable font for yourself, you can remember it by adding Add to collection. Now you're heading for home page font. Here you will find interesting information, among other things, what styles are available for your font. It must be inserted right after the heading for the font embedding to work smoothly. With this code, for example, you manually change the font of your headings.
Up to 6 fonts can be installed in the plugin. All plugin settings. Source photos: Own screenshots. However, what novice plotters may look like as complex graphics work is not so difficult to recreate in reality. To write text, you first need to create a text field.
Embedding fonts
So, we have already figured out how to change the font in Word. However, keep in mind that such a replacement will only be displayed on your computer and on a PC that also has these fonts installed. Otherwise, the user to whom you send the document will not be able to see your new font, since he simply does not have it in the system.
Some features of the installation
To do this, simply click the Type tool in the toolbar, move to the drawing area, and click again. Now you can see me on the surface of the drawing - this is your text field! Then you just need to write and the text will appear on the screen. It was already the most important step.
My tips for researching fonts are as follows. Find the font in your downloads folder, or click the "Show Downloads" button directly in your browser. Click "Install" on the preview window. The font is automatically installed in your user directory in the Library folder. Depending on the selected font, you can set whether the font should be bold, italic, or even underlined.
- Select and download a font from one of the above sites.
- The collection opens.
- Click on the drawing surface to make the green text border disappear.
- Click on the text again, now the border is gray.
- The Text Style menu also opens on the right side.
To avoid this, we will be helped by a very convenient option in Word - Font Embedding. To save a document with this option, you need to go to "File" and select "Options". Then click "Save". Now check the box next to "Embed fonts in file", and in the drop-down list, click on "Open Document".
How to add fonts to Word file?
If the words are separated into separate text boxes, you can better lay out texts with different fonts. You can either create this at the beginning or change it at any other time. To separate text fragments, you must.
- Select and cut the text to be placed in a separate text field.
- Create a new text field.
- Then paste the cut text into the new text field.
After this setting was produced, your document will display correctly on all computers, but its size will increase significantly since the fonts have been embedded in the file itself. So you learned how to install a font in Word.
We learned where all the fonts that are used in various programs are located, and now we will look at how to download and how to install fonts in windows 7. There is nothing complicated in this, but in the end you will learn how to beautifully design the typed text.
By the way, if you are interested in how to install a new font in Windows XP or Vista, then this lesson is also suitable, there are no fundamental differences, just read carefully.
First, let's remember where to install fonts. Open the Control Panel using the Start menu.
Now open the Fonts folder.
A window will appear that shows all the fonts that are on the computer.

If they are displayed differently for you, then for convenience you can change the view to a list, to do this, click on the triangle, as shown in the figure above. In the window that appears, click List.
In principle, you can try other items and see which look you like best.
These fonts are used in all programs in which you can print, for example, in text editors, like , or in graphics editing programs like Photoshop. But it happens that, for example, you want to print an inscription on a picture or an article title beautiful font, and the options available in the program do not suit you. Let's get back to our sheep. And so, how to install a font on a computer?
First, you need to download it from the Internet. Personally, I advise you to download fonts from www.photoshop-master.ru
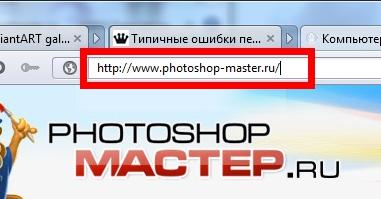
This site is about Photoshop, but the fonts are displayed the same in all programs, so you can download from here. Moreover, the site is reliable and convenient.
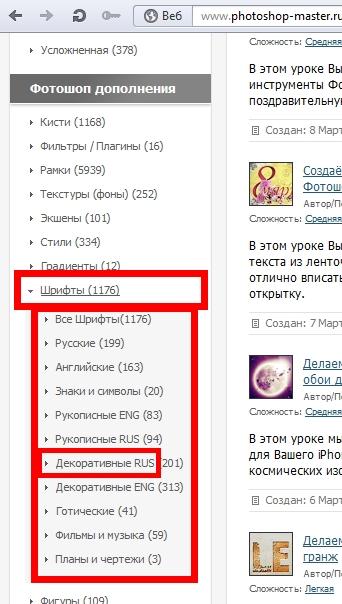
We scroll through the site and on the left we find the inscription Fonts. Click to open a list of different types of fonts. Let's choose, for example, Decorative Russian fonts.
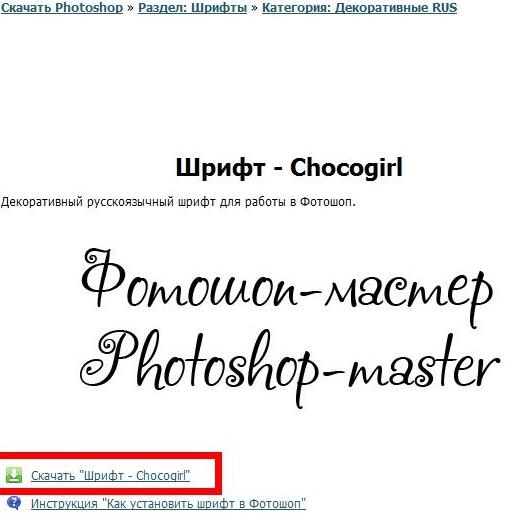
So, this page opens.

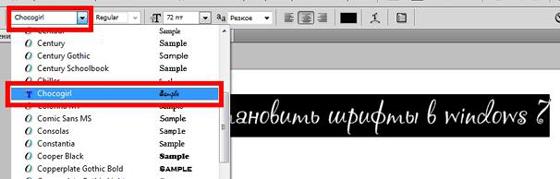
As you can see, here at the top there are also categories of fonts, and below here are the fonts of the category that we have chosen. Let's choose, for example, the font Chokogirl.
A page with the font will open, here the picture shows what the font itself looks like, but just below, click "Download font".
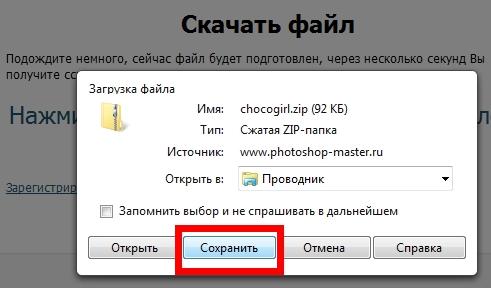
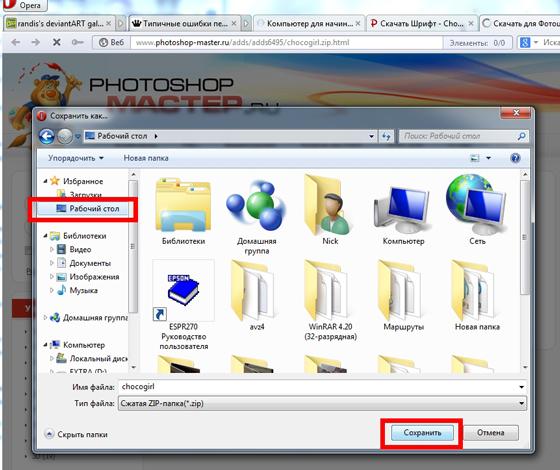
We save for convenience on the Desktop.
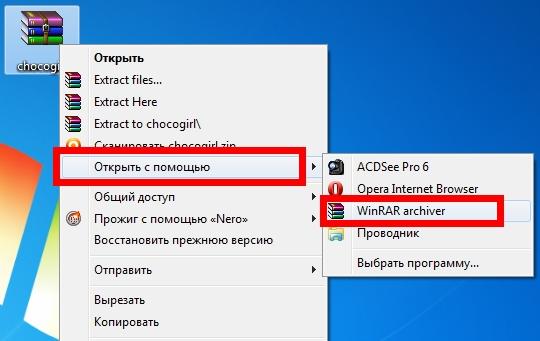
Fonts weigh little, so they download quickly. We find the archive with the font on the desktop. Now let's see how to extract it from the archive and how to add font in windows 7 so that it can be used.
How to add a font to Word and more?
Right-click on the archive, click Open with, then select WinRAR. If you do not know how to unpack archives, then read my two articles on this topic:
Here in the archive is a picture with an image of the font and the font itself. Now, without closing the archive, open the Fonts folder in the Control Panel. Hold the file with the font with the left mouse button and, without releasing, drag it to the Fonts folder and release the mouse button.
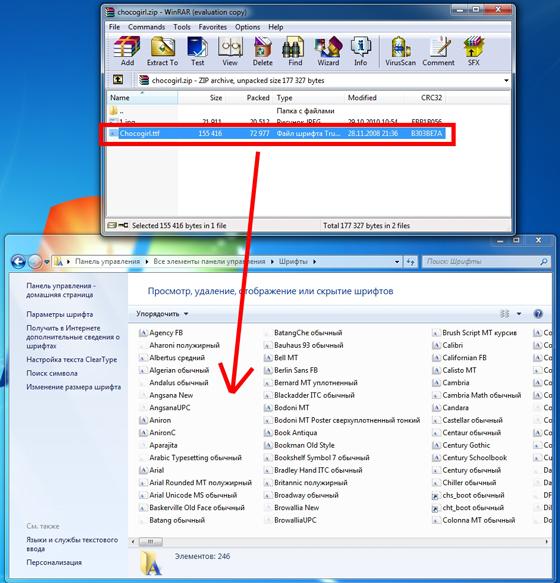
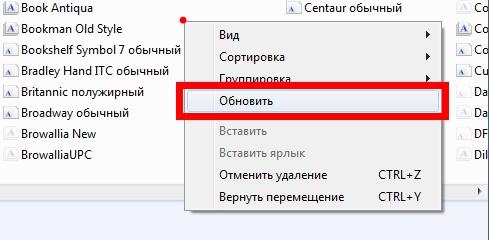
It should now appear in the Fonts folder.
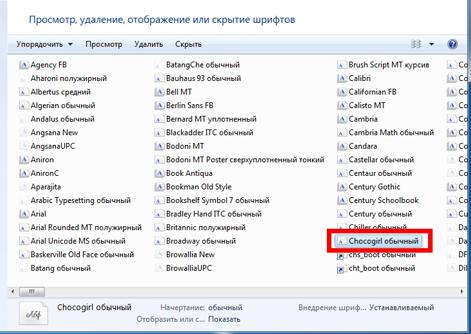
If suddenly it does not appear yet, right-click on an empty space in the folder and click Refresh.
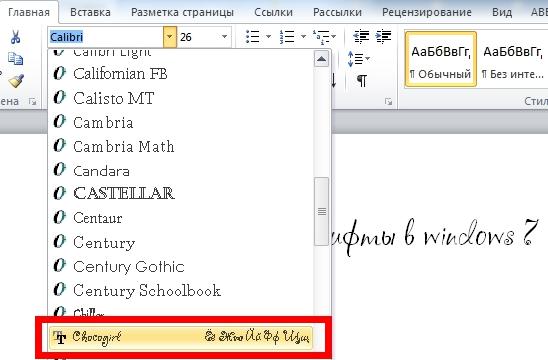
Now, to check, open the . Select the text and open the list of fonts.

Scroll through the list and find our font. We select it.

As you can see, even the English text has changed, but this is not always the case.
We do the same in Photoshop - everything works.
Here we found out how to set font in word and to other programs. Don't be afraid to experiment and find new fonts. Surprise your friends with interesting text design. After all, not only the content is important, but also the form. It is enough to understand once how to add a font , and you will open up new possibilities for the design of the text.
If you still have questions, then watch the video tutorial in which I explain everything in detail.