One way to change the style of a document is to use a new font for the text. To add the required font to Word, download and install it on Windows so that it is available to everyone Office applications.
There are many font file sites available on the Internet, such as DaFont. You can also import font files from a CD or DVD or from your organization's network. Both TrueType fonts (TTF files) and OpenType fonts (OTF files) work well for Office applications.
Since characters with grace don't get the desired result on the monitor, but they actually get the opposite effect, you prefer to use characters with no facets, such as Verdana, Arial, or Helvetica. To select the type of font that should be rendered by the font, simply use the syntax.
However, it's good to point out right away that you can't let the user render text in the tiled character of our choice. As in the example below. For this reason, it is good to consider two options. The choice of "safe" characters, which of course are present on the user's PC, and not a single character, but a series of characters that gradually move away from the result that we would like to receive, but not so much to indicate the family to which ours belongs character. So the user's browser will try to find the first font in its fonts folder if it doesn't find it the second, and only the last beach will use the default font. Let's see some examples of "safe" character families.
Note: Before downloading a font, make sure the source is reliable.
Adding a font
You can also install and manage fonts in two other ways.
The next time you open Word, the font list will display the new options.
Note: Machine Translation Disclaimer. This article has been translated using computer system without human intervention. Microsoft offers these machine translations to help users who don't know in English, learn about Microsoft products, services, and technologies. Since the article has been translated using machine translation, it may contain lexical, syntactical and grammatical errors.
True, the inability to choose the characters we prefer terribly limits our expressive options, but a good idea for development on the web is to agree to create with well-defined rules, and sometimes even very binding ones.
Fonts are character styles that your computer uses to display and print text. The font book is located in the Application folder. To manage or view fonts, open Font or double-click the font file. By clicking on each category, you can see different types of fonts, or you can click "All" to view all installed fonts.
As part of installed program"Word" has a huge number of different fonts. But sometimes they are still not enough. This is all the more true when you are doing something creative and want to embellish your work with a beautiful, catchy font.
In this article we will talk about how to "Word". We will figure out where to download fonts, where to unzip them, what tools to use for installation, and much more. It is noteworthy that the procedure is the same for all versions of Word, so by following this instruction, you can install them on both the 2003 and 2016 versions.
Preview and install fonts
On the right panel preview displays a sample character in the selected font. You can use the script book in other ways. If you want to see the new fonts you've downloaded or saved to disk, double-click the font file. The font book displays a font sample. You can change the font size from the drop-down menu at the top of the preview window.
To install a font for use in documents you create or view, click the Install Font button below the font preview. From the File menu, choose Add Fonts, select a font or a folder containing multiple fonts, and then click Open Fonts to install. The font library automatically checks the font installation and notifies you when it detects a problem with the font file.
Download and unpack
The process of installing fonts in Windows is quite long, but because of this, it is not difficult. Guided by the above instructions, you will completely cope with the task in a few minutes. So, let's get down to the story of how to install a font in Word.
It needs to be downloaded first. However, beware of unreliable sites. Instead of a beautiful font, they can reward you with a virus, which is highly undesirable. One thing can be said for sure: if you downloaded a font in the EXE extension, then delete it immediately. Fonts are downloaded in only two formats - TTF and OTF. The ZIP format is also allowed, but only if the font has been zipped.
Delete Fonts in Font Book
The font library sets the default fonts to a location where that font will only be available for the current account user. The font book will move these font files to the trash. System fonts cannot be removed.
Viewing Fonts in the Font Book
There are several ways to view fonts in the font library. These different options will help you decide which fonts you want to use for the project you're working on.The preview menu includes three options that affect the preview. You may need to use the content slider or the zoom slider on the right side of the window to view all available symbols. The "Custom" option allows you to write a custom phrase or selected characters that will be displayed each time the font is selected. The Browse option displays all the characters available in the font. . If you don't see the preview in the Font column, select View Preview and Hide Font Information from the View menu.
Here is a list of sites that are one hundred percent reliable:
- dafont.com
- fontsquirrel.com
- fontspace.com
- 1001freefonts.com
After downloading the fonts from this site, they will be downloaded in a ZIP archive. You will need to unzip them. Use any archiver for this. Choose any folder to extract, but just remember where it is located, this is necessary for the next installation steps.
When working with fonts, you may find that you often use certain fonts but rarely use others. To help you find the fonts you need, you can organize them into collections. Drag the desired fonts from the Font column to the new collection name in the Column column.
- In the Font Library, from the File menu, choose New Collection.
- Enter a name for the new collection.
Deactivate and activate specific fonts
dynamic collections. It will automatically contain fonts that match your criteria. Click on it to view all installed fixed-width fonts. Create a new dynamic collection. 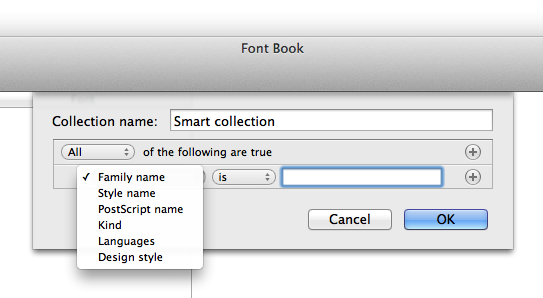
- In the font library, click "All" in the "Columns" column.
- In the Font column, click the font name.
- From the Edit menu, choose Deactivate Family Font Name.
Preparatory activities
Before you install the fonts, you need to carry out some preparatory activities. They consist in opening the necessary windows in Windows and are designed to facilitate and speed up the installation process. So, let's now talk about what windows you need to open on the desktop.

System scripts cannot be disabled. If you want to activate a previously deactivated font, click the font name in the Fonts column and from the Edit menu choose Activate Family Font Name. You can also disable or enable all fonts in a collection: Click "Collection Column" in "Collection Name" and then from the "Edit" menu choose "Disable" "Collection Name" or "Enable "Collection Name".
If any of the fonts are facing a problem, you can use the font library to check all fonts or fonts. Check checks possible problems. If you would like to use the Remove Selected Fonts button below, please log in as an administrator. Users who are not logged in as administrators can also check fonts, but can only delete those in their home folder. If there is a problem with fonts in the font library, you can click the warning icon at the bottom of the window and click "Remove Selected Fonts" to remove the problem fonts. You must reinstall the fonts you are interested in from the original source. If the font still fails the test, contact the font creator or the company you purchased the font from and ask for help.
- Open the Font Book.
- In the Column column, click All.
- From the File menu, choose Check Font.
First of all, use the explorer to navigate to the folder where you extracted the font. Most often, this folder will be called FONT, which translates into Russian as "Font". By clicking on it, leave the window open.
Now you need to go to In different Windows versions it is done differently. If you have Windows XP, Vista or 7, then you need to enter the "Start" menu and click on "Control Panel". If Windiws 8.1 or 10 then click right click mouse on the Start menu and select Control Panel. If you have Windows 8, then you can use the keyboard shortcut Win + X.
Find and eliminate duplicate fonts
You can also use the font library to check for fonts that are not yet installed. From the File menu, choose Verify Font, select the location of the font files you want to verify, and click Open. Duplicate fonts are highlighted in the Fonts column. . To eliminate duplicate fonts: Click "Allow" manually or "Allow" automatically.
Disadvantages when installing a custom font
Internet risks are inherently related. Other company and product names may be trademarks of their respective owners. You can find the new font in the dropdown menu where fonts are usually selected. If you can't find it, write it directly into the window where the font name will appear. If someone opens a document that doesn't have this new font installed, they won't see it. The same is true for you if you open the document on a different computer than where you installed the font. Basically, the text is perfect for you and it looks weird, silly, unprofessional. If you need to send a document that can be edited, you can mail only fonts and ask them to install them. When you prepare a presentation in which you have such a font, promise it from your computer. If you're projecting it from another, the font won't show up and won't show up. He will replace it with another, ordinary one. First, fast forward so you don't have to waste time on the video.
Login to the desired service
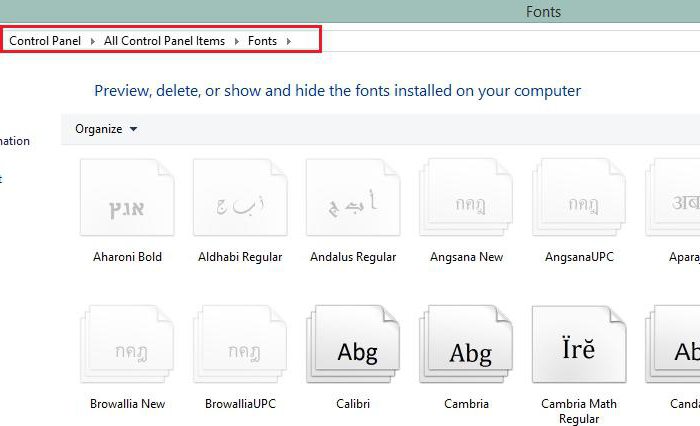
Continuing to talk about that, it is impossible not to mention where it is necessary to go further. At this stage, we should get into the font installation service, in Windows it is called "Fonts". It is located in the "Control Panel". It is for this that we opened the window of the same name.
To make it easier to find the service we need, change the display of icons to "Small" or "Large". It's just that in the category view it will be quite difficult to find the necessary element. The View menu is located at the top right of the Control Panel window. Find and select the appropriate item. Now, among all the icons and elements, find the "Fonts" service. Its icon is displayed as a folder with the letter "A" next to it.
Only where you always choose it. First of all, you need to install the plugin. By clicking on it, you should show the edit font style menu item and title 1 If the default menu is displayed instead, click on it. You can also set any font size, line height and space between characters. Once you've customized all the styles to suit your preferences, click Save and Publish Edit above.
- If so, click the blue "Activate" button.
- Only then will the main texts and headings be edited.
All preparations have been made, now we go directly to how to add fonts to Word.
Installing fonts
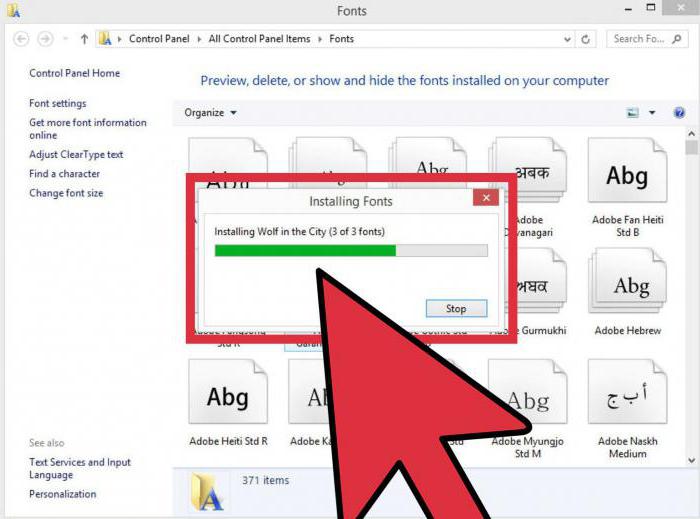
So, before going to Word, open the Fonts window itself and place next to the one in which the folder with fonts is open. All you have to do is drag the OFT or TTF files (depending on which fonts you downloaded) into the fonts window. The installation process will begin immediately after that. It doesn't last long. To make sure that the fonts are installed, look in the "Fonts" window for the name of the fonts you downloaded.
If changes to preview settings don't show up where they do, it may mean that the template is more complex. This will be a disproportionately long explanation of the purposes of this article. If they attack me. 🙂 Of course, you can ask and comment in the comments where you want to get "watercress" anyway. Fonts are collections of similar-looking fonts and are designed to be used side by side.
A font style is a variant of one of the fonts in the family. As a rule, the main font is Latin or regular. In addition, the family can include styles such as plain, bold, semi-italic, italic, and bold italic. In the documentation for your system, or software to manage fonts. Duplicated fonts are listed in their respective menus with the abbreviated name of the font technology in parentheses. By specifying a font, you can independently select the font family and font style.
You should also pay attention to the fact that often fonts are downloaded in their various guises. So, the same font can have two more versions: italic and bold. If so, then move all three files to the "Fonts" window.
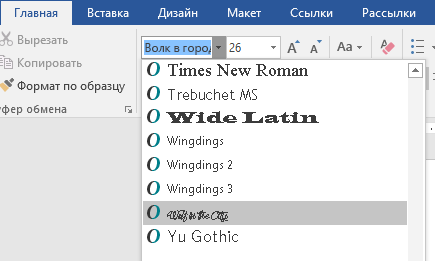
That's it, the font is installed. By the way, if you don’t know how to change the font in Word to the installed one, then it’s very easy to do it. In the program, open the drop-down list "Font" and select the name of the installed font there. To make it easier to find them, they are listed in alphabetical order.
Specifying the font size
In most cases, a particular version of bold or italic is used as expected. However, some fonts may use bold or italic variants that are not explicitly bold or italic. For example, some font manufacturers specify that font offsets use bold. Click the font family name or style name in the Character panel or Control Panel and type the first few letters of the selected name. Do one of the following: Set the font size in the Control Panel or Character panel.
- Select the object or text you want to change.
- Note that this menu allows you to select a font family and style.
- If no text is selected, the font will be applied to each new text.
- If you choose Custom, you can enter a new size value in the Character panel.
Embedding fonts
So, we have already figured out how to change the font in Word. However, keep in mind that such a replacement will only be displayed on your computer and on a PC that also has these fonts installed. Otherwise, the user to whom you send the document will not be able to see your new font, since he simply does not have it in the system.
To avoid this, we will be helped by a very convenient option in Word - Font Embedding. To save a document with this option, you need to go to "File" and select "Options". Then click "Save". Now check the box next to "Embed fonts in file", and in the drop-down list, click on "Open Document".
After this setting was produced, your document will display correctly on all computers, but its size will increase significantly since the fonts have been embedded in the file itself. So you learned how to install a font in Word.