If your camera shoots in RAW, congratulations. You can get much more out of your shots than owners of compact cameras that can shoot only in JPEG.
This article does not purport to be a complete guide to RAW processing, however, in our opinion, it will be useful for those who have not yet attached importance to the potential of working with RAW.
RAW and JPEG, which is better?
Of course, it is important to understand that RAW and JPEG were originally created to solve different problems, so it is impossible to argue that RAW is better than JPEG.
The JPEG image format was created in order to display the highest quality image with minimal memory consumption. When shooting in JPEG, you immediately get a finished picture, which you can immediately send to a forum, website, social network and maybe in print. JPEG files take up relatively little space and are the unspoken standard for storing images in user albums.
The colors in your photos will be exactly as your camera's imaging system sees them. In the case of RAW, you will either have to resort to using a native RAW converter, or use the correct profiles in a software specially designed for this. If there are no profiles (this is possible in the short term, for example, if your camera is new, and the software company has not yet had time to prepare the correct profiles), you will need to configure the image parameters yourself.
It is important to know that absolutely all cameras shoot in RAW. It's just that saving in RAW is blocked for them, and the camera independently converts the signal to JPEG using its own algorithm known only to developers. Thus, JPEG is the final result of processing the image by the camera, this process proceeds in several successive stages. This is done by the image processing system - this is how manufacturers now call a bunch of a special processor, additional microcircuits and software algorithms.
Knowing photographers love to shoot in JPEG, developers equip almost all modern cameras, including SLR and hybrid models, with advanced JPEG processing options. In Canon DSLRs, this is the Picture Style function, in Nikon DSLRs - Picture Control, in Sony DSLRs - image styles. In addition to several frequently used presets, it is possible to configure all the parameters yourself.
Of course, computing power and the intelligence of processing systems are constantly evolving. For instance, new system processing in Lumix cameras, called the Venus Engine VHD, and the image processing system in Casio cameras are equipped with three-core processors; Canon's DIGIC IV integrated circuit is equipped with fast memory and provides multi-channel reading from the sensor. The installation of these two processors in the Canon EOS 7D camera made it possible to achieve a data readout speed of 144 Mp / s.
Venus Engine FHD Tri-Core Processor
The software part is also important, and it is often based on an extensive database of typical shooting scenes. The camera compares the brightness composition of the shot against a database that already contains several thousand typical scenes and uses the optimal shooting settings. When recognizing a certain color in the frame, such as a blue sky, cameras increase the saturation of that particular blue color. It comes to the fact that cameras take into account the time zone, as well as the date and time of shooting. Thus, your camera can, for example, when shooting sunsets, automatically increase the saturation of reds and yellows, making the shot more “tasty” and the camera owner more joyful.
Unfortunately, often automatic programs glitches or provide undesirable effects, greatly overestimating / underestimating the contrast or saturation of the image.
There are many situations in which shooting in JPEG is more appropriate. It makes sense to shoot in this format if you are sure that the photos do not need significant processing, when shooting large series (not the cheapest SLR models usually have a large RAW buffer, but compact cameras and budget SLR cameras traditionally have a RAW buffer). no more than 10 frames per burst), and also when the memory card is close to full.
What is the path from the moment of shooting to saving the image to the memory card?
The signal received from the sensor is interpolated to RGB, the processor performs color correction in accordance with the white balance settings, and then applies color correction based on the saturation, contrast and other color settings.
After that, the image processing system applies one of the special effects, if they have been selected by the user, for example, miniature effect, tilt-shift optics simulation, fisheye lens distortion. If special effects are not involved, then, on the contrary, software correction of vignetting, chromatic aberrations and optical distortions is carried out.
By the way, these software methods allowed to reduce the cost and size of such popular cameras as the Canon S90 and Lumix LX-3. In order to reduce the price of devices and their dimensions, manufacturing companies decided to abandon the complex optical design of lenses, which minimizes unwanted distortion.
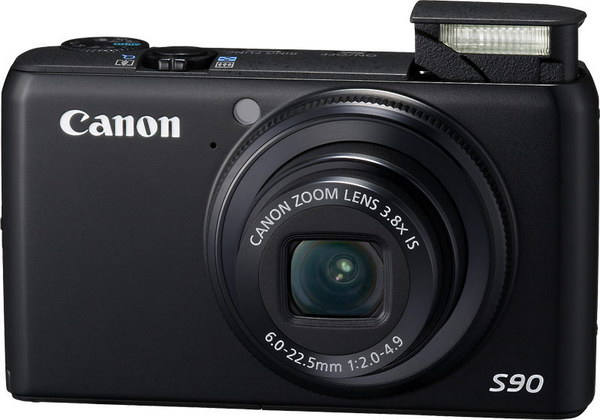
Small dimensions and high image quality in the Canon S90
made possible by software correction of lens distortions
Finally, the camera applies the user-specified sharpening (sharpening) or blur settings, noise reduction settings at slow shutter speeds or high ISO, and only after that it converts the result into an 8-bit image, i.e. JPEG.
The saddest moment is that each stage of transformation leads to an irreversible loss of information in the photo. And if the pictures are of some value to you, then it is very stupid to give all these stages for processing by the camera.
Shooting in RAW format allows you to edit the image beyond the limits of the JPEG format. You can correct the exposure, white balance settings, sharpen and remove noise in the image after. Roughly speaking, all you need when shooting in RAW is to get a technically satisfactory shot. The rest can be improved.
RAW is a specific format that stores information about the signal taken directly from the light sensor without further processing by the camera. Data in a RAW container can be either uncompressed or compressed, with or without loss. However, even in the worst case of lossy compression, a RAW file contains significantly more information than a maximum quality JPEG image: 12- or 14-bit RAW files are much more tolerant of user processing than highly compressed 8-bit JPEGs.
Almost all manufacturers have their own RAW formats: Canon has *.acr and *.cr2, Sony - *.arw, *.srf, *.sr2, Nikon - *.nef, *.nrw, Pentax - *. ptx and *.pef, while Samsung has *.srw. Many new models use the Adobe-developed open format DNG (Digital Negative, digital negative).
RAW is a kind of undeveloped digital image. Although it is recognized by many modern viewers (with or without special plug-ins), it is unsuitable for printing, and the file itself can be interpreted differently by different editors. For example, the same RAW when viewed in ACDSee and Picasa is significantly different.
The RAW format provides extensive post-processing capabilities within some limits without loss of quality. All those operations that the camera's processor does on its own will need to be done manually. There is only one reward here - much better and more effective photos.
However, RAW files take up significantly more space, they are 3-6 times larger than similar JPEG files, and some knowledge and processing time are required for conversion. Fortunately, the process is quite fun, and if you have a good RAW source, you will definitely be happy with the final result.
RAW conversion using the example of Adobe Lightroom
We will look at RAW conversion using an example Adobe Lightroom version 3.2. This program deserves attention for several reasons: it is quite simple to use, it is regularly updated and it supports almost all released cameras capable of outputting RAW files. The application is well integrated with the Photoshop family and is very functional, it is equally convenient when working with individual photos or with a large number of images.
Of the disadvantages of Lightroom, it is worth noting the exactingness of computer computing resources and the need to purchase it. The lack of a Russian-language interface also often scares off novice photographers. You can download the program on the official website of Adobe.
Despite a fairly large number of programs of this type, of which we would note the free RawTherapee, Apple Aperture, Phase One Capture One and Bibble Pro, the Lightroom application, in our opinion, is the golden mean.
All of these programs deserve attention, as they are stronger at certain points. For example, Aperture is very easy to use, while Capture One gives best opportunities color control.
In a loose translation, the word lightroom is interpreted as a place for developing pictures. In principle, the way it is - it is a convenient and powerful interface for developing RAW images and even working with JPEGs. Lightroom is a non-destructive image processing algorithm. Until the moment of conversion, the pictures entered into the program remain untouched, and a preview of the effects and settings is available from the application cache. Each file is assigned a detailed user-edited document, which is written into instructions and then executed when converting images from RAW.
This approach is quite convenient, and thanks to it, an infinite history of actions with a snapshot or snapshots is implemented.
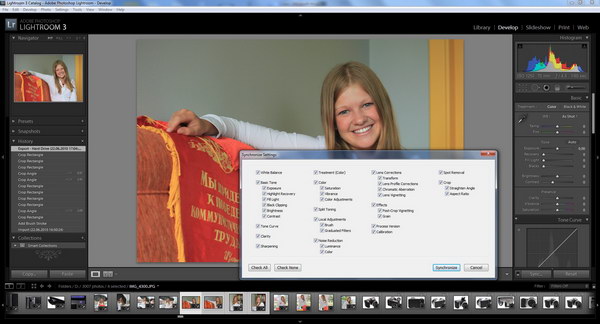
The Lightroom program allows you to synchronize the selected settings for a group of photos, which is very convenient, for example, if you have taken many shots of the same type and want to transfer editing to several pictures at once.
The Library module contains a feature of the program for cataloging images. We will not focus on it. We only note that frames can be sorted by creation time, title, shooting coordinates, lens, focal length, etc. It is possible to create dynamic collections that are automatically replenished according to selected criteria, and much more.
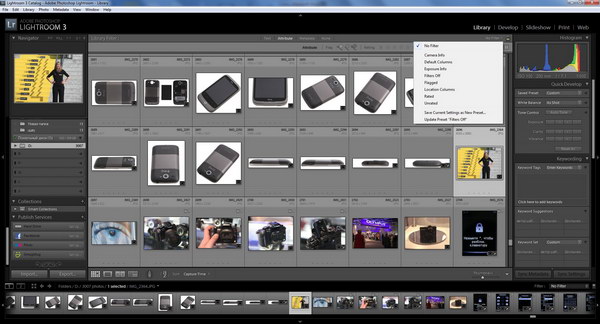
The Library module is very powerful and convenient, as are the modules for preparing for printing (Print), creating a slide show (Slide-show) and publishing on the Internet (Web). Their description would be enough for another article, so we will pay attention to the most important module - the processing module (Develop).
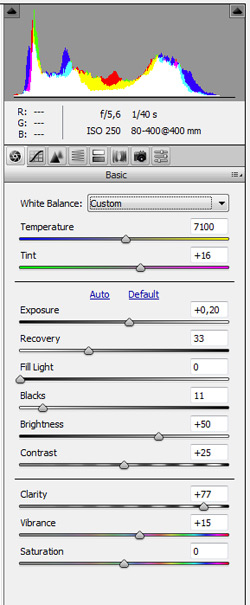
At the very top is an image histogram by color and shooting information. The histogram can be moved with the mouse, its certain areas are responsible for controlling the exposure, dark and light areas of the frame. The histogram is quite clear and allows you to quickly correct frames that were initially not very successful.
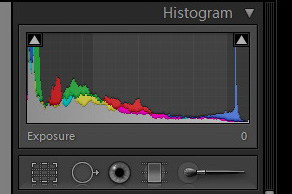
It should be noted that all settings follow in a logical order, and if you do not quite understand what you want to improve in the picture, you can move through the settings from top to bottom.
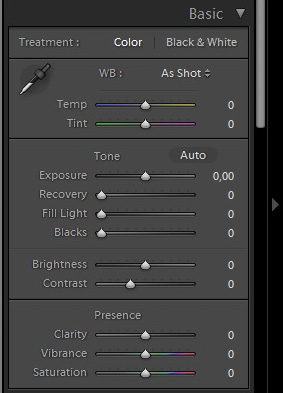
Basic panel
White balance (white balance). In this window, the user can choose one of the white balance presets available in your camera, or entrust the choice of optimal settings to automation, which provides a surprisingly high-quality result. If you are not satisfied with the above settings, you can use the sliders Temperature (color temperature) and Tint.
The easiest and most convenient way to correctly set the white balance is to use the White Balance Selector tool (eyedropper), which can be used to indicate a neutral tone in the image, such as a white or gray area. This shows a greatly enlarged area under the pipette so that you can more accurately select the correct neutral area on inhomogeneous textures.
exposure- one of the most important tools in the conversion. It is with its help that the primary “pulling” of details from incorrectly exposed photographs is performed.
This parameter sets the overall brightness of the image and its white point. If you hold down Alt while working, the areas of the frame that are knocked out into the light will be highlighted, i.e. they will not contain any information other than pure or almost pure white. If there is no artistic idea in this, the details lost in the lights should be tried to be returned. This applies to the bright white wedding dress as well as the texture of the clouds in the sky.
Tool Recovery called upon to help us. It removes overexposure exactly in the right places, almost without affecting the rest of the photo. If you have done color correction before, after applying Recovery, a light gray veil may appear in the picture or the colors may change slightly.
Tool fill light(fill light), on the contrary, increases the brightness of dark areas, while not affecting the light areas.
If Recovery can almost always be turned up to the maximum, then with Fill Light you should be careful - the unnatural brightness of dark areas can give even a good picture a flat and unnatural look. Both tools help to get into the histogram, and their judicious use can be considered a light variation of HDR, high dynamic range images.
Parameter Blacks sets the black point of the image.
Parameter brightness Many consider it a clone of the Fill Light tool, but this is not the case - it changes the brightness for the entire tonal range of your image.
Parameter contrast responsible for the contrast of the photo. Decreasing contrast makes tonal transitions softer, while increasing contrast makes them sharper.
Three interesting tools are in the subblock Presence (appearance), and changing them greatly changes the photo itself.
Tool Clarity affects the micro-contrast of the image, namely, the smoothness of contrast transitions, such as edges, contours of objects. Increasing the value of this setting creates the feeling of a sharp frame, while decreasing it creates the effect of a soft, almost out-of-focus image.
Tool Vibrance- this is perhaps one of the most effective, simple and beloved Lightroom tools. Following its success, Adobe implemented a similar tool in Photoshop CS4. Vibrance is a smart saturation enhancement feature. It does not affect already saturated colors, but selectively and non-linearly increases the saturation of dull shades. This approach avoids oversaturation, loss of shades and various artifacts in the image. In addition, Vibrance selectively enhances the saturation of skin tones and prevents people's skin from turning into a yellow-beige substance.
Tool Saturation increases the saturation of all colors at once. A slight increase in saturation along with the use of Vibrance will allow you to get even more juicy and vibrant colors. However, you should use Saturation carefully, you should not twist the parameter value to the maximum.
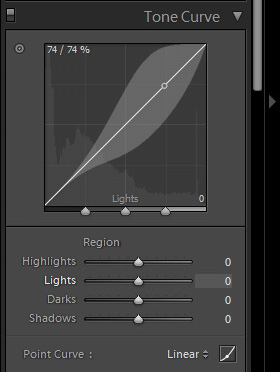
The next block is curves. The tone curve in Lightroom is used to adjust the contrast within a certain range of tones. Although this is a very powerful tool in terms of image enhancement, we will not cover it yet, as it is quite complicated for beginners, and The best way to study it is just to experiment.
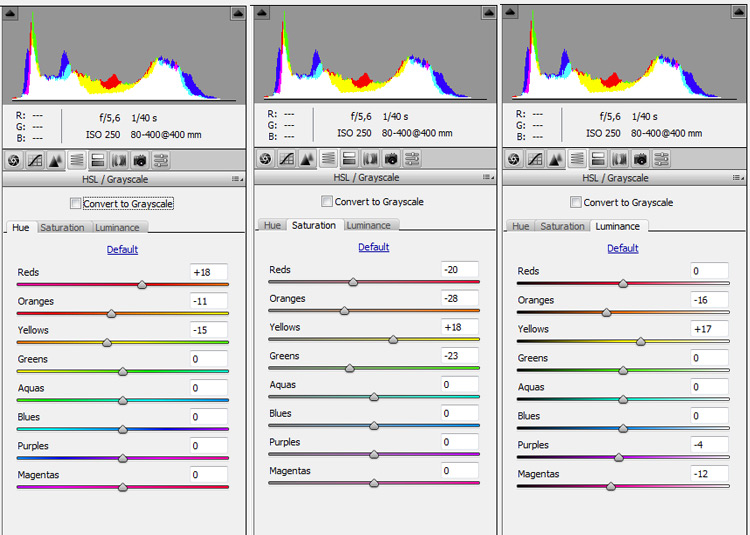
Color correction block
This block is designed to correct the hue, saturation and brightness (luminosity) of individual colors. Colors are initially divided into several shades: red, orange, yellow, green, aqua, cyan, violet, magenta.
![]()
On each options tab Hue(tone), Saturation(saturation), Luminance(brightness) there is a list with sliders to control each color. However, the most convenient way selective color correction will use the point tool. All you need to do is move it to the desired color in the frame, for example, to the sky, and move it up and down with the mouse button held down. The result of the application is immediately displayed on the photo, and this approach makes the method of working by eye very convenient.
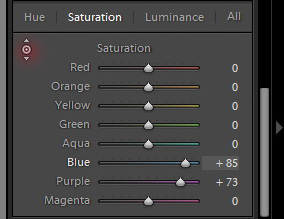
In mode grayscale all colors in the picture can also be varied and use the dot tool.
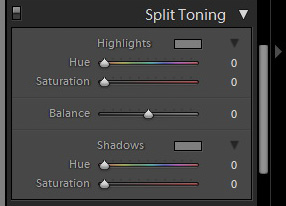
Split Toning Block
This block will be of interest to people who want to achieve creative processing comparable to effects such as sepia or film color simulation. Here, separate toning with a certain color of light and dark areas of the image is available. We invite you to experiment with the block yourself.
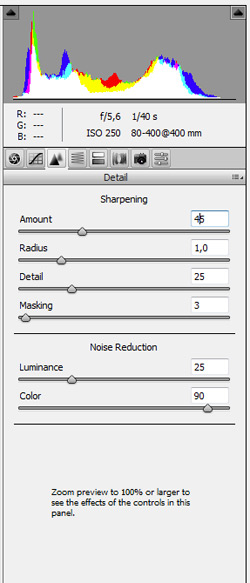
Block Details(detail) includes two very important items - Sharpening and Noise Reduction.
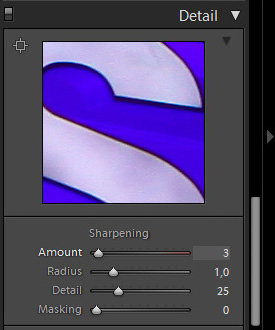
Tool sharpening responsible for sharpening the image. It works on the same principle as the Unsharp Mask tool in Adobe Photoshop. This tab contains a 1:1 scale image fragment and algorithm settings - Amount, Radius, Detail, Masking.
Parameter Amount is responsible for the intensity of the sharpening algorithm.
Parameter Radius is responsible for the thickness of the area on the boundaries of objects in which the algorithm will work. For modern SLR cameras with a resolution above 10 megapixels, the recommended values are 0.8-1.
Parameter Detail is responsible for the areas of the image on which sharpening will work. At high values, Sharpening will go through everything, even low-contrast transitions. At low - sharpening will affect only the most contrasting transitions.
Parameter Masking sets the filter operation mask and acts more rigidly than the Detail parameter.
Subblock Noise Reduction
This is one of the most valuable points for cleaning up image noise, which can be caused by both slow shutter speeds and high ISO values, and a small sensor if you are dealing with a compact camera.
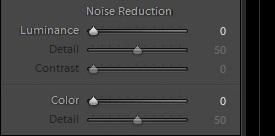
The noise reduction in Lightroom 3.2 is simply superb and can bring even very bad shots back to life.
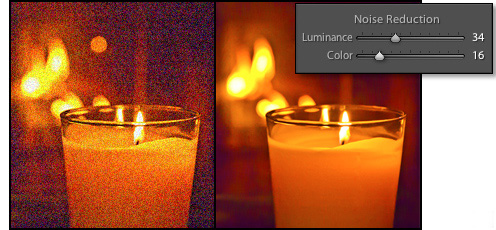
Paragraph Luminance allows you to suppress luminance noise, and the item color- Eliminate color noise. The settings should be used with caution on images that are full of very fine details (for example, the matte surface of a phone), as high noise reduction values will also smooth them out.
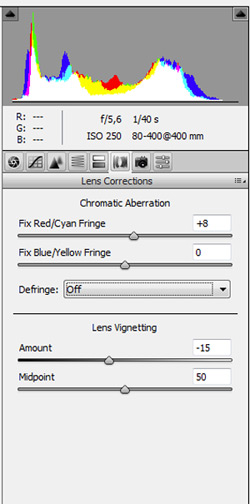
Block Lens Corrections
This block allows you to manually adjust the vignetting and distortion parameters, as well as eliminate chromatic aberrations. In manual mode, you can also use advanced perspective correction tools.
Adobe Camera Raw, or How to get everything out of photography” is one of the best materials on the basics of working in Adobe Camera RAW.
If you want to learn how to process in Adobe Camera RAW, Maria's article is exactly what you need.
Before I get down to business and talk about working with the converter Adobe Camera Raw, I would like to make a short introduction and explain what exactly I am pursuing in creating this article and who it is aimed at.
First of all, I want to note that I have no goal to tell absolutely everything that I know about working with this converter (hereinafter - ACR). This would take too much time and effort. In addition, although I know a lot, but obviously not everything. Yes, and there are enough sources to get thorough and guaranteed correct information about working with this program without me. For example, a very good textbook Adobe Photoshop CS3 for Photographers who wrote Martin Evening.
My goal is to give the most necessary basics and reveal the work with the most demanded (from my point of view) ACR tools, so that any beginner who has not yet decided to shoot in RAW and work with him, after reading this article, understands that this is the case, in fact, quite simple, and most importantly - extremely convenient and useful.
***
RAW- (c English - “raw”) data format containing raw information and avoiding its loss. Such files contain complete information about the stored signal. In digital photography, the RAW format is understood as data obtained without processing directly from the camera's matrix. .
Almost any modern digital camera has the ability to shoot (or rather, record the information received) in . The main difference between these two formats is that JPG is the result of processing the received data by the camera itself and, as a result, an image that is compressed and with a lot of lost information, and RAW is all the information that was received on the camera's matrix during the shooting process. Usually, smart modern cameras do a pretty decent job of processing information and produce quite acceptable results in JPG format, but still, with rare exceptions, they cannot do it better than we, much smarter people. So, to paraphrase the famous Michurin phrase: “We will not wait for mercy from digital technology, our goal is to take it ourselves!”
So let's get started...
- Workflow Options- First you need to decide on Workflow Options (by clicking on the line marked in red under the photo). You must choose in which color space ( Space) we will work (if the photo will be printed, then select Adobe RGB 1998, if you need the file exclusively for web applications, then sRGB is enough), and also select the depth ( Depth), size ( size) and resolution ( Resolution) of our future file. I want to note that converting in a wider space, with greater depth, maximum sizes and resolution, of course, is best for the quality of the final result, but we should not forget that all this will eventually give us a file of a rather impressive size ( 50-70 MB on average), and the hard disk space is not rubber. So let's be reasonable and try to match our needs with the need.
- Conversion Data Management– On the right side of the control panel in the line next to the inscription Basic there is a rather inconspicuous button, but meanwhile very convenient and necessary functions are hidden behind it. With their help, we can save the data of any conversion, and then with a single click apply it to any other rav. By default, all conversion data is saved in a small file format .xmp, which is automatically saved to the folder where the converted rav. If this does not happen (you could, for example, cancel this function), then the data can be saved by clicking on Save settings... In the future, if you want to apply the saved data to any other rav, just load the appropriate .xmp file via function Load Setting…
ACR also makes it possible to convert and make changes simultaneously to a large number of Ravov, but I will talk about this a little later. - White Balance Tool- Before we move on to the next part, I would like to draw your attention to one more thing - the white balance tool. This is an eyedropper that works on the same principle as the gray eyedropper in Curves in Photoshop (more on this topic in the “Simple Color Correction Wonders”).
The tool is very useful in some controversial issues with white balance or, for example, when converting infrared images.
Though White Balance Tool and convenient, but still the main tool for changing the white balance, as well as many other extremely useful ones, is located elsewhere. To do this, let's go back to the right, main part of the toolbars. Basic:
- white balance– In this drop-down box, you can select several standard automatic installations white balance, which any camera also has. It should be borne in mind that, despite the “standard”, they can vary quite significantly from camera to camera and from program to program and, most importantly, not always correspond to the true state of affairs, that is, these settings are very average and approximate.
You can always try clicking on the option Auto, it is not so rare that it produces quite acceptable results. Well, if none of the proposed ones suits you, then you have tools for manually setting the white balance at your disposal - temperature and Tint. Well, again, do not forget about the White Balance Tool pipette! - exposure– One of the most important converter tools. With it, you can make a significant exposure compensation of the existing frame. For example, my owl portrait is quite noticeably underexposed (dark), which is easily corrected by moving the lever to plus. If the frame is overexposed (overexposed), this is corrected by moving the lever to minus. Track the changes in the photo preview - the overexposed fragments will be filled in red, which is very convenient and visual.
- Recovery- My owl has white plumage, and the white color very easily fades into overexposure. So, having adjusted the exposure to plus, I got obvious overexposures in some places on the feathers. To fix this, let's use a truly wonderful tool Recovery. It allows you to expand the dynamic range of the photo even in the process of elementary rav conversion, removing overexposure in the necessary places, while (almost) not affecting the rest of the frame.
- fill light– A second tool to help expand the dynamic range. With it, if necessary, you can brighten excessively dark areas in the shadows, (almost) without affecting the rest of the photo. I want to draw your attention to the fact that with the tools fill light and Recovery should be handled carefully and not to lose a sense of proportion, because, overdoing it with their use, you can easily get ugly, flat and noisy photos. With proper and moderate use, these tools are priceless!
- Clarity- Another wonderful tool with which you can increase the tonal contrast of the image (increase the micro-contrast and get more detail) or, conversely, reduce it, getting a kind of “soft focus” effect. But be careful! Excessive use can adversely affect the image - noise and artifacts will appear, especially noticeable in out-of-focus areas, or details in the least contrasting areas of the image will easily disappear.
- Vibrance- Very nice, in my opinion, a tool that completely replaced the tool for me personally Saturation. Its beauty lies in the fact that it increases the color saturation only selectively and only in those areas that are already the most prominent and bright, (almost) without affecting the calmer (background) tones.
Now let's move on to the next page - Tone curve.
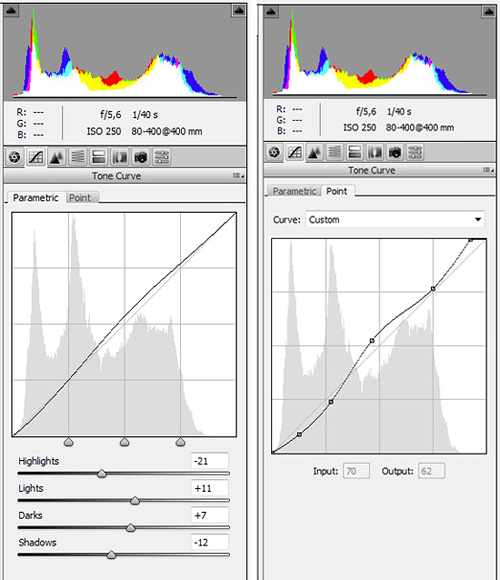
Everything related to contrast (and indirectly color) can be fine-tuned here by working directly with the histogram graph and individual zones of highlights, shadows and midtones. The principle of operation is the same as in Curves Photoshop itself, but including a more simplified one.
If you work with the second tab point, then we get the same graph in which you can work on any arbitrary points, as in Photoshop.
And here in the bookmark Paramtric changing the data is done by changing the values on four points (lights in two values and shadows also in two values). For people who are not very good at Photoshop Curves, bookmark Parametric should be much more obvious and intuitive.
In earlier versions of ACR, the function point, unfortunately, it was quite buggy and it was almost impossible to use it (maybe it was just me, I don’t know). So after a bit of pissing and spitting, I got used to using functions Parametric.
In the latest version I have, the points finally started working, but I’m already so accustomed to working with parameters that I first go to this tab on the machine, make changes ... and then turn over to the second one and finalize the chart points. How much it makes sense, to be honest, I don’t know, but I’m already used to working this way.
Moving on to the next page Detail. Here we will work on sharpening the image and dealing with noise.
NB! As the text under the tools rightly says, before you start making any changes in this window, increase the preview size to 100% or higher, only in this way you can reliably track the changes you are making.
Tool noise reduction consists of two parts - Luminance and color. In the first one, you work with luminance noise reduction, and in the second, you work with color noise. If this is necessary, in the column color the slider can be safely moved almost to the maximum value, there will be no harm from this. With Luminance but you need to be careful - the higher the value, the more the overall sharpness of the image will fall. However, this can be improved somewhat.
sharpening- Using this tool, you can significantly increase the sharpness of the image. It operates on approximately the same principle as the most popular tool of this series in Photoshop - unsharp mask.
For myself, I can say that I use this tool in the converter very moderately and most often only in cases where I had to work with noise suppression first.
Now let's go to HSL/Greyscale- the most important part of color correction in the converter.
Here you can quite flexibly and quickly convert the image to black and white, for this it is enough to check the box next to the inscription Convert to Grayscale.
We are now working with color, so we leave this place untouched and move on to the HSL tool tabs - an interesting and, in my opinion, quite a successful mixture of Photoshop Hue/Saturation, selective color and Channel Mixer.
Hue– Working with different color channels, here you can choose shades of any of the colors presented. For example, I did not want the red in the photo to give off pink, and I wanted to make the yellow a little warmer - so I moved the corresponding levers.
Saturation- By the same principle as in the previous part, here you can work with the saturation of various colors without affecting any others.
Luminance– The same tool allows you to change the brightness of colors by channel from darker to lighter, or vice versa.
All of these tools are very visual and intuitive. But, as in working with most other converter tools, the main thing here is not to lose a sense of proportion.
So, our image is almost ready, the final touches are left - fixing the shortcomings of the feedback, which can be done in the section Lens Corrections.
It is these unpleasant phenomena that can be combated with the help of a tool Chromatic Aberration. Zoom in to 100% or more and move the sliders back and forth to track changes in the problem areas of the image until you reach the optimal result.
in Adobe Camera Raw
Almost always, photo processing begins in the Photoshop application Adobe Camera Raw, and ends in Photoshop itself. And there you can process photos as raw format, and Jpeg .
If your camera allows, then be sure to take pictures in Raw or Raw + Jpeg format. Because the Raw format allows you to process a photo much better than the Jpeg format.
In the lesson " Easy photo editing in Adobe Camera Raw" shows how, literally by moving a few sliders, you can significantly improve the quality of a photo and practically save it from deleting it into the trash can of your computer.
Similar publications:
- Lesson "Quick photo correction in Photoshop"
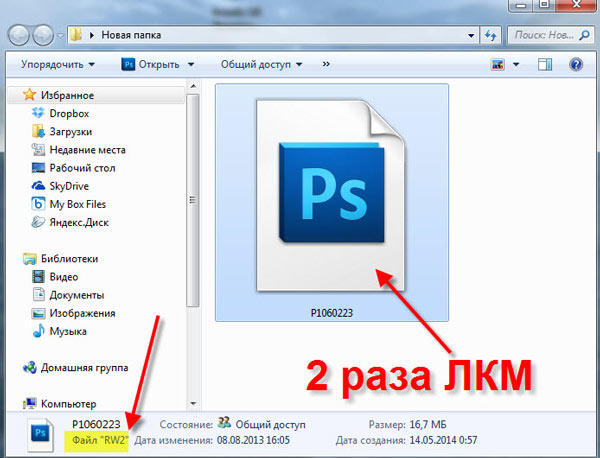
In order for a photo in Raw format to open in the Adobe Camera Raw application, it is enough to double-click on the file itself with the left mouse button. The Raw file format can have a very different extension, depending on the model of the camera with which the picture was taken. I have this file with the extension ".RW2".
The snapshot opens in Adobe Camera Raw. This is what the application window looks like.
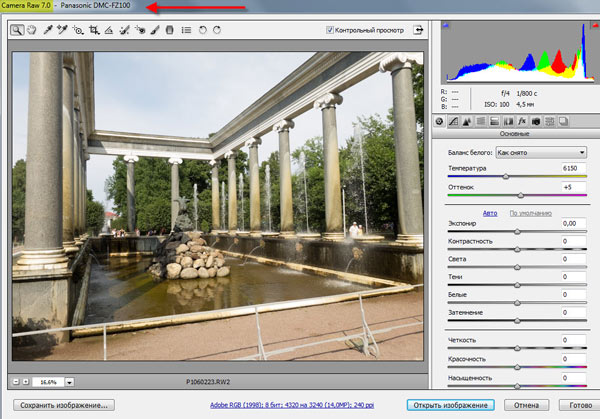
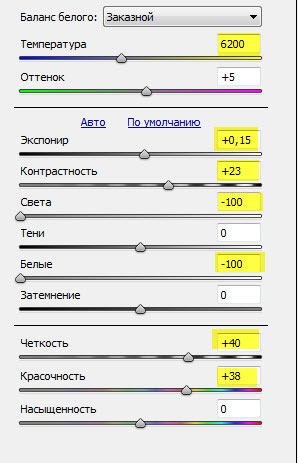
What did I do to quickly improve the original photo? To draw out all the details of the sky, I moved the "Light" and "White" sliders to the left. Then I moved the "Clarity" and "Contrast" sliders to the right, with these sliders we increased the volume of photos and gave contrast. Just make sure that your shadows do not go into "blackness". Since the photo darkened, I moved the "Exposure" slider a little to the right, thereby brightening the photo. Then I moved the Vibrance slider to the right and made the colors in the photo more "vibrant". And finally, the slider "Temperature" moved a little to the right, giving the colors in the photo warmer shades. Last action may or may not be performed. As the saying goes: "There is no friend for the taste and color!".
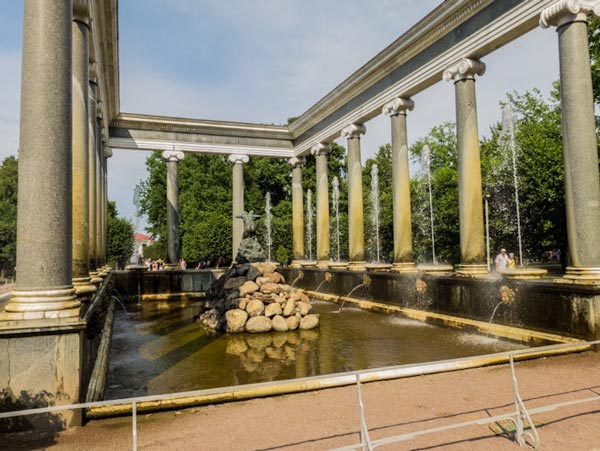
We get such a wonderful picture. Look at the original picture and you will see how literally in a few seconds you and I practically saved the photo. What do I dislike about this photo? Still, the shadows have gone a little "black" and it is necessary to slightly correct the perspective in the picture, since the columns in the photo are too tilted, it is necessary to trim them. We will correct the shadows in the same application, and we will already correct the perspective in Photoshop itself.
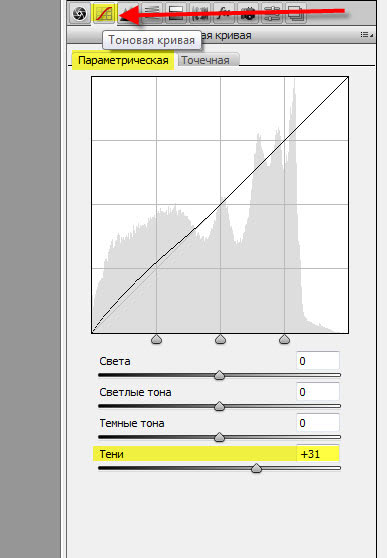
Go to the Tone Curve tab and move the Shadows slider a little to the right, thereby brightening the shadows. The curve shows that the lower left part has risen up.
We get this result.
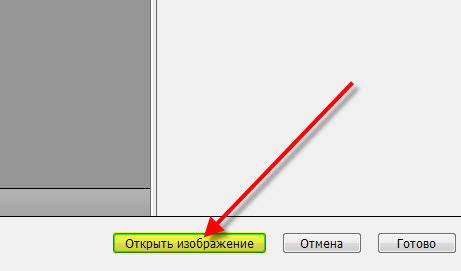
In the lower right corner of Adobe Camera Raw, click on the " Open Image". The picture opens already in Photoshop itself.
Fixing the perspective of a photo. Activate the tool Framing Perspective".
File raw image contains raw, uncompressed grayscale image data from a digital camera's photosensor, along with information about how the image was captured (metadata). Photoshop® Camera Raw interprets the raw image file based on camera information and image metadata for subsequent color imaging and processing operations.
You can think of a raw image file as a photographic negative. Such a file can be re-processed at any time to achieve the desired results by changing parameters such as white balance, tone range, contrast, color saturation and sharpness. When you adjust a raw image image, the original image data remains unchanged. The adjustments are stored as metadata in the accompanying accompanying file, database, or the file itself (in the case of the DNG format).
When shooting with JPEG files, the camera automatically processes the JPEG file to improve image quality and image compression. However, in this case, it is almost impossible to control the image processing progress. Shooting images with the camera as raw images allows you to have more control over the image than when shooting in JPEG format, because when using raw photos, you can go beyond the processing done by the camera. Although JPEG and TIFF images can be edited in Camera Raw, the editing is done on pixels that have already been processed by the camera. Raw image files always contain the original, raw data pixels received from the camera.
To shoot with raw images, you need to set up the camera to save files in the camera's raw image format.
Note.
The Photoshop Raw format (.raw) is a file format designed for transferring images between applications and computer platforms. The Photoshop Raw format should not be confused with the Camera Raw file format. Camera Raw file extensions vary by camera manufacturer.
Digital cameras capture and store raw image data with a linear relative spectral sensitivity curve (gamma equal to 1.0). On the other hand, photographic film and the human eye have a non-linear, logarithmic spectral sensitivity to light (greater than 2 gamma). An unprocessed raw image viewed as a grayscale image may appear very dark, because what appears to the sensor and computer twice as bright does not appear so to the human eye.
For a list of supported cameras and more information about Camera Raw, see Digital Camera Raw Image Support .
For a list of cameras and supported versions of Camera Raw, see Cameras supported in Camera Raw .
About Adobe Camera Raw
Camera Raw built into Adobe after effects® and Adobe Photoshop as a plugin. Camera Raw also extends the functionality of Adobe Bridge. Camera Raw lets you use each of these applications to import and work with raw image files. Camera Raw can also be used with TIFF and JPEG files.
Note.
Camera Raw supports images up to 65,000 pixels (length or width) and sizes up to 512 megapixels. Camera Raw converts CMYK images to RGB format upon opening them. For a list of supported cameras, see Digital Photo Raw File Support .
Adobe Bridge requires Photoshop or After Effects to be installed to open files in the Camera Raw dialog box. If Photoshop and After Effects are not installed, you can still preview images and their metadata in Adobe Bridge. If another application is associated with a specific image file type, the file can be opened in that application directly from Adobe Bridge.
Adobe Bridge lets you apply, copy, and delete image settings, and display images preview and metadata related to raw image files without opening those files in the Camera Raw dialog box. The preview image in Adobe Bridge is a JPEG image created using the current image settings. Such images should be distinguished from the raw camera data, which appears as a very dark grayscale image.
Note. The caution icon displayed on thumbnails and preview images in the Camera Raw dialog box indicates that they are based on raw image images.
You can change the default Camera Raw settings for certain camera models. For each camera model, you can also change the default values for specific ISO settings or individual camera settings (depending on serial number). Image settings can be modified and saved as presets for later application to other images.
When you use Camera Raw to make adjustments to a raw image (including straightening and cropping), the original raw image data remains unchanged. Adjustments are stored either in the Camera Raw database as metadata embedded in the image file, or in accompanying XMP file (metadata file that comes with the raw image file). For more information, see Determine where Camera Raw settings are stored.
After processing and editing a RAW file with the Camera Raw plug-in, the icon appears on the image thumbnail in Adobe Bridge.
After opening a raw image file in Photoshop, you can save the resulting image in other formats such as PSD, JPEG, Large Document Format (PSB), TIFF, Cineon, Photoshop Raw, PNG, or PBM. Using Photoshop's Camera Raw dialog box, you can save processed files as Digital Negative (DNG), JPEG, TIFF, or Photoshop (PSD) files. Photoshop Camera Raw lets you open and edit a raw image file, but it doesn't give you the option to save the image in raw image format.
When new versions of Camera Raw are released, the application can be updated by installing new version plugin. You can check for updates to Adobe software by choosing Help > Updates from the menu.
Various camera models save raw images in different formats, respectively, the received data require interpretation taking into account these formats. Camera Raw includes profiles for many camera models and allows you to interpret a large number of raw image formats.
About the Digital Negative (DNG) Format
The Digital Negative (DNG) format is a non-proprietary, open source, and widely supported storage format for raw camera data. hardware developers and software tools The DNG format is widely used because it can provide a flexible workflow for processing and archiving raw image data. The DNG format can also be used as an intermediate format for storing images that were originally captured using own format camera manufacturer.
Because DNG metadata is documented in the public domain, readers such as Camera Raw do not require camera-specific information to decode and process files created by a camera that supports the DNG format. If the camera's native format is no longer supported, then users may lose the ability to access images stored in that format, resulting in the loss of images beyond recovery. However, since the DNG format is documented in the public domain, there is a high chance that raw images stored as DNG files will remain readable. software and in the distant future, which characterizes the DNG format as more secure for archival storage.
Metadata related to image adjustments that are stored as DNG files can be embedded directly into the DNG file rather than present in an accompanying XMP file or in the Camera Raw database.
Raw image files can be converted to DNG format using Adobe DNG Converter or in the Camera Raw dialog box. For more information about the DNG format and DNG Converter, see the Digital Negative (DNG) product page. For loading latest version DNG Converter go to the Adobe Downloads page.
Image processing with Camera Raw
Copying raw image files to HDD, arrange and convert (if necessary) to DNG format
Before any work can be done on images contained in raw image files, the image files must be copied from the camera's memory card, organized, named with convenient names, and other preparatory steps must be taken. With the command Get photos from camera in Adobe Bridge, these tasks can be performed automatically.
Opening image files in Camera Raw
RAW files can be opened in Camera Raw from Adobe Bridge, After Effects, or Photoshop. You can also open JPEG and TIFF files in Camera Raw using Adobe Bridge.
Color correction
Color adjustments include white balance, hue, and saturation. You can make most adjustments on the Basic tab, and then use the controls on the other tabs to fine-tune the results. If you want to analyze the image and apply approximate tonal adjustments in Camera Raw, click the Auto button on the Basic tab.
To apply the settings that were used for the previous image, or apply the default settings that apply to certain camera models, a certain camera, or ISO settings, select the appropriate command from the Camera Raw Settings menu. (See Apply saved Camera Raw settings .)
Making other adjustments and corrections to the image
Use other tools and controls in the Camera Raw dialog box to perform image sharpening, noise reduction, distortion correction, and retouching.
(Optional) Save image settings as a preset or as default image settings
To be able to apply the same adjustments to other images later, save the settings as a preset. To save your adjustments as default values for all images captured with a specific camera model, specific camera, or ISO settings, save the image settings as the new Camera Raw defaults. (Cm. .)
Setting file management options for Photoshop
Set options to specify how images are saved with the Camera Raw plug-in and opened by Photoshop. Go to group settings File Management You can click the link below the preview image in the Camera Raw dialog box.
Save the image or open it in Photoshop or After Effects.
After you've finished making adjustments to an image in Camera Raw, you can continue to work in one of the following ways: apply the adjustments to the raw file, open the adjusted image in Photoshop or After Effects, save the adjusted image in a different format, or discard the adjustments. If the Camera Raw dialog box is opened from After Effects, the buttons Save Image and "Done" become unavailable.
- Save Image Camera Raw settings are applied to images, and copies of the images are saved as JPEG, PSD, TIFF, or DNG. Click Alt key(Windows) or Option (Mac OS) to open the dialog Camera Raw Save Options was not displayed, and the files were saved in accordance with the latest given parameters conservation. (See Saving a raw image image in a different format .)
- "Open image" or "OK" Raw copies of the image files open in Photoshop or After Effects (with Camera Raw settings applied). The original raw image file remains unchanged. Click the button Open Image while holding down the Shift key to open the raw file in Photoshop as a Smart Object. To set Camera Raw settings, at any time, double-click the left mouse button on the Smart Object layer that contains the raw image file.
- Ready The Camera Raw dialog box closes and the file settings are saved in a raw image database file, in an XMP sidecar file, or in a DNG file.
- Cancel The changes specified in the Camera Raw dialog box are discarded.
Overview of the Camera Raw Dialog Box
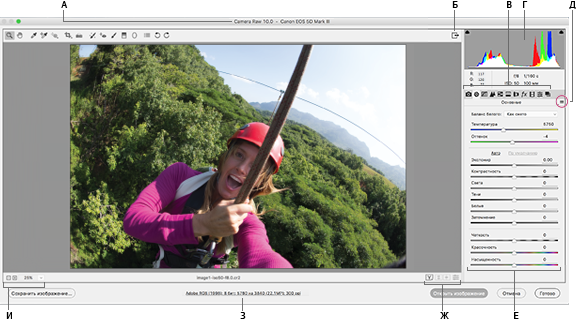
(Adobe Camera Raw 8.4) Camera Raw Dialog Box
A. Camera name or file format b. Switching to full screen mode C. Image Correction Tabs D. bar graph E. Camera Raw settings menu F. Adjustment sliders G. Preview Options H. File management I. Scale values
Note.
Some controls, such as window link File Management, available after opening the Camera Raw dialog box from Adobe Bridge or Photoshop, are not available when the Camera Raw dialog box is opened from After Effects.