How to put a screensaver on your desktop?
How to install a screensaver on your desktop
The expression to install a screensaver on your desktop can be understood in two ways!
Option number one:
download the screensaver and install the screensaver, for example, screensaver matrix ! Which is installed in the same way as a regular program.
Option number two:
You have a computer on which you simply need to install a screen saver on your desktop. Set the screen saver to automatically turn on after a certain amount of idle time when you are not working on it.
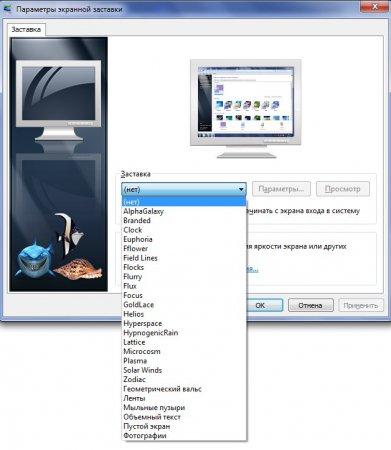
Click on the desktop, select personalization.
We get to the tab for changing the image and sound on the computer. We go to the lower right corner - the splash screen.
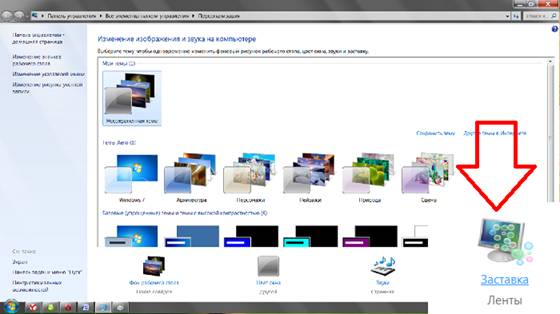
A new window comes out, in the drop-down menu there are already pre-installed screensavers in Windows.
Select the screensaver you want to install on your desktop. To see how it will look, click the preview button. The button - parameters, works only for screensavers in which you need to set a folder for viewing. These include the photo album screensaver and the photo screensaver. In them, you need to set in the parameters, the folder for the location of the photos.
When idle for several minutes, the operating system can automatically hide the contents of the screen, covering it with a colorful splash screen. In the past, splash screens were used to prevent phosphor burn-in in locations subject to constant, long-term exposure to electrons. Therefore, it has long been customary to use a dynamic (transforming) image as screensavers.
Today the role of screensavers is different. Burnout of the phosphor no longer threatens modern monitors, and screen savers protect information from prying eyes.
Self-creation of screensavers requires programming skills. This is not an easy task, so many use ready-made screensavers. A small collection of screensavers is included in the installed Windows 7 system, others can be found on the Internet, for example, at screensavers.ru.
The screensaver usually turns on automatically if the computer has been idle for a set amount of time. It is selected and configured on the Screen Saver tab of the Screen Properties dialog box. All screensavers of the operating system installed on the computer can be seen in the drop-down list. In the list, you need to select the desired screensaver, and set the interval time.
Sometimes you need to force the screen saver to turn on. To do this, you can use the View button on the Screensaver tab. The screensaver can also be run as a program. Screensaver files are stored in the C:\Windows folder and have a name extension of . SCR. To run them, you can use the dialog box Run the program (Start - Run).
In order for the protection of the computer screen from prying eyes to be complete, it is necessary that no outsider can reset the screensaver. This is only possible when the user account is password protected. "Restricting access to the computer." To protect, on the Screen Saver tab in the Display Properties dialog box, select the check box. Start with the welcome screen.
When you leave your computer, turn on the screensaver. If you try to disable it, the welcome screen will open. You must enter a password to access the session.
Instead of using a screensaver, you can lock your computer by pressing a key combination WIN+L
- sound effects assigned to events.
Through which you can contact me and suggest a topic for the article you want to see. Today I am publishing an article specifically at the request of my reader who contacted me through this way and asked me to write an article on how to put a photo on the screensaver.
First of all, after loading the OS (operating system), we see exactly the desktop, so everyone wants to put a background picture. This procedure is carried out in several ways in all operating systems. Today we will look at the example of setting the desktop background under windows control XP, many more use it on their computers, since the hardware of newer systems does not “pull”, just like OS 7 and Windows 10.
A little earlier, a friend asked me to write an article on this topic, thanks to him I wrote various articles before that. I won't refuse this time either.
A photo or picture on the desktop is installed under the guidance of Windows XP in at least two ways:
First way:
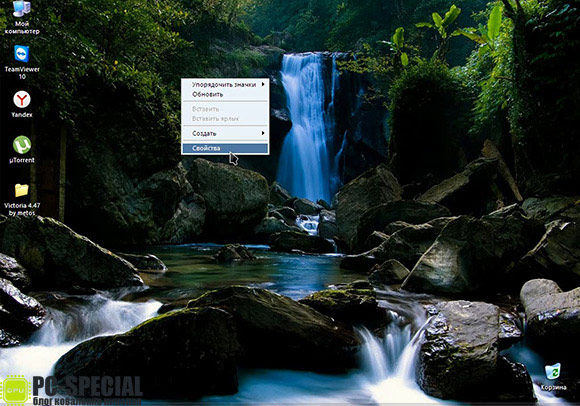
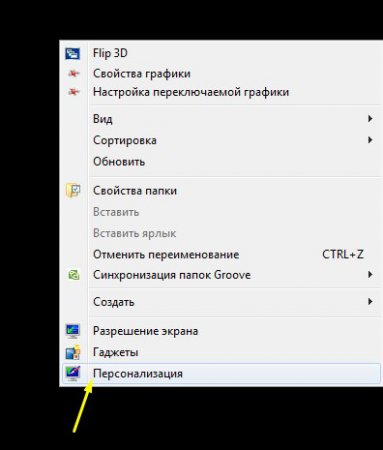
*Click right click mouse (RMB) in any free space on the desktop and select "PROPERTIES"
*Display Properties window will open. Go to the "Desktop" tab 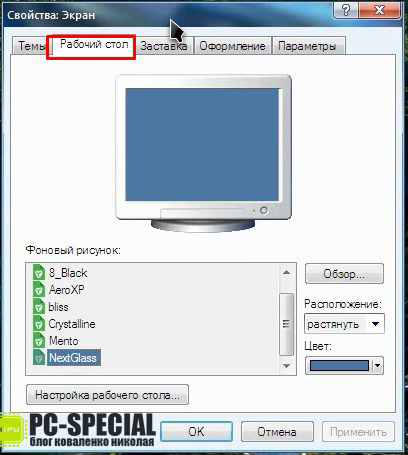
* We find the field "Background Image". It already has different default drawings. 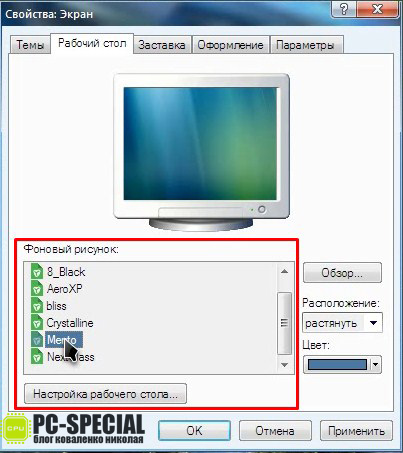
*Having chosen the one you like from the list, you can set its location on the screen in the corresponding "drop-down" menu. 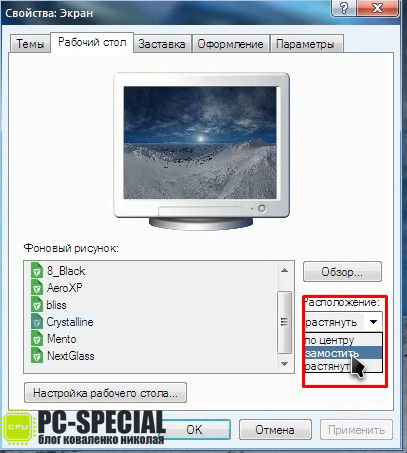
What to do if you want to put your own or downloaded picture? In this case, everything is very simple. Open the picture or photo that you want to see on the splash screen, and anywhere in it, right-click, select the item "Make background pattern desktop". 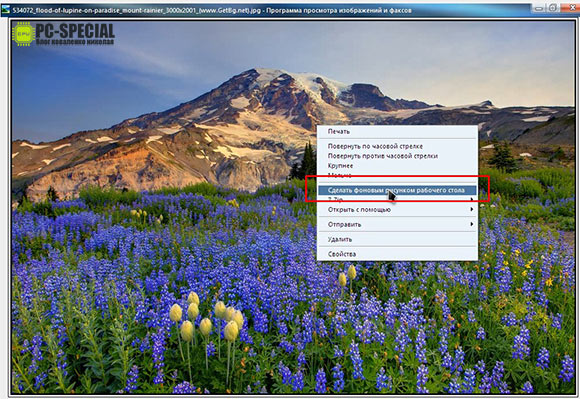
The same procedure under windows 7 is carried out a little differently:
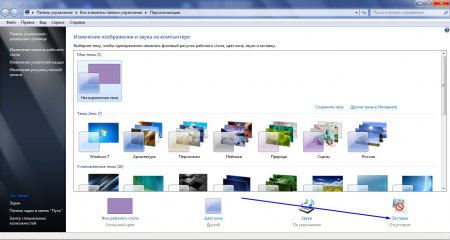
* RMB on the desktop and select "Personalization" 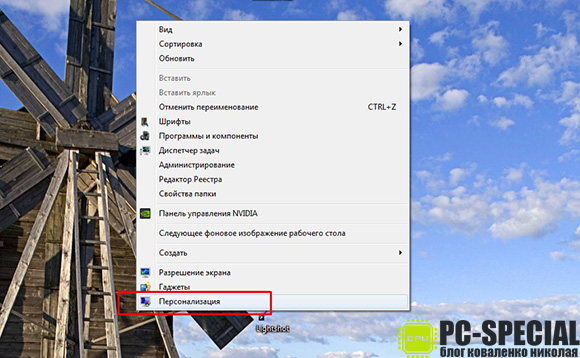
*In the window that opens, you can select the default theme. 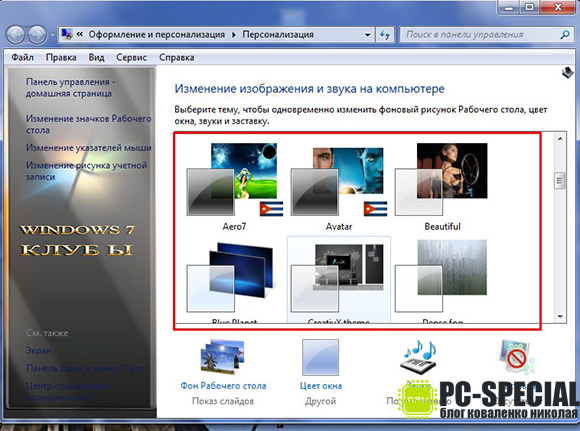
Selecting a theme changes the background image, window color, sounds, and screensaver. 
Also, when choosing a theme, the backgrounds change to those that are part of it.
*If you want to choose a permanent desktop background, then for this, below the theme area, there is a menu "Desktop Background". 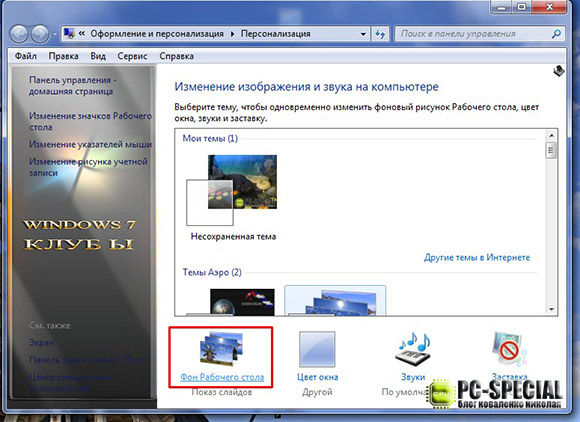
* By going to this menu, we are given the opportunity to select a background image. Click on the "Browse" button in the "Image Location" field and select the path to the picture, then click "Save Changes". 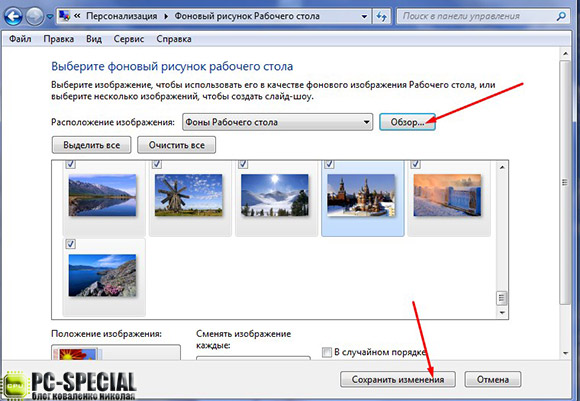
*If you specify a whole folder with selected photos (drawings), then all of them will change after a specified time interval. 
*In addition to choosing the time to change the picture in the "Change image every" drop-down menu, there is also the "Image Position" menu, as in Windows XP.
The way to set your photo as a splash screen in windows 10 is also simple:
*Here, too, there is "personalization". We select it in the same way as in Windows 7: RMB click anywhere on the desktop and find the desired item. 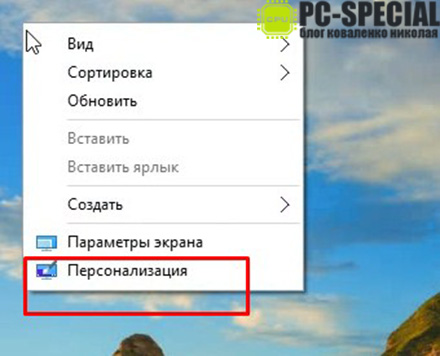
* In the window that opens, select "Background" on the left. 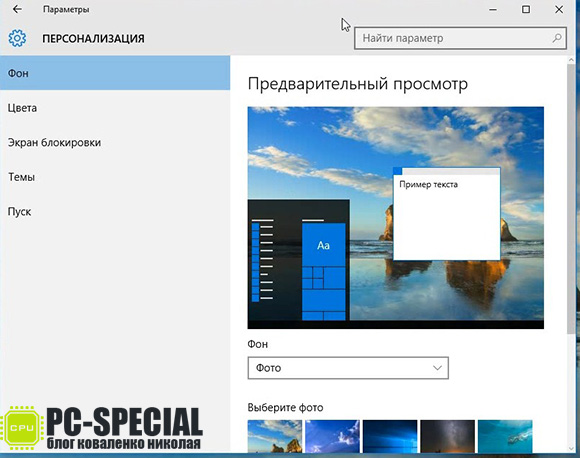
*In the right part of the window, from the drop-down list, choose at your discretion what to use: a photo, a solid color, or a slide show. 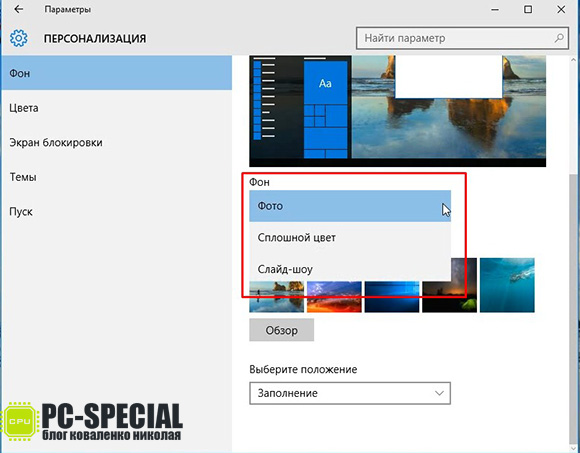
*When choosing “photo”, we are offered some of them by default, or you can use the “Browse” button to set the path to the desired photo. 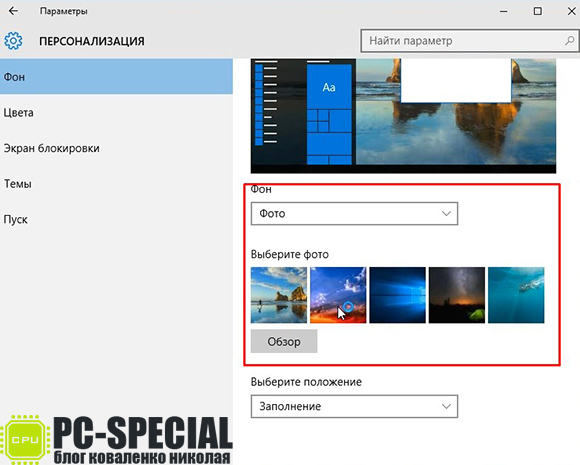
*When viewing a picture on a PC using the standard "Photos" 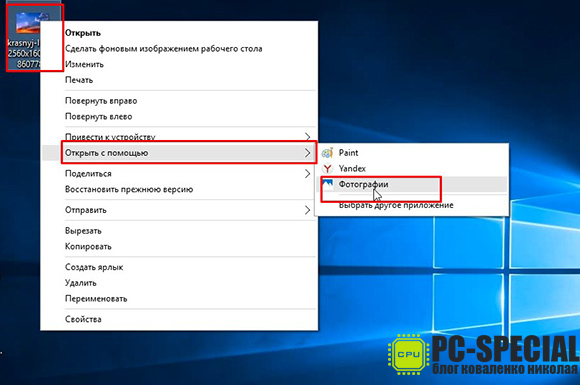
This OS enables the wide use of viewed photos. The control menu is shown in the screenshot below: 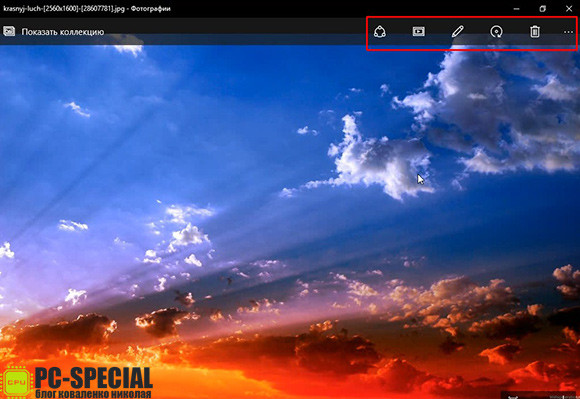
*You can "Share" the picture in the social. networks if you have access to the Internet. 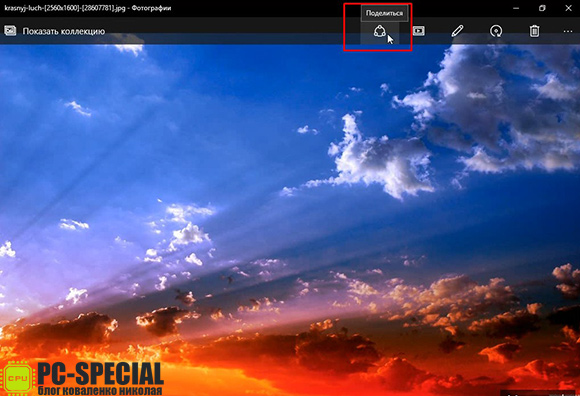
*If there are more pictures (pictures) in the folder with an open photo, you can view them in a “slide show” by clicking on the corresponding icon. 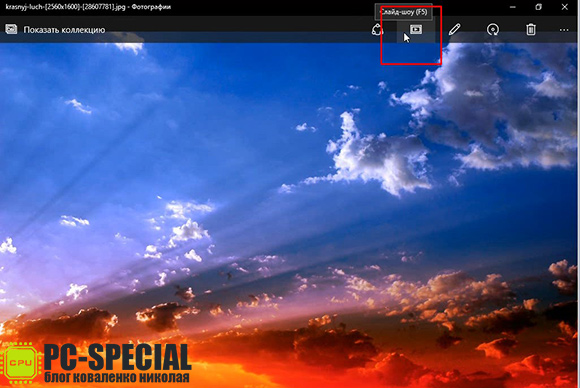
*We are also given the opportunity to make changes using standard editor in OS 10. 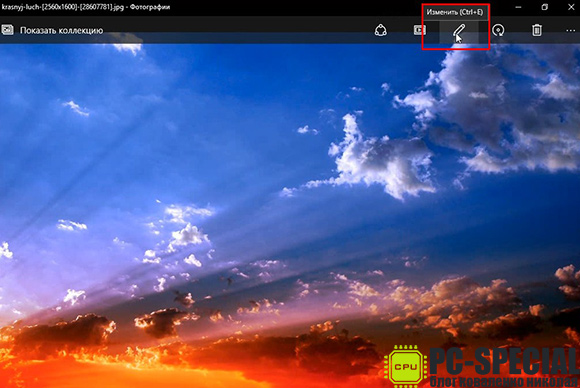
*Would you like to rotate the image? No problems. Click on the rotate icon. 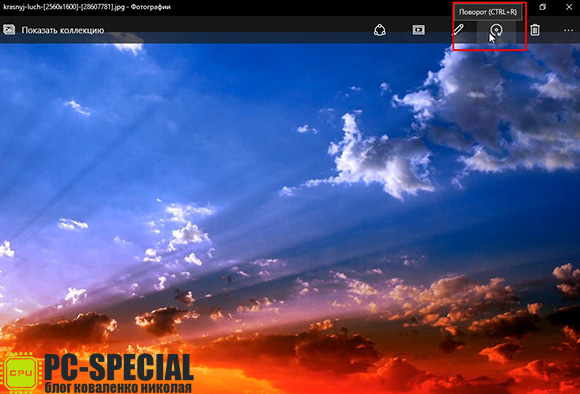
*And it was not without the necessary “delete” function. 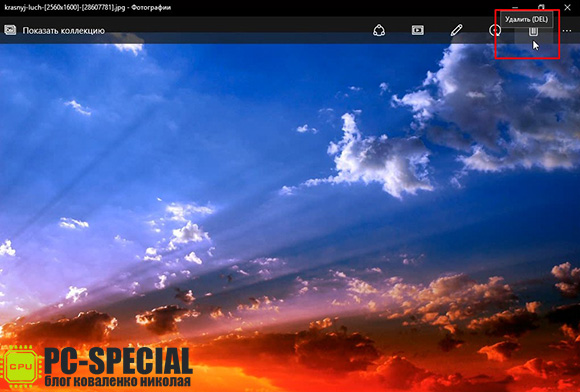
*There is an icon in the form of three dots in the right corner of the "management" menu of the item being viewed. We click on it, and there are several more options for managing it. We see them on the screen below: 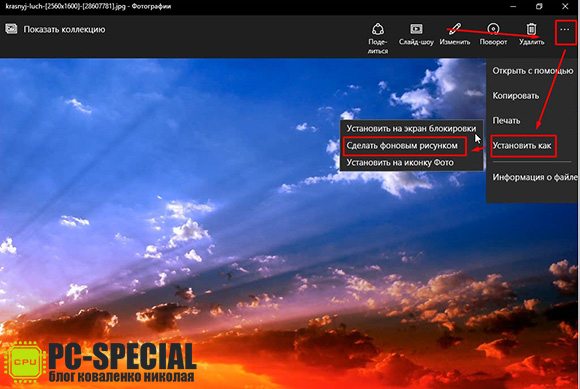
Since we are considering the topic of how to put a photo on the screensaver, we are interested in the “set as” item. By clicking on it, we choose how we will use this photo. Of the proposed options, namely, “Set to lock screen”, “Set as wallpaper”, “Set to photo icon”, select the second one.
After selecting a few seconds, we observe the process of setting the background and we can observe the picture we have chosen as the desktop background. 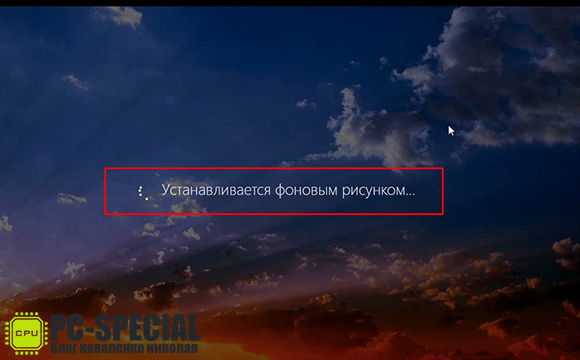 After reading this article, I think many people became interested in how I could consider in one day how to carry out this operation on three different operating systems. The answer is very simple. I have two virtual machines installed on my working computer on which I installed Windows XP and 10 for such purposes. Do you want to know more about virtual machine? Read
A screen saver is a picture or animation that appears after the computer enters standby mode. That is, when you are not working at the computer, but it remains on, either another picture or a beautiful animation appears on the screen instead of the desktop background.
If you did not make any settings related to the screen saver, then after the computer goes into standby mode, you just see a black screen. If you have already come to this article, then you undoubtedly want to get rid of this black screen and install something better and more colorful instead.
In order to install a screensaver in Windows 7, you must:
1. In a place free from labels, open context menu right click and select " Personalization».
2. The window already familiar to us will open, in which we previously changed , and . Now we need to move on to setting up the splash screen, and for this, at the bottom of the "Personalization" window, there is a special command " Screensaver". We click on it.
If it is not installed on your computer, then below under the command " Screensaver"will be inscribed" Absent».
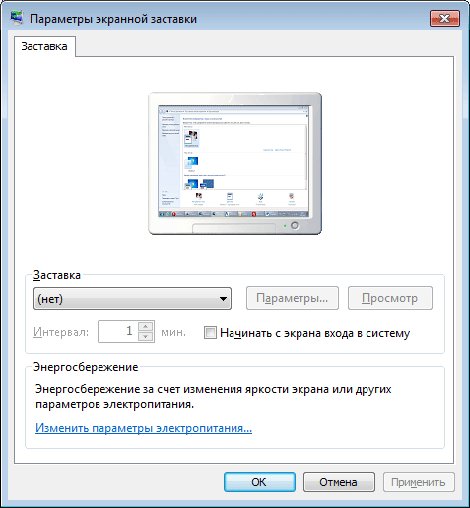
3. The " Screen saver options ". In the "Screen Saver" section, call the drop-down list and select the available screen saver options from it.
Each of these options is personalized (by pressing the button " Parameters "") and has the ability preview(by pressing the button View "). Also on the small screen of the monitor, which is located above all the settings, you can see how this or that screen saver will look like.
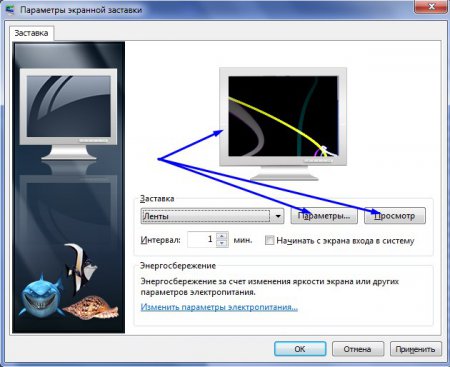
4. After you select a screen saver and change its settings, click the " Apply” to enable the settings.
There is nothing special to say about setting the interval and checking the box next to “Start from the login screen”, because these two parameters are already intuitively clear and you choose for yourself whether you need them or not. Although the interval will be set in any case and the default value will be 1 minute.
How to change the splash screen on the screen?
Master's response:
A screen saver (screen saver) is a static or animated image that appears on the monitor screen at certain intervals of idle time. If the current screensaver is tired, you can change it. And in order to do this, just a few mouse clicks are enough.
Open the "Properties: Display" window. To do this, go to the "Start" and go to the item "Control Panel". Then select in the "Appearance and themes" line "Screen saver selection". You can also click on the "Screen" sign. As an alternative, you can call right-clicking on any desktop space free from shortcuts and selecting the "Properties" item from the drop-down menu.
In this window, activate the "Screensaver" tab. We will see the current splash screen in miniature at the top of the window. Click on the "Screensaver" section and select the desired line. Now you can left-click on the image to see how the new screen will look in full screen mode. If you want to disable the screensaver, select the "No" item in the same list. Then a black screen will be displayed instead of the splash screen.
Having seen enough of the new splash screen in preview mode, move the mouse slightly to turn off this mode. In the "Interval" using the "Up" and "Down" keys (or by writing a numerical value yourself), change the number of minutes of downtime personal computer, through which the screen saver should be activated. To save the changes, click on the “Accept” button and close the window by clicking the “OK” button or by clicking on the cross in the window header.
However, the screensaver is not just beautiful picture. It can then serve to protect the PC. How? This mechanism works in such a way that the computer is idle for a specified number of minutes, after which a screen saver appears. If the security mode is activated, then when exiting the standby mode, after the screen saver is turned off, a password entry window will appear. However, without it, you can not log into the system.
To set the information protection mode, in the "Properties: Display" window on the "Screensaver" tab, check the box next to the "Password protection" item. Then we close the window, having previously saved the changes with the "Accept" button. Note that if your account password, turning on the data protection mode will not lead to anything.