The spreadsheet editor "Microsoft Excel" is great program, suitable for creating all sorts of diagrams. However, it is worth highlighting one that is excellent for displaying time periods, and it is called the Gantt chart. Its construction is somewhat different from others, so this article will describe in detail how a Gantt chart is built in Excel.
Create a raw version of the chart
Figure 1: An example of a simple Gantt chart that shows the timing of individual work packages and also indicates the steps that run in parallel. To create a Gantt chart, you will need three pieces of information. Start date Duration and description of activities, work packages or similar. For the sample chart, we use the data from the table shown in Figure 2. The raw version of the chart is then passed step by step into the desired form.
First, make sure that the cell in the upper left corner of the data area to be checked is empty. Figure 2: The start and duration of individual work packages should be displayed on a Gantt chart. These are the cells with the names of the work packages, which should then be placed on the left edge of the Gantt chart in front of each of the bars. These are two columns detailing the start and duration of work packages, including the column headings. Go to the "Insert" tab. In this case, the area also contains an empty cell for the column heading. . What makes templates so valuable is that you have a base you can always go back to.
Preparatory stage
Initially, before building a Gantt chart in Excel, you need to prepare the table itself, because it must have the proper form, otherwise nothing will work. Temporary variables must be included in it, which is why the article will build on the example of a vacation schedule for employees. It is also important that the column with the names of employees is not titled, that is, its header is empty. If you have entered a name there, then delete it.
Template for projects with a Gantt chart
You don't have to re-create the structure every time you report to others, report status, or track issues. The foundation already exists, you only need to enter your own information about the project. We explain the different types of templates and when to use them. Gantt charts are one of the most popular templates among project managers. You can quickly visualize the order in which tasks are performed and which tasks are interdependent. You can create a chart with different colors and icons for the progress bar, or use conditional formatting to highlight specific tasks for individual employees.
![]()
If your table is created by analogy with the one presented above, then everything will work out for you, and we can continue to tell you how to build a Gantt chart in Excel.
Step #1: Building a Stacked Bar Chart
However, before you build a Gantt chart in Excel, you need to create another one - a bar chart. To do this, follow these steps:
If you include a critical path, all tasks that directly affect the project's due date are displayed. You can share your Gantt chart with co-workers or clients to keep everyone involved up to date. Bring all your project information to one central location so everyone knows where to find it important information. The project tracking template allows you to enter tasks, status, priority, deliverables, due dates, costs, time spent, and more for the entire project.
Agile Project Planning Template
If you are working on a large project, a project tracker template will help you keep everything nice and clear. An intuitive visual layout lets you update your project, reassign tasks, change data, and more. Flexible project planning is feature-based. Scheduling estimates how long each feature will run, but doesn't go into detail about how it's implemented. Because project planning focuses on features, similar features can be grouped into sprints.
- Highlight your table. To do this, move the cursor in one of its corners and, holding left button mouse (LMB), drag to another corner located diagonally.
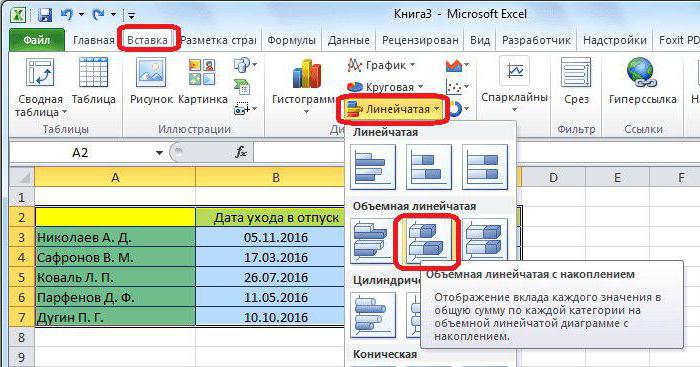
- Go to the "Insert" tab.
- Click on the "Bar" button, which is located in the "Charts" tool group.
- In the dropdown menu, click on any stacked chart. In this case it is "3D Stacked Bar".
Agile project planning is constantly changing. Once the planning is in place, the project team should maintain it and update the status and timelines as needed. In the template for this type of time scheduling, also called flexible time scheduling, you can enter tasks, responsible persons, start and end dates, and status. The duration of each task is calculated automatically. The template also includes a Gantt chart that automatically adjusts as you enter your own data into the spreadsheet.
Once you have done this, a corresponding diagram will appear on the program sheet. This means that the first stage is completed.
Step #2: Chart Formatting
At this stage of building a Gantt chart, in Excel it is necessary to make the first row invisible, which in our case is indicated in blue, that is, it is necessary that only the vacation period highlighted in red be on the chart. To do this, you need:
It allows you to plan and manage sprints, product features and tasks, and use the built-in Gantt chart to make your project visually memorable in a timeline view. Your employees can record recent accomplishments, track achievements, save documents, and set alerts, all in one sheet that can be shared with other users. This ensures that your project always stays on budget by keeping track of labor, fixed costs, materials and other costs.
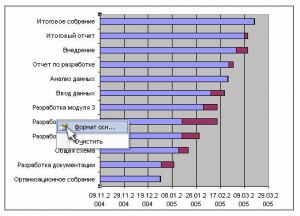
- Click LMB on any blue area.
- Call the context menu by pressing RMB.
- In it, select the "Data Formatting" item.
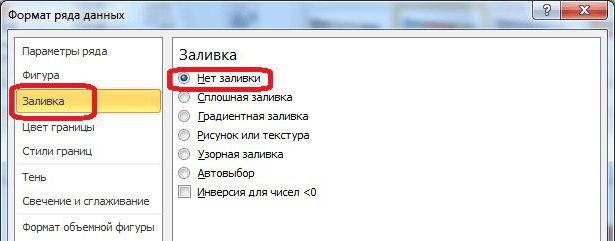
- Go to the Fill category.
- Select "No fill".
- Press the "Close" button.
Now, as you can see, the blue bars have disappeared from the diagram, of course, it would be more accurate to say that they have become invisible. This completes the second stage.
The budget template helps you keep a close eye on your expenses and keep your employees up to date on a budget or budget. This template is useful for projects of all types and sizes. This project template includes a status summary, budget and schedule variance space, and a Gantt chart.
This makes it easy to compare estimated and actual costs for labor, materials, and more. When a project has a lot of things in motion, a to-do list helps you focus on the most important tasks. You can manage appointments by day and hour and view your priorities throughout the week. Use a to-do list template if you want to organize individual tasks.
Step 3: Changing the Axis Format
The display of the axes does not currently match the correct pattern, so it needs to be changed. To do this, do the following:
- Click LMB on the names of employees to select them.
- Press RMB.
- In the menu that appears, click on "Format Axis".
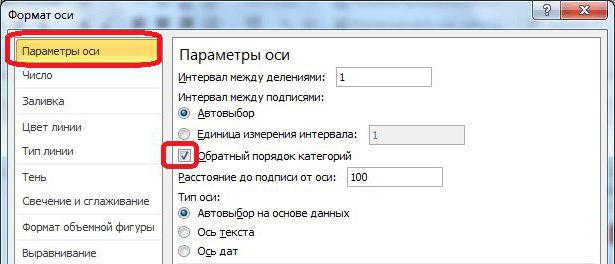
- A window will appear. In it, you need to go to the "Axis Options" category (usually it opens by default).
- In the category, you need to check the box next to "Reverse category order".
- Click Close.
You can share the sheet with your employees, creating a high degree of transparency. You can also track task status with customizable icons and highlight high-priority items so tasks don't get missed. The timeline helps you visualize complex information in a clear and concise way. You can track progress, identify possible delays, track the actual duration of a project task, and more. Timelines are a great help for projects of any size, especially if you need to keep external collaborators or interest groups informed about the current status.
Now the chart has changed its appearance - the dates are on top, and the names are turned upside down. So, firstly, it will be easier to perceive information, and secondly, it will be correct, so to speak, as required by GOST.
By the way, at this stage it would be nice to remove the legend in the chart, since it is not needed in this case. To do this, you need to initially select it by pressing the LMB and then pressing the DELETE key. Or you can delete it through the context menu called by RMB.
Your employees can easily track the latest achievements, track achievements and check the latest status anytime, anywhere. Potential problems are often ignored in project management. But if left unresolved, these issues can delay your entire project and affect the services you provide. Therefore, use a project tracking template that allows you to quickly identify problems and assign them to the responsible person so that problems are resolved as soon as they occur.
This template is useful for managing medium to large projects with many changes. Issues are reported via a customizable form by service staff, testing staff, and customers, and you have access to all incoming messages in a central location.
The third step of the instruction on how to build a Gantt chart is completed, but this is far from the end, so we proceed directly to the next step.
Stage 4: changing the period
If you pay attention to the time period in the chart, you will notice that its values go beyond their boundaries, which, at least, looks ugly. Now we are going to fix this nuance.
Template for temporary registration of projects
You can prioritize and coordinate responses until all issues are resolved. With the time entry template, you can quickly get an overview of your workforce allocation. In this way, the entire project team and all participants can see how each individual has been committed to the project over time. You can track the availability of human resources on a weekly basis and find out who has more time and who is overloaded. The schedule template, also known as timetable, is an effective tool for large projects with numerous human resources.
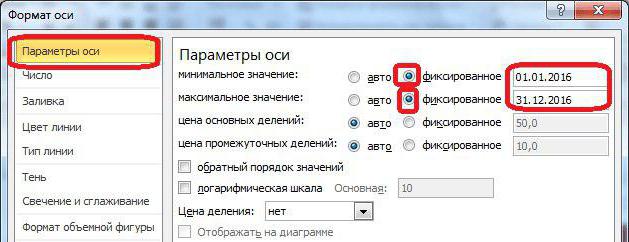
First you need to select the time period itself. Then click the right mouse button on it and select the already familiar "Format Axis" item from the menu. In the window that appears, you need to be in the "Axis Options" category. There are two values \u200b\u200b"minimum" and "maximum", which you will need to change, but before starting, move the switch to the "Fixed" position. After that, enter the length of time that you need. By the way, in this window you can set the price of intermediate divisions if necessary.
You can assign tasks to individual employees and easily identify underused or overburdened resources. Identifying these risks early on in a project is key, before they affect costs and schedules. It helps in the management of medium and large projects. Working with multiple documents to run reports for your executives can be time consuming and frustrating. With the Project Dashboard, the current status of your project can be quickly displayed and shared with third parties.
The Project Dashboard is always available if you want to share the current status of your project with other stakeholders at a high level. Landmarks provide unprecedented visibility into ongoing work by merging data from individual project sheets. The Project Dashboard turns your project information into eye-catching graphics. This visual report makes it easy for you to communicate the full status of your project to clients or other stakeholders without providing detailed information.
After completing all the steps, click the "Close" button.
Stage number 5: entering the name
The last, fifth stage remains, which will complete the final formatting of our Gantt chart in Excel. In it we will set the name of the chart. Let's jump right into the process:
From the dashboard, you can view your project's timeline, overall status of tasks, budget, and what's open at a glance. The Project Dashboard consists mainly of diagrams. This way your dashboard will not contain numbers, just attractive charts.
- We recommend renaming the name in the project toolbar.
- Then click the plus sign on the right to add a second sheet.
- Double click on Table2 and rename it "Notes".
Create a task list and draft Gantt chart
Based on this, diagrams are created, which then go to the project toolbar sheet. Enter titles for Task, Assigned, Start, End, Duration, and Status. List the tasks of your project and indicate which task, what day it starts and ends, how long the task will take and the status. After creating the Gantt chart, click right click mouse over the diagram and select "Cut". Go to the project toolbar sheet, right click and select Paste. It is also possible to copy and paste parts of the task name if you also want to show them on the toolbar.
- In the "Notes" sheet, create a table with tasks.
- Then enter information about the project.
- Build a Gantt chart based on this information.
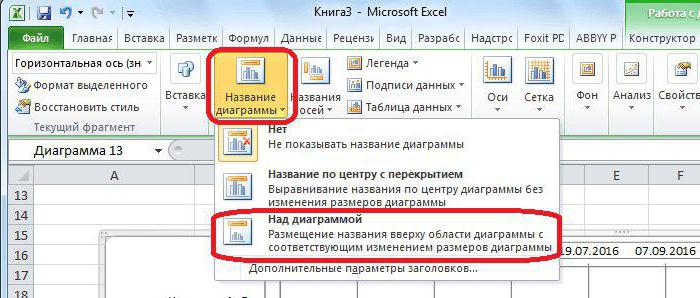
- Go to the "Layout" tab in the "Chart Tools" tab group. note that this group appears only when the chart is selected.
- In the "Layout" tab, you need to click on the "Chart Name" button, and in the drop-down list select the "Above the chart" item.
- In the field that appears in the diagram, you need to enter the name itself directly. It is advisable to choose one that fits the meaning.
Add graphs for task status, project budget, and pending items
To add symbols, click on a cell and click "Insert" and then the rightmost icons. Also, think about what other information you want to include in your project dashboard. In your notes sheet, create a mini-table for each entry you want to display. In this example, we show how many tasks are completed, overdue, running, or not running. These statuses are in the left column, and the column next to it indicates the percentage of projects that are at this stage. After creating diagrams for each entry, cut out the diagrams and copy them to the project toolbar.
Customize Project Dashboard
To change the background color of the task list, click on the cell on the Start tab in the Fonts section, select the color bucket, and choose the color you want. To change the colors of the Gantt chart, double-click the taskbar and select Format Data. Click the paint icon icon, then click Fill Fill and click the paint icon icon again to select the color you want. To change the background color of the cover, double-click the entire graphic or clipping.- In the budget chart, we compared planned and actual expenses.
- Select a chart on the chart.
- Repeat this process with other entries.
- The Data Format window will appear on the page.
We hope that our Excel Gantt chart example helped you, as this is the end of the creation. Of course, you can continue formatting further, but this will already affect, so to speak, the cosmetic part. By the way, if you do not want to bother and create it yourself, then you can find a bunch of Gantt chart templates in Excel on the Internet.
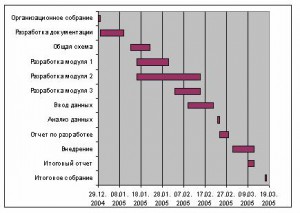
To begin with, we fill out a table listing the stages of the project, the start and end dates and the duration of each stage:
The task is to build standard means chart-calendar graph, as in the picture:
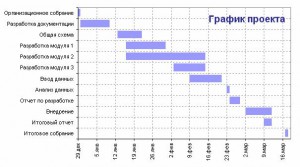
Let's go, step by step:
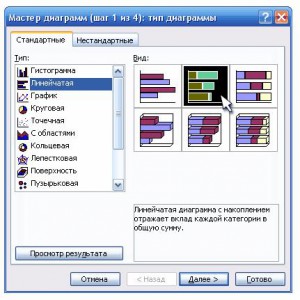
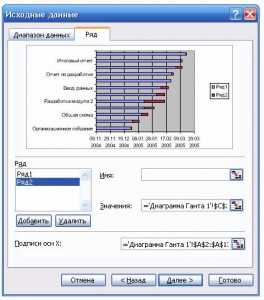
Let's select the source data for the chart - the range A2:B13 and select Insert - Chart from the menu, type - Stacked Bar:
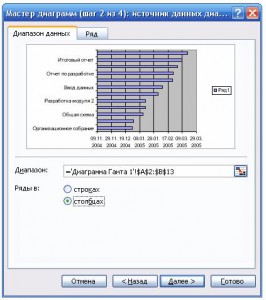
On the Series tab, click the Add button, place the cursor in the Values field and select cells with stage durations (C2:C13):
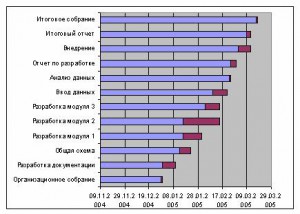
Do not be afraid - everything is going according to plan - you just need to "bring to mind" our diagram. To do this, right-click on the vertical axis with the names of the stages and select in context menu Axis Format:
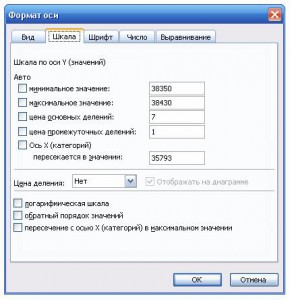
On the Scale tab in the window that opens, put two "checkmarks" - Reverse order of categories and Intersection with the Y axis in the maximum category. Click OK. Now let's get rid of the blue columns. Double-click on any of them and in the window that opens, select an invisible frame and a transparent fill. You should get the following:
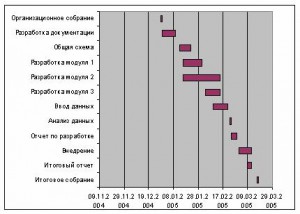
Looks like the truth already, right? It remains to correctly configure the range of data displayed on the chart. To do this, you need to find out the real contents of the cells from which the timeline begins and ends (yellow and green cells in the table). The fact is that Excel only displays the date in the cell as day-month-year, but actually stores any date in the cell as the number of days that have passed from 1.1.1900 to the current date. Select the yellow and green cells and, one by one, try to set the General Format for them (menu Format - Cells). It turns out 38350 and 38427, respectively. Let's add three more days to the end date - we get 38340. Remember these numbers.
It remains to right-click on the horizontal time axis and select Format Axis and enter these numbers in the Scale tab:
After clicking OK, the diagram will take the required form:
For convenience, you can download an example