Hey! Recently, I have received several questions about the fact that the touchpad does not work and people are asking for help with this problem. I already wrote an article about this, I will give a link below. The touchpad is a useful thing, but as I understand it, not for everyone. For example, many people ask to turn off the touchpad, they say it interferes with working with a laptop, and especially when typing.
Disable touch panel On a laptop, there are two ways. It is possible through the BIOS, this is so that it can be disabled ironically, or you can also use a special key combination on the keyboard. Every laptop (probably every one) has a key that disables and enables the touchpad. And if you accidentally press these two keys, or during other actions, the touchpad stops working. And then questions like “touchpad does not work”, “How to enable the touchpad”, etc.
Everything is actually very simple, let's look at the ways in which you can enable, well, or disable the touchpad on a laptop.
Touchpad not working? We solve the problem
1. First, let's look at the function keys to enable and disable the touchpad, which I wrote about above. Different laptop manufacturers have their own, and maybe models. For example, on a Toshiba Satellite L300-11G laptop, these are the FN + F9 keys. The FN key is always used in this combination, plus the key with the touchpad icon.
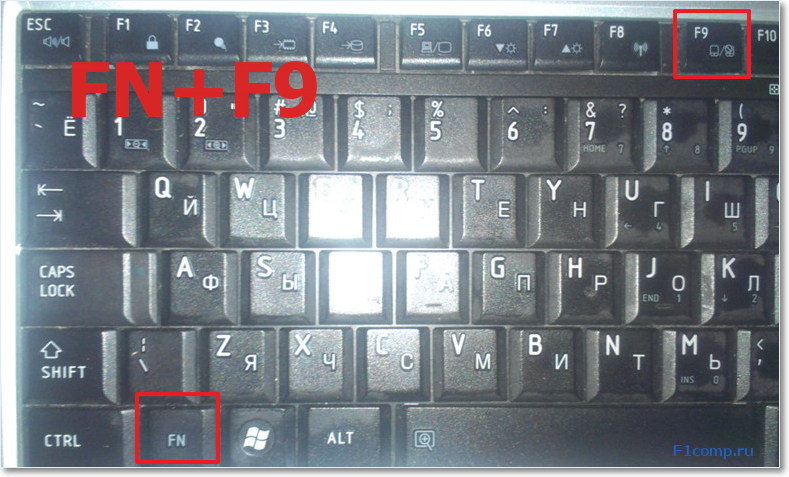 Press these keys once, the touchpad turns on, hold again - turns off, or vice versa. This method is worth trying from the very beginning.
2. The second option is to check if the touchpad is enabled in the BIOS. I had a case when the touchpad did not work even during Windows installation. It turns out it just had to be included in the BIOS. I wrote about this case and how to do it all in an article.
3. If the two methods that are written above did not help, then it is worth checking whether the drivers are installed on the touch panel. I have not seen such a problem, but they say that it can be. You can see if there is a touchpad in the device manager. It's usually displayed like this:
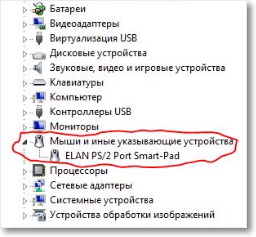 If you don't see it there. It is possible that the driver for it was not installed. But, the driver for the touchpad must be on the disk that comes with the laptop, or on the manufacturer's website. And if it is displayed there, then look at its properties, perhaps it is disabled there.
4. Well, the fourth way, which has the right to life, is a simple breakdown of the touchpad. This device, like other components, and it can simply break.
It seems that he wrote everything he wanted. In these ways, it is possible (if it does not work), and disable if you don't need it. Good luck friends and trouble-free touch pads :)!
P.S. The information that is stored on our computers, more specifically on hard drives I think it is very expensive for everyone, and losing it is a big problem. But if this has already happened, and you have problems with hard drive, then HDD recovery should help. Read the information on how to restore a raid 0 array and order data recovery from your media.
Many users often need to disable the touchpad on their Asus laptop. Since in some cases it interferes with the normal operation of the keyboard. For example, when working in office applications, when you need to type large amounts of text, or in games.
There are many ways to solve this problem. All of them allow you to turn off the touchpad sensor and make working on a compact PC as comfortable as possible.
What is a touchpad
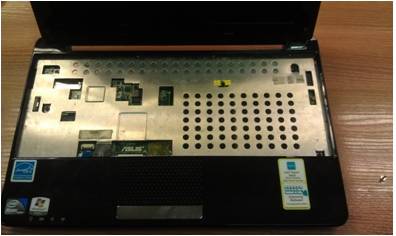
The touchpad is a special type of sensor located on the Asus PC and used to move the cursor around the screen, perform a variety of actions.
This invention was born back in 1988, its author was a certain George Gerfeide. Apple licensed this invention and began using it in their compact PCs in 1994.
Touchpad consists of several main components:
- printed circuit board;
- inductive-capacitive elements;
- matrices;
- insulating layer.
Most often you can find this device for manipulation, made in the form of a rectangle or square. Also occasionally on exotic models of compact PCs, round or oval-shaped touch panels are used.
Shutdown methods
You can turn off the touchpad in various ways.

The most commonly used and available are the following:
- using the function keys;
- through the "Hardware Manager";
- using the control panel;
- in BIOS.
Each method has both its advantages and disadvantages. The choice of any is a matter of taste and convenience.
Keys
The fastest and in a simple way to make the touchpad inactive is to use dedicated keys. They are present on the laptop keyboard of almost any model from Asus, it is very easy to find them.
To deactivate the touchpad using only one keyboard, you must follow all the steps in strict order:

After performing these simple steps, the touchpad will most likely turn off. Otherwise, you must use the "F9" key instead of "F7". On some laptop models from Asus, turning off the touchpad is done in this way. If neither one nor the other method helped, it is possible that the keyboard drivers are simply not installed on the laptop, activating all its additional functions.
The solution to this problem is very simple. You just need to visit the official website of Asus and download the drivers from there, and then install them. This will not only allow you to turn the touchpad on and off when you need it, but also make it possible to use all the functionality of the keyboard.
Video: on ASUS laptops, disable the touchpad via FN
Dispatcher
Another way to turn off the sensor is through the "Hardware Manager" operating system Windows. This must be done as carefully as possible, since deleting some elements in its window can lead to system inoperability. And even to the need to reinstall it.
The dispatcher itself can be launched in various ways.
For experienced users, this method is suitable:
After that, the manager window should open, through which you can perform a variety of manipulations, including turning off the touchpad with just a couple of clicks.
The second way, longer - through the "Control Panel":
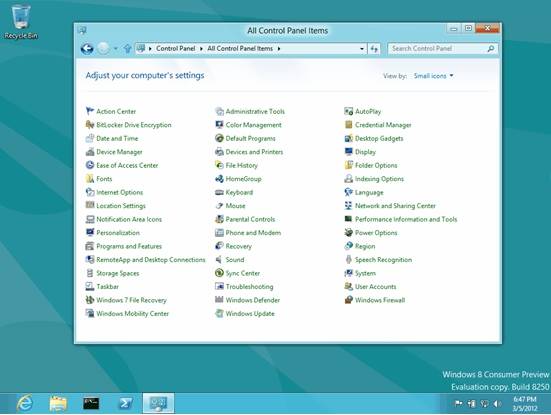
After it is found, you need to run it double click and proceed to disable the touchpad.
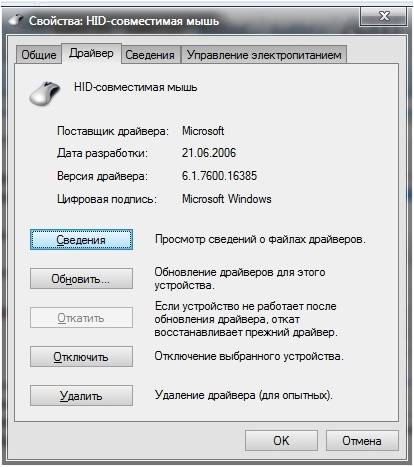
Directly turning off the touch panel is carried out as follows:
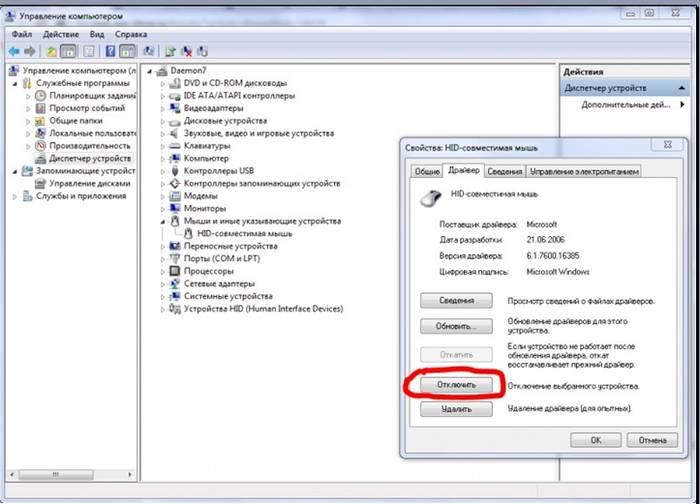
After the step-by-step implementation of the entire list of the above actions, the touchpad will be disabled. You can turn it on just as simply: just follow the same operations, and in the "Driver" section, click on the button called "Enable".
Control Panel
You can disable the touchpad using the control panel.
You can do this in the following way:

Shutting down in this way can only be done if the target PC uses a Synaptisc sensor. Most likely, this is the case. And with branded drivers installed, the mouse properties will be displayed in this way.
If the standard drivers that come with the operating system are installed, then the shutdown is performed in a slightly different way:
The last stage is the agreement with making changes to the system. This convoy turns off the touchpad in Windows 8.
BIOS
You can also disable the touchpad without even logging into the operating system. To do this, start the BIOS and find the section there that is responsible for configuring and managing the touch panel.
To do this, you need to carry out the following steps step by step:
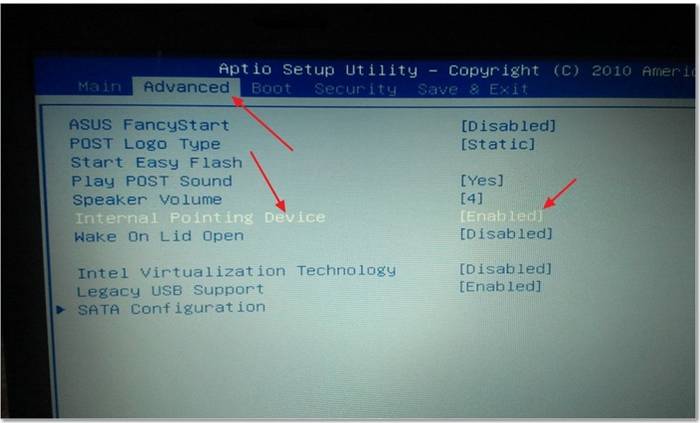
After completing all the steps above, the laptop will reboot. After the system starts, you can make sure that the touchpad is not active. Enabling it through the BIOS is carried out in a similar way, it is necessary to switch the “Internal Pointing Device” item to the “Enabled” position.
Features of disabling the touchpad on an Asus laptop in Windows 7
Disabling the touchpad in the operating room Windows system 7 has its own characteristics. When performing a shutdown in Windows 8, a reboot is usually not required. Windows 7 often requires a system restart. Especially if used old version, which does not have the latest updates installed.
Loop off
The most complex and time-consuming method of removing a device from the system is to physically disable it.
In order to do this, you will need the following tools:

When all the necessary items are ready, you can proceed directly to disassembling the device.
It must be done in the following order:
All actions must be performed as carefully as possible. Be especially careful with the motherboard and cables. The latter are especially fragile, and one careless movement can lead to the thin conductor simply breaking. In this case, the entire cable will need to be replaced.
All unscrewed screws should be wrapped in their original places. Since the length and diameter of their threads can be different. Since later you will need to purchase them in the store.
There are many ways to wean the sensor to Asus laptops. If necessary, you can do it very quickly, in just a few clicks, making the work more convenient and comfortable. Turning on is just as fast, unless the device is disabled at the hardware level. When carrying out any actions with the equipment, you must be as careful and accurate as possible.
Occurs according to the same pattern. It is important to understand only the essence of how the shutdown is performed and in the future you can easily disable the touch pad on any laptop, regardless of the company, model and year of assembly. For most laptop users, using a mouse is much more convenient than using a touchpad. In addition, the touchpad sometimes even gets in the way and can delete, modify or otherwise damage important documents of the laptop owner. Most often, the user may accidentally touch the panel with the hand while typing. But even those who often use the touchpads can confirm one more minus: during active work, something like scuffs, visually ugly spots are formed that look like greasy spots on a laptop.
Most laptop manufacturers use Synaptics touchpads. This company has been producing touch panels for several years now. With the help of application software, you can edit the parameters that were originally included in the touchpad operation device (device sensitivity, click speed, scrolling, etc.). Latest Versions These touchpads allow you to lock your notebook. Only the person who has locked it can unlock the laptop, using fingerprint technology.
To disable the touchpad in your laptop, you need to go to the properties of the touchpad or refer to the Synaptics Pointing Device Driver program, which is responsible for the operation of the touchpad. The program allows you to turn off the device until the next system boot or completely.
To access the touchpad capabilities, click on the "Start" menu, select "Control Panel", then select "Mouse". In the Mouse Properties window that opens, select the Device Settings tab. Find the device name and turn it off.
Disabling the touchpad can be done using hot keys on the laptop keyboard. Clamp at the same time function key Fn and a key that shows a hand touching the touchpad. To enable the touchpad, do the same. For Asus laptops, the additional keys will be F7 or F9. To disable the touchpad on Acer, press Fn+F5. Lenovo has additional keys - F5 or F8. Samsung uses an additional F5 or F6 key to disable the touchpad.
Some laptops are equipped with a special button, located next to the touchpad, which allows one easy movement to turn off the panel, and if necessary, quickly turn it on without any difficulty. You can find out if there is such a key on your device by referring to the instruction manual for your laptop. The touchpad information section will provide all the keys that interact with the pad.
Some touchpads do not have a button to turn it off. But on the other hand, they have a whole area on the touch panel, when touched twice, the panel automatically turns off. The presence of such a site has a significant drawback: it is possible to uncontrollably press on the forbidden area and, accordingly, accidentally turn off the touch panel when there was no need for it.
Shut down the operating system on the laptop in the correct way and wait for it to turn off automatically. Turn off power to the computer and all peripherals connected to it. Remove the battery from the computer. Use a screwdriver to pry off the bezel covering the additional keyboard board. Carefully unfasten the latches and remove this bezel.
See if there is a laptop power button on the same board with additional keys. Even if this turns out to be the case, see if any separate cable is used to connect this button. If there is such a cable, disconnect from motherboard computer, one of the cables that belongs to the auxiliary keys, and leave the one that goes to the power button in place. In the event that the power button and auxiliary keys have a common cable, you cannot turn it off, and to block the latter, you will have to use a hard overlay. It must be thin enough, otherwise, when closing the laptop, it can crush the screen.
Place the connector disconnected from the motherboard in such a way that it does not interfere with putting on the false panel. If it has protruding contacts, isolate them from the board with a thin film. Install the bezel in place. Carefully fix it with all the latches.
It remains only to connect the battery to the laptop. Supply power to it, as well as to all peripheral devices. Press the power button - if everything is done correctly, the machine should start. Wait for the OS to load and make sure that the additional buttons do not work. Install software multimedia kiosk and make its settings so that when running program it was not possible to launch any other applications with any key combinations.
If it becomes necessary to use the laptop again outside of the multimedia kiosk, do all of the above again, but instead of disconnecting the auxiliary keypad connector, plug it in.
A panel with auxiliary keys may be located next to the laptop keyboard. They are designed to launch a browser, text editor, player, etc. When using a computer as part of a multimedia kiosk, uncontrolled launching programs using the keys on this panel can compromise the security of the machine.
Instruction
Properly shut down the operating system on the laptop and wait for it to turn off automatically. Turn off power to the computer and all peripherals connected to it. Remove the battery from the computer.
Use a screwdriver to pry off the bezel covering the additional keyboard board. Carefully disengaging the latches, remove this false panel.
See if the laptop power button is on the same board as the auxiliary keys. Even if this turns out to be the case, take a look at whether a separate cable is used to connect this button. If the cable is separate, disconnect from the computer motherboard one of the cables that belongs to the auxiliary keys, and leave the one that goes to the power button in place. In the event that the power button and auxiliary keys have a common cable, you cannot turn it off, and to block the latter, you will have to use a hard overlay. It must be thin enough, otherwise, when closing the laptop, it can crush the screen.
Notebook users who often have to deal with typing know firsthand about the terribly annoying problem of accidentally touching the touchpad. If while typing in text editor accidentally hook the touchpad with a brush or the palm of your hand, the cursor will jump to another place. And if you don’t see this in time and print further without looking, the text segment will then need to be manually transferred to the right place, and before that, also look for the jump point of the cursor. Alas, laptop touchpads have not yet forgotten how to recognize whether their user deliberately puts his finger or accidentally touches his palm. How to disable touchpad on laptop?
Those who use a laptop for typing, as a rule, when actively working with the device, connect a mouse to it and, of course, do not use the touchpad at this time. To prevent the touchpad from interfering while typing, manufacturers of some laptops (for example, Hewlett Packard) specifically build in a hardware button to disable it temporarily. Other laptop manufacturers provide the ability to disable the touchpad with a key combination involving the Fn button. For example, for Lenovo laptops, this is Fn + F8, for Acer - Fn + F7, for Dell - Fn + F5, for Asus - Fn + F9. Alas, these combinations do not always work, and owners of Asus and Lenovo laptops often complain about this problem - no matter how many times you press these keys, the touchpad still works.
There are several alternative solutions on how to disable the touchpad on a laptop.
1. How to disable the touchpad in a household way
If you don't like to bother with different software settings, you can solve the problem of temporarily disabling the touchpad on a laptop simply and in a businesslike way - cover it up with thick paper for a while.
2. How to disable the touchpad Windows tools
If a USB mouse is connected to the laptop, you can disable the touchpad using regular Windows tools. Let's go along the path:
"Start" -> "Control Panel" -> "Mouse"
Recall Windows users 8.1 to call the system control panel, you can use context menu on the start button.
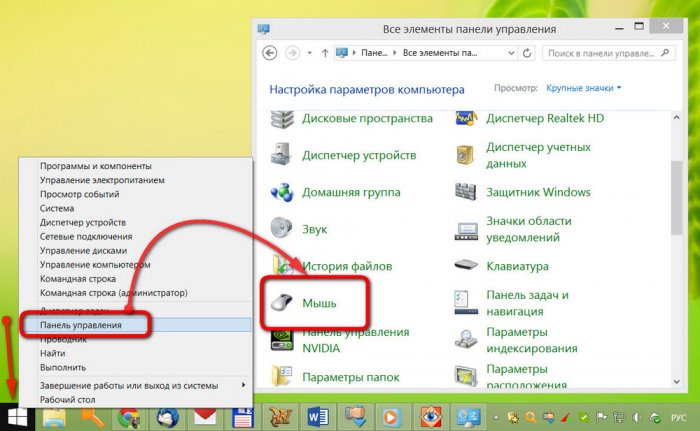
Once in the mouse settings section, select the "Device Settings" tab and disable the touchpad with the appropriate option.
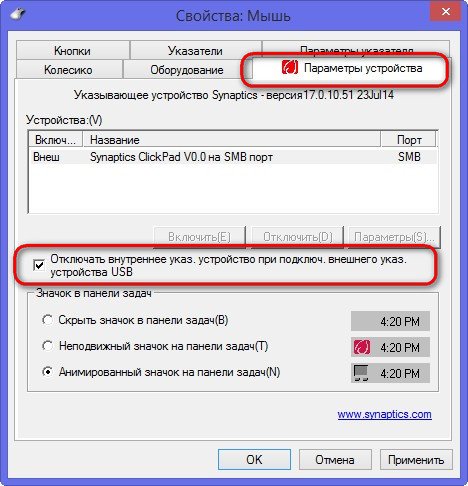
This option of enabling and disabling the touchpad when connecting an external mouse is not found on every laptop. The Device Settings tab is made possible by Synaptics' touchpad driver. But not all versions of the driver are equipped with such an item. Therefore, this method of disabling the touchpad is far from universal, in contrast to the one that will be discussed below.
Both the first and second methods of solving the problem with touchpad interference when typing, as we see, can only be used if a mouse is connected to the laptop. But there is also a more flexible way to make sure that the touchpad does not interfere with typing, but is ready when it becomes necessary.
3. How to disable the touchpad using the Touchpad Blocker utility
small free utility Touchpad Blocker is designed purely for solving one single task - to block the touchpad, and when it is needed. As soon as the user starts typing, Touchpad Blocker will turn off the touchpad itself, and when input is no longer actively carried out through the keyboard, the utility, again, will turn the touchpad back on. Touchpad Blocker does not provide any other actions. Therefore, after downloading it from the official site and installing it, we will see a minimalistic interface consisting of a series of options and no more.
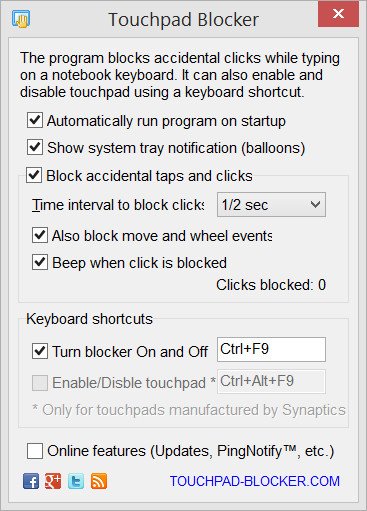
After launch, the program "dwells" in the system tray, from where it can be called to configure options. The Touchpad Blocker interface is in English, but this is unlikely to prevent the use of the utility even by those whose knowledge of English language leave much to be desired. Let's analyze the values of the Touchpad Blocker options below.
The first option specifies that the utility will start with Windows.

This is a rare case when you can not uncheck the program, since this will not significantly affect the system boot time. Just as the running Touchpad Blocker will not affect the performance of the system as a whole, because the utility consumes very few system resources.
The second option, when unchecked, will disable program notifications from the system tray if they become annoying or distracting.