Along the way, we will also get acquainted with the terms used by experienced program users and programmers.
What is an interface?
An interface is a system for facilitating interaction between a person and a machine (device).
For example, the mouse and keyboard are parts of the computer interface, the dashboard, levers and pedals are the car interface.
The 1C program interface is a system of virtual panels and buttons that allows you, the user, to easily and quickly work with the program.
The interface of Accounting 8.2 edition 3.0 is very different from the interface of Accounting 1.6 and 2.0 that is already familiar to users, and even more so from Accounting 7.7. The developers call it command.
It would be more logical to call it command controlled interface. The user can change it to his taste in 1C:Enterprise mode for ease of working with the program. In previous editions, the interface had to be created or modified in Configurator (a special mode of operation of 1C, in which programmers change the structure of the program or carry out administrative work), resorting to the services of a programmer for this. And the configuration had to be remove from 1C support(i.e. to be completely deprived of the opportunity automatic update programs).
Now, in 1C Accounting 8.2 edition 3.0, a competent user is able to independently create an interface in accordance with the area of his work.
Let's take a closer look at what a managed command interface consists of. 1C Accounting Enterprise 8.2 edition 3.0.
Video tutorial on setup managed interface on one's own you can see
In a typical configuration, the command interface consists of several panels:
- System command panel;
- Section panel;
- Action bar;
- Navigation bar;
- Workspace;
- Information panel.
System command barAllows you to perform general actions to help manage the system. It contains a button to go to the main menu. The main menu contains a set of commands related to the 1C system as a whole, regardless of the application configuration (Trading, Salary or Accounting). For example, commands for customizing the interface and commands for setting system parameters as a whole.
On the right are buttons for auxiliary commands: calculator, calendar, system information and more. The user can independently configure the visibility of commands.
Section panel displays a list of subsystems of the 1C Accounting program, or enlarged accounting sections. Each of the subsystems is depicted as attractive pictogram (i.e. a small-sized logo design). Using this panel, it is easier for the user to navigate the program and determine in which accounting section to reflect a particular business transaction. To select an accounting section, you just need to click on the desired icon on the section panel.
After selecting an accounting section, the entire structure of this section will be displayed in Navigation Bars(located vertically on the left side of the screen and similar to the table of contents of a book). This is a guide to this section of accounting. From the information in the Navigation Panel you can see what operations can be performed in the selected accounting section.

The section table of contents in the Navigation Panel represents hyperlinks, those. You can click on each of them and go to the corresponding list of documents or reference book. They are also called navigation commands . They do not change the information, but only move us through the system objects, opening either a reference book, a list of documents, or a report in the Workspace of the interface.
Action bar is updated simultaneously with the selection of an accounting section, along with the Section Panel. The Action Panel contains links to the most frequently used objects in the accounting section - mainly reports.
Workspace command interface - the area in which documents, directories are created and modified, reports are generated, settings are edited - in a word, where actions leading to changes occur information base. Lists of documents or directories must first be opened using the navigation panel.

If several objects are open at the same time, they are each located on their own tab, and it is convenient to navigate between them.
If you have a lot of bookmarks open, some of them become invisible. To make it easier to move between open bookmarks, there is a button to display a list of open objects.
The program interface also allows you to open objects in separate windows, move them to any area of the screen, minimize them, and resize them. Open object windows can be displayed in the panel Windows tasks as separate programs.
The forms of documents, lists, and reference books externally remained almost the same as in Accounting edition 2.0, and, having become accustomed to the new interface, it is easy to get used to working in the new edition of 1C Enterprise Accounting.
At the bottom of the interface is Information panel.
It displays the latest documents recorded by the user, making them easy to find in the system. On the left is the “History” button, which allows you to view the list recent actions with all objects produced in the system. But only users with the “Save user data” rights have access to this information.
Edition 3.0, starting with release 3.0.33.15, the interface changes dramatically. We have already written about changing the complete interface of the program -, and in this article we will look at changing the block of regulated reporting and the 1C-Reporting service.
Due to the fact that the 1C-Reporting service is gaining more and more popularity and most users of the ITS service connect 1C-Reporting, it became necessary to combine the regulated reporting block with electronic document management with regulatory authorities.
The appearance of a new interface in 1C-Reporting and support for the “Taxi” interface, which the user can disable in the Administration panel, coincided and was implemented in release 3.0.33.
Free training on version 3.0 and training program -
Single workplace
In the new interface, all functionality for working with reporting and sending it to regulatory authorities is combined in the “1C-Reporting” block - in fact, a single workplace has appeared.
Fig.1. New interface "1C-Reporting"
The features of this single workplace are:
1. Nice interface
2. Convenient selections by organization, reporting period, type of report
3. Control of unread incoming messages
4. Easy access to protocols
The block is grouped into sections:
1. Basic regulatory reporting (“reports”)
2. Statements, notifications, messages sent to regulatory authorities (“notifications”)
3. Responses to demands and letters (“letters”)
4. Acts of reconciliation with the Federal Tax Service and the Pension Fund of the Russian Federation ("reconciliations")
5. Extracts from the Unified State Register of Legal Entities/Unified State Register of Legal Entities ("USRLE")
6. Incoming letters, demands and notifications from regulatory authorities ("incoming")
The transition to the section is carried out at the top of the screen. There you can return the previous interface.
Instead of the "Exchange" button, there is now an "Update" button in the upper left corner.
Increased workspace
In the new interface, the workspace has increased by 2.5 times compared to the previous form of regulatory and financial reporting.
Fig.2. Workspace in the new interface.
Quick selections
In the new interface, for optimization purposes, selection is provided:
By organization;
By period;
By type of report.
Selections act on the list independently of each other.
Fig.3. Quick selections
Selecting a reporting period
Now the choice of period is very easy and quick - year and quarter (only what is necessary). The period that was selected before is highlighted in yellow.
Fig.4. Select period
How to create a new report?
Now, when creating a report, a list of all available reports, grouped by type, is displayed. You can add them to your favorites (for faster searching). Already created reports are automatically added to favorites. You can select reports by category and by recipient, or without grouping.
Rice. 5. Create a report
How to load an external report into 1C-Reporting?
To load an external report, go to the “More” submenu and select “Load from file”. Downloaded reports are displayed in the general list of reports.
The first difference you will immediately notice in the new interface is the large font. Of course, it is more convenient to read. The second difference is the optimized workspace: an accountant can now independently design his own desktop, placing the panels in the part of the screen he needs.
Now let's talk about the details of the new interface. You can add not only data objects (documents, directory items), but also commands to your favorites. The functions necessary for convenient navigation are implemented in several auxiliary panels: tools, favorites, history, etc.
Appearance The calendar has been changed, selecting the month and year has become more convenient.
There are also new options. For example, in Taxi, most forms open in one main window, and the user can move back and forth through the forms open in the window by clicking on the arrow. This mode is similar to the browser.
Add new element the directory has become easier: in the list that drops down under the input field, there is a button that will allow you to create a new data element and automatically insert a link to this element in the input field. The list displays the items most requested by the user.
Rice. 1. Directory "Counterparties" in the new "Taxi" interface
Role Stories, as a data retrieval tool, has improved. Now all objects that the accountant worked with are saved in Stories. Previously, for example, they were not displayed there Reports.
Switch to the “Taxi” interface
Users of edition 3.0 to use the Taxi interface must install version 3.0.33.15 and higher of the Enterprise Accounting configuration and version 8.3.4.482 of the 1C:Enterprise platform, and then update as usual.
Users of edition 2.0 can upgrade to version 3.0.33 if they have a configuration installed starting from version 2.0.59. If an earlier version of the configuration is installed, you must first update the configuration to a version no lower than 2.0.59.
This is the second part of the article about setting up the Taxi interface that appeared in the 1C:Enterprise 8.3 application. In I talked about how to add new panels to the interface and change their layout according to your preferences. In the second part, I will teach you how to manage sections of the application and their content, as well as change settings home page interface.
In the screenshot below, the interface looks like how we made it look in the last lesson. For me, this working view is not very convenient. I prefer the section bar to be on the left, as it is by default. And it's not just a matter of habit. It’s just that when all the sections are compactly collected on one side, they can all be covered at one glance, which cannot be said about the stretched menu at the top of the interface.
But since the side menu takes up too much space in the screenshots, I will leave the sections in the place where we moved them. Although I recommend that you leave this menu where the developers themselves placed it.
Here and below, screenshots created using “1C: Salary and HR Management 3.0” are used, but, as I said in the previous article, these settings are relevant for all new configurations, since the “Taxi” interface is used in them too.
So, the next feature I want to tell you about is customizing section panels. It allows you to remove individual sections from the interface.
Here the question may arise as to why someone might want to remove entire sections of operations from a program. In fact, everything is very simple. Let's say you have a small company in which only one employee is responsible for personnel and salaries. Of course, in this case, nothing can be deleted, since from time to time he will use all available tools.
But let's assume that you have a human resources specialist on staff who keeps personnel records and a payroll accountant. A personnel officer does not need payroll calculations, just as an accountant does not need personnel operations. Therefore, each of these specialists can be left with only those sections that they really need, so that unnecessary elements do not distract your employees from their work.
Of course, some objects are used by both personnel officers and accountants within the scope of their powers. For example, sick leaves or vacations. But, as a rule, access to such objects is duplicated in the corresponding sections.
To delete or add a previously deleted section, you need to select the “Customize section panel” function in the “View” settings subsection.

In the window that opens, it is easy to remove any elements from the interface and return them back. This can be done in several ways.
First, you can use the "Add", "Add All", "Delete" and "Delete All" buttons. If you do not use a button that removes or adds all possible objects, the action will affect only the selected objects.
In order to select several consecutive menu items, you need to select the top one with the mouse, and then, holding Shift, click on the bottom object of the selected group.

In order to select several objects in random order, you need to mark them with the mouse while holding the Ctrl key.

Secondly, you can add or remove objects by simply dragging the mouse.
But the third method is closer to me. Following it, you just need to double-click on the desired object. If it is located among the available objects, it will immediately become selected, otherwise it will be moved from selected to available.
At the top right you see two blue arrows. They are needed to change the order of elements in the menu.
Now, using the knowledge we have gained, let’s remove the “Salary”, “Payments” and “Taxes and Contributions” items from the section panel, and raise the “Administration” section to the top of the list of selected sections.
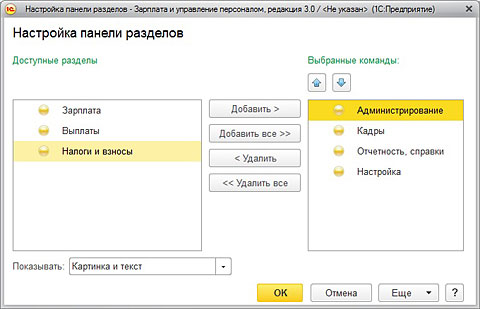
Now let's accept the changes and see what form our menu has taken.

Everything turned out just as we planned. To quickly return everything back, you need to go back to the section panel settings, click the “More” button, select the “Set standard settings” option and accept the changes.

It is no coincidence that I spent so much time describing these actions, since they are widely used in all 1C:Enterprise 8.3 configurations and we will need them in the following examples.
The next thing I want to tell you about is setting up the home page. Right now there is an invitation to configure the system from scratch or transfer data from other configurations, but in the future, when the program is configured, other data will be displayed there. For example, if we talk about the “1C: Salary and HR Management 3.0” configuration, then this could be the staffing table and the history of accruals.
To manage the home page settings, you need to go to “View”, “Start Page Settings”.
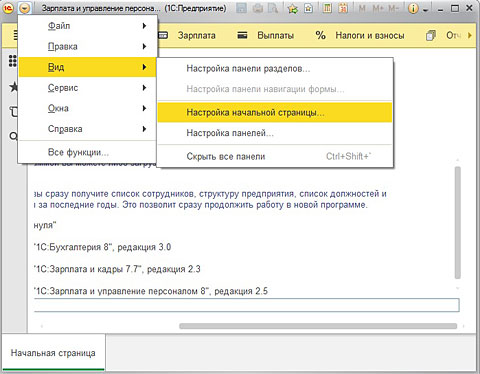
As you can see, everything here is the same as in the section panel settings. The only difference is that the initial page also has a second column that can be activated by adding some of the available forms there. But you should only do this if you have a large enough display. Otherwise, the second column will only get in the way, eating away at the workspace.

You can experiment with the settings yourself home screen. You can return everything to the default settings in the same way as we did after setting up the section panel.
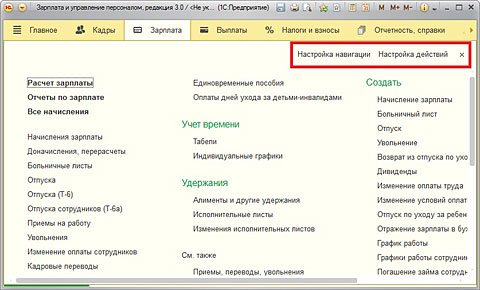
The workspace of each section is divided into a navigation panel and an action panel. Visually, they do not differ from each other, so for clarity, I marked the navigation bar in the next screenshot with a red outline.
![]()
Through the navigation panel, the user has access to lists of reports, documents, and so on. And using the action panel, he can immediately create a document, a report, and the same “so on.”
For clarity, let’s look again at the previous screenshot illustrating the “Salary” section. As you can see, in the navigation bar, which I surrounded with a red frame, there is a section “Sick Leaves”. If you click on it, a list of all sick leaves will open, which is currently empty. Here you can create a new sick leave by clicking the “Create” button.

But in the same “Salary” section, in the action menu, there is also the “Sick Leave” item, located under the eloquent heading “Create”. By selecting it, you will create exactly the same sick leave as in the previous example, but for this you will not have to go to their general list and click an additional button.
The content of the navigation and action bars can also be controlled. So if you are sure that a feature should be in a certain section, but it is not there, it may simply not have been added to the list. You can do this yourself using the Customize Navigation and Customize Actions features. This is done in the same way as the settings for sections and the home screen.
See what this same section looks like after I enabled all the features available for it.
It's just some kind of porridge, isn't it? All the actions do not fit on the screen, even if you expand it, and you have to use the scroll bar to see them all. Therefore, it is advisable to activate in the action menu only those functions that are really needed quite often. Those documents that you need much less often are better created by navigating to them through the navigation bar, and not including them in the action bar.
Here it would be useful to recall that access to any “1C:Enterprise 8.3” object in the “Taxi” interface can be obtained through the “All functions” option, which I wrote about in the first part of the article.
In the upper right corner of the Taxi interface there is a panel with buttons that duplicate some of the application’s functions. You can choose which buttons will be displayed in this panel. To do this, you need to use the “Add or remove buttons” function and tick those that you need most often, as shown in the screenshot below.

This concludes the article about customizing the “Taxi” interface. Next time I will tell you how to get started in the 1C: Salaries and Enterprise Management 3.0 configuration.