Launch options are set in the properties of the selected game in Steam after clicking the button Set launch options. It is strongly not recommended to use them all the time, because. various problems and errors may occur.
Basic parameters for launching Source games:
- -novid (-novideo) - disables the video that plays when the game starts;
- -autoconfig- Restores graphics settings to default. Ignores any installed configs until this parameter is removed;
- -full (-fullscreen) - launch the game in full screen mode;
- -window (-sw or -windowed) — launch the game in windowed mode;
- -width or -w— specify the resolution or horizontal width of the window;
- -height or -h- specify the resolution or vertical height of the window;
- -console- turns on and automatically starts the developer console;
- -dxlevel- sets the DirectX mode (80, 81, 90, 95). Strongly not recommended for use, because. when used, the game stops saving and loading video settings (default settings are set each time). Instead of this parameter, it is better to use the DirectX mode selection in the graphic tweaker field of the same name;
- -autoconfig— ignores the settings of all configs. Restores default settings;
- -heapsize NUMBER- sets the amount of occupied memory. Calculated by the formula: (RAM / 2 * 1024). Number examples for the OP:
- 512 MB -> 262144 ;
- 1 GB -> 524288 ;
- 2 GB -> 1048576 ;
- 3 GB -> 1572864 ;
- 4 GB -> 2097152 ;
- -nojoy— disables the joystick in the game;
- -noipx— does not load IPX connections, saves RAM;
- -noborder- do not display the frame and title of the window when starting the game in windowed mode;
- -noforcemspd- use the mouse speed settings from Windows;
- -noforcemparms- use the settings of the mouse buttons from Windows;
- -noforcemaccel- use the mouse acceleration settings from Windows;
- -freq NUMBER (-refresh NUMBER) - sets the refresh rate of the monitor (for LCD monitors, it is recommended 60 Hz, and for CRT - 85 or 100 Hz);
- -nocrashdialog- disables the debugger built into the game, allows you to save a little random access memory;
- -32bit- launches the game in 32-bit mode on a 64-bit operating system(x64);
- -dev- enables developer mode: the last lines of the console will be displayed on top of the game's HUD. It is not recommended to use;
- -condebug- turns on the debug mode, in which all the contents of the console will be written to a file console log;
- -toconsole- forces the console to launch, even the + map parameter is specified, forcing the engine to load the map when the game starts;
- -lv- enables Low Violence mode in Left 4 Dead (2);
- -sillygibs- Enables Low Violence mode in Team Fortress 2.
Since CS 1.6, many people remember that the launch options allowed you to set certain commands for the game by default. There is a similar function in the Steam service.
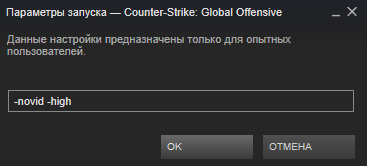
Previously, launch options had to be specified in the properties of the game shortcut by adding the command in the "Object" field. Now it's much easier to do this - just launch the Steam client, enter your library, select a particular game, right-click on it and go to properties. Now you need to click the "Set launch options ..." button, after which a new window will appear, where you need to write commands.
Each command must be preceded by a "-" (without quotes), and if you decide to write several commands at once, separate them with a space. Don't be afraid to specify the wrong command - otherwise it won't work, but it won't lead to any negative consequences.

There is also an assumption that various cheats can be prescribed in the launch options, which can lead to a VAC ban. In fact, all this is not true, since any team is monitored by Valve and simply will not work if it affects the balance.
All teams work in Valve games, including CS:GO, Dota 2, Portal 2, Half-Life 2 and Team Fortress 2. Some teams may not work in games from other companies.
Most useful and used commands for launch options
- -novid - removes the introductory splash screen. A particularly useful command if you want to launch the game faster;
- -high - puts high priority, due to which the main resources of the computer will be used by the game (FPS may rise);
- -low - sets a low priority for the game, reducing its performance;
- -noborder - launches the game in a borderless window, allowing you to easily switch between multiple windows right during the game;
- -full - starts the game in full screen mode;
- -w 1920 (width) -h 1080 (height) - sets any resolution for the game. Where the numbers indicate the resolution of your monitor;
- -console - displays the developer's console in the game;
- -freq 60 (put any number) - sets the number of hertz that your monitor supports, so you can remove frame blur;
- -noforcemparms Sets the mouse settings for the game to be set in Windows. Suitable if you want the sensitivity of your mouse to be exactly the same in all games;
- -threads 4 (put any number) - sets the number of active cores for the game;
- -exec file name.cfg - starts the game with a pre-created config in the root folder of the game.
After you enter the commands, click OK and start the game. It is noteworthy that the startup options are saved even after the computer is turned off, and therefore if you want to cancel the commands, just open the window and delete it from there.
Video
All liked it? Tell your friends!
This guide was made for Source 1, Reborn will be tested as soon as possible.
Introduction
The guide was completely updated on February 1, 2014. Most commands have not changed. If there are new - write.
Setting location
Location (screenshots)
Command list (game start)
-console- starts the game with the console turned on. More:
-novid- on startup, disables the video that plays when the game starts
-toconsole- force launch console, even if the parameter is specified +map, which forces the engine to load the map when the game starts
Command List
-override_vpk- the game will read game elements in \steamapps\common\dota 2 beta\dota to replace and load them into the game. The command is for Modifications.
The use of -override_vpk has been removed by Valve.
Instead, a slightly different command was added:
-enable_addons- allows to use allowed modifications of client resources ( Mini-map, HUD, icons and sound scripts, music scripts and flash video)
-autoconfig- Restores default graphics settings. Ignores any set configs until this option is removed
-dev- includes developer mode. Also disables automatic download background image of the menu and stops asking for confirmation to exit.
The last lines of the console will be displayed on top of the game's HUD. It is not recommended to use
-nod3d9ex * - turns off(forced) directx 9 external rendering.
-d3d9ex * - includes(forced) directx 9 external rendering.
-32bit- starts the engine in 32-bit mode. Useful for 64-bit OS only.
-full or -fullscreen- run the game in full screen mode
-windowed or -sw- starts the game in screen mode
-w **** -h**** - Launches Dota 2 with a specific screen resolution (width and height). For instance: -w 1280 -h 1024
-noborder- don't show window frame and title when running the game in windowed mode
-nosound- completely disables the sound in the game
-nosync* - disables vertical sync.
+exec"cfg file name" (without quotes) - Automatically loads the CFG configuration file on startup. For example, you can execute your special config with settings.
-noaafonts* - disable true type fonts (font smoothing)
-insecure - VAC not used when starting the server
-nomaster- the server you created is not visible to other users in the Steam server list
-gl- changes the quality of the game to OpenGL, the default is SoftWare.
-heapsize"NUMBER" * - Specifies the size of the paging file (an acceptable number is 2-4 times the amount of physical RAM) that the game will use (in kilobytes).
Calculated by the formula: (RAM / 2 * 1024). Number examples for the OP:
- 512 MB => 262144;
- 1 GB => 524288;
- 2 GB => 1048576;
- 3 GB => 1572864;
- 4 GB => 2097152;
- 8 GB => 4194304
-high* - starts the game with HIGH priority.
-nojoy- disables the joystick in the game
-noipx- does not load IPX connections, saves memory
-noforcemspd** - use mouse speed settings from Windows;
-noforcemparms** - use mouse button settings from Windows;
-noforcemaccel** - use mouse acceleration settings from Windows;
-freq"NUMBER" or -refresh"NUMBER" * - sets screen refresh rate(recommended 60Hz for LCD monitors, 85 or 100Hz for CRT monitors)
-nocrashdialog- disables the debugger built into the game, saves some RAM. Removes the dialogue memory could not be read".
-condebug- turns on the debug mode, in which all the contents of the console will be written to a file console log
* Help with FPS optimization, but maybe not all teams (what would DotA * didn't lag*)
** Mouse acceleration in Windows
Command List (Menu Interface)
-dota_members 0- Disable background animation in the main menu (this is the only way to put old backgrounds in the menu, i.e. they will be without animation)
-dashboard international_2012- Change menu theme to International 2012
-dashboard international_2013- Change menu theme to International 2013
-dashboard frostivus_2013- Change menu theme to Frostivus 2013
-dashboard spirits_2013- Change menu theme to 3 Spirits Update
-dashboard newbloom_2014- Change menu theme to newbloom
Command list (non-working)
-international
-international2012
-halloween
-perfectworld* - Gift orb via Chinese client
-dxlevel :
-dxlevel 9 ; launch with DirectX 9.
-dxlevel 8 ; launch with DirectX 8.
-dxlevel 7 ; launch with DirectX 7.
-dxlevel 6 ; launch with DirectX 6.
* Can break the client
FAQ and problems
Save between commands (write) spaces.
- Is it possible to write multiple commands? - Can.
- Most problems with the game solved by checking the cache.
- If you still started the game with the team -perfectworld and wised up with the registration of the Chinese client, the game, etc. and at the same time, after all, Dota will look strangely necessary:
- Check cache
- Change the Dota language from English to another and back (in extreme cases, do the same fraud with Steam itself)
- Through the Task Manager, set the Steam.exe process for the process real time priority(at the very least, high priority)
- Launch game from high priority (-high)
- Set launch parameter -clientport 27015(or 27011 -20 i.e. any number from 11 before 20 )
- Delete everything in a folder \Steam\userdata\ and run a cache check.
-high: high CPU priority in your system, not cheat
-nod3d9ex: can give a small boost FPS and faster ALT-TAB
But! also this team can break the game(only stops running), and also if 1 time trying start the game with -nod3d9ex, growth FPS should be preserved, and then quietly remove this command.
Try setting the mode * in full screen*, for many with * in full screen* with the nod3d9ex command enabled, the game hung or crashed, or crashed when minimized, so a way to fix this problem was invented - mode * in a frameless window*. If you don’t crash or freeze in full screen mode, leave where there is more fps, for MOST in full screen mode gives more fps.
On this page you will find detailed instructions for launching the game with parameters, launch keys. "Why is this necessary?" - you ask. To answer this question, you need to tell what parameters, startup keys are and what they can affect. When you start the game with the parameters you activate hidden opportunities, which in most cases cannot be enabled in any other way. It should also be said that each game has its own individual launch keys, without knowing which you will not be able to activate something.
And so, what needs to be done to start the game with a parameter? It should be said right away that it is possible to launch games along with parameters, launch keys only through a shortcut or command line, but since it is easier to do this through a shortcut, the second method will not be considered here.
Create a game shortcut
Before creating a shortcut to the game, you need to find the file that is responsible for launching it. All these files have the extension exe, i.e. the game launch icon will have the following name format: name.exe It should also be noted that the extension exe may be hidden (not displayed). The required startup file is located in the location you specified during installation - it could be the following path:C:\Program Files\game_name\name_name.exe
So, required file you have found. Now let's create a shortcut to the game on the desktop. You can create a shortcut in several ways - use one.
- Right click on the icon. Find Send to - Desktop (create shortcut).
- Press the key combination [ ctrl] + [Shift
- Hold down the [ key on the keyboard alt] and drag the icon to the desktop.
Adding Launch Options to the Game Shortcut
The shortcut has been created and you can add game launch options. To do this, right-click on the created shortcut on desktop and select the item Properties. A window will appear in front of you in which you need to edit only one field with the name An object.In order to start the game with parameters (keys), they must be added at the end of the field An object through the gap. It should be said right away that there can be more than one launch parameters and they are all written in the following format at the end of the field An object through a space:
-parameter_1 -parameter_2 -parameter_3
Example: "C:\Program Files (x86)\Skype\Phone\Skype.exe" /parameter
Notes:
- in most cases, the parameter name should be preceded by a hyphen ( - ) or slash ( / ) depending on the game, but for many games these signs are identical, that is, it does not matter which one to put;
- between the parameters (keys), if there are several, there must be a space;
- double quotes from the Object field, if present, do not need to be removed;
- if you launch a special bootloader (Launcher) and only after that start the game by pressing the "Play" or "Run" button, then adding the launch parameters to the shortcut of the Launcher.exe file will not launch the game with additional parameters (keys), but only the program for its launch - the game will start without parameters.
Instruction
call context menu label to be edited by clicking right button mouse and go to the "Object" item to perform the operation of adding the required value to the selected label.
Enter the desired value at the end of the description of the selected shortcut, separated by a space (example: D:\Games\Diablo 2 LOD\D2Loader-1.11.exe_-direct, where -direct is the added value, in this case, the localization).
Use the following values to add to Counter Strike game shortcuts:
Noforcemaccel - (no force mouse acceleration) to change windows acceleration settings;
-noforcemspd - (no force mouse parameters) to change mouse speed settings;
-noforcemparms - (no force mouse speed) to change settings for windows mouse buttons;
-noaafonts - to disable screen font smoothing;
-heapsize 262144 - allocates 512MB of RAM for the game;
-heapsize 524288 - allocates 1GB of RAM for the game;
-heapsize 1048576 - allocates 2GB of RAM for the game;
-w 640 -h 480 - to run the game with a screen resolution of 640x480 pixels;
-w 800 -h 600 - to run the game with a screen resolution of 800x600 pixels;
-w 1024 -h 768 - to run the game with a screen resolution of 1024x768 pixels;
-full - to run the game in full screen mode;
-window - to run the game in windowed mode;
-freq 100 - to change Hertz for HL1 Engine monitors. CRT 60-100 85=Common LCD 60-75 72=Common;
-refresh 100 - to change Hertz for HL2 Engine monitors. CRT 60-100 85=Common LCD 60-75 72=Common;
-soft - to run the game in Software graphics mode;
-d3d - to run the game in Direct3D graphics mode;
-gl - to run the game in Open GL graphics mode;
-nojoy - to disable joystick support;
-noipx - to disable the LAN protocol;
-noip - to remove the IP address without the ability to connect to servers;
-32bpp - to enable 32Bit mode;
-16bpp - to enable 16Bit mode;
-dxlevel 90 - to use DirectX 9;
-dxlevel 81 - to use DirectX 8.1;
-dxlevel - to use DirectX 8;
-dxlevel 70 - to use DirectX 7;
-dxlevel 60 - to use DirectX 6;
-port 27015 - to change the port for the game;
-console - to access the console when starting Half-Life;
-dev - to enable mods for developers;
-zone # - to allocate more memory to files like autoexec.cfg etc;
-game - to enable Half-Life modification of the game;
-safe - to run the game in safe mode and mute audio;
-autoconfig - to restore default video settings;
-condebug - to save all console logs to text file console.log;
-nocrashdialog - to cancel the display of some errors (memory could not be read);
-novid - to remove the Valve intro video;
-toconsole - to start the game engine in the console if no map is defined with +map
+a +r_mmx 1 - to start the game with a console command or cvar command in command line(instead of cfg);
+ex_interp # - to assign a parameter to the ex_interp command.
Sources:
- How to write -direct in a label
- Parameters that can be written in the CS label
- How to write a command in the properties of a shortcut
There are several ways to set individual features font any text block on the page. Some of them use exclusively HTML tools, others use only CSS, and others combine the capabilities of both languages.
Instruction
You can specify options font, which the browser should use to display a particular block of text on the page, just before the start of that block. To do this, the markup language means are sufficient, without involving style descriptions of document elements. The corresponding HTML construct consists of opening and closing font tags ( and), between which the text is placed. This tag allows you to specify a name font in the face attribute, its color (in the color attribute) and size (in the size attribute). A color can be specified in its textual designation (for example, Blue), but it is better to use hexadecimal codes (for example, #0000FF instead of Blue), as they can be used to more accurately select the desired shade. Size font here it is set in relative units - you need to specify a number in the range from 1 to 7. Sample text with parameters set in this way font:Sample text
Another way is to use the style attribute. It can be specified in many tags, including those that form inline or block areas with text in the body of the document. Here is an example with a tag that forms one paragraph of text:
Sample text
Here the number 700 is the font-weight property and 20px is the font-size property. By effect, they practically duplicate each other - they set the size of the letters. The only difference is that font-size specifies sizes in absolute units (px or em), and font-weight in relative ones, i.e. increases or decreases the size of this text block relative to that specified for the entire document. As you understand, there is no point in using both at the same time in one style attribute, they are combined here only as an example. The number 12, indicated through