Today there will be a lesson especially for office workers who often have to deal with all sorts of papers in their work.
There are times when you need to correct the document: change the text, remove the live seal from the form, or vice versa, copy this seal from the document and move it to another.
Photoshop will help you with this.
First task: Remove stamp from document
Second task: Delete text and leave only seal and signature
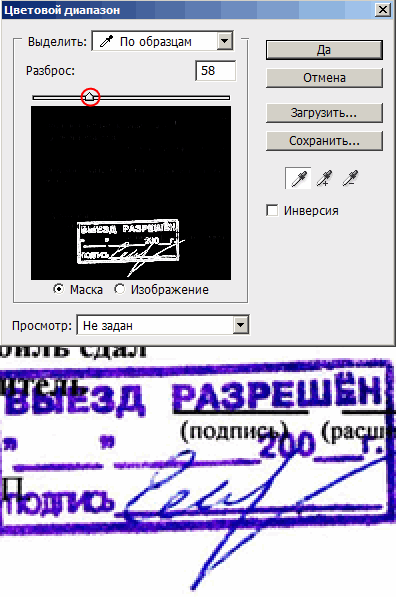
Here's the blue printed form we'll be working with.
I will make the problem area larger so that you can see it better:

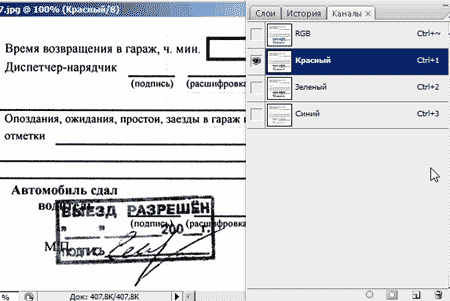
The easiest way to remove blue print is with a palette. Channels(Channels)
Open it soon!
If we run through the channels, we will see that the print in red(Red) and green(Green) channel is quite dark:
But in blue, on the contrary, it is almost invisible:
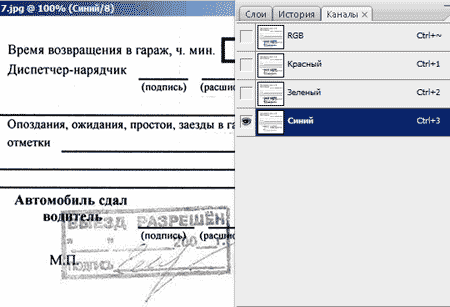
We will continue to work with this channel!
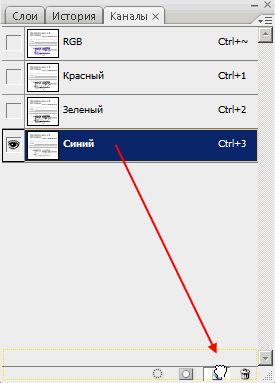
Duplicate this channel, drag down to the button
With the blue channel copy active, press Ctrl+L to bring up the palette Levels(Levels). Now start moving the white slider to the left, see what happens? The seal is gradually disappearing.
To prevent the black letters from disappearing, move the black slider a little to the right. When you are satisfied with the result, click OK.
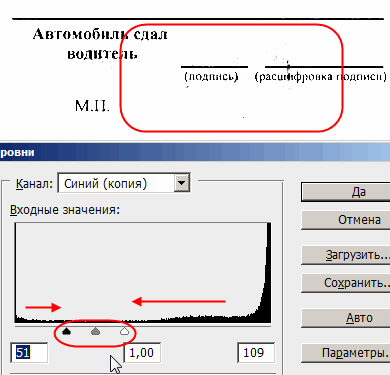
Black dots are still visible on the document - the remnants of printing. Enlarge the document, take a white hard brush and carefully paint over them.
![]()
Now everything is clean!
Ctrl+click by channel, load the selection, click on the RGB channel and return to the palette Layers(Layers)
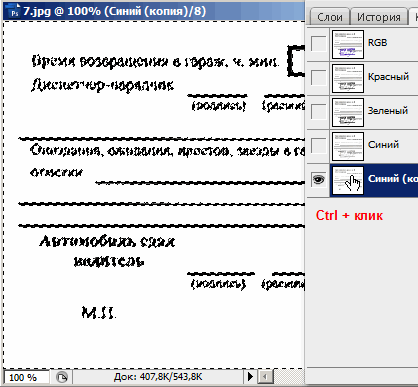
There everything is as before, the seal is still visible.
Invert selection, Shift+Ctrl+I
And we press Ctrl+J to copy the black text onto new layer.
Create a white background under the blank text, i.e. create a new layer and fill it with white.
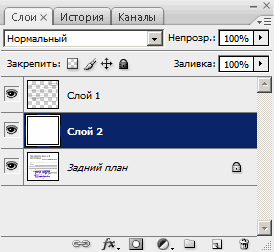
The text without printing is ready!
The next task is to cut the seal.
The printed image should be scaled.
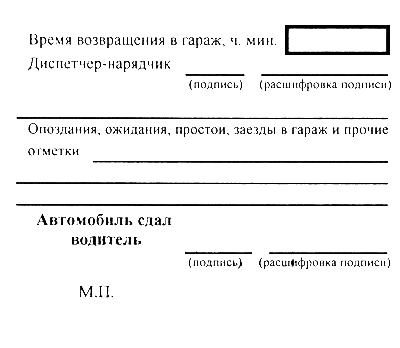
Opening the menu Highlight - Color Range(Select - Color Range)
We take an eyedropper with a sign (+) and click on the seal and on the signature, the more pixels of different shades you collect, the better.
On a dark screen, you will see that with each click your print appears more and more accurately.
Use the option scatter(Fuzziness) to increase or decrease the number of pixels that will be included in the selection.
Click OK.
Now again Ctrl+J(copy selection to new layer)
We place a clean white layer under the print.
Here is the finished print without text:
If you want to place this seal on another document, go ahead!
Just don't forget to change the blend mode to Multiplication(Multiply)
Here is an example!
The sequence of actions performed when separating a fragment from the background in Adobe Photoshop, strongly depends on its type. So, if you need to cut out a seal, you should not use the standard selection tools. It should be taken into account the fact that the print image, although highly fragmented, has approximately the same color.
You will need
- - Adobe Photoshop;
- - an image containing a print.
Instruction
Load a graphic file containing the print image into Adobe Photoshop. From the File menu select "Open..." or "Open As...", or use the appropriate keyboard shortcuts Ctrl+O or Ctrl+Alt+Shift+O. In the dialog that appears, navigate to the desired directory, select the file and click the "Open" button.
For the convenience of further work, transfer the image fragment containing the print to a new document. Activate the Rectangular Marquee tool. Use it to create a rectangular marquee around the seal. Adjust the size of the selection by selecting Select and Transform Selection from the main menu. Copy the fragment to the clipboard by pressing Ctrl+C or by selecting Copy from the Edit menu. Press Ctrl+N or select "New..." from the File menu. In the Preset list of the New dialog, select Clipboard. Click the OK button. Press Ctrl+V or select Paste from the Edit menu.
Highlight the main parts of the print image by color. Set a convenient viewing scale using the Zoom tool. From the main menu, select Select and "Color Range...". In the Select list of the displayed Color Range dialog, select Sampled Colors. Set the Fuziness parameter to 1. Activate the Image option. In the Selection Preview list, select Quick Mask. Click the Add to Sample button. Click on several points of the print image that have the most different colors. Increase the Fuziness value, adjusting it in such a way that the selection covers the print as much as possible, but without affecting too wide adjacent areas. Click the OK button.
Adjust the selection area. Enter Quick Mask Mode. Press the Q key or the Edit in Quick Mask Mode button in the toolbar. Choose a brush with parameters that are convenient for work (type, diameter and hardness). Set the foreground color to black and remove the extra selection areas. Set the foreground color to white and add highlights where needed. Disable the quick mask mode in the same way that it was activated.
Cut out the seal. If you need to put it on the clipboard, just press Ctrl+C. If the "clean" print image needs to be saved for later use, invert the selection by pressing Ctrl+Shift+I, remove the background by pressing the Del key, and invert the selection again. Select Image and Crop from the menu. Then press Ctrl+Shift+S or select "Save As..." from the File menu.
Instruction
Load a graphic file containing the print image into Adobe Photoshop. From the File menu select "Open..." or "Open As...", or use the appropriate keyboard shortcuts Ctrl+O or Ctrl+Alt+Shift+O. In the dialog that appears, navigate to the desired directory, select the file and click the "Open" button.
For the convenience of further work, transfer the image fragment containing the print to a new document. Activate the Rectangular Marquee tool. Use it to create a rectangular marquee around the seal. Adjust the size of the selection by selecting Select and Transform Selection from the main menu. Copy the fragment to the clipboard by pressing Ctrl+C or by selecting Copy from the Edit menu. Press Ctrl+N or select "New..." from the File menu. In the Preset list of the New dialog, select Clipboard. Click the OK button. Press Ctrl+V or select Paste from the Edit menu.
Highlight the main parts of the print image by color. Set a convenient viewing scale using the Zoom tool. From the main menu, select Select and "Color Range...". In the Select list of the displayed Color Range dialog, select Sampled Colors. Set the Fuziness parameter to 1. Activate the Image option. In the Selection Preview list, select Quick Mask. Click the Add to Sample button. Click on several points print images that have the most different colors. Increase the Fuziness value, adjusting it in such a way that the selection covers the print as much as possible, but without affecting too wide adjacent areas. Click the OK button.
Adjust the selection area. Enter Quick Mask Mode. Press the Q key or the Edit in Quick Mask Mode button in the toolbar. Choose a brush with parameters that are convenient for work (type, diameter and hardness). Set the foreground color to black and remove the extra selection areas. Set the foreground color to white and add highlights where needed. Disable the quick mask mode in the same way that it was activated.
Cut out the seal. If you need to put it on the clipboard, just press Ctrl+C. If the "clean" print image needs to be saved for later use, invert the selection by pressing Ctrl+Shift+I, remove the background by pressing the Del key, and invert the selection again. Select Image and Crop from the menu. Then press Ctrl+Shift+S or select "Save As..." from the File menu.
When creating collages photoshop often you have to cut out individual fragments and transfer them to another image. It is necessary to do this in such a way that the transferred objects fit organically into the new drawing and do not give the impression of alien elements.
You will need
- Adobe Photoshop, photography
Instruction
Press the L key. A window is activated on the toolbar, in which you can select one of the tools of the Lasso group.
Polygonal Lasso is suitable for selecting objects with polygonal contours. Using the Lasso Tool, the object is selected manually. Hover over circuit object, press the left mouse button and, without releasing, circle the entire object. When the path closes, release the key - the object will be selected. If by mistake you mark an unnecessary section, press the Backspace key to undo the wrong action.
Magnetic Lasso analyzes the difference between the colors of the main contour and the background and, as it were, "sticks" to the silhouette of the object. On the properties panel, set the following options:
-feather- blur selection, in pixels
- Width - the width of the strip that the tool will analyze to distinguish the object from the background
- Edge Contrast - the difference in color tone between the object and the background, in percent
- Frequency - the frequency with which the tool will "cling" to the image.
Move the cursor over the object and press the left mouse button to set the initial data for the tool. Then release the key and move the cursor over contour. If in some area the colors of the background and the object are very close, move the cursor over the object again and press the left button to set new parameters. If the background area is marked, press the Backspace key to undo the wrong steps. To end the process, double-click the left mouse button.
Another way to select an object is the quick mask mode. Press the Q key and select the Edit in Quick Mask Mode button. The foreground and background colors on the tool palette should be set to default, to do this, press the D key. Select a hard brush and start painting over the object in the image. If you have captured an extra area, change in places black and white squares on the toolbar and use a white brush to remove the mask. After you paint over the entire object, press the Q key again - this way you will return to the standard mode. The entire image around your object will be selected. From the main menu choose Select and Inverse. After that, the selection will go to the object.
After you have selected a part of the image in one way or another, you need to save it to the memory buffer. If you want to remove a fragment from an image, press Ctrl+X or select Edit and Cut from the main menu. If you just want to copy the object, use the Ctrl + V combination - the image will not change, and a copy of the selected fragment will be stored in the program's memory.
If necessary, open a new image and add the copied object there using the Ctrl + C keys.
You can cut and move an object in Adobe Photoshop different ways. One of them involves the use of the "Mask" command, and therefore is called " masking". It is most often used in cases where a complex object needs to be cut.
Instruction
Open the desired image in Adobe Photoshop. Turn on the channels palette (Window – Channels). Go to the channels tab and create new channel. To do this, click on the arrow in the corner and select New channel. A new layer will appear at the bottom of the palette, it will be located under the RGB, Red, Green, Blue channels and will be called Alpha 1.
Make all channels visible. To do this, turn on all the icons with eyes in squares next to the channel names. When you do this, your image will turn red, as if covered with a transparent red film.
Select the Alpha channel 1. Take the Brush tool, select white and start painting over the entire area of the image except for the one you need to cut out. Try to paint it evenly. If you can't keep the borders, use the Lasso tool. If you drew the wrong line, select black instead of white on the palette and correct the image. Also, you can always undo last action command ctrl + z or Edit - Undo. By using a soft-edged brush, you can select an object so that it has soft edges.
Now select the desired object. To do this, click on the dotted icon at the bottom of the channel window. The object will be highlighted. Copy it. To do this, press ctrl + c or select the command Edit - Copy. Then create a new layer (Layers – New Layer) and press ctrl+v. Now you have the object you need on a new layer. We can make the bottom layer (Backgroung) invisible or completely remove it so that it does not interfere.
Save the rest of the layer as a PSD so you can use it later to paste into other images. You can immediately drag cut object to another image. To do this, simply drag it from help mice.
Related videos
Sources:
- cut mask in 2017
Photoshop is a popular image editing tool that helps you turn ordinary amateur photography into a spectacular, memorable shot. One of the most necessary skills for a photo editor is the ability to cut out any region Images.
Instruction
Open the image in Photoshop with Ctrl+O. Highlight the required region using the tool Marquee Tool (Rectangular region) in the toolbar. Select the desired shape to highlight the area. Select by pressing left button mice. A dotted box will appear.
Highlight region images, if it has a complex shape, using one of three tools: Lasso Tool (Lasso), Magic Wand (Magic wand) or Pen Tool (Pen), which are also on the toolbar. Use lasso to select region along the contour. To select with a magic wand, click on region.
To make a selection, use the pen to draw a curved outline of the area Alt key drag the curve handles ( mugs). Press Ctrl+Enter to create a selection. If necessary, switch to quick mask mode by pressing Q, paint with a brush region and press Q again.
To cut the area pixels, press Ctrl + X or Del on the keyboard, or go to Edit (Editing) and select Cut (Cut). The area of the image will be cut (i.e. removed) and will be empty instead region, filled with checkered cells or a color from the color palette.
To cut region and copy it to a new layer, go to the top menu tab Layer (Layers). Select the section New (New) and click on the inscription Layer via Copy (Copy to a new layer). You can also copy to a new layer by pressing Ctrl+J.
To cut region on the document, so that instead of an area on the image an empty space is formed, go to Layer, after - New and in Layer via Cut (Cut to a new layer). The area will be copied to the new layer, but the area will not appear on the image itself. To not open the top menu tab, press Shift+Ctrl+J.