The Russian version of Pinnacle Studio invites you to learn how to compress a movie in just a few minutes. To do this, you do not need expensive professional equipment or study a large number of manuals. Burn the compressed video to disk; this function will also be useful for you when publishing videos on the Internet, storing a large collection on a smartphone or external memory card.
Modern offers you to master the basic functions of video editing completely free of charge at home, and using convenient professional software.
Step 1. Download an analogue of Pinnacle Studio.
Get a link to the address Email and download the program distribution kit to your computer. Click on the downloaded file and wait for the installation to complete. Launch the utility from a shortcut on your desktop, and in the window that opens, select “New Project”. Select the widescreen resolution, then select the movie on your computer, and add it to the project.
Step 2: Improve your video.
Sequentially click on the “Edit” and “Enhancements” tabs, then, using the sliders on the left side of the menu that opens, adjust video parameters such as brightness and saturation. Also set the desired contrast and color tone settings. We recommend that you try the comprehensive image enhancement and image stabilization features.

Step 3. How to compress a movie for burning to disk.
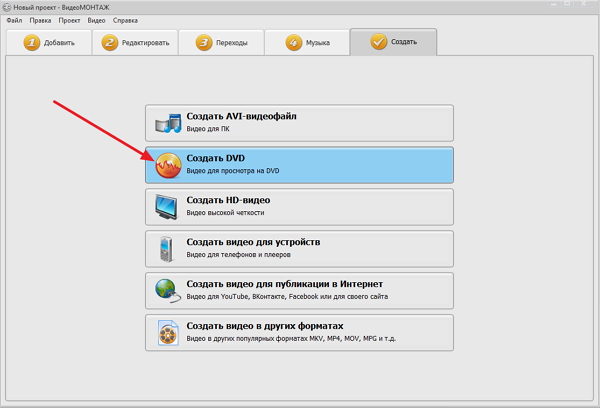
Go to the “Create” tab, select “Create a video to burn to DVD”, then the program offers to save the video in a working format, do this. In the future, this file can be converted to any other format; it is a kind of blank for creating products.
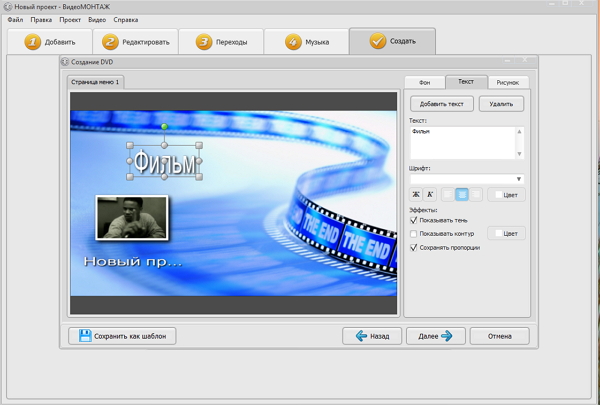
Select the menu for the movie. Click Next, enter new text, on the “Background” tab, click opposite “Picture” - “Select” and install a new image from the collection on your PC. In this tab at the bottom, select music for the menu and set its duration. Change the text content using the “Text” attachment. Click Next. Following the utility's instructions, convert the video.
Step 4. Compress video in other formats.
Go to the main menu, add the converted movie, go to “Create”. Click on one of the items, for example, HD video. Select one of the available formats (in this case: MPEG4, H.264, H.264 HQ), the utility will automatically set the required values for video quality and frame size.

Try manually changing these settings and you will see how the file size changes. You can also enter this value yourself if you need to adjust the film to a certain size. The settings will be adjusted automatically. Click "Create Video", wait for the conversion to complete, and the movie is ready to watch.
The function of how to compress a film without losing quality is one of the most important when creating big projects. It allows you to quickly change a large number of files, and apply additional effects to them. Read step by step instructions and useful articles, for example, and video editing to evolve from an arcane art to a frequently used feature.
Lately, large files have become quite common, for example, HD movies or toy images. In this regard, I noticed that many friends and acquaintances began to encounter the problem of writing similar files to a flash drive, as an error message was displayed about not enough space. In this article I will show the solution to this problem...
What causes the problem of lack of space, especially if your flash drive is 8 GB or higher? The fact is that the file system on flash drives is usually formatted in FAT32. One of its disadvantages is the limitation of the maximum size of one file to 4 gigabytes.
To remove this limitation, you need to format or convert the file system to NTFS, which has a much higher maximum file size limit - about 16 Terabytes, 1 TB equals 1024 GB. I offer your choice of 2 ways to switch from FAT32 to NTFS (both can be done by standard using Windows without using third party programs):
1 way. Formatting
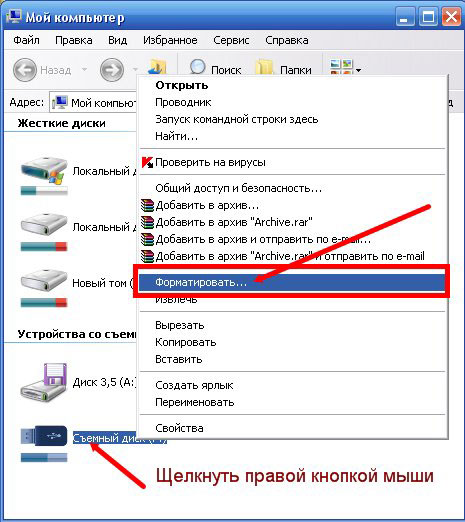
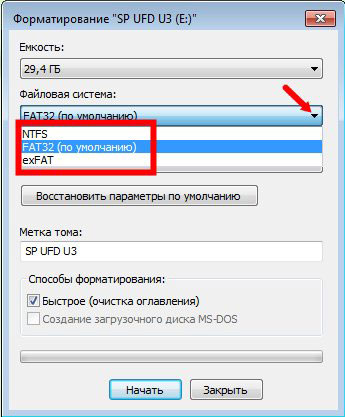
The first method is to format the flash drive. To do this, go to My Computer, right click Click on your flash drive and select Format... In the window that appears, select File system: NTFS. The only difficulty that may arise is Windows users XP, because by default, NTFS is not in the list of available file systems. However, this is fixable.
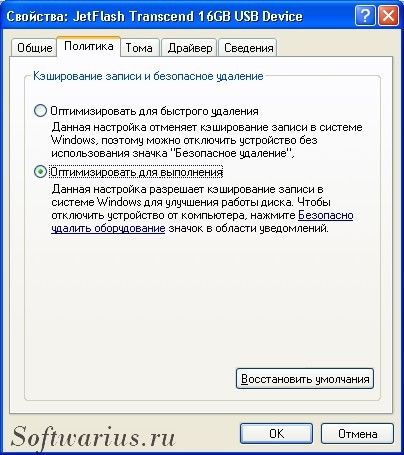
Go to Device Manager (right click on the icon My computer->Control->device Manager). Select the flash drive in the Disk devices section:
Then on the tab Policy select an item . (When you format the flash drive, switch it back to the position Optimize for quick removal)
After this, you can format the flash drive to NTFS. And, of course, don't forget to do backup copy your data!
Method 2. Conversion
You can also convert the file system using the standard system utility - convert.exe.
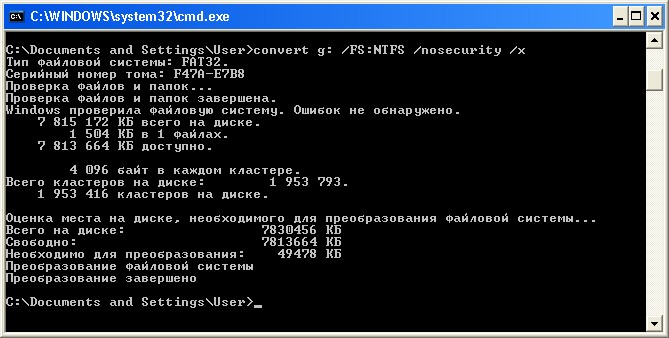
To do this we go to Start-> Execute..., enter cmd and click OK. A black window opens. In this window we enter the command:
convert [flash drive letter]: /FS:NTFS /nosecurity /x,
where instead of [flash drive letter] substitute the letter of your flash drive (for me it’s g) and press Enter
The conversion process takes place without data loss, but just in case, make a backup of all data.
If the flash drive is filled to capacity with files, then the conversion may not work, since the conversion requires a certain amount of free disk space. In this case, delete some of the files and try again.
And I also note that a flash drive with the NTFS file system should not be used as a boot disk.
Updated – 2017-01-25
How to record big file to a flash drive. Flash drives come in large and small sizes. Naturally, when buying a large flash drive, a person expects to write large files to it, such as games, movies, programs, etc. Why then large files(more than 4 GB) don’t want to sign up for it? What is the problem? Was the flash drive really defective? Nothing of the sort, your removable media is perfectly fine. After all, you can fill this very flash drive with small files to capacity. So the secret lies somewhere else. It is this very secret that we will talk about now.
You've probably heard of such a concept as file system. I won’t fool you with all these concepts that you don’t need at all. You are currently interested in the question - How to write a large file to a flash drive, and all sorts of abstruse articles are simply not appropriate now. You will need to find out about this very file system, and you will look for the answer to this question.
But for those who want to know the reason why large files are not copied to a flash drive, I will briefly explain. It's all about the file system your flash drive works with. If the flash drive is formatted in the FAT32 file system, then it cannot support recording files larger than 4 GB. This is an "ancient" system and is not designed to work with large files.
So far, all flash drives are produced in this system. And in order for it to support recording large files, it must be in the NTFS system, or write to it using special programs.
We won't bother with any third party programs, but just take it and transfer it to the NTFS file system. Moreover, we don’t need anything for this.
IN operating system Windows 7 formatting removable media into the NTFS file system is easier than a “steamed turnip”.
Before performing the operations described below, you must save all valuable files from your flash drive on your computer. After the formatting operation, all data will be erased!
Insert the flash drive. Open the menu - Start - Computer(you can simply press the Win + E keys on your keyboard at the same time). Key Win usually indicated on the keyboard by a flag in the form of the Windows logo. Find your flash drive and right-click on the icon. Select the item from the drop-down menu Format.
In the Formatting window, select File system – NTFS, and press the button Begin.
Wait until the end of the operation. Now you can write any files to your flash drive as long as its capacity allows.
WindowsXP
In the operating room Windows system XP when formatting does not file system NTFS, but this can be fixed. See my video below for how to do this.
Video clip - :
Don't forget to go through the window again later Device Manager and return the settings to default.