Today we will solve the problem of connecting a TV to a computer, whether it will be a stationary PC or a laptop - there is not much difference. There are several options, or rather, connection methods, but we will use the most modern interface– HDMI. It is with its help, using only one cable, we will transfer both image and sound to the big screen.
Moreover, the output will be carried out with the maximum resolution that the TV is capable of and that the computer can provide. Some time ago, we told. Now let's move on to the big screen.
Before connecting
Before we start answering the question of how to connect a TV to a computer via HDMI, you need to make sure that some conditions are met, namely:
– Your computer must have an HDMI output.
– The TV must have an HDMI input.. All modern television receivers have at least one such connector, but they have, as a rule, several of them are installed. Any free one will be needed.
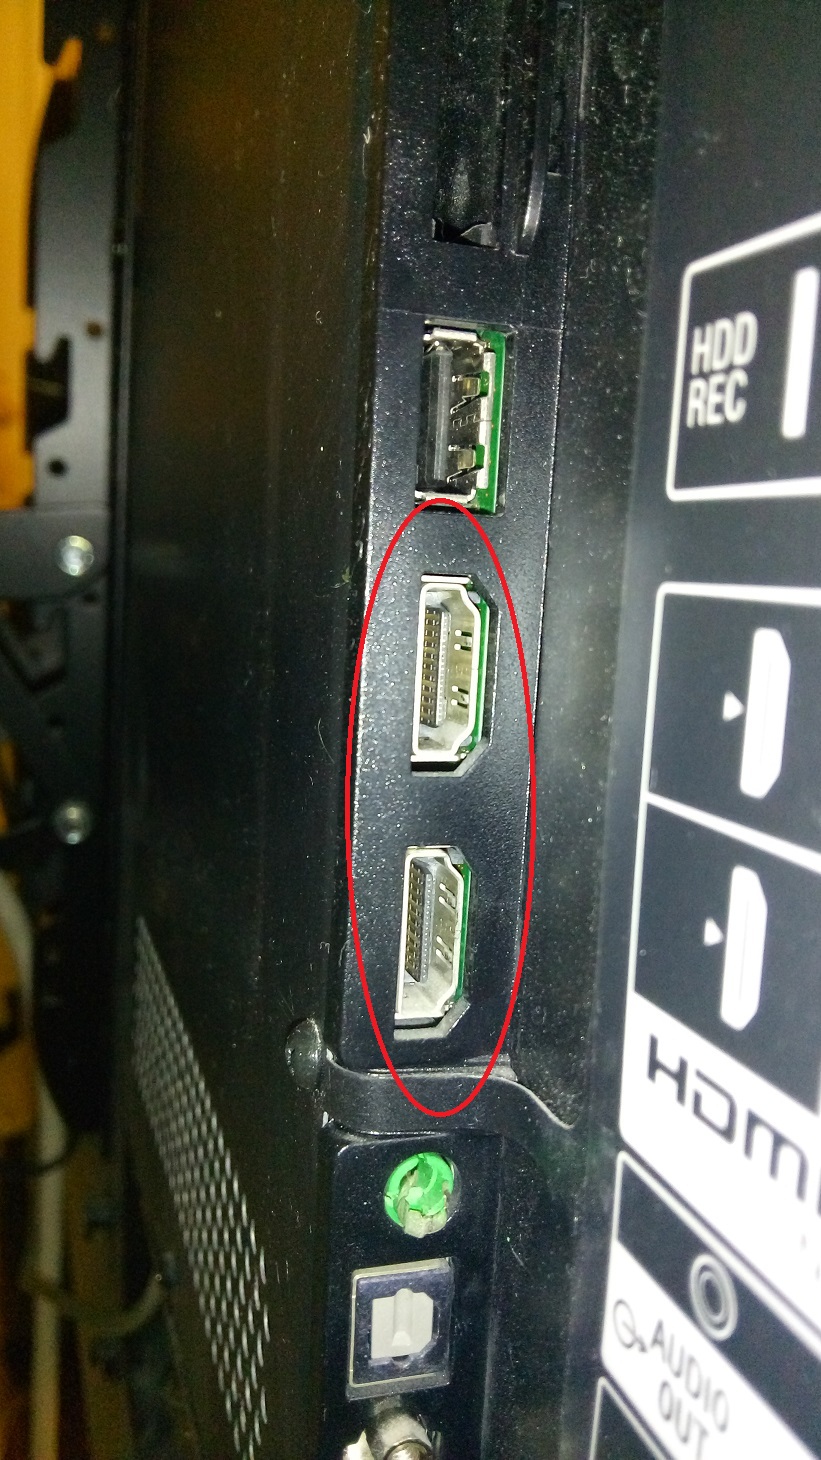
– Need to purchase an HDMI cable. Select the length, manufacturer, cable model yourself based on the physical distance of the devices from each other, your preferences, and financial capabilities. It is desirable that the cable correspond to interface version 1.3, and preferably not lower than 1.4.
- It is highly desirable that your PC has Latest video card drivers. This can help get around potential problems.
If all these points are completed, the presence of connectors is installed, the cable is present, you can proceed directly to the connection.
Let's just say that switching different devices (and the computer and the TV so far have nothing to do with each other, except electrical network, not connected) Recommended to be done with the power turned off.. Or at least turn off one of them. This is not a mandatory requirement, but its implementation can save you from possible malfunctions, such as: failure of the HDMI interface of the video card, TV, problems with motherboard etc. Repairs can be quite expensive.
We will warn you in advance about one more possible pitfall. The TV supports at least HD (1280x720) resolution, but most likely FullHD (1920x1080). What can not always be said about the resolution of a computer monitor, and even more so a laptop. In this case, in the "Screen mirroring" mode on the second device, a "picture" will be displayed that is similar in parameters to that displayed on a computer monitor. This will be mentioned below.
Connecting and setting up
So, all the preparatory steps are completed, we proceed to the connection. As already mentioned, in order to avoid possible problems, turn off the TV and, preferably, the PC. After that, you can connect the HDMI cable to the corresponding connectors on both devices.
Modern TVs, in most cases, are equipped with several HDMI inputs, which one to use is a matter of taste. Use the one that is easier to reach, just don't forget see number HDMI input.
Now you can turn on the devices. There is another subtlety that should be mentioned here. It happens that they “do not see” a TV connected to a working computer. Therefore, it is advisable to follow the following sequence of switching on: first the TV, then the computer.
The remote control of any television receiver, as a rule, is equipped with a signal source selection button. Pressing this button will display a list of available inputs. Their number, names, depend on the manufacturer of the TV receiver, but everyone has HDMI inputs (usually they are called HDMI1, HDMI2, etc.) We select the one to which the cable has just been connected.
In most cases, when you boot your computer on the second screen, you will immediately see the desktop image. Naturally, with the parameters corresponding to the capabilities of your PC monitor.
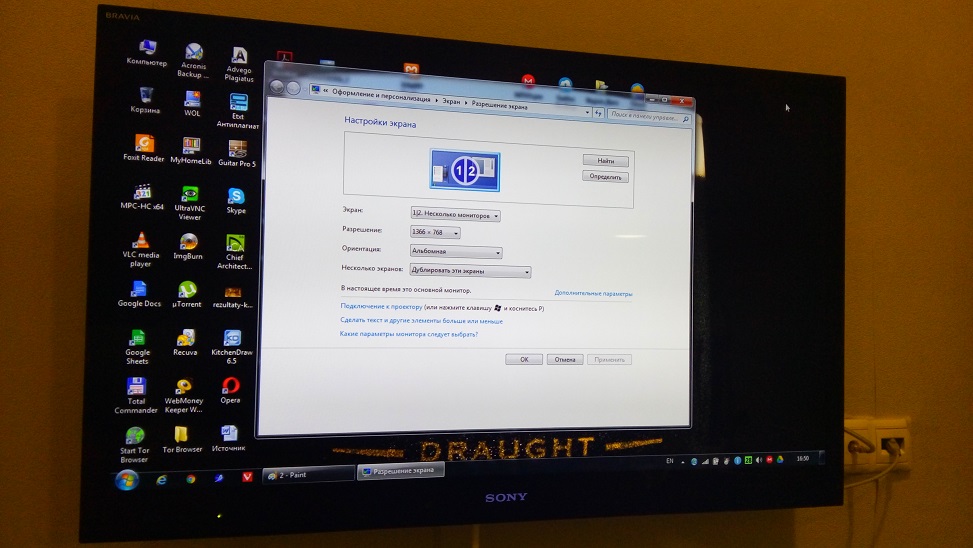
If there is such an image, then we can say that almost all the work has been done. There is little left: check the sound transmission from the computer to the TV and, possibly, change the operating mode, if necessary, so that different screens show different information. For example, a computer monitor is used for work, and a large screen broadcasts a movie.
To view and, if necessary, change the parameters of the second screen, you need to click right click mouse on the desktop, in the menu that appears, select the item " Screen resolution».
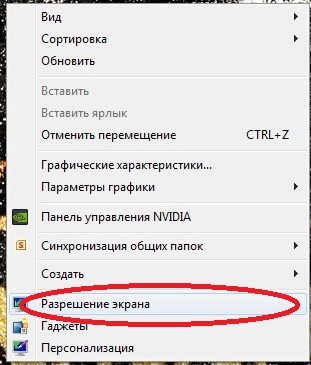
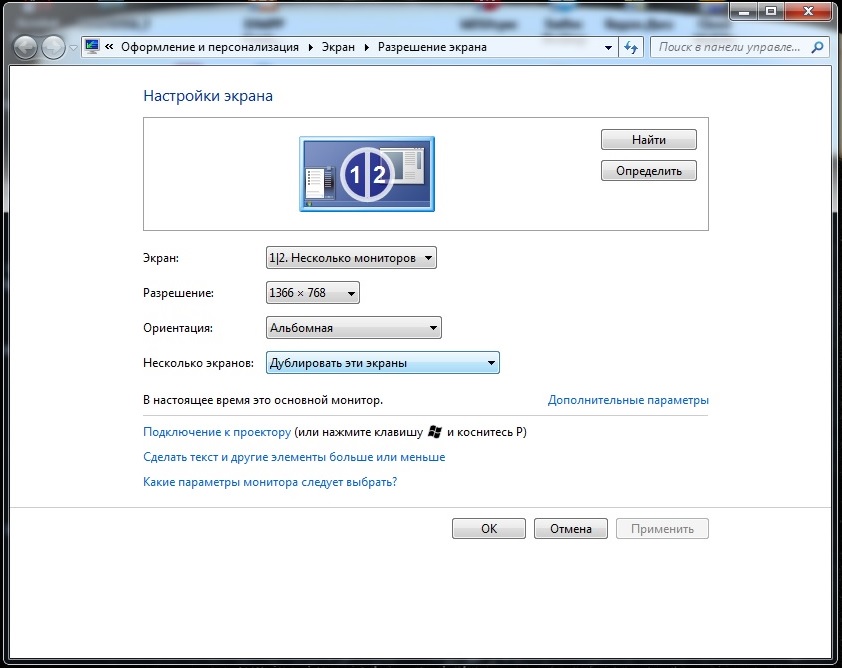
Let's start with operating modes. There may be several(further options from the menu “Screen Resolution”):
– Screen mirroring. In this case, both display devices work synchronously, showing an identical "picture", i.e. the desktop of your computer, and all your actions will be visible.
– Expanding screens. A more interesting mode that allows not only to "stretch" the desktop to 2 different display devices, but also to get different display sizes on them. For example, a laptop monitor often has a screen resolution of 1366x768, and a TV is full HD.
– Desktop display on the 1st or 2nd screen. If, with a second display device connected, you need the image to be on only one of them, then these modes are intended for this.
In addition, you can swap the numbering of devices, change the orientation (from landscape to portrait), change the resolution.
Now let's launch some movie, concert or any program on the big screen. Of course, recorded in FullHD format, otherwise, why did we fence the whole garden. We load your favorite media player, move it to the second monitor with the mouse, select the movie of interest, turn on playback, and switch to full screen mode. Not only the image should appear, but also the sound. Most likely it will. For example, it took the author just a few minutes to slowly bring the Judas Priest concert to the big screen by connecting his laptop with a rather cluttered Windows 7 to his TV.
If everything went smoothly - enjoy the result. Everything is done correctly, it works correctly, the pleasure is appropriate.
Possible problems
Among the most common problems are the "invisibility" of the connected TV, the lack of image and / or sound. Ways to help avoid them in advance were listed at the beginning of the article. We now briefly list the main solutions.
– Make sure the used HDMI cable is working.
If there is no image on the TV at all, check if the selected HDMI input matches the one to which the cable is connected.
Try changing the monitor image size, display mode.
– If no sound is transmitted, then you should check which device is used to transmit it. To do this, open the "Control Panel", select the "Hardware and Sound" section, then - "Sound".
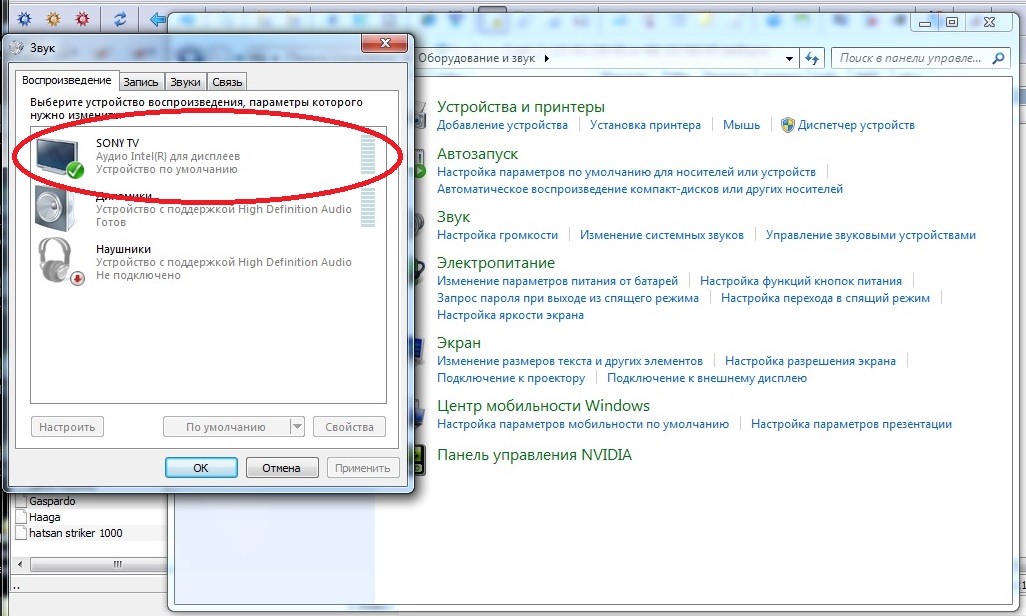
The TV should not only be in the list that appears, but also marked as "Default Device". If this is not the case, then right-click on the playback device corresponding to the connected TV, then set it as the default. If it is not in the list of devices, then in the same window, right-click on an empty space and check the box "Show connected devices". The TV should appear in the list.
If it is still not there, then you should check which versions of the sound device drivers you have installed and update them.
It happens that everything is done correctly, the cable is working, the driver - it doesn’t happen newer, but it doesn’t work as it should. Most likely, the matter is in the operating system. In the most advanced case, it may happen that you have to reinstall the system.
Usually there are no connection problems. If something doesn’t work right, then you should look for the reason, rather, in the “soft” part. Select drivers, and not just update them, but, preferably, completely remove the old ones and only then install new ones.
Owners of older versions of the OS from Microsoft, such as XP, may be faced with the situation that everything is configured as it should, but does not work. You will have to configure using the utilities that are part of the video system driver. As a rule, after short experiments, getting everything to work as it should turns out.
Good luck with your connections.
P.S. If something still doesn’t work, write in the comments, we will help!
Everything you do on a computer: watch videos, chat on Skype, play games, view photos or browse the Internet in a browser, everything can be used on a TV screen if it is connected to a computer via an HDMI cable. Now, almost every TV has such an input, and most video cards have an HDMI output. Consider the features of such a connection.
If earlier, in order to connect a CRT TV to a computer, only RCA connectors were needed, which, first of all, output standard images, now we want to see higher quality images, such as HD video, but to transmit such image quality, we need already HDMI connectors.
HDMI is a high definition multimedia interface. It can often be found on new models of computers, laptops and TVs. This interface uses a digital method of information transmission, which is why the transmitted images retain their quality. The HDMI connector is capable of transmitting digital data, both audio and video. HDMI is now very popular, because it is one of the most advanced and advanced interfaces.
Types of HDMI Connectors
To date, there are three types of HDMI connector:
- Type A- a standard connector, the most common in technology.
- Type C(micro HDMI), Type D(mini HDMI) - found on laptops, camcorders, laptops. These are smaller versions that have all the functions of the prototype.
- Type B– This jack has an extended video channel that allows images to be transmitted at resolutions greater than 1080p. But this type of connector is not as popular as the first three.
Each type of HDMI connector requires a special wire. There are 5 main options:
- Standard. Supports video resolution up to 1080p.
- High speed. Supports almost all video formats, including even 3D and Deep Color.
- Standard with Ethernet. As you can see, among other things, it can provide Internet access.
- High speed with Ethernet. Also supports internet.
- Automotive. A special type designed to connect car HDMI devices.
Connecting a computer to a TV
To do this, we need a type A HDMI cable, which can be purchased at any computer store. It remains to find HDMI connectors on the TV and computer. As a rule, they are located on their back side. On a computer, this connector is located next to the monitor connector. If the computer has a built-in video card, then the socket, in most cases, is located near the USB ports.
When the TV is placed on the wall, it may be difficult to connect the HDMI cable. You can get out of this difficulty with the help of an HDMI corner or by purchasing a cable where one of the plugs is located at an angle of 90 degrees.
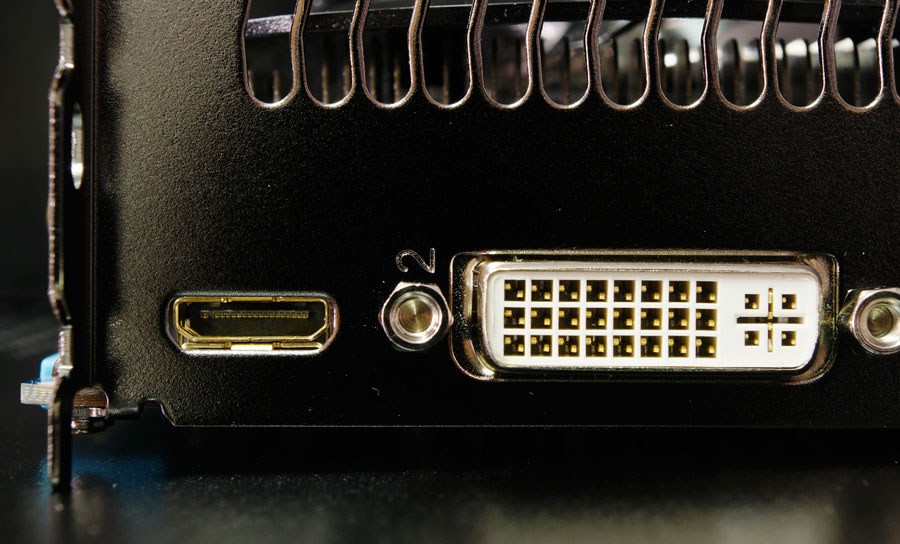
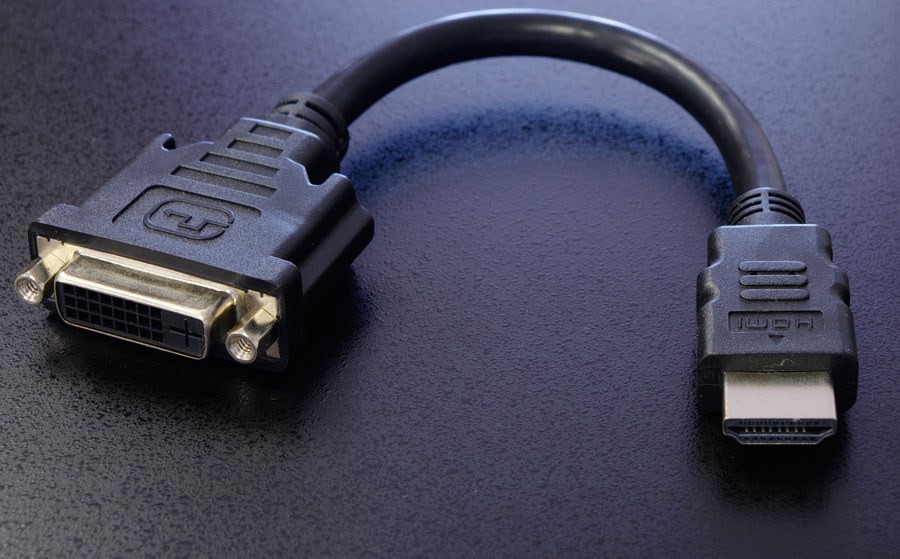
There are video cards where the additional connector is not HDMI, but DVI. In such a situation, you will need to additionally purchase a DVI-HDMI adapter. If the video card does not have HDMI and DVI ports, then you will not be able to connect the TV to the computer in this way.
When connecting HDMI, it is important to remember that if only a TV is connected to the computer via the HDMI connector, and an additional monitor is not connected, when starting the OS, your desktop will automatically appear on the TV screen. But there are exceptions in which the screen remains black. Therefore, it is best to first set the video card to a specific TV resolution. This can be done if, additionally, via the VGA or DVI output to system unit connect a computer monitor. Then it will accurately show the image, and you can set the desired resolution for the TV in the video card driver. If you have a FullHD TV (that is, HD Ready 1080p), your computer must necessarily output 1080p resolution, and if it is an HD Ready TV, then 720p resolution is enough.
Setting
The very first time you connect your computer to your TV, you will need to make sure you adjust the picture. To do this, you need to right-click on the desktop, then it all depends on your operating system, but one thing is for sure, that you need to find the graphics card settings. Call the context menu on the desktop by pressing the right mouse button.
If your computer has Windows 7 installed, then select "Screen Resolution", then find the line "Screen" and select the appropriate option. If the connected TV is not automatically detected, then in the same window, click the "Find" button and wait until the TV search is completed.
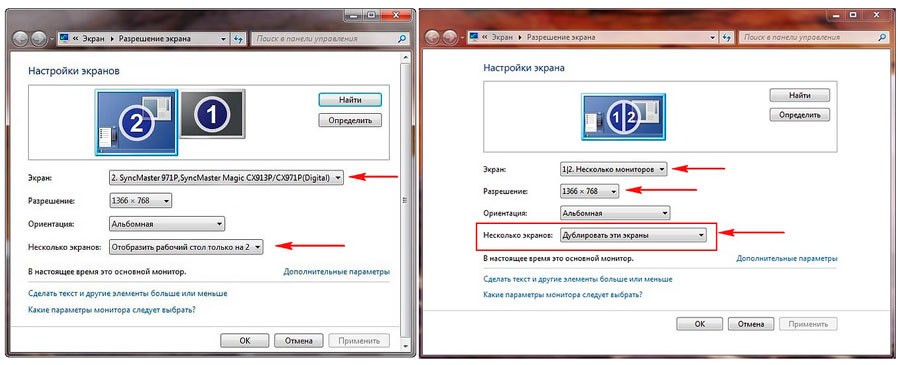
The desktop of your computer will appear on the TV screen. If necessary, in the properties of the video card, you can adjust the resolution, desktop size, color correction and make other image settings.
If you often use the TV as a second monitor, then many video cards have modes such as "Clone" or "Mirror", where both displays are configured exactly the same. You can also make both monitors work independently of each other, all this is available for the Extended Desktop mode.
By connecting HDMI-HDMI, the sound is most often transferred to the audio channel of the TV from the computer without additional cables and special problems. The main thing is to configure the computer's audio settings by using the "output sound via HDMI" option. Please note that if the TV is equipped with an HDMI version 1 port, no sound will be transmitted. Also, sound will not be transmitted when connected via VGA, DVI and some video cards do not have a sound chip for HDMI.
Many owners of laptops and computers lack the diagonal of the "native monitor". If for permanent job conditional 15-24 inches is more than enough, then for good games Or there won't be enough movies. To enjoy the gameplay or watching a movie to the fullest, you can use a TV instead of a regular screen. With the above information, establishing a connection between two devices will no longer be a problem for you.
Having an LCD TV or a plasma panel, you probably wondered how to connect a TV to a computer via HDMI. At first glance, this is easy to do, but nevertheless, people often have questions, and the connection itself is difficult. In this article, we will tell you step by step how to do everything right.
What cables are required?
It should be borne in mind that the use of expensive HDMI cables is not necessary at all, and the most common one will do for us. But note that if you are a happy owner of a TV with 3D support and plan to watch the corresponding content, then you will need a cable that supports HDMI version 1.4 or higher.
Connection step by step
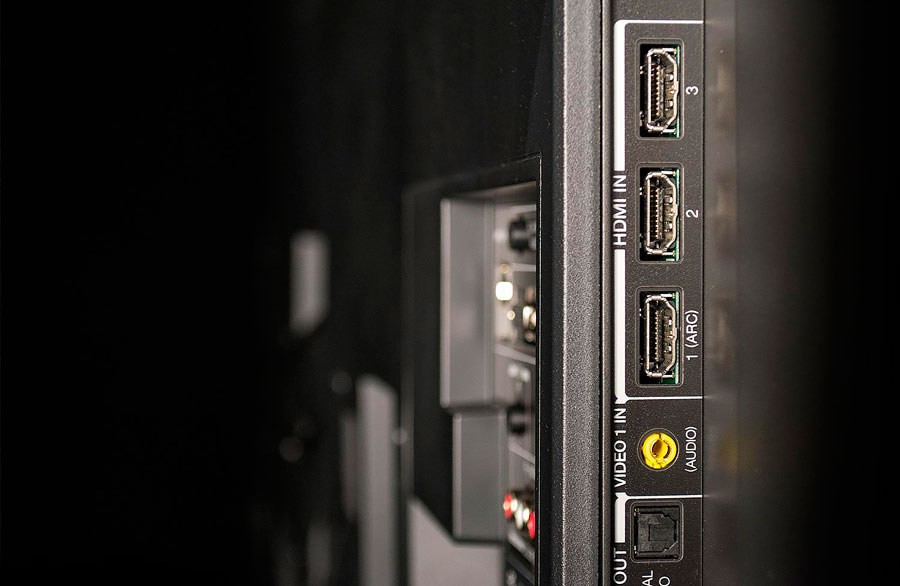
So, first we will find an HDMI connector on your TV. It is located either on the side or back wall, and looks like in the picture below:

If your TV has more than one HDMI connector, then we are interested in the one that is in the "Input" section and is marked with the number "1".
We are looking for the same connector on the back of your computer. It is usually located among the video card connectors. If your computer has a built-in video chip, then the HDMI connector we need will be located on the motherboard connector bar.
IMPORTANT: do not confuse or connect the cable to the Output connector, this may cause it to break or burn. Carry out all work only with the computer and TV turned off, with the network cables nutrition!
Sometimes it happens that a computer or TV does not have an HDMI connector. In this case, you can use a DVI to HDMI adapter to connect the TV to your computer, but with this connection you will have to supply sound separately and the description of this method is beyond the scope of this article.
So, we insert one end of the cable into the TV connector, the other into the computer connector. We check that they both sit tightly and are inserted all the way.
The first step has been taken, let's move on to the next steps.
HDMI output setting
We turn on the TV and computer.
After Windows boot, right-click on the desktop and in the list context menu Select "Screen Resolution". Windows defaults to the maximum supported resolution, but you need to check if it's set correctly.
For example, if your TV is “Full HD”, then 1920 × 1080 will be optimal for it. If the TV is "HD Ready", then it corresponds to a resolution of 1366 × 768. Thus, by connecting a TV to a computer via HDMI, we can separately and independently configure the TV and monitor settings. By selecting the "Duplicate these screens" item, you clone the monitor image on the TV and thereby make it the same. If you select "Extend these screens" by making the monitor the main one, then you extend the desktop to the TV, as shown in the picture. The choice of display method for TV depends on your preference.
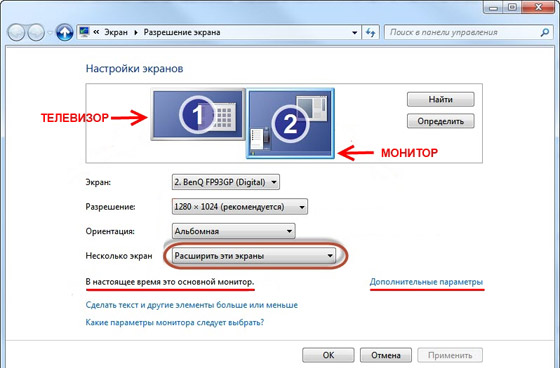
Next, click on "Advanced Options" and set the screen refresh rate. Please note that if you connect your TV to your computer via HDMI, it may appear under a different name, such as "Generic PnP Monitor". This is not a problem, because Windows treats all connected display devices as monitors. We select your TV and in the "Color quality" field we set "True Color (32 bits)", and in the "Screen refresh rate" we indicate at least 60 Hz. You can experiment with this parameter in the future if the image displayed on the TV shows artifacts or “breaks” with a dynamic picture. In this case, it would be better to specify 60Hz, but if your TV initially supports 100Hz, then it is better to set the same amount right away, without experimenting.
After the image is configured, we move on to setting up the sound.
Output sound to TV via HDMI
First of all, make sure you have the latest video card driver installed, which contains all the necessary components to output sound from your computer to your TV via HDMI. The easiest way to check this is by clicking on the speaker icon next to the clock in the taskbar. If you see another one next to the speaker volume slider, called something like "HDMI Digital Audio Device", then everything is in order.
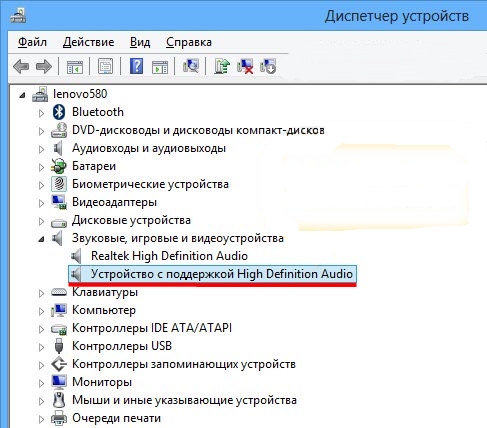
Otherwise, go to the "Device Manager" (Start -> Control Panel -> All Items -> Device Manager) and select "Sound, game and video devices". This item must contain a device with the same name as the one highlighted in the figure. If it is missing, then you will have to reinstall or update the video card driver.
In this case, a situation may arise when everything is connected and configured correctly, but there is still no sound. This is due to the fact that not all TV models from different manufacturers support sound reception at all input connectors. In this case, you can try to connect the cable to the adjacent connector HDMI TV, but subject to the safety requirements specified at the beginning of the article.
Common connection problems
Why does the TV not see the computer via HDMI?
Possible causes and remedies:
- HDMI cable failure. The cable needs to be replaced.
- Incorrect input source selected. Check the correct input in the TV menu. For example, you have connected the cable to the "HDMI-1" connector, and "HDMI-2" or "Component" is selected.
- Faulty or damaged HDMI input. You need to contact service center or to a TV technician.
Why does the computer not see the HDMI cable from the TV?
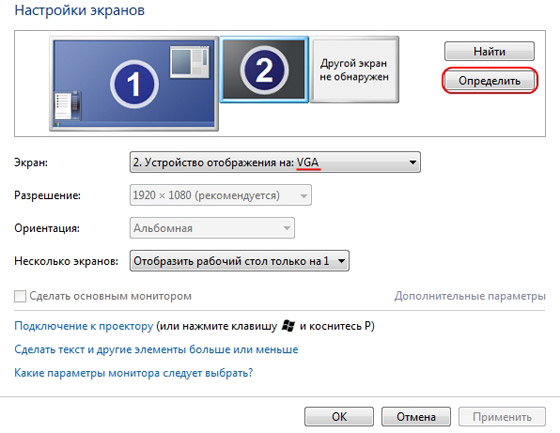
We hope this article was useful to you and helped you solve the problem of how to connect a TV to a computer via HDMI.
HDMI is a popular connector for interfacing various equipment with each other (for example, a computer and a TV). But when connecting, various kinds of difficulties may arise - technical and / or software. Some of them can be solved on your own, to eliminate others, you may need to take the equipment in for repair or replace a faulty cable.
If you have a cable with any intermediate adapters, for example, you can use it to connect to the DVI connector. Instead, it is better to try using a regular HDMI cable that works in HDMI-HDMI mode, since the TV / monitor may not accept a cable that implies the ability to connect to several ports simultaneously. If the replacement does not help, then you will have to look for and eliminate another cause.
Check the HDMI ports on your computer/laptop and TV. Pay attention to these defects:
- Broken and/or rusted, oxidized contacts. If any are found, then the port will have to be replaced completely, because. contacts are its most important component;
- Presence of dust or other debris inside. Dust and debris can distort the incoming signal, causing inconvenience when playing video and audio content ( quiet sound or its absence, distorted or retarded image);
- See how well the port is installed. If it begins to loosen at the slightest physical impact, then it will have to be fixed either independently or with the help of specialized service workers.
Perform a similar test on the HDMI cable, pay attention to the following points:
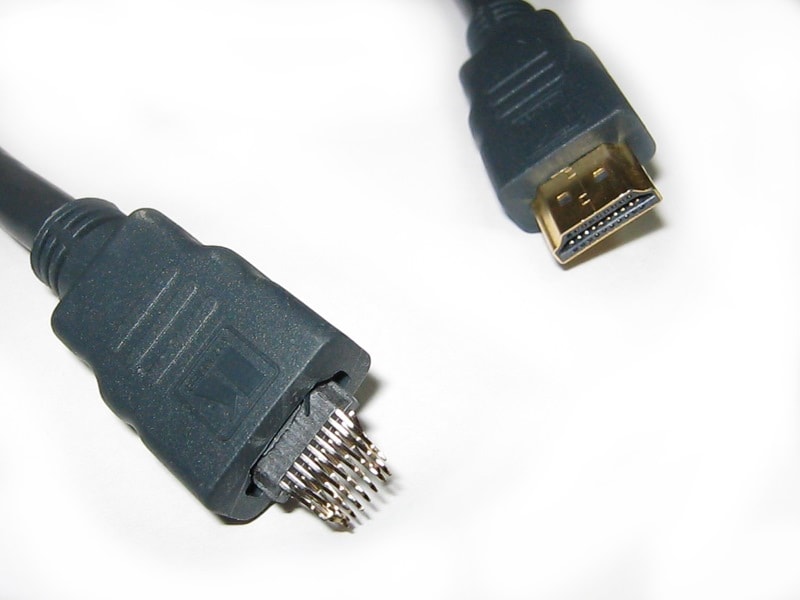
You need to understand that not all cables fit all HDMI connectors. The latter are divided into several main types, each of which has its own wire.
Method 1: correct TV settings
Some TV models are unable to independently determine the signal source, especially if any other device was previously connected to the TV via HDMI. In this case, you will have to re-drive all the settings. The instruction for this case may vary slightly from TV model, but its standard version looks something like this:
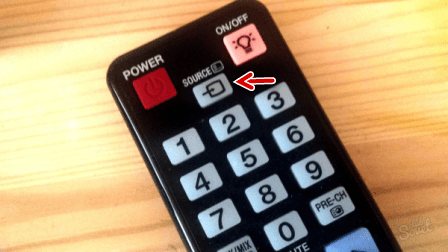
For some TVs, the instructions may look slightly different. In the 2nd paragraph, instead of the proposed options, enter the TV menu (button with the corresponding inscription or logo) and select the HDMI connection option. If the TV has several connectors of this type, then do the rest in accordance with paragraphs 3 and 4.
If this method did not help, use the instructions for the TV (it should say how to connect via HDMI cable to this particular device) or pay attention to other ways to solve the problem.
Method 2: Computer setup
Incorrect setup of the computer / laptop with multiple screens is also the reason why the HDMI connection is ineffective. If no external displays are connected to the computer, except for the TV, then this method can not be considered, since problems arise if another monitor or other device is connected to the PC or laptop using HDMI (sometimes other connectors, for example, VGA or DVI) .
Step-by-step instructions for setting up multiple screens for devices on Windows 7/8/8.1/10 look like this:
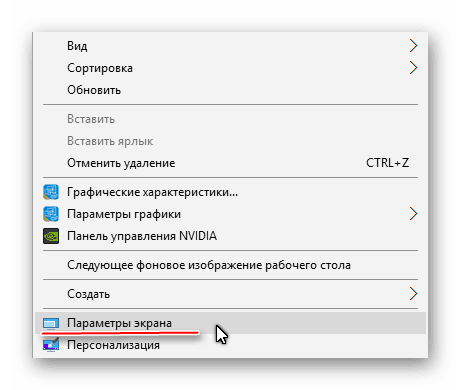
It is worth remembering that HDMI is capable of providing a single-stream connection, that is, it works correctly with only one screen, so it is recommended to disconnect an unnecessary device (in this example, a monitor) or select a display mode "Display Desktop 1:2". To get started, you can see how the image will be broadcast to 2 devices at the same time. If you are satisfied with the quality of the broadcast, then it is not necessary to change anything.
Method 3: update video card drivers
It is recommended that you check the specifications of your video card initially, as some graphics adapters may not be able to support two displays at once. You can find out this aspect by viewing the documentation for the video card / computer / laptop or using third-party software.
First, update the drivers for your adapter. You can do it like this:
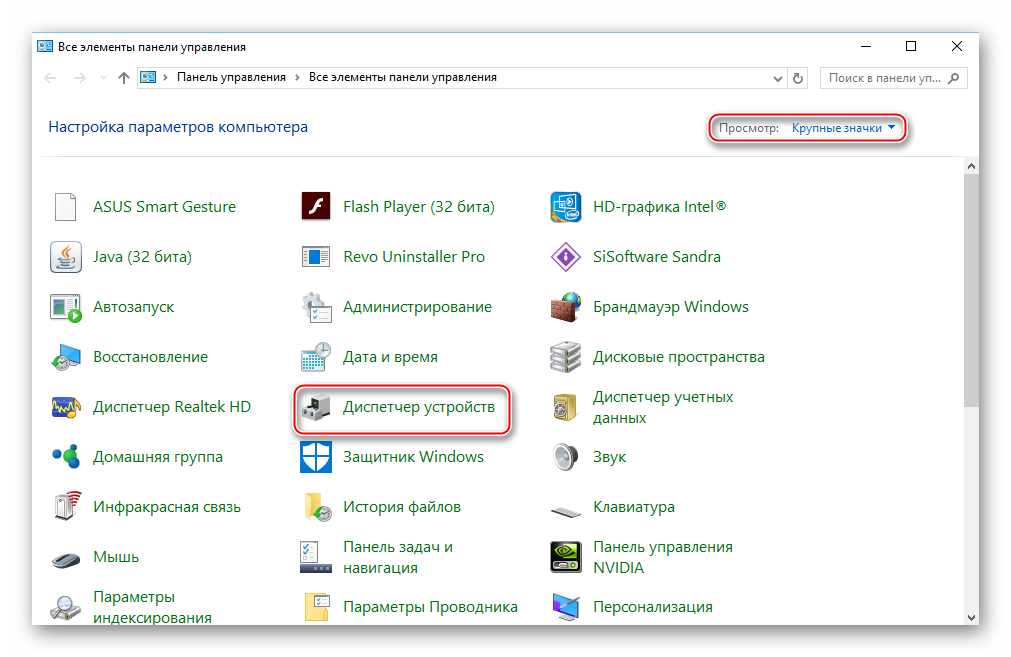
Also, drivers can be downloaded and installed from the Internet, always from the official website of the manufacturer. It is enough to specify the adapter model in the appropriate section, download required file Software and install it following the instructions.
Method 4: we clean the computer from viruses
Least of all, problems with outputting a signal from a computer to a TV via HDMI occur due to viruses, but if none of the above helped you and all cables and ports are working, then the possibility of virus penetration should not be ruled out.
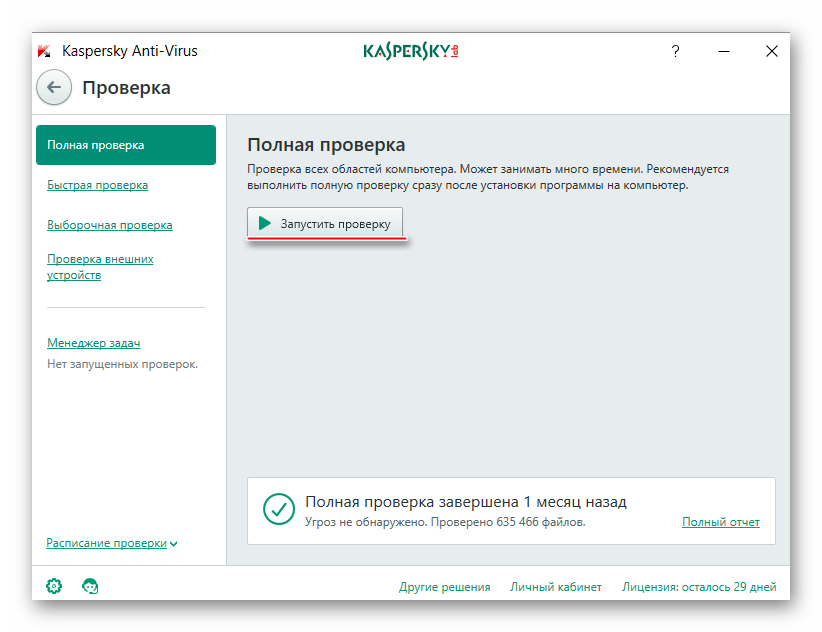
To protect yourself, it is recommended to download, install any free or paid anti-virus package and regularly check your PC for dangerous programs with it. Consider how to run a PC scan for viruses using an antivirus (it is paid, but there is a demo period for 30 days):
Problems with connecting a computer with HDMI to a TV occur infrequently, and if they do appear, they can always be solved. Provided that your ports and / or cables are broken, they will have to be replaced, otherwise you will not be able to output anything.
