Step 1. Manual control of the distribution of processor time
There is a finite amount of resources available to the computer's processor. Windows manages these resources automatically and can distribute tasks across multiple processors, as well as manage multiple processes running on a single processor. You can customize the management of these resources by prioritizing foreground applications and background services.
By Windows default sets the priority for foreground applications. Additional processor resources allow you to speed up the work of these programs. However, if you want any programs running in the background (for example, printing and backup disk) respond faster, you can configure Windows to evenly distribute CPU time between foreground and background programs.
Note. If you are using a Windows XP computer as a server, it is recommended that you allocate more CPU time to background programs.
To manually change the speed of background and running programs, follow these steps:
- Click Start, click Run, type sysdm.cpl in the Open box, and then press ENTER to open the System Properties dialog box.
Click the Advanced tab and do one of the following under Processor time allocation.
Select Programs to allocate additional processor resources to foreground applications. This setting recommended for most users.
Select services running in the background so that all running services (including applications and print jobs) receive an equal amount of processor resources.
Click the OK button to save the selected settings and close the dialog box.
Step 2: Manually manage computer memory
If there isn't enough physical RAM, Windows adds more memory by using the hard disk's paging file (also known as "virtual memory") to mimic physical RAM. By default, the virtual memory paging file created during installation is 1.5 times the size of the computer's RAM. So a computer with 1 GB of physical RAM will have 1.5 GB of virtual memory.
The paging file size can be increased or decreased manually. You can optimize the use of virtual memory by allocating space for paging files on multiple drives at once, and avoid placing them on slow or hard to access drives. To optimize the use of virtual memory in the best possible way, paging files should be placed on as many pages as possible. hard drives. When choosing discs, keep the following guidelines in mind.
- If possible, avoid placing the swap file on a drive that contains system files(usually this is drive C).
- You should not place the page file on a fault-tolerant disk such as a mirrored volume or a RAID-5 volume. Swap files do not need to be protected from disk failures, and some fault-tolerant systems experience a slowdown in data write speed as they are written to multiple locations at once.
- Do not place multiple swap files on different partitions of the same physical disk.
Manually resizing the virtual memory paging file
To complete this procedure, you must be logged in with account Administrator or a member of the Administrators group. If your computer is connected to a network, network policy settings might prevent you from completing this procedure.
To manually increase the page file size, follow these steps:
- Click the Advanced tab, and in the Performance section, click the Options button.
- Click the Advanced tab and click the Change button under Virtual Memory.
- Under Drive [volume label], select the drive that contains the paging file you want to resize.
- In the Paging file size for the selected disk section, select the Custom size radio button, enter the new size of the paging file in megabytes (MB) in the Initial size (MB) or Maximum size (MB) field, and click the Set button.
- Click OK to close the dialog box and save your changes. Note.
After changing the size of the paging files, you may be prompted to restart Windows.
If you were prompted to reboot, then the changes made will take effect only after you restart Windows.
Notes.
- To let Windows choose the appropriate paging file size for you, select the Size by system option switch. The recommended minimum size is 1.5 times the computer's RAM, and the maximum size should be set to 3 times the minimum size. For example, if the amount of RAM is 256 MB, the minimum page file size should be 384 MB and the maximum 1152 MB.
- For best performance, do not set the initial page file size to less than the recommended size listed in Total page file size across all drives. The recommended size value is 1.5 times the computer's RAM. It is most productive to use the recommended swap file size, as performance can be degraded if the swap file is too large. However, you can increase the size if you often use resource-intensive programs that require a lot of memory (for example, graphic programs or games).
It is strongly recommended that you do not disable or delete the paging file, as this will reduce the performance of your computer. However, if you do decide to remove the paging file, set its initial and maximum sizes to zero, or select the No paging file check box.
Manual optimization of memory usage
You can optimize memory usage according to your needs. If your computer is used primarily as a workstation and not as a server, you can configure it to allocate more memory to programs. In this case, programs will run faster, and the system cache size will be set to the default value for the Windows XP operating system. If your computer is primarily a server or you use programs that require a large cache, you can allocate more memory for the system cache.
- Click Start, click Run, type sysdm.cpl in the Open box, and then press ENTER.
- Click the Advanced tab, and in the Performance section, click the Options button.
- Click the Advanced tab and do one of the following under Memory Usage.
- Select Programs if your computer is primarily used as a workstation and not as a server. In this case, more memory is allocated to programs.
- Select the system cache option if your computer primarily acts as a server or if you use programs that require a large system cache.
- Click OK to save your settings and close the dialog box.
Step 3: Manually change visual effects
Windows provides several options for installing visual effects on your computer. For example, menus can cast a shadow, and you can also set Windows to show the entire contents of a window as it moves across the screen.
Note. While many visual effects make using your computer more enjoyable by offering a more attractive interface, they can also slow down your computer.
Windows has options to enable or disable all visual effects, as well as automate them. You can also restore the default settings or set your own by selecting the desired visual effects.
To change the visual effects settings, do the following:
- Click Start, click Run, type sysdm.cpl in the Open box, and then press ENTER.
- Click the Advanced tab, and in the Performance section, click the Options button.
- Click the Visual Effects tab and use one of the following methods:
- Select Windows will choose settings on its own to allow Windows to select visual effects.
- Select the Ensure radio button best view to let Windows automatically set the options to give you the best look.
- Select the Ensure the best performance radio button to have Windows automatically set the settings that give your computer the best performance.
- Select the Special Effects radio button and check the boxes to enable the options you want.
- Clear the checkboxes to disable unnecessary visual effects.
- Click OK to save your changes and close the dialog box.
Note. Regardless of which visual effects settings you choose, you can always customize them by manually selecting or unchecking the checkboxes in the list. If you change any item, Special Effects will automatically be selected.
Glossary
background program A background program is a program that runs in the background while the user is working on another task. The computer's microprocessor allocates fewer resources to programs running in the background than to foreground applications.
environment variable An environment variable is a string containing data about operating environment settings, such as a drive, path, or filename, associated with a symbolic name that can be used by the operating system. Windows system. You can use the System item in Control Panel or the set command to set environment variables. command line.
Foreground application A foreground application is a program that runs in the active window (a window that sits on top of all other windows and has a color-coded title bar). The foreground application responds to user commands.
Mirror volume A mirrored volume is a fault-tolerant volume whose data is duplicated on two different physical disks. A mirrored volume provides data integrity by using two identical volumes, called mirrors, to duplicate the information stored on it. Mirrors are always located on different physical disks. If one of the physical disks fails, the data on that disk becomes inaccessible, but the system continues to use the mirror located on the other disk. Mirrored volumes can only be created on dynamic disks.
swap file Commonly known as "virtual memory". The swap file is a partition on the hard disk that is used to increase the available RAM. When Windows runs out of physical random access memory (RAM), the page file is used as "virtual" memory. By default, Windows transfers data for background services and idle programs to the swap file to free up RAM for programs currently in use.
Chapter A partition is a part of a physical disk that functions as if it were a separate physical disk. After creating a partition, you need to format it and assign a drive letter, after which it will be possible to store data on it. Partitions on basic disks are called basic volumes. Basic volumes include a primary partition and logical drives. Partitions on dynamic disks are called dynamic volumes. Dynamic volumes include the following volumes: simple, striped, spanned, mirrored, and RAID-5.
RAID-5 volume A RAID-5 volume is a fault-tolerant volume with data and parity striped across three or more physical disks. Parity is a calculated value used to recover data after a failure. In the event of a failure of part of the physical Windows disk recreates the data that was stored on the failed part of the disk using the remaining data and parity. RAID-5 volumes can only be created on dynamic disks. You cannot mirror or expand RAID-5 volumes.
 Such a procedure as configuring computer settings, very often required not only to customize the computer to suit your needs, but also in order to increase its performance. The computer sometimes starts to slow down due to "non-optimal" system settings, and it happens that changing the latter speeds up its work. In this article, we will look at some basic settings that can help squeeze the maximum possible performance out of the computer.
Disable unused services
The first thing to do when setting up a computer is to disable all services that are not needed and are not used. An example is the service responsible for updating the Windows version. If you do not update the operating system, why do you always have this service enabled? After all, it seriously loads the computer.
To turn off the corresponding services, go to the "Computer Management" section through the control panel (or by pressing the "Win + X" button combination), where select the "Services" item. Open the services you want to disable and do so. Set the startup type of the disabled service by selecting "Manual" - now the service will only start working after you start it yourself.
Adjusting performance settings
The above versions of Windows are clearly not deprived of all sorts of visual, sound and graphic effects. And if you can still somehow “live” with sounds, then graphics and visual effects can seriously slow down the system, especially if the computer belongs to the “weak-middle” class. In this case, you will need to disable unnecessary effects, which will require adjusting performance settings, which in turn will significantly increase the performance of your computer.
You can change these settings as follows:
1) in the control panel, open the "System and Security" tab;
2) open the "System" item;
3) in the left column, find the item "Advanced system settings" and select it;
4) go to "Performance Options".
Here you can make settings for all the visual and graphical effects of the operating system. It is recommended to check the check box for “Ensure the best performance”. Save your settings by clicking on the affirmative "OK" button.
Setting OS startup
If your computer takes too long to load, then the reason for this is the numerous programs that, when you turn on the computer, also begin to automatically load. Therefore, to speed up the download computer device, you need to turn off the autoload function for certain programs. Wherein OS startup setup produced in two ways.
Method one
Edit automatic download by means of your operating system, namely:
- Press the combination of buttons "Win + X", after which a small window will appear on the left; Type "msconfig" into it and press "Enter".
- Go to the "Startup" tab and there disable the machine for those programs whose "activities" you do not need when you start your computer. Start with uTorrent - it is very, very slow to boot your computer.
Method two
Edit autoload by means third party programs. There are many great utilities, such as Glary Utilites, which will easily and simply not only turn off unnecessary machines, but also optimize the operating system. Proceed like this:
- Run the utility, and then open "Startup" in the system management section.
- You will see an automatic launch manager, where you can very quickly and easily disable the corresponding applications.
Moreover, the program will kindly provide you with statistical information about what percentage of users disable this or that application. It is very convenient and will help you navigate.
Cleaning the hard drive
Over time, all sorts of “garbage” accumulates on the system, or hard, disk - temporary files and applications that need to be deleted from time to time using any appropriate utility, such as Wise Disk Cleaner. periodic disk cleanup and defragmentation will make your computer run much faster.
In order to clear HDD , you need to install the utility and run it by clicking on "Search". The program will begin to analyze your system, and then offer to mark with “birds” those items that need to be deleted. All that remains for you is to agree and click on the "Clear" button. The program will immediately tell you how much space will be freed up after that. You are guaranteed to be surprised!
HDD defragmentation
In order to defragment the disk, the same program is used. For defragmentation, it provides a special tab. You just need to go into it and start the process. It should be noted that the utility defragments the hard drive extremely quickly - it will take about 10 or 15 minutes for a 50 gig disk. As for cleaning, it all depends on the "litteriness": if you have not done "cleaning" the disk for a long time or have never done it, get ready for the fact that the process promises to be lengthy. But this will not prevent you from working on the computer.
This is the very minimum of those settings that you need to make to speed up your computer. But they will also have a significant effect.
Updated - 2017-01-25
Speed setting. The computer slows down - awfully! Each file or program is loaded for half an hour. Not enough patience. I reboot the computer and it starts all over again. What to do?
Don't think it's only for beginners. Nothing like this. First, when you first installed new system everything works fine, but as you install new programs or games, the situation changes radically. This indicates that the resources of the computer are not distributed correctly. What can be done? You need to adjust the performance settings.
I want to warn you right away that these settings are suitable for everyone. operating systems Windows.
Many programs, when the system starts up, immediately turn on and work in a "shadow" mode. The icons for these programs are located at the very bottom of the screen, in the taskbar. And the more of them, the lower the performance of your system.

Is there any way to adjust the speed of the system?
It is possible and even necessary, otherwise you will not be able to work further.
The main internal system performance management tool is the dialog box Performance Options .
You can get into it in this way: - Start - Control Panel - System - tab Additionally (top) - button on the panel Performance – Parameters .

A window will open Performance Options .
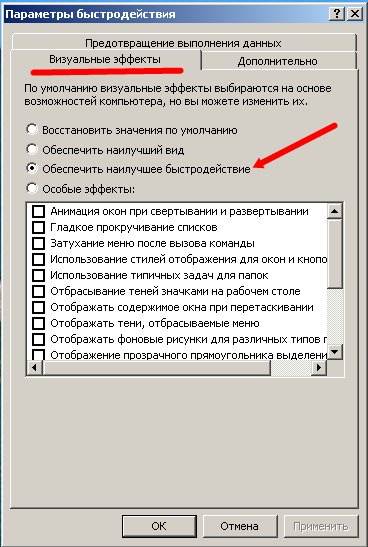
On the tab Visual effects select item Ensure the best performance and press the button OK.
The computer will think hard, the screen will turn black and white, and after a couple of minutes it will change its parameters. Restart your computer and try running some file or program. Everything should work.
In the same settings window, if you have an icon My computer displayed on the Desktop, you can go in another way. Click right click mouse by icon My computer and select from the drop down menu Properties .