What mode to take pictures
If you are not sure when and in what shooting mode to take pictures, then I will give
some advice for you.
Av (Aperture Priority Mode). I recommend using this shooting mode for both portrait and landscape photographers. This mode allows you to fully control the display of the background on the photo. If you want to blur the background, choose the lowest aperture value (f/4 or f/2.8). If you want all the details in the image to be as clear as possible, including the background, then you should set the highest aperture value (f / 11 or f / 16). When you select any value, the camera will automatically select a shutter speed that will provide a normal exposure for the picture.
Also, if you would like to do a group or one-time training with me, check out mine. Hope to see you here soon! The file type, sometimes also known as the file format, determines how your image data is written and saved. And your choice of file type has implications beyond image quality.
And smaller files consume less space on your camera's memory card and in your computer's storage tank. Too much compression also leads to defects. Luckily, your camera lets you specify how many compressions you're willing to accept. This is a significant amount of compression and brings with it a lot more risk of artifacts. It is only when you enlarge the photo significantly that the differences become apparent. Well, only you can decide what level of quality your photos require. You never know when a random shot will be so large that you want to print or display it large enough that even a slight loss of quality becomes a problem.
Tv (Shutter Priority Mode). I recommend this mode when shooting sports or when you want to capture movement. This mode allows you to select very low shutter speeds (assuming you are photographing in good light), based on which the camera will automatically select the appropriate aperture value, which will ensure the correct exposure of the picture.
The most important thing to implement is
And of all the imperfections you can fix in a photo editor, artifact is one of the hardest to remove.
Physical differences and consequences
It's just a bunch of numbers that need to be decoded to create an image file that can then be printed, posted online, and so on. has a large file size. There is no compression so no data is lost, and an 18 megapixel camera will generate at least 18 megabytes or more of raw file. Being larger files, you can't put that many cards on your memory card, and you'll soon find that external hard drives come out of your ears at home. You may also find that you can't take that many photos in quick succession until the camera's internal buffer fills up, and you have to wait for huge raw files to be copied to the memory card before you can shoot again. Mostly read-only - you can't save changes to the raw file. That's why they can be requested as proof that a photo is real, such as a "digital negative" for a rigorous competition or even in court. However, when it comes to editing your images, the extra color definition that uses raw files gives you a huge advantage. Print-ready image files are posted on the Internet, etc. have a smaller file size - from half to a fifth of the raw file. You can usually set how much to compress the file: very high compression produces surprisingly small files, but noticeably low quality and low compression still drops information, but usually it's not that noticeable and the image stays very high. This "invisible information" is gone and you can't get it back by changing your photo later. Being smaller files, you can fit many more photos on the memory card, they don't clog up your computer hard drives as quickly, and you'll likely take many more photos in quick succession until the camera's internal buffer fills up and starts to choke. Lose a little more information each time they are edited and re-saved. Have a lower color "bit-depth", highlighting only 7 million colors, as opposed to 7 billion raw file. As explained above, this doesn't really matter until you start trying to process your images, then you'll find less information there to work with. Keep in mind that today's high-end cameras equipped with fast memory cards can still snap off a surprising amount of raw photos before stopping. If you have the time, opportunity, desire and software so that you can send photos to your computer yourself to get the best results from your photo. The extra quality you can get in your final image may well be worth the time. If you're shooting in situations where there's a lot of dynamic range, then you'll find it handy to display highlights and capture shadows in post-production later. If it's critical that you don't ruin the shot - raw files were much more forgiving in terms of accidentally underexposing the photo.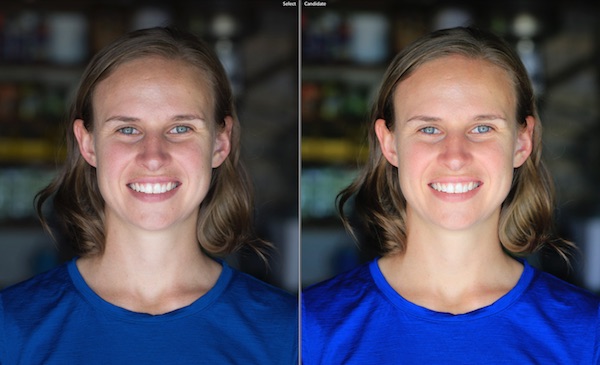
Straight from the camera and placed side by side
One of the amazing abilities of the raw file.- It depends on you.
- If you have enough space on your memory card.
M (Manual). When shooting in a studio using strobe lights, you need to use this particular shooting mode. Neither Shutter Priority nor Aperture Priority will let you choose the correct exposure because the camera cannot account for the use of strobe lights when shooting.
R (Program). This shooting mode is ideal when you need to quickly aim the camera at a target and take a picture. This mode is ideal when you want to capture the moment without having to go into settings.
Although the number of pixels is the same
As we can see below, the "restored" raw image has a little extra noise in it than the one that was done correctly, but this noise can also be reduced in post-production to some extent. However, the raw file is almost useful.
Enhance High Dynamic Range Photos
Here is a classic example of high dynamic range, a bird in flight.But let's see what happens when we start tweaking both files to try and pull out the details in the shaded underside of the wings. If, like me, you're hooked on getting the best results from your camera, then switch to Raw and you'll never look back. In the first part of this series, we explain the main differences between the formats.
Choosing an ISO value
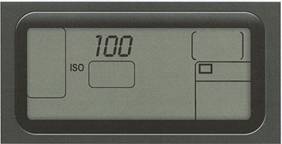
When shooting, you should strive to use the minimum ISO value (preferably 100), because in this case there will be less digital noise in the image, and the details will be displayed as clearly as possible. Increasing the value of this parameter is justified only when shooting without a tripod in low light conditions. Thus, at ISO 100, you can shoot in daylight or bright artificial light. At ISO 200, you can shoot handheld photos in less bright conditions and get normal-clear pictures, but the amount of digital noise in the image will increase. At ISO 400, you can shoot without a tripod in even less favorable lighting conditions, but the amount of noise in the image will increase even more. At ISO 800, you can take handheld shots in very dim lighting (such as in a church), but the digital noise in the image will be seen even more clearly. In general, it all comes down to this: increasing the ISO value allows you to shoot handheld in less favorable lighting conditions, but at the same time, the amount of digital noise in the image increases significantly. That is why professionals take pictures with tripods. On a tripod, the camera is fixed as rigidly as possible, so the photographer can safely shoot at ISO 100 without worrying that the pictures will be fuzzy even in low light conditions.
One of the questions most asked by enthusiasts or people with a new camera is the file format to use. Both formats have their benefits, depending on your type of photography and workflow. Unless you have overridden the default settings in the menu, these presets are determined by the processor and firmware programmed into the camera.
For example, the processor recognizes flat spaces of color and chooses the average of the pixels that make up the color. Some of these pixels are then removed and replaced later on the computer. But it's a bit dull and lacks bite. Raw files are also slightly compressed by the camera before being written to the media card, although this is lossless compression so no data is lost.
What format to shoot (RAW, JPEG or TIFF)

In most modern digital cameras (and in all SLRs without exception) at least three file formats are available for shooting: RAW, JPEG and TIFF. These formats are used in the following cases.
JPEG. If you have learned how to perfectly expose the exposure with each shot, then the JPEG format is just made for you. You can safely take pictures in this format if you are sure that after choosing the exposure you will not have to further edit the resulting frames in Photoshop. Using this format file sizes are greatly reduced, and many more photos fit on the camera's memory card, and subsequently take up much less space on your computer's hard drive.
Software supplied by another camera manufacturer will not be able to read them. This effectively doubles the file size and increases the tonal levels and fine details of the image. It certainly makes sense when you consider that not only are cameras getting smarter, but they are now highly customizable, allowing you to get the results you want with less hassle.
Smaller file sizes bring many benefits
This is not the case easy use one format or another at all times, but rather knowing what makes the most sense in a given situation. It may be as little as two or three times as much, or perhaps even six or seven - and this has many disadvantages.
RAW. If you often make mistakes in setting the exposure and choosing the white balance, and in most cases you have to improve the resulting pictures using Photoshop or Photoshop Lightroom, then it is better to shoot in RAW format. Files of this format are very easy to correct - change the exposure of the frame, white balance or perform color correction of the image. The RAW format provides you with the highest quality original images and maximum flexibility in editing them.
Shooting in RAW - the choice of professionals
Your cards filling up faster will be the most immediate downside and it will usually also take longer for those images to be flushed to the memory card. The need for big or big hard drives means it will cost you more to store all that information in the long run.
Shoot sports or any other photography? In fact, some cameras claim to allow this memory card to be used. Just make sure your memory card is fast enough to handle a lot of images as this can be a bottleneck.
TIFF. This is a format for rich people. It is simply excellent for those who live in a big way, take pictures on 16 GB memory cards and who have a myriad of such cards. It is also a format for those who have a lot of space on their computer's hard drives, since files in this format are very bulky. And I don't know any more reasons to recommend using the TIFF format when shooting.
Disciplines you to do it right
Disciplining yourself in this way means you're more likely to tweak the appropriate processing settings to your liking, and put in more effort to fix it if you review your images and find something isn't quite right.
If you're used to shooting raw files, you may not know how much this is possible in a camera. From checking focus with the zoom controls and using the highlight alerts to guide you through to fine-tune the sharpness settings to suit your particular subject, you may find that your camera is more capable than you think.
What image size to choose when shooting

I recommend choosing the maximum image size and quality when shooting. For example, if you are photographing in JPEG format, then it is advisable to select the JPEG Fine or Large quality level in the camera. If you select Norm for the JPEG format, you will initially reduce the quality of the resulting image. Files saved in JPEG Fine format will only be slightly larger. The difference in file size is not very noticeable (when comparing the same files, only saved in TIFF or RAW formats), but the difference in quality justifies such a compromise. If you really care about the quality of the resulting images, then I would recommend choosing the Fine or Large file size for the JPEG format. In this case, you will follow the example of most professional photographers.
In-camera processing is often good enough
While you can get great results with time and care in post-production, it's possible that your camera will perform just as well as it did in an instant. Today's cameras are sophisticated enough to instantly deal with defective pixels, reduce noise only in certain areas of the scene, and lift up dark areas to better balance exposures, so it makes sense to take advantage of these time-saving measures.
The typical camera also offers a variety of preset colors, and most models allow you to either customize the settings for these presets or create new ones if none suits your taste. One of the lesser advantages of digital capture over film is that the camera can automatically handle a number of minor lens corrections such as vignetting, distortion, and chromatic aberration.
The abbreviation BZIRF will save you from trouble.
Let's say you're heading out for a landscape shoot early in the morning. What are your camera settings at the moment? They are the same as on your last shoot. Therefore, if the last time you photographed was at night, then most likely the ISO setting is very high, and the white balance is adjusted according to night lighting conditions. I've gotten burned on this so often that I've come up with a simple rule for myself that allows me to avoid a lot of problems. The rule I developed sounds like a short abbreviation for BZIRF. It is decoded as follows. This is a test:
If you've started shooting on film where it wasn't possible, you may already be appreciating how useful and time saving it is to make it happen without you even thinking about it, especially if you're used to using wide-angle or wide-angle, aperture lenses. where things like distortion and vignetting can be problematic.
What image size to choose when shooting
Not only will you not process every image you take, but it's unlikely you'll be able to view them all at those sizes, where small differences in sharpness and noise reduction make a big difference. If you need to quickly send it to someone or upload it to a website social network, or alternatively print it, copy it, or just view it on a computer or other display, you can do that.
B - white balance;
3 - highlight warnings (which should be enabled);
AND - ISO (make sure you are using the correct ISO setting for the conditions you are currently photographing in);
P - shooting mode (check which shooting mode is selected: aperture priority, manual, program, etc.);
f - file size (make sure you select right size files and their quality).
If every day before you start shooting you apply the BZIRF rule, you will never regret the pictures spoiled by your own inattention.
How to lock focus
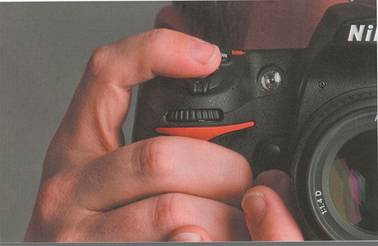
This is another nuance that not everyone can handle. How to fix focus? For example, you are lying on the ground and trying to photograph a landscape through tall grass. You want the grass in the foreground to be crisp. But as soon as you raise the camera, the autofocus function shifts the focus to the landscape in the background. To lock the focus on thin grass leaves, you just need to hold down the shutter button halfway. As long as you hold it in this position, the focus of the camera will be fixed and you can recompose the picture as you like without automatically focusing on another subject. I often use this technique, for example, when I want to focus on a person who is not in the center of the composition. Instead of moving the focus point around the viewfinder, I aim the lens at the subject I want to focus on, and while holding the shutter button halfway, I aim the camera at another subject to recompose the frame as I need. The sharpness will be, as before, aimed at the person I have chosen. All I have to do is press the shutter button all the way down and take a picture.
Many novice photographers shoot in RAW format and don't know what they're doing it for. When asked: "Why?" - they answer: “What are you, it's cool! All the professionals of our time shoot in RAW format!”. If you have the same opinion, then this article is just for you.
Imagine, you recently bought a camera, saw how to change formats and immediately got on the Internet, or went to your friends to find out in which format it is better to shoot ...
If you don't know what format is better to take pictures in, choose JPEG.
Why? - I'll explain now.
JPEG(aka JPG) is the most famous and popular image format. It is readable everywhere, even on your mobile phone. Any digital camera takes pictures in JPEG format, JPEG gives excellent quality with minimal processing time.
RAW(English) raw: raw) - a file that contains raw data directly from the camera's matrix. Designed for further adjustment and processing.
This is how it actually happens:
RAW - intended for further adjustment and processing, a paradise for designers. You can fiddle with it for a long time and tediously, for example, adjust exposure, contrast, brightness, change white balance, and most importantly - all the changes you make do not significantly affect the loss of photo quality. In fact, you can change all the values that you can set on the camera before shooting.
The main disadvantages of RAW:
1) since the “raw” format weighs several times more than the JPEG format, you will need a lot of space to store files in this format.
2) you still need to convert RAW to JPEG format in order to show it to friends or print it.
3) time is money, and working with the RAW format will take you a lot of time, both for processing images and for converting them.
4) different camera manufacturers have their own settings and standards for RAW files (this is noticeable by the extension RAW files, for example: for nikon it is .NEF, for canon it is .CRW, for sony it is .ARW), of course because of this there is a large number of software for editing RAW files, the problem is that in different RAW editors, the same RAW file will look different.
5) The speed of photographing in RAW is much slower due to the processing of larger files, as a result, you can miss the moment, for the photographer this is unforgivable!
Everywhere loved and read. A JPEG file is created from a RAW file, using your settings on the camera, such as white balance and color settings, which you can already change significantly during processing.
The JPEG format uses different levels of compression. On the camera you can see JPEG Fine, JPEG Normal, and JPEG Basic. The higher the JPEG quality, the better more file takes up space. What compression to choose? You decide what is more expensive - a place on a memory card or quality. Take a closer look at JPEG Normal, since the difference in quality between Normal and Fine is almost not noticeable, and the space occupied in JPEG Fine is twice as large. I advise you to experiment before choosing.
RAW+JPEG
Most likely, if you understood the settings of the camera formats, you saw the RAW + JPEG option. In this case, the camera will create two files: JPEG and RAW.
As a result, we get both, but the downside is that this will require even more space and your time. Moreover, if you do not free up disk space, then you will have mountains of unnecessary copies that will be a pity to delete ...
findings
If you have not decided in which format to photograph, definitely choose the JPEG format.
If you are designing, choose RAW format.
If you take many identical photos of the same object and then choose the best one from them, take pictures in JPEG. If you take only one photo instead of a dozen, shoot in RAW.
Decide what you like if you want to become a photojournalist - you need to get used to doing everything clearly and quickly, learn how to properly set up your Camera. If you want to spend more time in front of the monitor than with the camera, shoot in RAW and learn photoshop.
Article and photos reprinted from Kostya Kakushi's blog: