It’s not uncommon that after purchasing a TV with SmartTV, users are interested in how to connect the TV to a computer via WiFi. If you also have a similar problem, then this article should help you.
Step No. 1. Open the TV settings.
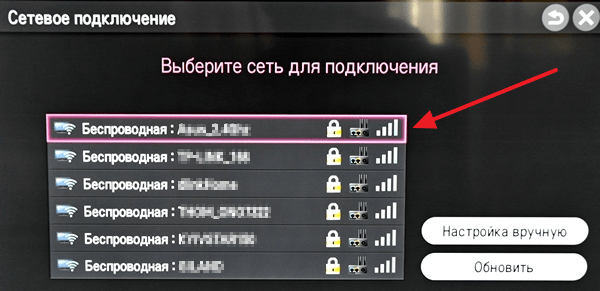
Typically, connecting your TV to the Internet via WiFi is done through the settings. Therefore, click on the “Settings” button on your remote control and go to the “Network Connection” settings section. It should be noted that in different TV models, this settings section may be called differently. For example, “Connect via Wi-Fi” or simply “Wi-Fi”.
Step No. 2. Connect to the WiFi network.
The next step is to connect to your home WiFi network. This process is not much different from connecting to a WiFi network on a computer or smartphone. In my case, connecting the TV to WiFi begins by clicking on the “Set up connection” button.

After this, a list of available Wi-Fi networks appears on the screen. Here you just need to select the Wi-Fi network of your router. In most cases it will be first on the list.
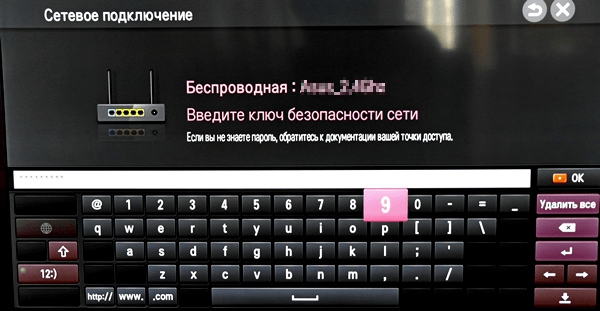
The next stage is the most important. You need to enter the password for the WiFi network. Try to enter your password as carefully as possible. Because it is very easy to make a mistake when entering a password using the remote control.
If you entered the correct password, the TV will connect to WiFi and you will see a message indicating that the network is connected.
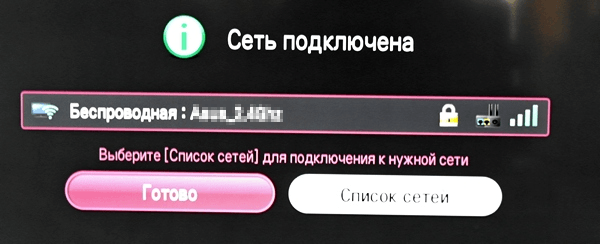
To check that your WiFi connection is working as it should, go to your SmartTV and open your browser. Check if the pages are loading. If you wish, you can measure the speed of your Internet connection.
Step No. 3. Set up a DLNA server on your computer.
In order to watch video from your computer on your TV, you need to use a DLNA server. DLNA is a technology designed to transfer media content from one device to another using a local network. Now this technology is supported by almost all modern TVs.
First, you need to select and launch a DLNA server on your computer. To do this, you can use the free program “Home Media Server” (). Install this program on your computer, launch it and go to settings. Here, in the “Media Resources” section, you need to click on the “Add” button and select the folder that you want to access on the TV.

Next you need to set up parental controls. To do this, select the folder that you just added to the program and click on the “Change” button. In the window that appears, in the “Parental Control” block, you need to select green for the desired content type.
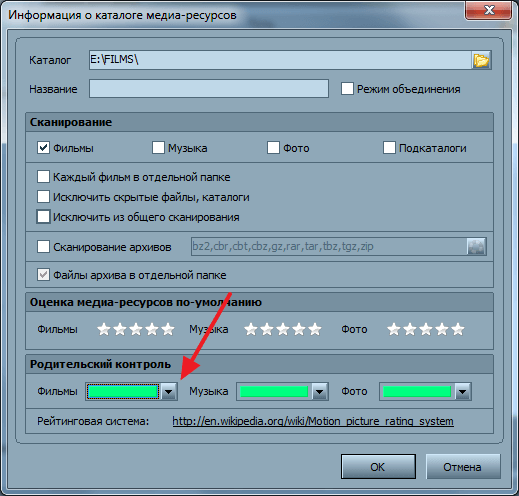
After that, close all windows by clicking on the “OK” button to save the settings.
Step No. 4. Connect the TV to the DLNA server.
The final step of connecting the TV to the computer via WiFi is connecting the TV to the DLNA server. To find out how to do this for your TV model, read the instructions.
As an example, we will demonstrate how this is done on LG TVs. First you need to press the “SmartTV” button on the remote control and go to the “SmartShare” section.
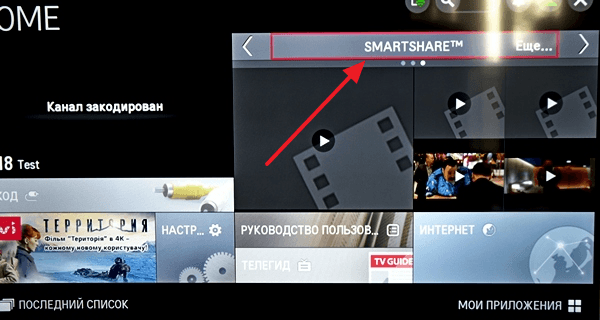
After this, you need to go to the “Connected device” tab and select the DLNA server that is running on the computer.

After this, files from the folder you need on your computer will appear in the “Recent”, “Video”, “Photos” and “Music” folders. At this point, connecting the TV to the computer via Wi-Fi can be considered complete.
05/30/2019 at 06:27 pm (1 month ago)
Hello, please tell me if it’s not difficult
I bought a 50uk6410 a couple of days ago, the network from the router (D-Link DIR-300) to the PC goes via cable, to the TV via Wi-Fi (the TV is located behind a load-bearing wall from the computer and the router). The computer also has a TL-WN751ND network adapter installed (via PCI). At first I tried to use Display Share, a 4k movie with a volume of about 60 GB was played back normally, with the exception of some kind of inadequate sound lag, it felt like a second, which was then half eliminated by digging into the sound settings and turning on the “Bypass” function, but still a slight lag remained and caused discomfort. Then I decided to set up DLNA, and here everything is completely sad, there seems to be no sound lag, but it’s impossible to watch, it constantly loads.
Everything started up great through the external HDD.
Help me understand what hardware is used when using these functions: the computer's network adapter or the router? And will changing them (they are ancient) help in solving the problem? Anyone here play 4k movies via Display Share over Wi-Fi without audio lag? And what is the real speed of this so-called “LAN network” needed for playback without freezing, is it equal to dividing the volume of the film by its timing, that is, for a 60 GB film lasting 2 hours 60*1024*8/(2*60*60 )=68 Mbit/s
The problem with sound delay via Display Share was observed even when broadcasting a stream from Twitch in FullHD, although doing the same from a phone 2 meters from the TV there was no delay.
Thank you
05/30/2019 at 07:46 pm (1 month ago)
Hello. It is better to watch heavy films from USB drives. I cannot guarantee that such films will be played through any specific equipment without loading and sound delay. This is all very individual. Up to how well your TV catches the Wi-Fi network, what is the signal level. The connection speed greatly depends on this.
As for your equipment. Is the computer still connected via cable, or via Wi-Fi via TL-WN751ND? Or is everything still buggy? The D-Link DIR-300 router, of course, is very weak for such tasks. We need a more productive, gigabit one (with WAN/LAN port speeds up to 1 Gbit/s. D-Link DIR-300 has up to 100 Mbit/s) with support for the 5 GHz band. Well, if you connect your PC via Wi-Fi, then it needs a Wi-Fi adapter that supports the 5 GHz band. TL-WN751ND is very weak, its maximum speed is up to 150 Mbps. If via cable, then the computer must have a gigabit network card (perhaps one is installed there, if the computer is not very ancient).
The LG 50UK6410 TV supports Wi-Fi in the 5 GHz band and the 802.11ac standard. If you connect your TV and PC to the router in the 5 GHz band (according to the 802.11ac standard), the speed will be much higher. Well, or a PC via cable via a gigabit card.
But whether there will be stable Wi-Fi network coverage in the 5 GHz range near the TV is a question. Since coverage in this range is usually a little weaker compared to 2.4 GHz. This already needs to be looked at on the spot. A lot depends on the distance and the wall (thickness, material).
AllShare technology provides wireless synchronization of PCs, laptops and Samsung mobile phones with TV, providing streaming content: videos and photos, viewing tabs and information about calls, text messages on the TV screen.
Sync your phone and SMART TV
Devices are synchronized using the built-in Wi-Fi module in the phone and the built-in or optional Wi-Fi module in smart TVs. In this way, two devices can exchange information with each other. To synchronize devices you need to run the application AllShare bilaterally. The phone name will appear on the TV screen in the list of external media. By pressing the "Enter" button you can enable the function MediaPlay with the following set of options: “Video”, “Photo”, “Music” and “Recorded TV programs”. All that remains is to select the required file.
You can also use your phone to play media files on a TV screen located on your PC's hard drive. To do this, select “Play file from server on another player” from your phone’s AllShare menu, which will allow you to access media content shared from your PC.
How to watch photos and videos from your computer on TV
- installation of a special program that will provide access via Wi-Fi to your multimedia files:
- Serviio
- Samsung PC Share Manager
- Samsung Allshare
- Windows Media Center on Windows 7 and 8
Options for connecting a TV and PC on a home network
The easiest way to connect all devices to your home network is to use a router and then connect all wireless network clients (including your TV) to the created access point, provided that all your devices have a built-in WLAN module. Read more about setting up a router.
You can also use a wired connection from your smart TV to your home network:
1. Computer - TV(or other media device).
To connect, you must use a crossover type network cable.
2. Computer - Switch (switch) - TV(or other media device).
3. Computer - Router - TV(or other media device).
To connect devices, you must use network cables that are directly crimped.
How to set up Windows Media Player to play content from your phone on your TV screen
In Windows Media Player you need to go to Flow and enable the following options — Allow remote control of the player And Automatically allow devices to play my media, then go to More streaming options and allow transmission on the network by clicking on the link on the required device Tune and highlight Make all library items available to this device. To transfer multimedia content, you need to synchronize your PC and Phone using Wi-Fi, as a result, when you press on the phone Play a file from the server on another player, the name of the PC will appear, clicking on which will open content from the Windows Media Player library. Now media content can be played and downloaded to your phone.
Samsung Allshare Play allows you to:
- save or transfer your multimedia content to a computer or other devices;
- play multimedia content on a computer or other devices;
- view or play multimedia content stored on your computer from another device;
- View or search content stored on connected devices.
Attention! Don't forget to configure your antivirus and firewall to allow access to multimedia. If you use Samsung Allshare or other programs as a media server, then create a rule for it or add it to exceptions.
Connecting Samsung TV to PC (directly)
- Turn on your TV and PC
- Connect them with a network cable (crossover crimp)
- Write down the IP addresses for your computer and TV. In the properties of the local connection to PC enter IP address: 192.168.1.1 , and on TV: 192.168.1.2 . Subnet mask: 255.255.255.0 for both devices. An alternative connection method would be to use a switch and network cables crimped in a direct (ordinary) way.
- Run the program Samsung PC Share Manager and follow these steps in sequence:
- find the folder in which the content necessary for playback is located;
- click on the button at the top (with a green checkmark), thus opening access to this folder to the TV;
- then go to the menu: “Sharing” - “Set device policy”. Set the device status to "accepted". Then click “Set State” (green arrow), thereby saving the changes;
- Now all you have to do is press the “Media player” button on the remote control and select a video file from your PC.
Setting up Allshare on a Samsung Galaxy smartphone for synchronization with SMART TV
Connect your smartphone and TV to a shared Wi-Fi network and start syncing to establish a connection between them for later streaming content.
- On your smartphone, go to Settings -> Advanced Settings.
- Then select “Available devices” and activate “Data exchange”.
Now turn on the AllShare application, it is usually already pre-installed. The first time you activate this feature, you must register to create an account. If you already have a Samsung account, then simply log in by entering your username (email) and password in the fields.
Setting up Allshare Play on your TV
Turn on the smart TV and activate the Smart Hub service, which allows you to manage multimedia applications. Find and activate the AllShare Play application. To log in, press the red button (A on the remote control). In the window that appears, enter your login credentials. Setting up the exchange of multimedia content between two devices depends on which device you select as the base one.
Base device in Allshare Play – Samsung SmartTV
Having chosen a smart TV as a base, we will play media content that is stored in your smartphone using the smart TV interface. Thanks to DLNA technology, we can play and manage files on a smartphone using the remote control of a smart TV.
You need to select one of the categories: photo, video or music, and then select your smartphone from the list of available devices.
The base device in Allshare Play is a Samsung smartphone
This option is used to view multimedia files on a large TV screen. Log in to your Allshare Play account on two devices—your smartphone and your smart TV—and make sure both devices are connected to the same Wi-Fi network.
To transfer media content to a SMART TV, you must play the required file on your smartphone. A special symbol will appear in the upper right corner - a monitor icon, which signals that the selected file can be transferred to an external device - in this case Smart TV. Click on the icon and the file will start broadcasting automatically.
While playing content, your smartphone can be used as a remote control. If you have a SmartTV not from Samsung, but you are the owner of a Galaxy smartphone, then it is possible to transfer media content to a smart TV from another manufacturer. It is enough to purchase a special wireless adapter - AllShare Cast Dongle, which connects to your TV and allows you to play all media content on the big screen of Smart TV.
Analogue of Samsung Allshare: using the Home Media Server program
Finding a server on the device used to play content
The search must be performed in accordance with the user manual of the media device (for example, the instructions for your Smart TV). If the server is not found and all connections are made correctly, then in the program settings (in the section Server) check that the list of allowed client devices is empty or the IP address of the device is in the list of allowed ones. When using a network protection program (firewall, antivirus), check its rules for the module hms.exe(if the server runs as a Windows service, then for the module hmssvc.exe), if possible, put the firewall program into learning mode, restart the Home Media Server (UPnP) program. And if you use other media servers, disable them while setting up the Home Media Server program.
The server does not open on the device for playback
If the server is found, but there is no way to open it in the media device, then go to the settings of the “Home Media Server (UPnP)” program in the section Device: mode “DLNA 1.0”, “DLNA 1.5”, “Authorization Service”, “Russian names of main folders” (using these settings will help solve problems with opening the server), and in the section Server set a permanent server port (from 1024 to 65535).
Navigating through the media resource database on a media device
If the device supports Russian language, then in the program settings (section Device) turn on the mode “Russian names of main folders”, this affects the names of the main folders of the media content database. If the Russian language is not supported by the media device, then select the “Translit” mode for encoding Russian names; the “Russian names of the main folders” mode is turned on/off at the user’s request (if disabled, then the names of the main folders of media resources will be in English).
Slow navigation through the media content database may be due to the operating characteristics of the media device, the inclusion of the “Exclude empty folders when transferring information to UPnP devices” mode, the presence of slow removable media in the system, frequent changes in media resource directories and the enabled “Automatic directory scanning” mode when they change while the server is running." The “Exclude empty folders when transferring information to UPnP devices” mode can be turned off, the “Removable media” folder can be deleted in all sections of media resources (Movies, Music, Photos).
Navigation through directories of media resources in the structure of their storage on disk can be done through the folder “Watch Folders” (Russian language is turned off), “Catalogues of media resources” (Russian language is turned on). If some media content is not visible on the device, but is shared in the program, then this may be due to the mime type transmitted by the server for this media resource. The Mime type can be changed in the program settings - Settings button - "Media resources" section - "File types" - selecting a file extension - Change button.
Do you want to show your photos or video footage to your friends and family, but don’t want to huddle in front of a small mobile phone screen? Connect your smart device and enjoy high-quality images on the large display. How to do this - read the article. We looked at 10 popular ways to connect a mobile phone to a television screen.
Some methods are suitable for Android gadgets, some for iPhones. Read on to choose the appropriate option. The article describes both connection methods that involve the use of USB cables and wireless options.
MicroHDMI
MHL cable

This cord is another option that allows you to synchronize your smartphone with your TV screen. MHL is a combination of the function performed by HDMI (for example,), which is responsible for carrying high-quality audio and video signals, and micro USB, which recharges the smartphone battery.
- Classic - involves the use of an adapter cord that has three wires: HDMI-in - for connecting to a TV screen, USB-in in micro format - for connecting to a power source and USB-out of the micro type - for a mobile phone. The downside to this synchronization method is the extra wire.
- Connecting directly – HDMI-out on TV + MHL-out on mobile phone. This connection method is convenient, however, it is not compatible with every TV.
- Exclusive - created by Samsung, which is available to users as a separate adapter or as an addition to some products. Exclusive - there are additional contacts with 11 pins, while the standard has only five. It is important to consider that the number of pins in the devices must be the same, otherwise an additional adapter will be needed to connect the devices.
MHL 3.0 (for 4K)

Important: the adapter must be selected accordingly, for example, MiniDisplay-Port to HDMI.
Essentially, this is an interface standard designed for outputting a signal to monitors, known to the user as Display-Port. The prefix “mini” indicates that this is a smaller copy of it, allowing you to use the corresponding connector for mobile gadgets.
Slimport

Slimport was offered to users of smart devices by Analogix, based on the development of DisplayPort.
This standard works on an almost identical principle to the well-known MHL: support for 7.1 multichannel sound, UltraHD and 4K playback. To connect to external image sources, DisplayPort or HDMI and a USB microslot on the user’s gadget are used.
Important:Direct connection of a mobile phone to a TV is not possible in all cases, so the user is recommended to stock up on an additional adapter.
Individual features of “slimport”:
- No external power supply.
- USB host capability: connecting additional devices to the adapter.
- free of any patent fees, unlike HDMI.
Chromecast

Chromecast is a development from Google that allows you to display images from a mobile gadget, for example, on a TV screen.
What to do:
- connect your phone to the HDMI connector located on the TV;
- provide power supply via network or USB port;
- install the appropriate extension on your phone;
- indicate the code (will appear on the screen after installing the extension);
- allow network access.
The advantages of using the Chromecast service are to increase the speed of interaction with the hosting of smart TVs.
DLNA

DLANA is a technology for exchanging media data (between devices that support this technology), provided that the interacting devices are connected by a network connection.
Attention!Owners of smartphones released by DLNA are known as "SMART SHARE". Samsung calls this technology AllShare, and they called this shell VAIO Media Server.
How to synchronize DLNA service with a smartphone (using example):
You need to make sure that all devices have an Internet signal
⇓
Launch “Gallery”
⇓
Select any of the available files
⇓
Click "more"
⇓
Select a player that matches the brand or specific model of the TV.
After user actions, the selected photo will appear on the television display automatically. This applies to any files stored in the smartphone's gallery.
Note: if the task could not be completed, then the user will need to download a shell compatible with the device brand. As a rule, the name of the shell is identical to the additional software.
Miracast

Based on the development of Wi-Fi Direct, Miracast is an excellent option for connecting smart devices to television wirelessly.
Peculiarities:
- Wireless connection: if the TV does not have a Wi-Fi receiver built into it, you can use a separate adapter by connecting it via the HDMI port.
- The video resolution threshold is 1920x1200: if the quality of the broadcast image is higher, the system will “adjust” it to its own standard.
- Dolby AC3 sound quality – for 5.1 multi-channel playback.
There are some drawbacks here: not every gadget supports Miracast connections, and besides, this standard is not compatible with 4K quality, while “smart” mobile phones can take such images.
If you don’t yet have an access point (router) at home, but you have already acquired a modern TV with the Smart TV function and want to connect your smartphone or tablet to it, then you can use Wi-Fi Direct technology, which allows you to connect devices directly.
In this article I will try to write in detail about how to establish connections between two devices using “Direct” technology. I will show the example of an NTS smartphone on Android OS and an LG TV (32LN575U).
If we talk about why they should be connected, there are several options. For example, to control a TV from your phone, using proprietary technology from LG, called TV Remote. I have already written about this technology and how to set everything up. Or to transfer media content from a smartphone to a TV using DLNA technology (I’ll write about this later).
We will need:
- Smartphone or tablet with Wi-Fi Direct support. You can look in the settings, where you can manage Wi-Fi networks, etc.
- TV with Wi-Fi Direct support. You can find out about this in the specifications, call the manufacturer’s support, or look in the settings.
Enable Direct on your phone
Go to settings and in the section “Wireless connections and networks” click on the “ More" (this is how it is on my HTC One V, these settings may be called differently for you). Click on WiFi direct, thereby turning it on. We confirm the inclusion by clicking on Ok.
 A message will appear indicating that the feature is enabled.
 That's it, let's move on to TV.
Launch Wi-Fi Direct on TV (LG)
Go to settings (there is a special button on the remote for this) and go to the tab Net. Then select “Wi-Fi Direct”.


