Greetings dear friends and colleagues! I continue the series dedicated to YouTube video hosting. In this article, I will tell you and show you how to properly design your YouTube channel in order to stand out from the crowd of competitors. If you have not read my previous article on how to create a YouTube channel then =>>
In the last tutorial and in the article, I talked about how to create a YouTube channel, but I did not tell you how to properly create it. Why is it so important to know? Yes, because dear reader, there are thousands, maybe millions of channels on YouTube, and every day they are created and grow exponentially.
Perhaps your competitors are not sleeping and they have already created dozens of channels. But, here's what will set you apart from the crowd of competitors. As you already understood, this is your individuality, expressed in the correct design of your channel.
First, let's decorate the header of our channel beautifully. I will use an already prepared template and program Adobe Photoshop. If you do not have this program, then it does not matter, now there are many different resources where you can this program download for free, but I strongly recommend you to use licensed program purchased from an official Adobe distributor.
Well if you don't have enough money. To pay for the program, you can search for it on this site, only it will be at your own peril and risk.
Link.
Under the video that I specially prepared for this article, there is a link to the channel template. Go and click, in a minute you have it downloaded to your computer.
Download
We unpack the file with our favorite archiver, I recommend using Winrar. As soon as this archive is unpacked, we find the file in psd format and double-click on it with the left mouse button.
You will immediately open Photoshop and in it this template. Here. What will we see. 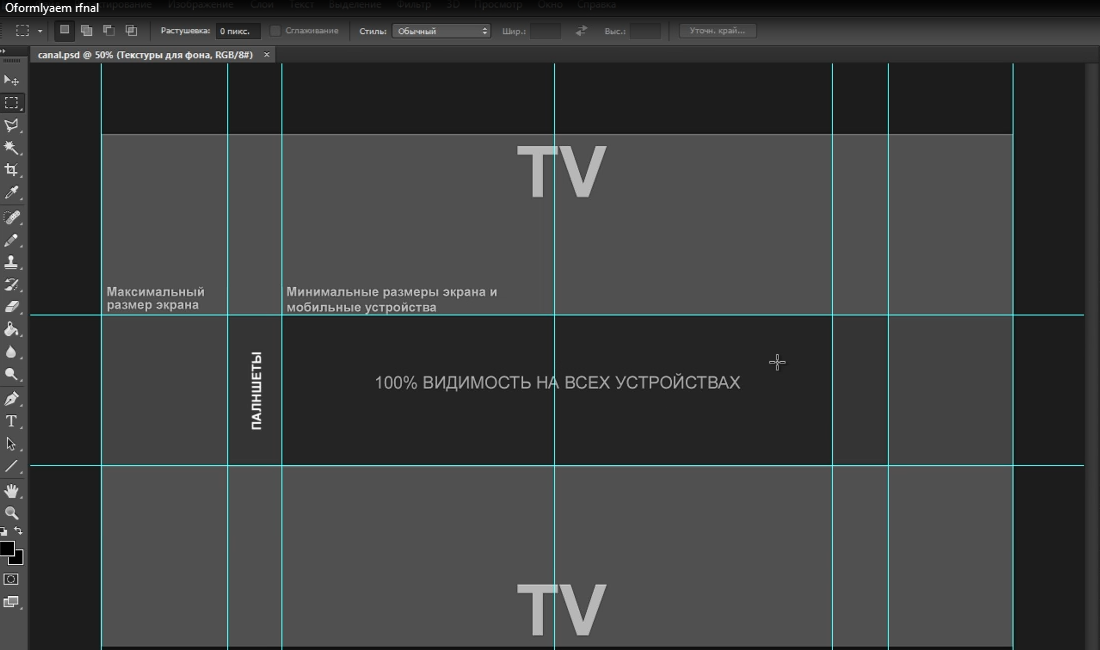
We see an open template in the markup, within which, when saving our header, users will see it on different devices.
At the bottom right, we see a lot of layers. Experiment with these layers on your own by adding and subtracting layers by clicking on the little eye. By the method of elimination, something can be removed, something can be added.
Here, only your imagination and creativity should turn on. In this matter, I am not an adviser. The main thing is that it was beautiful and you liked it. 
You can change the color tone, add a clipping mask and apply it to only one specific layer. But I will talk about this in the lessons dedicated only to Photoshop, and now my task is to show you how easy it is to make a beautiful header for your YouTube channel.
After you have created a beautiful header, for example, here I made such a header for my channel. 
Save, click on the file and save as and save to JPEG format. Now we need to upload our picture to the YouTube channel. To do this, go to the channel, right-click on the “change channel design” button, then click on “Upload photos”, click on “Select a file on your computer”, look for our file in the place where we saved it, click and upload.
Congratulations, now you have the original picture in the header of your channel.
Now click on the "channels" button. 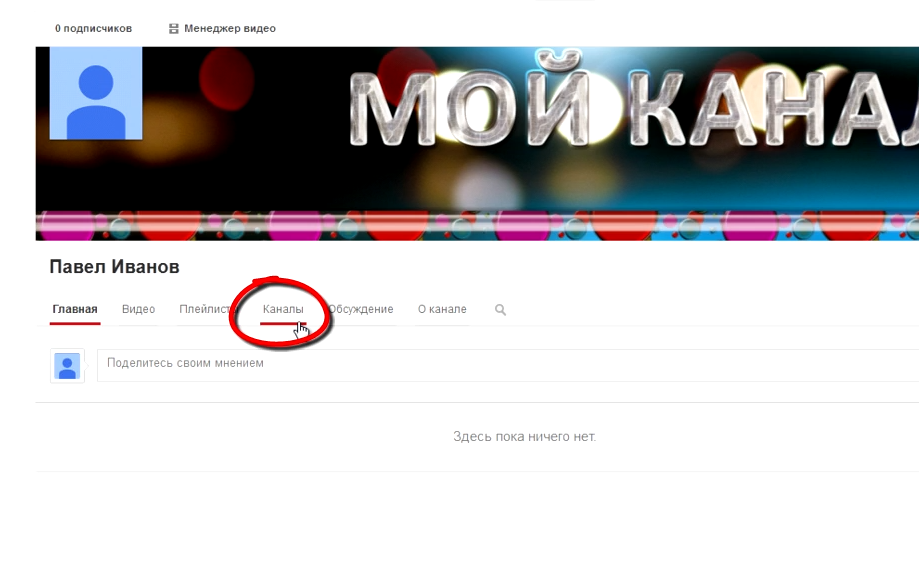
And we need to add as many links to our resources to our channel as possible. These may be our websites or profiles in in social networks.
After you have added links, they can be seen in the header of your channel at the bottom right. 
Now you need to go to the channel settings, look as shown in the screenshot.

What we see here is that you can put your own gravatar. Write keywords channel, they will depend on the subject of your channel. After that, save and go to the description of our channel.
Click on the "About Channel" button. 
And we write a description, everything that comes to our mind, about our channel. Don't forget to leave a link in the description. To your website or blog. It is better to leave the link at the very beginning, so that it is clearly visible. After you write a description, you can read. That your channel is set up correctly at the first stage, and you have already stood out from the crowd of thousands of competitors.
And I can only congratulate you on this and wish you good luck in the field of Internet entrepreneurship. See you in my next articles dedicated to YouTube and not only, there is still a lot of interesting things ahead. See you soon friends!
It's one thing to just upload a video to YouTube, but it's another thing to get the person who watched the video to stay on your channel. A well-designed YouTube channel will help you retain your visitors.
In this article, we will talk about how to upload all the images on the channel correctly. Also how to write descriptions for the channel, put a link to your site, a group on Vkontakte or another link. We will also make a beautiful arrangement of the video. Let's put a video intro on the channel.
How to create a YouTube channel?
Uploading a background image to a YouTube channel
Open your channel on YouTube and in the center we see the button " Add channel skins».
You are asked to upload a recommended photo size of 2560x1440 pixels. And weighing no more than 4 megabytes. By clicking on " Select file from computer» you specify the path to the image located on your computer and it will load and become a background.

After you fill in, you will be shown an example of how it will look on a PC, TV or phone. Press " Choose and the background is ready.

Let's move on to installing an avatar on YouTube
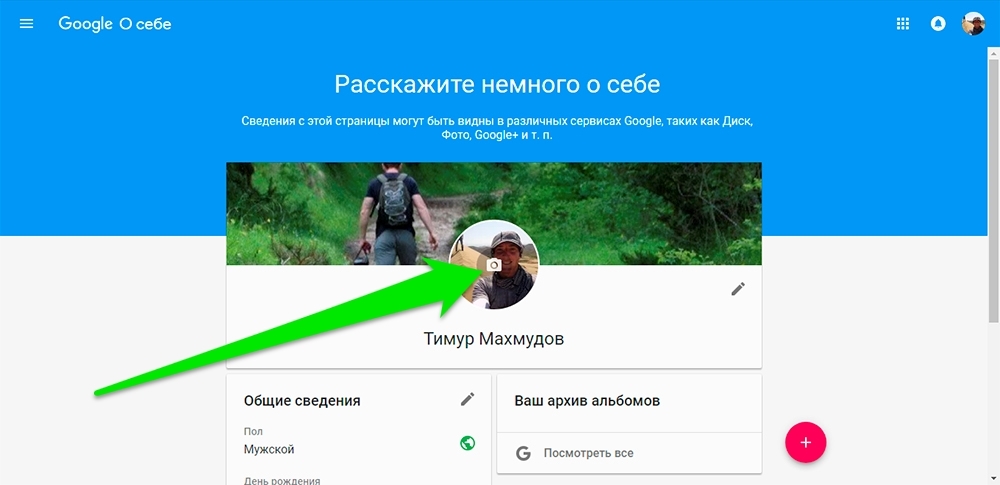
The avatar is set from the Google+ service. To change the avatar on YouTube, you need to move the mouse cursor over it and a “pencil” will appear in the upper right corner.
Click on it and you are offered to go to the Google+ service and change it there.
![]()
The size of the avatar in Google + and in YouTube is 250x250 pixels in jpg format. Please note that the picture will be square! Load exactly like the background image and click " Set as profile photo».

YouTube channel description and link to your website
To go to the channel settings, hover over the background with the mouse and see a “pencil” in the right corner. Click on it and select the sub-item " Edit Links».
Click on the button " Channel Description».

In the open window, write the text no more than 500 characters, without links! For the best result, the text should be unique, i.e. written by you. The text should describe what kind of channel it is and what videos will be shown on it.

Also, just below you indicate your E-mail address for communication with you. country, if you will. And below we indicate a link to your website or pages on social networks. Click add and write the name of the link, and to the right its url-address.

They will display in the bottom corner below the background.

Designing an external page for subscribers
Point to an empty area, slightly to the right of the name. The “pencil” appears again on the right, click on it and in the pop-up window click on “ Navigation settings».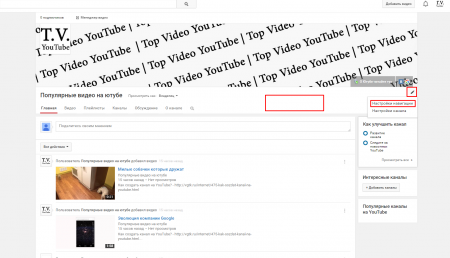
In the window that opens, click " Turn on" and " Save».

As you can see, now the videos on the channel are lined up not in a tape one by one, but in a beautiful chaotic arrangement. The big window always shows the last video, to the right of it are the videos that were uploaded later.

There is a button below Add Section", press it and select, for example" Popular videos", press" Ready". A line with the videos that were viewed most often on your channel will be added below.

Many sections can be added. There, a specific playlist can be added both by download and by popularity.
Channel navigation for new users (guests)
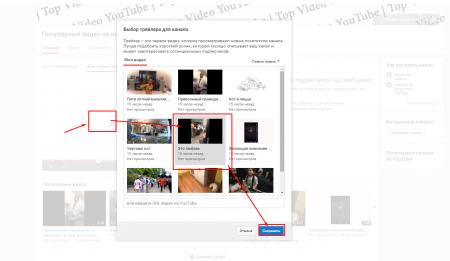
Click on the top " For new viewers". You are offered to put a trailer for your channel. Basically it's either the most interesting video or the video that talks about what's on your channel. To view it, a person wants to subscribe to your channel.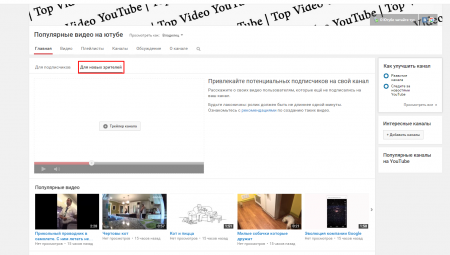
Click on the center Channel trailer” and choose one of the videos.
Now the new viewer who opens your channel will see what content is on it. And just your channel will look a little more prestigious than before.
Add Branding to YouTube Video
In the same way as in the case of the appearance of the channel, we hover the mouse over the void, which is slightly to the right of the channel name. And click on the "pencil", only now select " Channel settings».
Why do we enter Form style » and press « Add channel logo". It should also be 250x250 pixels, but in PNG format. To make it more beautiful, make it without a background.

After loading, the service will ask you in what period of time to include this watermark. We recommend putting it on all videos.
![]()
In general, by completing all these steps, you will make your channel attractive. Guests will be happy to subscribe to you and like your videos.
Just like pages and profiles in other social networks, a YouTube channel has its own specific settings and design. An incorrectly designed channel will lose its potential subscribers, even if it is filled with quality content. So, if you want to promote the channel, think about how to make it as convenient and informative as possible for your subscribers and attractive for guests.
Channel header and avatar
The design of the channel begins with a header and an avatar. For them, YouTube has its own recommended parameters. As an image of the channel header, it is desirable to use an image of 2560 × 1440 pixels in size and no more than 4 MB in weight. I did not meet any restrictions for the avatar, but it is worth considering that it is square. The optimal value for the avatar image will be 800 × 800 pixels.
How to add a channel header?
To change the channel header, hover over it and click on the pencil icon that appears in the upper right corner. In the drop-down list, select "Change channel design".
In the window that opens, you can upload an image for your channel header from three available sources: from your computer, from the collection of your photos on Google, and from the gallery of suggestions.

After selecting and uploading the desired image, a window will appear in front of you in which you will see how your channel header will look on various devices. If you do not like the area of the image that is shown on the channel header on any device, then you can try to shift this area by clicking on the "Crop" button.


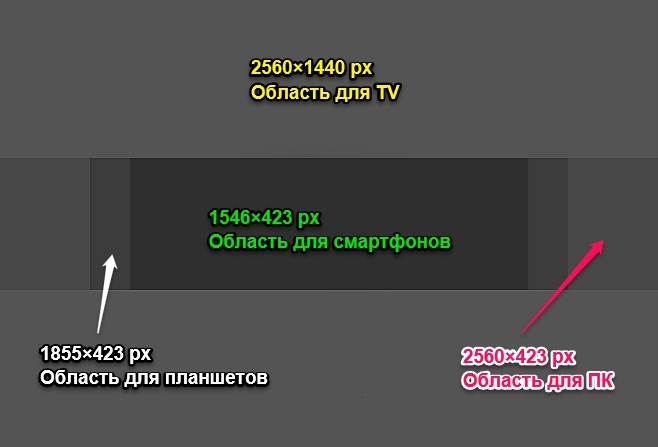
As we can see, only a certain area of the selected image was displayed in the header. So why upload a big picture then? The fact is that YouTube channels can be viewed from various devices and on each of them, in the header, a certain area of our image will be shown. Here is a list of devices and areas of the image that are shown in the header:
- On TV - 2560 × 1440 px;
- On a desktop PC - 2560 × 423 px;
- On tablets - 1855 × 423 px;
- On smartphones - 1546×423 px;
An area of 1546×423 pixels located in the center of the image will be visible on all devices. This should be taken into account when creating the header design, and all the most important information should be placed in this area.
How to add a channel avatar?
The second visual element of your channel is the avatar. As I mentioned above, the avatar should have equal sides, that is, be square. There are no recommendations on the size and weight of the avatar.
To add or change your channel profile picture, hover over it and click on the pencil icon. A window will appear in front of you with a notification that in order to change the icon you need to go to your Google account. Clicking the "Edit" button in the notification will take you to your Google account, where you can change your profile picture. Changing the avatar on your YouTube channel will not happen immediately, but after some time.

How to add links to YouTube channel header?
YouTube allows channel owners to add links to external resources. Links are displayed in the lower right corner of the channel header.

To add links to the header of your channel, hover over the header itself, click on the pencil icon that appears in the upper right corner and select "Edit Links" from the drop-down list. You can do the same by going to the "About the channel" section in the channel menu. In the "About channel" section, you can also edit other information related to your channel.

Show content on a channel
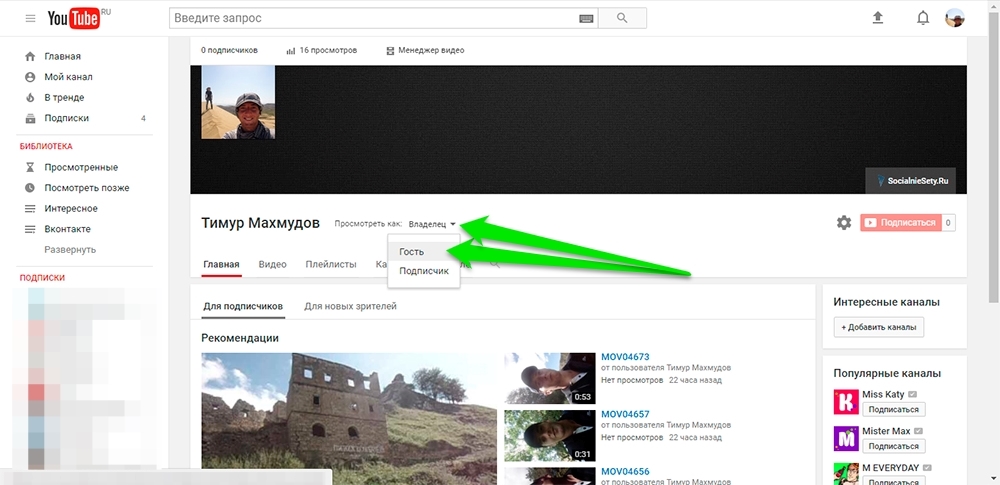
3 different types of visitors can view your channel: you are the owner, subscribers and guests, that is, those who are not subscribed to your channel. For all three types, your channel interface may differ.
When your channel is viewed by yourself, that is, the owner, the channel interface will contain editing buttons with which you can create and arrange video blocks in the way that subscribers and guests should see them.

For subscribers and guests, your channel can be presented in different ways. You can see how your channel will look on the screens of your subscribers or guests by switching the value in the "View as:" item to the right of the channel name.
You can create blocks with videos on your channel by clicking the "Add Section" button. By clicking on it, you must specify what content will be contained in the new block (Content) and how it will be located (layout).
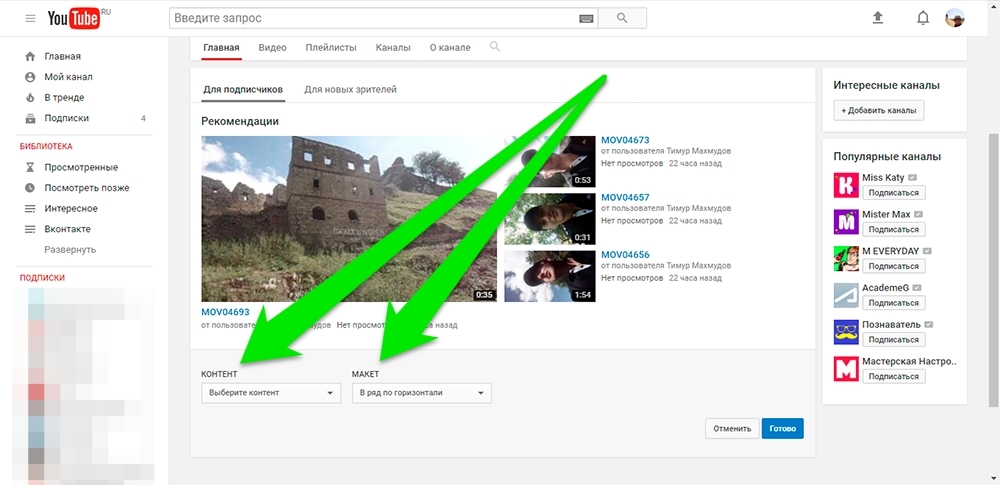
In the "Content" list, you can specify:
- Video
- Popular video
- Downloads
- Liked
- Published
- On air
- Upcoming
- Completed Live Streams
- playlists
- All playlists
- One playlist
- Saved playlists
- Multiple playlists
- Published playlists
- Channels
- Subscriptions
- A new group
- Other
- Recent Activities
In the "Layout" list, you can choose one of two options - "In a row horizontally" or "Vertical list".
You can edit or delete the created block by clicking on the pencil icon that appears on hover in the upper right corner of the block.

Channel trailer
Your channel page for your subscribers and for new users visiting your channel for the first time will look the same, except for the title block. The main block for your subscribers will contain recommended videos. For new users, this block may contain a trailer for your channel, if you specify it, or be absent altogether. The trail of your channel is a video recording that reveals the essence of your vlog. You can specify the trailer of your channel by switching to the "For new viewers" mode.

That's all! If you have any questions, you can always leave them in the comments to this article!
If you are going to use YouTube video hosting to host your video, then first you need to create your own channel and format it correctly. The more interesting and enjoyable appearance channel on YouTube, the easier it will be to attract users and increase the number of views. How to create a YouTube channel? We will talk about this in today's article.
YouTube channel design: choosing a style, template and pictures
To promote a new YouTube channel, you need to come up with not only interesting videos, but also the right design. The pleasant appearance of your channel will be the key to good attendance. Users have learned to distinguish good from bad, and they will not enter a channel whose owner has not taken care of the design. Your YouTube page should look beautiful and modern, then it will appeal to visitors and be able to attract their attention to the videos.
Choose a design style based on the theme of your channel. What kind of videos do you plan to create and post? If you run a channel about cooking, then pictures that depict food, beautiful dishes, products, serving, etc. are suitable for decoration. If you are talking about car repair, then the style of the channel should be consistent with the relevant topic. Use photos depicting cars, auto parts, units.
Image search for YouTube channel design
To create a beautiful and original design, it is best to use unique pictures. You can take photos yourself or buy images from photo stocks. You will have to pay for unique pictures, but you will receive original images that you can use on your channel without fear that someone will convict you of copyright infringement.
If you do not want to pay for registration, you can find pictures on the Internet. In the public domain there are a huge number of images on various topics. You just need to go to Google or Yandex, enter a request and select the appropriate pictures. When choosing, consider the resolution of images and other parameters of their quality.
Template selection and placement
For the next stage of work on the design of the channel, you will need to download the template. This can be done on specialized resources that you can easily find through Yandex or Google. You can also use one of the templates offered on the video hosting itself. Choose the option that seems best to you.
Once the template is selected, you can start installing it. To do this, you need to install the template on your channel and make necessary settings. You can use Photoshop to edit the design. With it, you will add the necessary inscriptions, elements and other details. Open the template file in Photoshop and add to it the image that you selected in the first stage of work. Make the necessary settings and upload the template to the channel.
Registration YouTube channel will allow you to set an original look and draw the attention of visitors to the page. Spend some time on a beautiful design so that viewers will be pleased to visit your channel, leave comments and likes.