alignment
can be done in the Format Menu - Paragraph or using the buttons on the toolbar
Select the text and apply alignment to it
If you align a paragraph, then just put the cursor in this paragraph
left alignment or CTRL+L
![]() center (symmetrical about the middle) or CTRL+E (best used for headings)
center (symmetrical about the middle) or CTRL+E (best used for headings)
The text tool can be called different ways. Usually, tool parameters are displayed in a window that is docked to the toolbar immediately after the tool is activated. Choose a font from the installed ones. When you select a character, this is interactively applied to the text.
This control sets the font size in one of the selectable units. Use an external editor window instead of writing directly to the drawing. It will create texts with borders and curved edges. This is achieved with a slight blur and melting of the edges. This setting can greatly improve the character's visual appearance.
right-align or CTRL+R
 fit to document width CTRL+J
Consider LINE
There is vertical ruler(it is rarely used) and the horizontal ruler shown here. If you do not have it, go to the VIEW MENU and check the RULER box. Fields are marked in blue. If necessary, they can simply be moved apart or moved. On the ruler, in addition to hatching, there are icons. Before moving the icons, you need to select the text fragment to be moved. Otherwise it won't work. What do all these icons mean and how to use them?
Use character correction indexes to modify them to create readable letters even in small fonts. Sets the color to be used to represent the character. The default color is black. The color can be selected from the dialog box that opens when you click on the color bar.
Allows you to justify the text according to one of the four options selected by the corresponding icons. Check the left margin indented space for the first line. Check for space between subsequent text lines. This option is interactive: each change will be displayed directly on the image. The number is not the space between lines, but it specifies how many pixels to add or subtract from that space.
 Protrusion and indentation on the right.
Check letter spacing. Also in this case, the value is not the actual space entered, but the number of pixels added or subtracted to the last. Relative to the text rectangle. The associated dropdown list offers two options.
Dynamic: Default setting. The size of the text rectangle increases as you type. The text may end from the image. The indentation parameter is all lines. If you change the size of the rectangle, the setting will change to "Fixed". Fixed: You need to expand the text rectangle first, otherwise regular labels will be active! The text may leave the image below the border.
If you need to make a ledge or it is also called a hanging paragraph, hover over this icon on the left. Hold down the left mouse button and drag along the ruler to the right to the desired location. The buttons Protrusion and Indent on the left seem to stick together, as it should. The first line of the paragraph stays in place, and the rest of the text follows the vertical line that appears on the Stage. 
The indent option will only work on the first line. It's probably kept because it's not possible to put all of its functionality into direct edit mode. Commands that cannot be transmitted later will be described below. As soon as you start writing, a text layer is created in the layer dialog box. In an image with this level, you can edit the text by selecting the layer and clicking on it. Naturally, you can apply the same functions that you use to other layers at this level.
To add text to text, you can click on the non-text layer. The symbol editor will open and a new text layer will be created. To move from one text to another, select the appropriate text layer and click on it to activate the editor.
If you want to do text indent right in the document, you need to click on the same icon and drag it to the left.
indentation on the left. If you click on it and start moving, it will move and all selected text. This is the most convenient way to move text.
indent the first line of each selected paragraph will move as much as you move it to the right.
Text editor options. Text can be downloaded from text file by clicking the folder icon in text editor. All text in the file is loaded. This option allows you to enter text from left to right, this is done in many Western languages and some Eastern languages.
This option is also present in the text context menu. This option allows you to enter text from right to left for some Oriental languages such as Arabic. By default, the symbol selected in the Options window is not used, if you want to use this symbol, enable this field.
The above icons work with selected text.
Those icons that I will describe now must first be set, and only then start the text.
Tabulation. Tab Types
Tab types work well in text where columns need to be made. If you indent with spaces, this is not correct. There is a button at the intersection of the top and side rulers in the left corner. To select an icon on the left side of the ruler, click on the icon until the one you want appears.
Align, subtract from paragraph and special formats. Formatting a paragraph means defining its following functions: alignment, line spacing, and escape. Before formatting, a text marker must be placed in the paragraph to be formatted.
Paragraph formatting can be done in two ways, using the buttons on the formatting bar or in the "Format" menu by selecting the "Paragraph" command. Using buttons, paragraph alignment is determined relative to the margin. The main alignment methods are four - left, center, right and two sides.
Left alignment
Text will be positioned to the right of the alignment line
Center alignment
The text will be positioned exactly in the middle of the alignment line.
Right alignment
Text will be positioned to the left of the alignment line
Delimiter Alignment
Text to the left of the separator
The Align Left button aligns the text to the left, the Center button aligns the text in the middle, the Align Right button aligns the text to the right, and the Align button aligns the text twice. Paragraph indents can be divided into three groups. Nudge to the left and right of the paragraph - they define the distance between the paragraph and the leaf constellation. Using the "Decrease Indent" and "Increase Indent" buttons, you can decrease and increase the indent from left to left in the sheet margin.
It consists of two pages of indents, spacing and lines and page breaks, which allows you to apply additional features to the paragraph. On the Indexes and Spacing page, the Alignment box aligns a paragraph in a sheet box, and can be set to Left, Center, Right, and Symbol, respectively, for left, center, right, and right alignment.
dash alignment
Just a dash
Click the left mouse button on the ruler at the point where the text will begin. The icon you selected will appear in that location. I advise you to clamp ALT key wherein. Then the icon will be set more accurately and you can see how far in centimeters it is from another object. If there are several icons, then the transition in the document to the next icon is carried out by pressing the TAB key. Press ENTER at the end of the line. To remove an icon from the ruler, you just need to drag it with the mouse in any direction and it will disappear.
In the "Identification" field, the left and right margins are used to indicate the indents to the left and right of the paragraph, respectively, in the sheet margin. In the "Distance" area there are fields "Before" to define the indent before the paragraph and "After" to define the indent after the paragraph. These outputs are measured in points. The line spacing field determines the spacing between lines.
The preview reflects all changes made. Continue using next when the paragraph should be on the same page as the next, and the previous before the paragraph should start on new page. These options are toggled on and off by placing or deselecting the checkbox in front of the field. You can see the changes made in the area preview preview.

Let's take an example
Method one
To make such a text, you need to enter the word Vegetables. Press the TAB key. We print the word cabbage. Press the ENTER key. In this column, except for the word Vegetables, there is nothing else. Move with TAB to the next item in the second column. We print the word beetroot. ENTER. TAB. We print the word carrot. ENTER. Repeat until we print the entire list of vegetables. In our case, the list is over. Now let's get to the fruit. At the beginning of the line we write the word Fruit. TAB key. And we repeat everything that I described above. If you do everything right, then you will get what I have.
In its basic form, it is widely supported in the browser. Various ways of centering are devoted to a separate article. Will be left in the middle. Will be correct. Default behavior for text written from left to right. Align the text to the right. Align the text into a block, as you would normally do with newspaper columns. When aligned to a block, so-called rivers are easily created, where there are unnaturally large gaps between words. In the case of normal writing from left to right, the beginning is equivalent to the text: from left.
Text alignment at the end of a line, which behaves as it should in supported browsers. In particular, in the case of block-alignment, it is generally the goal that the last line in the block should not be unbalanced. Browsers do this - the last line is aligned to the beginning of the line.
Let's take an example
I want to say a few words about such a button as Non-printable characters. It's on the Standard Toolbar. Personally, it helps me to see what and where I have spaces, transitions, indents, and some others. One has only to press this button and such a list, as we have just done, takes on the following form. 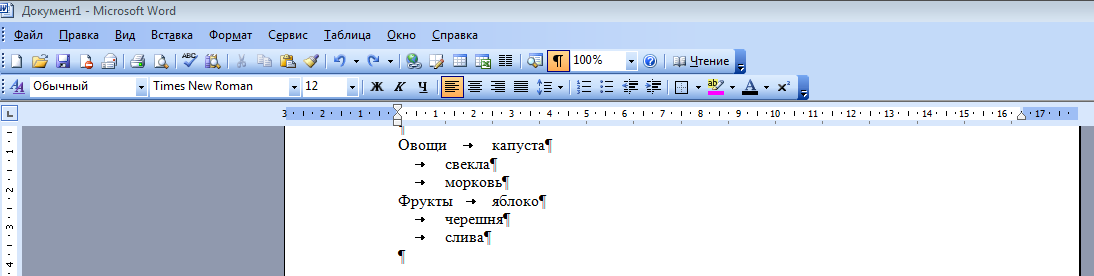
This works seemingly well, but only until the text is copied - splitting into columns will cause bookmarks to be inserted between them. In right-to-left languages, left alignment is correct. A left-aligned paragraph tries to have left margins right at the bottom.
Box alignment attempts to have both the left and right edges of the lines exactly below each other. This is achieved by creating interliteral spaces. The last paragraph of a paragraph aligned in a block is aligned to the left. This does not affect the alignment of the element itself in its environment.
The arrow means that the TAB key was used, and at the end of the line ENTER. If these signs bother you, disable this option by pressing the same button again and the icons will disappear.
Select the entire list. Set a tab to a horizontal ruler. By clicking on the tab button in the upper left corner, you can select any tab character. I'll choose left alignment. On the ruler, approximately in the middle, click the left mouse button. If you want to set exactly, use the ALT key at the same time as clicking.
Otherwise it works inside, not out. Very good support for left, center and right and value alignment. In File Explorer, text alignment can be used to center a page block. For standard viewing centrifugal auxiliary brand: car.
Newspapers have columns side by side, and they must have a beautiful appearance. The block has good alignment because it helps readable two adjacent columns. Without block alignment, adjacent columns would look stupid. Nothing like adjacent virtual columns is very popular on the web, so there's no primary reason to use inline text. In every software for a newspaper show there is a word processor. But there is nothing like it. By the speed of the newspaper, block-aligned columns create jagged ruins, but they are mostly covered in words.
Immediately take away that the second column has moved to the place where you put the icon. It remains only to remove the selection by clicking anywhere in the document.
Method two
We looked at an example where we typed text, selected it, and only then set tabs. And now let's see the second way, where while entering text, we see how it looks already in columns. And I think it's more comfortable. Decide for yourself which way to use.
When you use block alignment on the web, it's not a word of words that needs to be spoken, so the very bottom of the text is really big and adventurous. This is especially true in the case of rigid columns. Sometimes it looks right when the last line contains too much text. While horizontal text centering is supported by the text alignment feature, obviously centering block elements and more importantly vertical alignment is more complex.
Horizontal box centering with floating hook
This is the vertical centering of a block whose height is dynamically determined by the height of its content. Both horizontal and vertical centering of the floating ring block.
- How to center a floating ring block horizontally.
- How to center a block with a solid edge horizontally.
- Horizontally and vertically center a block with a hard edge.
Display on the line desired icons tabs where columns should be. In our case, we set the ALIGNMENT TO THE LEFT EDGE approximately in the middle of the document. The cursor is at the beginning of the line. If there is a column, start the first phrase. In our example, our first column starts at the beginning of the line and we type the word Vegetables. Press the TAB key. The cursor should move to the middle of the document. Type the word Cabbage and press ENTER. The cursor has moved to the next line. There is nothing here, so press the TAB key. We print the next word in the second column. ENTER. We continue further. I think you got the gist.
However, the described solution can be used to horizontally lay out blocks of blocks at the roots of their parents, in addition to the entire site layout. A typical example would be the centering of lists, tables, images, etc. A centered element may not have an explicitly defined skirt that will display the rest of your parent. For example, the size of the ribs can be determined firmly. in pixels, as follows.
Or dynamically as a percentage. The design is full of "invisible forces" that contribute to the clarity and clarity of the message. Whatever you try to solve by simply choosing the right font or the right combination of colors, if you ignore these invisible forces, your design will fail.
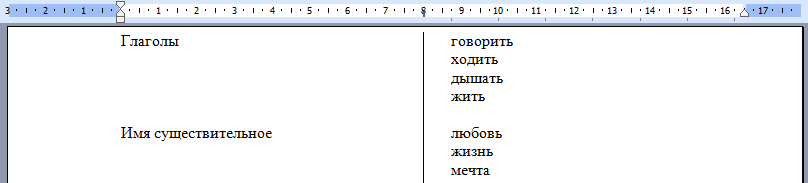
If in your task the first column does not start from the beginning of the line, then you also need to set a tab character for it. And work in new line start by pressing the TAB key.
In the screenshots below, I want to show what can be achieved with tabs.
This is the first of three parts of articles on invisible forces. Let's start with alignment, direction and center of gravity. To really think about the invisible powers of design, you must first discard the idea that your design is all about fonts, colors, images, and text. You have to start thinking of these things as design elements.
Each individual heading is an element, each paragraph of text is one large element, each image is an element. Elements consist of additional - subelements. For example, your logo may contain two elements - a symbol and text. Each of the letters in the text can then be treated as a different sub-element.
Tab with placeholder
You must have seen that in some Menu or Directory such  filling form.
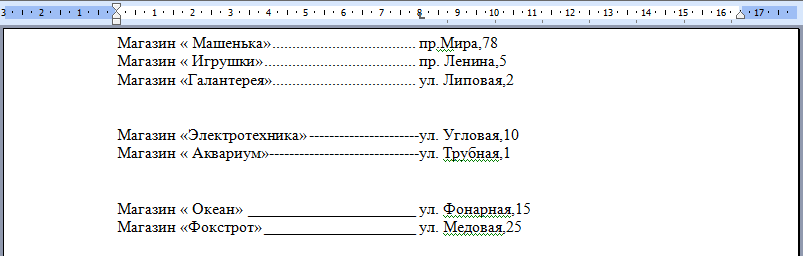 It is called tab with placeholder
.
A very convenient form and you can make it by going to Menu Format - Tab. So we got to such a thing as Tabulation. You probably guessed that the name of the TAB key is very similar to this word. By default in Word program 2003 tab defined by distance 1.25 cm.
It is called tab with placeholder
.
A very convenient form and you can make it by going to Menu Format - Tab. So we got to such a thing as Tabulation. You probably guessed that the name of the TAB key is very similar to this word. By default in Word program 2003 tab defined by distance 1.25 cm.
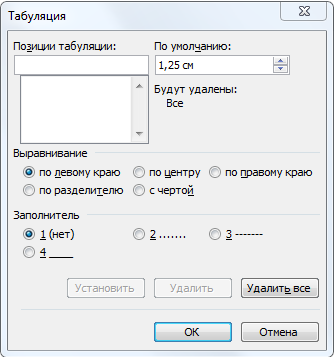
You can change this setting by writing your own there and saving the settings. And each time we press the TAB key, we move 1.25 cm to the right, or to the next tab stop.
Here, in the Tab stops field, you can write a number where the tab stop mark will be set on the ruler, which is marked in the Alignment field. And then there is another field Placeholder. It can be dotted, dashed, underlined.
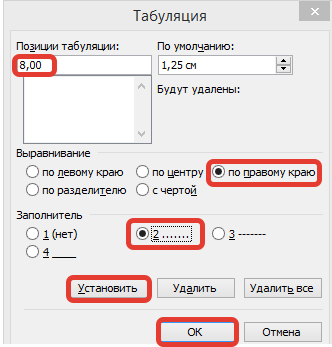 Enter a word or combination of words on the left side of the document from the beginning of the line. Enter Menu Format - Tabs and set the switch to any of the placeholder options, set the tab stop and decide on the alignment. Click Install and OK. The window will close. Now press the TAB button and, after you see the placeholders, type in what you want to see on the right. You will get a tab with a placeholder like in the screenshots above. You can experiment with different placeholders.
So far, we've only aligned elements to the left. More precisely, we didn’t do this at all, and the browser itself aligns elements to the left by default. Of course, it would be too boring to align everything to the left. Therefore, there are various ways center and right alignment.
Aligning elements is something you just need to know when . The first thing to do is to type the simplest page.
Once upon a time there was a tag
You can add an image centered as well, let's also move to the next line using the tag
:
Level 1 heading centered
It was a tag
To solve this problem, the developers came up with universal way element alignment HTML. The method is to use the so-called containers, which are created using the tag Let's now write the same HTML code, but with the use of containers, in addition, let's align not to the center, but to the right. As you can see, everything works. I advise you to also change the value of the attribute " align" to look at other kinds of container content alignment. Another way to align elements HTML- these are tables, but this topic deserves a separate discussion, so we'll talk about it in one of the following articles. For now, your page should look like this: Sincerely, Mikhail Rusakov. P.S. If you would like to know more about HTML, then check out my free course with an example of creating a website at HTML:
Level 1 heading centered
Level 1 heading, right-aligned