Social network buttons on the site from Yandex
The first and most popular, perhaps, way. We follow this link and get to the page where you can install social buttons. Yandex made everything very convenient - the services we need can be easily added by ticking them. You can also choose yourself appearance buttons.
The theme you have installed has a list of templates. Among them should be single.php , which means a single entry (post, article). It is in this file that you need to paste the copied code. However, if you paste at the very beginning, then the buttons will be in front of the article.
How to display social media icons in header
Step 2 - Choose Header Layout #2 - #5. Step 3 - In the Content Header 1 or Content Header 2 dropdown, select the Social Links option to display social links in the header.
Header social styles style
On this tab, you will find configuration options such as font size, tooltip position, color, and layout. Here you can customize the appearance of the social icons that will be displayed on footer, such as font size, color, layout, etc. please read below to learn how to customize and display icons social networks on the footer.Even if you don't know HTML, I'll give you a hint. If you plan to insert buttons at the beginning of the article, then find the first block (div) in the template code and paste the code there. It's good when there are developer comments in the template code. Rely on them. For example, POST START, CONTENT START, POST END - such marks clearly show that the article begins or ends here.  Do you see ‘bp_after_post_content’ in the code? Here it is even intuitively clear that this is the end of the article. It was in front of this code fragment that I created a block where I inserted the Yandex button code.
How to display social media icons in footer
Find "Display social icons in footer" and select On. There are also some options on this tab that you can use to customize the appearance of the footer social media icons. The social sharing box allows your viewers to share any blog or portfolio post using multiple social media networks. This feature can be enabled or disabled on any single page blog or portfolio page. On this tab, you can customize the social sharing section itself and the social media icons inside it.
In any case, updating the site and looking at the result, you can rearrange the code to another place in the template if you did something wrong. The only minus of Yandex buttons is that scripts are loaded from the Internet, but since they are at the end of the article (as a rule), this is not critical.
Social Buttons for a WordPress Site
WordPress has a lot of plugins that make it as easy as possible for you to install. social buttons. Of these, I would recommend Juiz Social Post Sharer. This social buttons plugin for wordpress has intuitive settings and displays nice looking buttons. There are 8 appearance options in total. A total of 11 social networks can be selected. Compared to Yandex.buttons, this is less. 
How to enable social sharing bar in all blogs with single blogs
Please read below to know about social sharing box.
How to enable social sharing bar on single blog post page
How to enable social sharing package in all single portfolio pages. Find the "Social Sharing" option and select "On" to enable "Social Sharing". How to enable social sharing package on one page with one portfolio. Step 1 - Navigate to the portfolio post where you want to include the social sharing bar.For example, there are no Odnoklassniki, My World, Livejournal. Still, the plugin was made by a foreign developer, so these features. But the setup is very simple. You can choose which post types to display buttons for, as well as where to display them. You can generally disable the automatic addition of icons and insert them yourself through the shortcode.
How to Create a Social Sharing Bar and Badges
You'll also find options for social media icons, such as font size, tooltip position, and more. Step 3 - In the "Social Links" section, you can choose which social links will be displayed in the social sharing box. Just select "On" For the relevant social link parameter you want to show.
How to add a sharing bar item to a page or post
Step 1 - Go to the page or post where you want to add the exchange element. Step 5 - Set up the element " General access» to your liking. To learn how to add and customize the social link element, please read below.
How to add a social link element to a page or post
Step 1 - Go to the page or post you want to add to the Social Links element.Good day dear readers of my site. Today we'll talk about social buttons, why they are needed on the site and how to install them. In the past few years, social networks have become very popular. They are increasingly penetrating into our lives and very often replace us, in the usual sense, communication with each other.
How to set up the social links element globally
Step 3 - Add a new container to the page and choose the desired column format. Step 5 - Add links to the relevant social media fields you want to display. Step 2 - In this panel, you will find the Social Icons tab. On this tab, you will find several options that will allow you to customize the appearance of the social links element globally.
You can use the Social Links widget to insert social links to any of your sites; such as footer, sliding bars, sidebars, mega menu columns and the like. If the fields are left blank, the hardcoded value is inserted.
What are social buttons and why are they needed
Do not forget that social networks are very fond of search engines. The more links to a page on your site in Twitter accounts, G+ and Facebook, the higher it will rank in the SERPs. Because search engines take into account social signals, and sharing using social network buttons is included in the list of such signals.
How to Add Social Link Widgets to Widgets
To learn how to add the Social Links widget to widget sections, read below. Step 2 - First you have to create the widget section. Step 3 - In the "Available Widgets" section, find the "Avada: Social Links" widget. Then drag it to the widget section where you would like to add it.
After adding it to the widget section, the widget will automatically expand and display all available customization options. Using these options, you can customize the widget and add the social links you want to the appropriate social media fields. There are several customizable options that make it easier to style social media icons. These options can be found in the respective areas where social icons can be displayed. To learn how these options affect social icons, read below.
Yandex social network buttons- this is a whole block of buttons, which includes buttons of all popular social networks. This block allows the visitor to quickly share a page on your site. He just needs to click on the button of the social network he is interested in and the link to your material will fly away to all his subscribers and friends. At the same time, no more actions are required from the user's side, the Yandex block itself will automatically fill in all the necessary fields for sending (page url, signature, description, picture).
Add social media buttons to this website and you've personalized the experience for the client. There are many ways to share social media, whether it's sharing your site's content with the world, displaying similar fields, or providing links to visit your site on social media.
Share your content with the world
One type of button you might be looking for is a button that allows other users to share their content via social media. One such option is an add-on called Sharing that allows you to place buttons above or below your posts and blog pages that give people the ability to share content with their feeds. In the settings panel for "Sharing", you can drag and drop the social networks you would like to share with people and decide if you want the social network buttons to be at the top or bottom of each page or post.
Today, there are a lot of services that provide the code for social network buttons. But not everyone can provide high-quality code that will not introduce a virus to your site or slow down the loading of your page. As you know, download speed is also not an unimportant ranking factor.
Yandex social network buttons is a flexible, easily customizable system. The user can customize the appearance of the buttons as he sees fit. A large palette of colors and many options for displaying buttons allows them to harmoniously fit into any website design. On the buttons of the most popular social networks, you can display the number of page shares, likes, and so on.
Get people to "like" your social media pages
On this note, you can also control which pages and posts you want to use. When you post a new post on your blog, it will be automatically shared with your friends and followers on your connected social media channels. Before using the "Publish" feature, you may want to check on your server host to see if there might be a technology preventing this from working. Don't include too many social media options. While it's easy to get turned on and add all of your social media feeds to your site, too much can create confusion for the client.

Another an indisputable plus of social buttons from Yandex is that you can view statistics in Yandex.Metrica if you are registered with this service and you have a counter installed. This makes it possible to analyze the social activity of your visitors.
Use your best social media sites. You can even add your own header. Simply place the widget in your sidebar, footer or header area and our themes will flexibly display the social media you have entered in those respective places! Do you have social media profiles?
Facebook social buttons
You've built a community on each, but how connected are they? The quickest and easiest way to start building a social media transfer machine is to add buttons to your site. The social media buttons you see on websites usually fall into one of two categories: share or follow.

![]()
Going to the tab " Counters» You can customize the appearance of the block so that the number of shares of your page is displayed opposite the icons of social networks. But there are limitations, which I mentioned above.
Your website should always be working to grow your social media presence and your social media content should send people to your site. It should be a continuous circle of growth for your brand, like in this scenario. These buttons do what you think, so why are they so confusing?
Share Button: Drive traffic from social networks
Because for each type, you need to know when, where, and how to use it in order to get the biggest hit for your button, if you will. You probably spend a lot of time trying to share on social media with traffic, right? There is a faster The best way- get other people to share your content as well. Because they really want to.

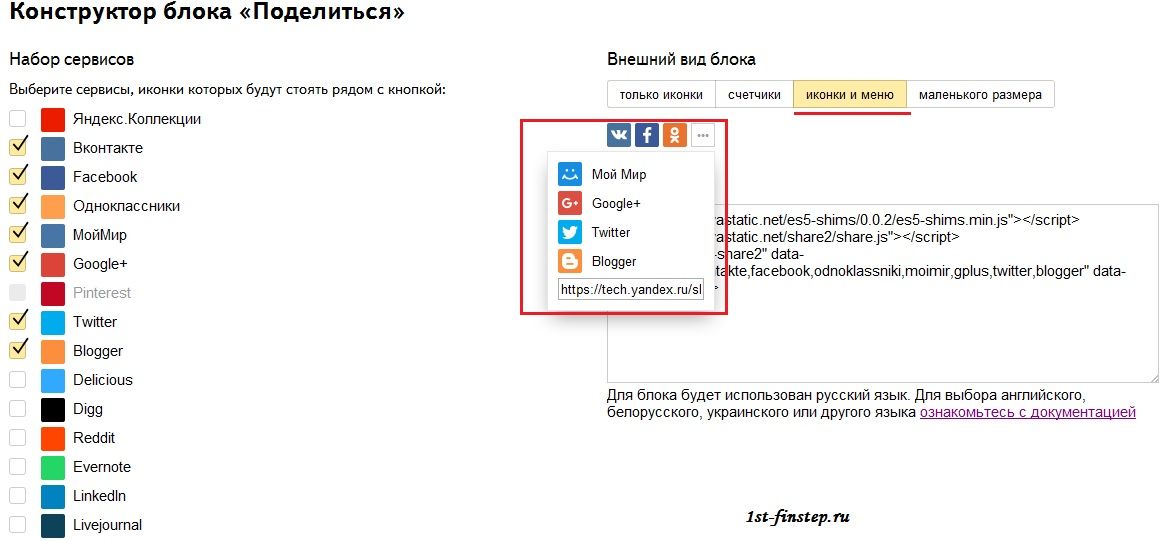
The number of displayed icons can be configured in the block code, namely here:

The number "3" is responsible for the number of icons that will be displayed in the Yandex block, the rest of the icons will be hidden in the POP-UP menu.
When you share your own content, you reach the same audience every time. Those who see your posts are already following you, know who you are, and may already be aware of the content. Your current followers are amazing and returning visitors is important. But social media is great for growing your general audience.
By encouraging readers and new visitors to share your site, you reach a wider and more diverse audience of new people who can discover your business. In terms of actual page locations, it's popular to add buttons at the top or bottom of the page content, to the left, or statically at the bottom of the page. This is where your readers are likely to look first. Experiment with what works best with your design.
Having customized the appearance of the block, you just need to copy the finished code and add it to the code of your page in the place you need. And it does not matter where and what part of the code you need to insert. The first two lines of code for inserting buttons are responsible for connecting the button script from the Yandex. Therefore, you can place them at the beginning of the HTML test of the page between tags
…. The third line of code is directly displaying the button block. But, if you don't want to bother with searching for tags , then just copy the button code and add it in its entirety in the right place on your site, and it will work.Online services generators of social buttons
But the really great place to add them is in the page content. Capture visitors while they are reading, browsing, etc. And don't make them look back. Do you have a killer quote on your blog? When you have these buttons on your site, you want to make the most of them. Here are some ways they can work even harder for you.
Focus on driving social engagement on channels that matter to your audience. Instead, focus on those that have successfully driven traffic in the past. Know when to use the number of shares. Sometimes they add social proof, but low numbers can actually discourage readers. If you're still working on moving stocks, hide the number of stocks, or use a tool that only displays them if they're above a certain minimum.
- It could be an alternative title, a quote, or a lesson learned.
- Don't clutter your site with generic buttons for each network.
How to add official social media buttons
Having considered the universal block of social buttons from Yandex, let's look at what social networks themselves offer us to install on the site as their buttons. I would like to point out right away that the functionality of the official buttons is slightly higher. For example, Vkontakte offers not just a button of different sizes and with a counter, but also without a counter, a link, a link without a social network icon, just an icon, and so on. That is, the visualization of such buttons will be higher. Let's figure it out how to add official social media buttons to your website.
Next Button: Connecting to Readers
But it's great for new people. Now, how can you connect with your current readers? But what about returning visitors - connecting with your existing readers and making them come back? That's where the buttons go. While the actual jargon may vary - like, follow, surround, etc. - the concept is the same in every network. These buttons simply link to your social profiles so people can add you to their network.
It's very rare that someone will one day see a website and think, "I'm going to keep up with them forever." No, it takes much longer for someone to become a true fan or client. And in the meantime, you need to make sure they don't forget about you. By having readers following your active social media profiles, you pop up there to help you stay on top of your mind.
Social network VKontakte


Let's move on to this section. This section provides a service for setting up the functionality and appearance of a button, generating a code for a Vkontakte button. Let's take a closer look.

- Style option. Offers you to choose the style of your button. Namely, how the button should look (with or without a counter, as a link or as an icon, etc.)
- In the "Text" field, write the text that will be displayed in the button itself
- "Link" - is responsible for which page the button will share. That is, by clicking on the button, the page with the button or another page where this button is not set will be shared. If another page, then you need to specify the URL of this page in the "Link" field
- Below is a ready-made code for adding a Vkontakte social network button to your site
- Below code shows an example of your button. Thanks to it, you can visually see how your button changes when you change certain settings.
In this form, you can read the documentation for the advanced settings of the Vkontakte button by clicking on the link "Go to the detailed documentation of the widget".
The button code consists of two parts. Therefore, it must be inserted separately.

The first part of the code must be inserted between the tags
…. We add the second part of the code in the place of the site where you would like to see the buttons of the social network Vkontakte themselves.Facebook social buttons
To add Facebook buttons you need to log in to this social network and on home page look in the lower right corner. At the very bottom we find "More" and select "Developers" in the drop-down window.

Going to the page for developers, click on the link " Products»

On the next page, you will have access to all the products that Facebook has to offer. But we are interested social plugins.

The following page gives a brief overview of the social plugins offered by Facebook. We are interested in the buttons "Like", "Send", "Share". So click on the link at the top of the page


And so we got to the page for selecting and setting up social buttons that Facebook offers us. As you can see in the screenshot below, this social network offers a wide range of social plugins to install on the site. All of them are presented in the left column. Consider setting up and getting the button code " Like».

Fill in the fields in the configurator:
- Url address is the address of your page where you want to place the "Like" button
- Composition - Customize Appearance
- Button size - small button or large
- Width - the width of the button. This is necessary if the standard sizes of the buttons do not suit you or they do not fit in the place you need on the site
- Action Type – Like or Recommend, you choose what the button should do
Below the settings form, the appearance of the button is shown, that is, during the settings, you visually see how the appearance changes - this is very convenient.
It is worth noting that if you do not specify the URL in the Page Address field, then the page on which the button code is located will be shared.
After setting up the main elements, click "Get Code". The code, as well as in the case of Vkontakte, consists of two parts. The first part needs to be set at the beginning of the HTML code of your page after the tag
, and install the second part where you need.