Hard disk (HDD) is the most important element of a computer on which all the necessary information, programs and user files are stored. Like any other component, over time the hard drive wears out, its normal operation is disrupted, and failures begin to occur. Along with physical wear and tear, which leads to the appearance of so-called bad sectors (bad blocks), logical errors associated with the file system, indexes and the main file table often occur.
For the time being, you may not observe any problems with your hard drive, but this does not guarantee that one day the hard drive will not die. Therefore, it is important to periodically (once or twice a year) check your hard drive for errors and bad sectors that require repair. Regular monitoring will allow you to track the condition of the media and respond in a timely manner to changes in its condition. Of course, you should not neglect such a proven method of protecting information as backup. The most valuable data must be duplicated on a backup storage device.
Symptoms of a failing hard drive
In most cases, HDDs operate smoothly for several years without requiring special attention. However, in case of improper operation (physical impact, lack of proper cooling), the resource of the storage medium is significantly reduced. In rare situations, there may be a manufacturing defect or sudden failure.
Failures in the hard drive may be indicated by loading the operating system for too long, the unreasonable disappearance of files and folders, and slow startup of applications. Obvious symptoms of a hard drive losing its functionality are slowdowns in programs and long periods of copying files. If the computer constantly hangs, and nothing but restarting helps, then in the process of identifying the causes, checking the hard drive should be the first point.
Using standard Windows 7/10 tools
You can test the media using standard Windows tools. The easiest way is to select the desired hard drive in Explorer, right-click on it and go to the “Service” tab.
Next, click the “Run scan” button and set the scan parameters in the window that opens. If both checkboxes are checked, Windows will automatically correct all system errors and restore damaged sectors during diagnostics.

The results of the audit can be found in the report.

Command line
You can also audit your hard drive using the utility chkdsk called from the command line. In fact, such a check will not differ much from the above option.
So, launch the command line by selecting the required Start menu item. Then enter the command in the window: chkdsk G: /f /r
- G – name of the hard drive being tested (select the drive you will check);
- f – error checking and correction;
- r – detection and recovery of bad sectors.

All information about errors and bad sectors found will be displayed as the diagnostics are carried out.

Third-party programs for checking your hard drive
There are many programs and utilities for finding bad sectors and fixing HDD errors. We will list only the most famous ones.
Victoria
Perhaps the most popular hard drive checking tool. The program can be launched both in Windows and in DOS mode from a bootable USB flash drive.
The interface provides five tabs: Standard, SMART, Tests, Advanced and Setup. First of all, go to the section Standard, where in the list of devices we select the hard drive we are interested in. The Drive passport area will display basic information about the HDD.
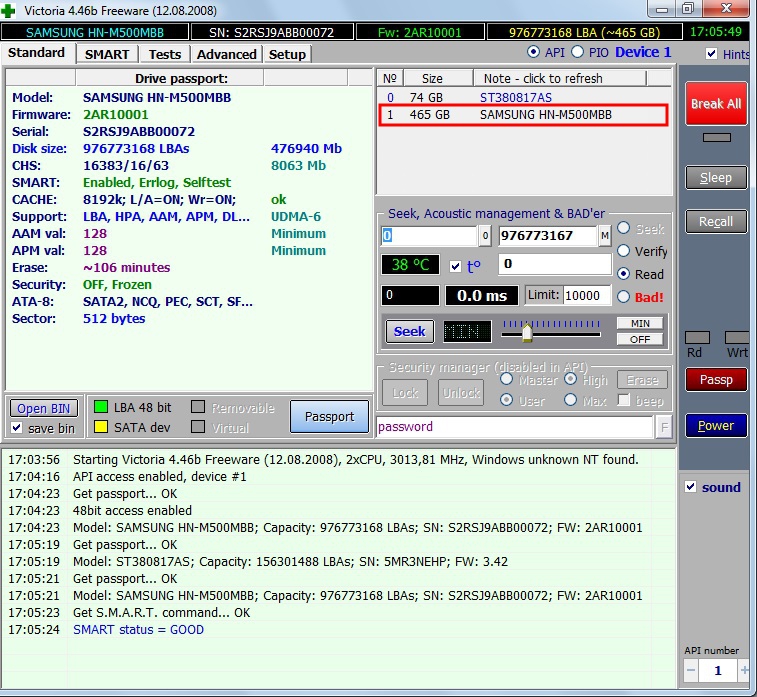
Next, select the tab SMART and press the “Get SMART” button. SMART (Self-Monitoring, Analisys and Reporting Technology) is a hard drive self-monitoring technology. Those. The hard drive monitors its operation during operation, recording information on a set of parameters that allows one to assess the condition of the media. It is this service information that we are trying to obtain.
After clicking “Get SMART”, either the inscription GOOD on a green background or the inscription BAD! will appear to the right of the button. on red. The second option will indicate that the media is in unsatisfactory condition and will most likely have to be replaced. For a more detailed study of SMART statistics, let's pay attention to the list of parameters on the left. Here we are primarily interested in the attribute 5 Reallocated sector count, indicating the number of sectors remapped. If there are too many of them, then the disk has begun to “crumble,” that is, its surface is rapidly degrading and it is urgent to make a copy of all data. In this case, there is no point in restoring the hard drive.

Chapter Tests makes it possible to check the hard drive for bad sectors, as well as try to “cure” or reassign unreadable blocks. For simple testing of the hard drive, set the switch to Ignore and start the test with the Start button. Sector health is assessed by measuring response time. The smaller it is, the better. Each response time range has its own color code. The slowest blocks are marked in green, orange and red. Sectors that could not be read at all are marked in blue. If there are a large number of “slow” and unreadable blocks, the hard drive should be replaced.

The Victoria program allows you to restore bad sectors, but we will not consider all the nuances of the procedure. Moreover, “treatment” often contributes only to a slight extension of the service life of the storage medium. To reassign bad blocks, perform a check with the mode enabled Remap. If the restoration was successful, do not rush to rejoice. Re-diagnostics of the disk after a certain period of operation. The appearance of new bad blocks will indicate that the degradation of the hard drive is irreversible, and it’s time to find a replacement.
HDDScan
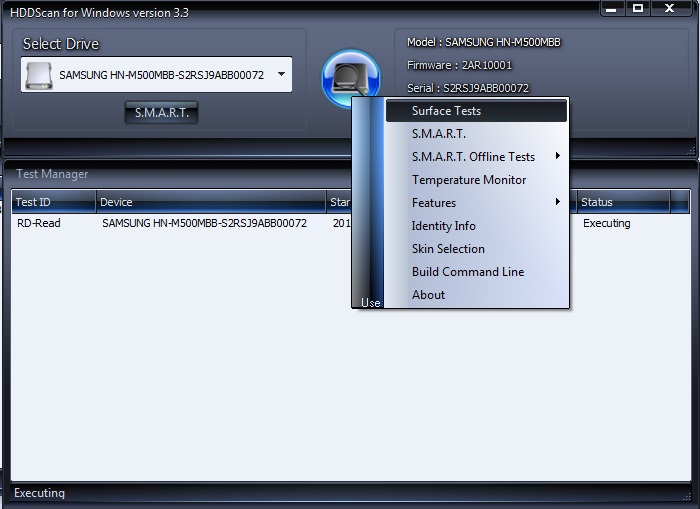
This is another handy program for identifying hard drive problems. After launching the application, select the drive that needs to be checked in the Select Drive list.

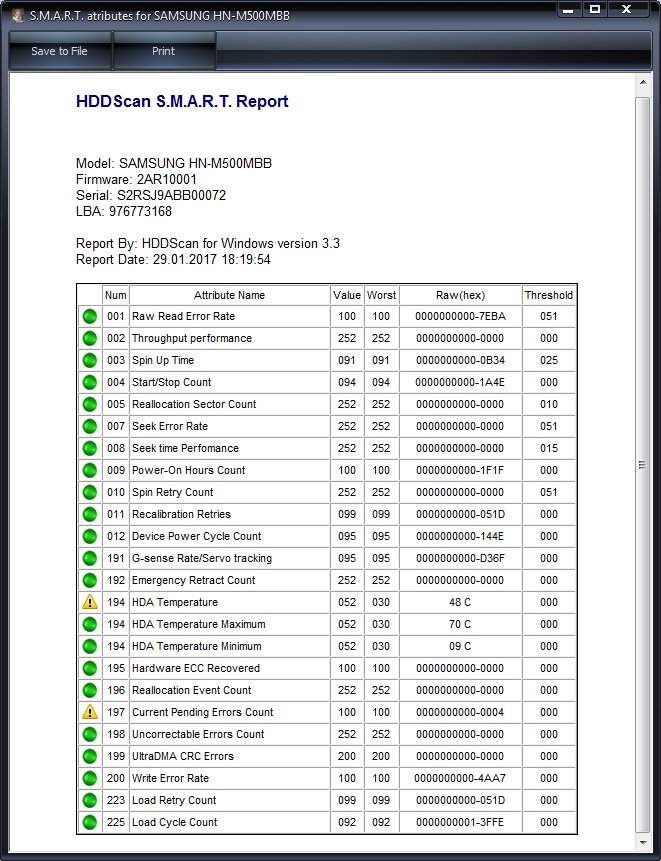
Below we click on the “S.M.A.R.T.” button and get acquainted with the provided report.
Now let's diagnose the disk surface. Click on the round button to the right of the drop-down list of media and select Surface Tests in the menu that opens.
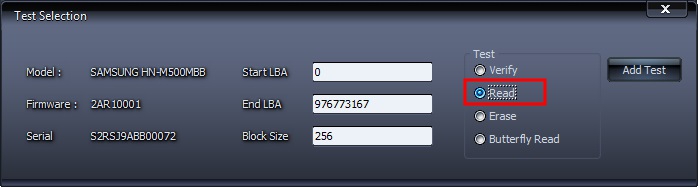
Click on the Add Test button, thereby adding a test to the list and starting its execution.

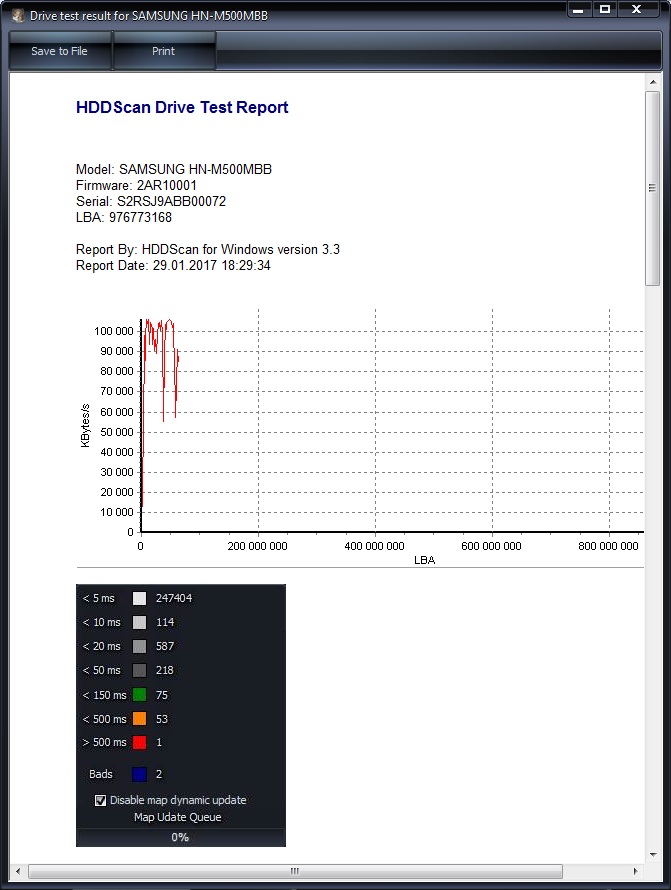
You can receive information about the progress of testing in Graph, Map, and Report modes. All blocks are also distributed into groups with corresponding color markings depending on access time.


At the end, a final report is generated.
Perhaps this is all we wanted to tell you about the methods of checking a computer’s hard drive for functionality. We hope the information provided will be useful to you and help you save important data.
Of all the different problems that can occur with your computer, the one that few people worry about is hard disk drive (HDD) errors. Our hard drives can contain precious memories such as photos and videos, important documents and a music collection accumulated over the years. Our files can be synced to the cloud or online backup, making it more secure due to hard drive issues.
However, it's still a good idea to keep your hard drive in tip-top condition to avoid the chances of losing anything before it's hidden in the cloud. The first sign that a hard drive is having problems is when there are logical errors on the drive. When a drive has logic errors they are unreadable or cannot be written to. When a disk has a bad sector, it does not mean that there is anything physically wrong with the disk, which also means that it can be repaired.
The best way to keep your hard drive in good condition is to use the utility. As the name suggests, this program can check your drive and fix hard drive errors. When it works, CHKDSK scans the hard drive, corrects logical sector errors, marks bad sectors that cannot be fixed, and moves data to safe and healthy locations on the hard drive. This is a handy tool, but this utility does not work automatically. Instead, users must manually launch it.
However, CHKDSK is not suitable for everyone. The utility is intended primarily for PCs with hard drives. If you have a computer with a solid state drive (SSD), CHKDSK is not needed. It shouldn't hurt anything if you run it, but some people have reported that the utility caused their problems. Despite this, SSDs come with their own built-in error recovery system and do not require CHKDSK.
How to run CHKDSK on Windows
There are actually two ways to check your disk for errors on a Windows 10 PC. The first is to use a disk error checking utility.

It may say that Windows didn't find any errors, but you can still check your drive. If so, click "Scan Disk" and the scan will begin.
Another way
Old school CHKDSK can also be run from the command line. Unlike older versions of CHKDSK, you do not need to restart your computer to run the utility. To get started on Windows 10:
- Open Command Prompt as Administrator
- In Windows 10, this can be done using the keyboard shortcut Windows + X
- In the window that appears, select Command Prompt (Admin)
To run the check disk utility on a PC with one disk, you only need enter chkdsk And press Enter on keyboard; however, this will only check your drive for errors, and it won't actually do anything to fix any problems it finds.
To solve the problem, you must add what are called switches. These are additional commands that tell the command line utility to take an extra step. In our case, the switches have the meaning “/f” (correction) and “/r” (restore readable information). So the complete command would be " chkdsk /f /r- Pay attention to spaces as they are critical with command line utilities.
chkdsk /f /rIf you want to run CHKDSK on a system with multiple drives such as C: and D: drive, you should run a command like this " chkdsk /f /r D:", but again, don't forget about spaces.
Now that you know how to use the Check Disk utility, be sure to run a scan once a quarter to monitor the health of your hard drive.
From time to time you need to check the disks.
- Here are the cases when checking the disk is necessary:
- once every six months - for prevention, even if there are no apparent reasons for checking the disks;
- after an incorrect shutdown (for example, due to a freeze); in this case, Windows itself offers to check the disks at startup - you should not refuse. If the system does not prompt you to check the disks, you need to call the disk scan manually.
To check the drive, open the Computer window, right-click on the drive you want to check, and select Properties. In the disk properties window, go to the Tools tab and click the Run scan button.
Then you will see the Check Disk utility window. To check only the file system, check only the first box (Automatically correct system errors), but if you also want to check the disk surface, then check the Scan and repair bad sectors box.

You cannot check the drive that is currently in use. Disk C: is always used. What to do? Windows will offer to add a disk scan to the schedule - the scan will be performed the next time you start the computer. Click the Disk Check Schedule button, and then restart your computer.

For other drives (not system drives, i.e. D:, E:, etc.), Windows may offer to disconnect the partition before scanning. You can agree, but before doing this you need to close all programs that could use the disk being checked. It is best to close all programs altogether.
Checking the hard drive for errors necessary in case of slow operation or freezing of the computer, as well as failure of the operating system. Often, many users try to resort to third-party software, which is inconvenient for simply checking the hard drive for errors. Therefore, in this article we will consider “ how to check hard drive for errors» using two methods integrated into Windows OS.
There are two ways to run disk scan:
- running the chkdsk utility using the command line (be sure to run it with administrator rights);
- checking the disk using standard tools in the Windows graphical interface, or rather through “disk properties”.
Checking the hard drive for errors using the command line (method I)
To launch the built-in utility CHKDSK You must run the command line console with administrator rights. To open it, use the keyboard shortcut “Win+R”, in the “Run” window, enter the value “cmd” in the empty field and run it. For more information, see: "Windows Command Line".
As indicated in the figure, we have entered one command with additional parameters that will check the hard drive for errors - CHKDSK C: /F /R, Where:
Chkdsk– specify the name of the utility for checking the hard drive;
C:– this parameter means that we will check partition C (system drive);
/F– this option will correct errors on the disk.
/R– search for damaged sectors and recovery of surviving information.
After entering the command, a message will appear indicating that the disk will be checked for errors the next time the system is rebooted. Agree, enter "Y" from the keyboard and restart the computer to begin the test.
Additional information about utility parameters сhkdsk can be obtained by running it with key "/?".
Checking the hard drive for errors using the graphical interface (II method)
Regardless of the operating systems used - Windows XP, Windows 7 or Windows 8, you need to go to the icon on the desktop “My Computer” - “This Computer” - “Computer”.
Next, select the desired drive, right-click and select “Properties”. To check your hard drive, go to the “Service” tab. In the window that opens, click the “Check” button. When you click on the button, a special window will appear, move the cursor and click “Check disk”.

After clicking, a scanning window will appear, which notifies you about the analysis of checking the hard drive for errors. The disk check process may take some time.

If completed successfully, the above image will appear.
And if the scanned disk actually contains errors, the program will offer to restore this disk. Therefore, you need to click on the “Repair disk” button and if the operating system cannot fix the errors, this usually occurs on the system drive C, then the error checking program will suggest “Repair the disk at next reboot”, click this button, the program will close and you will need to restart your computer.
After the reboot, when your computer starts to start, a special application will open that will check and correct errors on the hard drive being checked. Here are two simple ways you can check any local disk for errors.
Windows malfunctions, emergency shutdown of the computer, experiments with disk space management software, the consequences of viruses - these and other problems can lead to the automatic launch of the standard Windows Chkdsk utility, designed to correct errors in the file system of hard drives. Incorrectly completed operation of the operating system with files leads to file system errors, and sometimes even damage to the file system. In emergency cases, the Chkdsk utility turns on itself before Windows starts, scans disk partitions and corrects errors. However, the fact that there are problems with the file system may not make itself felt during normal use of the computer and only become apparent when trying to manage disk space. So, for example, when trying to shrink a disk partition using standard Windows tools, we may receive the following notification: “It is possible that the volume selected for compression is damaged. Use Chkdsk to troubleshoot the problem, and then try shrinking the volume again."
In this case, disk check will not start automatically. How to run Chkdsk manually in Windows 7, 8.1 and 10? How can I use Chkdsk to fix disk errors if this problem is the reason the operating system is unable to boot?
Inside Windows, the Chkdsk utility can be launched in several ways.
1. Run Chkdsk using Windows GUI
To run Chkdsk, in the system explorer on drive C, right-click and open “Properties”.

In the disk partition properties window that opens, go to the “Services” tab, and in it click the “Check” button (or “Run check” for Windows 7).

In versions of Windows 8.1 and 10, if everything is in order with the disk file system, in the window that appears next, we will see a notification that checking is not required. But if you wish, you can start checking the disk with the Chkdsk utility by clicking “Check disk”.

If the system suspects file system errors, this window will contain a button to start scanning and repairing the disk.

For Chkdsk to work relative to drive C, you must restart the computer. You can do this immediately or delay running the scan until the next reboot.

After restarting the computer, we will be able to observe the operation of Chkdsk.

In Windows 7, launching Chkdsk is slightly different: to the preinstalled option of automatic error correction, you can add another possible option - checking and repairing bad sectors of the hard drive. When activating this option, it is worth considering that in this case Chkdsk may take longer to run.

As with Windows 8.1 and 10, in version 7 the system drive C cannot be scanned within a running operating system. To start the scan, the computer must be restarted. Click “Schedule disk check”.


When checking a non-system partition of a disk, if it is used by some programs, the situation is simpler than with the system partition. In the window with a notification that the disk is currently in use, you just need to click the “Disconnect” button to, accordingly, disable this partition for the duration of the scan.
2. Run Chkdsk using the command line
To run Chkdsk using the command line, first, accordingly, launch the latter.
In the command line enter a command like this:
In this command, instead of drive C, we each time substitute the letter of the desired partition on which the scan is required. If Chkdsk needs to check the system partition C, as with the GUI, you will need to restart the computer. When a message appears in the command line about the impossibility of locking the specified drive, you need to enter “Y”, then restart the computer.

In addition to the /f parameter, which is responsible for correcting disk errors, Chkdsk can be run with the /r parameter, designed to search for bad sectors and restore data. As a result of Chkdsk running with this parameter, hard disk clusters with unreadable sectors will be listed as damaged (bad blocks) and their functions will be transferred to a new cluster. Therefore, it is recommended to run Chkdsk with the /r parameter only when the usual error correction - running the utility with the /f parameter - does not bring the necessary results. Using the same drive C as an example, the command would look like this:
3. Running Chkdsk on a non-booting Windows
If Windows freezes at a certain point in the boot process, one of the possible causes of this problem is file system errors. In this case, you need to run Chkdsk by booting from the rescue media. As such, you can use regular installation media with versions of Windows 7, 8.1 or 10. With its help, we will launch the Chkdsk utility inside the command line. At the first stage of starting the system installation process, press the command line launch keys – Shift+F10.

In the command line that opens, before running the Chkdsk command, you need to clarify which letters define the disk partitions. This is easy to do using a notepad. I launch it with the command:
Click the notepad menu “File”, then “Open”.

In the explorer that opens, remember the new drive designations. As a rule, in Windows 8.1 and 10, the C drive partition (as it exists inside the running operating system) is listed as D, since the letter C is assigned to the first technical partition of the system. And all other sections are shifted by one letter of the alphabet.

Having decided on the letters of the disk partitions, close Notepad, then, returning to the command line, enter a command like this:


As with Chkdsk inside Windows, you must first try to fix disk errors by running the utility with the /f parameter. And only if the problem is not solved, only then run the command with the /r parameter, as indicated in the previous paragraph of the article.
In cases where Windows is unable to boot, you can pre-burn an emergency Live disk with a selection of various tools to restore the operating system. Among these, for example, is AdminPE based on WinPE. Its image for recording on a disk or flash drive can be downloaded from the official website of the project Adminpe.Ru. Using AdminPE, you can launch a command prompt and enter the Chkdsk launch commands discussed above. But in this Live disk, the Chkdsk utility has its own interface and is launched using a script. The shortcut to launch the utility is placed directly on the desktop.

In the drop-down list to check the disk, select the desired disk partition. Next, activate the checkboxes for restoring damaged sectors and forcibly disabling a partition (volume). Let's check the launches.


AdminPE's tools include a number of other utilities for working with hard drives, as well as the well-known programs Hard Disk Sentinel and Victoria.
Have a great day!